
You also want an ePaper? Increase the reach of your titles
YUMPU automatically turns print PDFs into web optimized ePapers that Google loves.
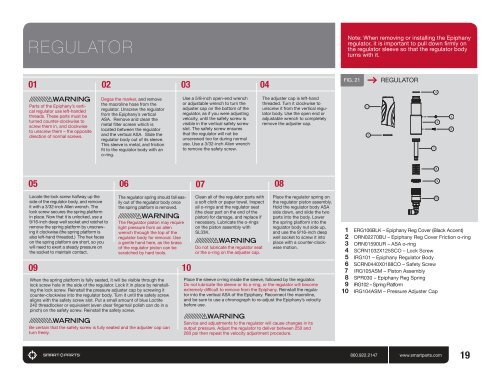
REGULATORNote: When removing or installing the Epiphanyregulator, it is important to pull down firmly onthe regulator sleeve so that the regulator bodyturns with it.01 02 03 04FIG. 21REGULATORParts of the Epiphany’s verticalregulator use left-handedthreads. These parts must beturned counter-clockwise toscrew them in, and clockwiseto unscrew them – the oppositedirection of normal screws.Degas the marker, and removethe macroline hose from theregulator. Unscrew the regulatorfrom the Epiphany’s verticalASA. Remove and clean themetal filter screen which islocated between the regulatorand the vertical ASA. Slide theregulator body out of its sleeve.This sleeve is metal, and frictionfit to the regulator body with ano-ring.Use a 5/8-inch open-end wrenchor adjustable wrench to turn theadjuster cap on the bottom of theregulator, as if you were adjustingvelocity, until the safety screw isvisible in the vertical safety screwslot. The safety screw ensuresthat the regulator will not beunscrewed too far during normaluse. Use a 3/32-inch Allen wrenchto remove the safety screw.The adjuster cap is left-handthreaded. Turn it clockwise tounscrew it from the vertical regulatorbody. Use the open end oradjustable wrench to completelyremove the adjuster cap.05060708Locate the lock screw halfway up theside of the regulator body, and removeit with a 3/32-inch Allen wrench. Thelock screw secures the spring platformin place. Now that it is unlocked, use a9/16-inch deep well socket and ratchet toremove the spring platform by unscrewingit clockwise (the spring platform isalso left-hand threaded.) The hex faceson the spring platform are short, so youwill need to exert a steady pressure onthe socket to maintain contact.The regulator spring should fall easilyout of the regulator body oncethe spring platform is removed.The Regulator piston may requirelight pressure from an allenwrench through the top of theregulator body for removal. Usea gentle hand here, as the brassof the regulator piston can bescratched by hard tools.09 10When the spring platform is fully seated, it will be visible through thelock screw hole in the side of the regulator. Lock it in place by reinstallingthe lock screw. Reinstall the pressure adjuster cap by screwing itcounter-clockwise into the regulator body. Turn it until the safety screwaligns with the safety screw slot. Put a small amount of blue Loctite242 threadlocker or equivalent (even clear fingernail polish can do in apinch) on the safety screw. Reinstall the safety screw.Clean all of the regulator parts witha soft cloth or paper towel. Inspectall o-rings and the regulator seat(the clear part on the end of thepiston) for damage, and replace ifnecessary. Lubricate the o-ringson the piston assembly withSL33K.Do not lubricate the regulator seator the o-ring on the adjuster cap.Place the regulator spring onthe regulator piston assembly.Hold the regulator body ASAside down, and slide the twoparts into the body. Lowerthe spring platform into theregulator body nut side up,and use the 9/16-inch deepwell socket to screw it intoplace with a counter-clockwisemotion.Place the sleeve o-ring inside the sleeve, followed by the regulator.Do not lubricate the sleeve or its o-ring, or the regulator will becomeextremely difficult to remove from the Epiphany. Reinstall the regulatorinto the vertical ASA of the Epiphany. Reconnect the macroline,and be sure to use a chronograph to re-adjust the Epiphany’s velocitybefore use.1 ERG106BLK – Epiphany Reg Cover (Black Accent)2 ORN02270BU – Epiphany Reg Cover Friction o-ring3 ORN01590UR – ASA o-ring4 SCRN1032X125SCO – Lock Screw5 IRG101 – Epiphany Regulator Body6 SCRN0440X0188CO – Safety Screw7 IRG105ASM – Piston Assembly8 SPR030 – Epiphany Reg Spring9 IRG102 – Spring Platform10 IRG104ASM – Pressure Adjuster CapBe certain that the safety screw is fully seated and the adjuster cap canturn freely.Service and adjustments to the regulator will cause changes in itsoutput pressure. Adjust the regulator to deliver between 250 and280 psi then repeat the velocity adjustment procedure.800.922.2147 www.smartparts.com19