Modification Cardigan - My Label 3D Fashion Pattern Software
Modification Cardigan - My Label 3D Fashion Pattern Software
Modification Cardigan - My Label 3D Fashion Pattern Software
- No tags were found...

Create successful ePaper yourself
Turn your PDF publications into a flip-book with our unique Google optimized e-Paper software.
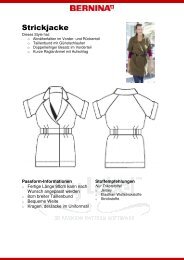
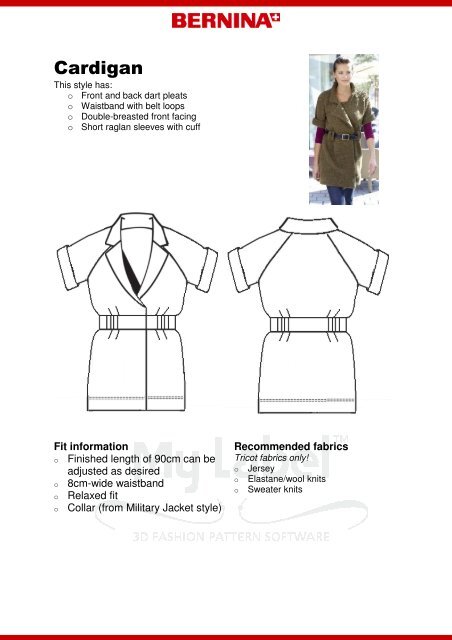
<strong>Cardigan</strong>This style has:o Front and back dart pleatso Waistband with belt loopso Double-breasted front facingo Short raglan sleeves with cuffFit informationo Finished length of 90cm can beadjusted as desiredo 8cm-wide waistbando Relaxed fito Collar (from Military Jacket style)Recommended fabricsTricot fabrics only!o Jerseyo Elastane/wool knitso Sweater knits
Style VariantBarn Jacket becomes <strong>Cardigan</strong>Select modelOpen <strong>My</strong> <strong>Label</strong> software and open the desired model in the Model Drawer.Select styleIn the Style Drawer, under the ‘Jackets’ tab, select the ‘Barn Jacket’ styleo Open Barn Jacketo Increase base of neck in the Style Properties to 47 cmo Increase finished length to 90cmStitch variant via stitch placementDetailed instructions for this can be found in the Appendix.Sleeve with cuffFirst draw a vertical line from the end point of the shoulder dart up to the sleeve hem.Next, draw a horizontal line from underarm point to underarm point to yield as accuratea 90-degree angle as possible.Now draw three further parallel lines for the sleeve cuff. The middle of the three lines islocated on the midpoint between hem and underarm. The distance between the threelines depends on the desired sleeve width – here, approx. 8 cm.
BackFirst, mark the centre-back with a vertical line. Next, draw in two parallel horizontal linesapprox. 3cm above and 5cm below the waistline, respectively.For a better fit, round off the lines slightly upwards towards the side seam.For the pleats at the top and bottom edges of the waistband, make two markings ineach case, both about 5cm apart. These markings should lie approx. at the midpoint ofthe waistband.FrontDraw in the waistband on the front as you did on the back. For this, it is helpful toposition the front and back sections next to each other.
Print out pattern piecesPosition, save and print out pattern pieces.For the cardigan, only the front and back section, sleeve and front facing are necessary.The remaining pattern pieces can be placed on the half of the back section not requiredin order to minimise paper consumption.‘Work table’Print previewCollarThe original Barn Jacket collar is not particularly suited to the <strong>Cardigan</strong>, so the ‘MilitaryJacket’ collar is used.The collar can be printed out separately in DIN A4.In the Style Drawer, under the ‘Jackets’ tab, select the 'Military Jacket'.o In the same model, open ‘Military Jacket’o Increase base of neck in the Style Properties to 47cm.o Position collar so as to save space and print out separately (‘Print Selection’).Cut out pattern pieces and make alterations by hand Tip: If you are constructing the <strong>Cardigan</strong> with an overlocker, the seam allowance onall pattern pieces can be reduced to 1 cm.After printing out the pieces, check all new cutting and marking lines and correct them ifnecessary.
BackCut back section in half at the centre-back. Cut off waistband, and re-label patternpieces as follows:o Top backo Bottom backo Back waistband1 x to fabric fold1 x to fabric fold1 x to fabric foldFrontGlue in an additional 8cm-wide overlay strip on the front, on the front-edge line near theseam allowance. Adjust the waistline, neckline and hemline via the overlay.Now cut out the new front pattern pieces. The waistband is cut off all the way through.Re-label the pattern pieces and complete markings where necessary.o Top front 2 xo Bottom front 2 xo Waistband 2 xBackFrontBack waistbandOwing to the pleats in the top- and bottom-back sections, the circumference of thewaistband must be reduced by the pleat depth, by 2.5cm per pleat.Divide waistband of back section into thirds and mark in a vertical line on each section.Calculate 2.5cm per pleat. Mark in a further vertical line (1.25cm) to the left and right ofthe lines and glue these two lines one on top of the other. The waistband is now 5cmnarrower. Adjust the waistband shape. The centre-back is cut out along the foldline.Check the pleat markings on the waistband and correct if necessary.
Back waistband: mark in pleat depth and fold togetherFront waistbandGlue together front waistband as per the back waistbandaround, reducing it by the 5cmpleat depth. Check pleat markings and complete if necessary. Adjust waistband shape.FacingAn identical paper strip to the one on the front section is glued to the facing. The facingremains together as a whole pattern piece. Adjust neckline as per the front section.Complete labelling and markings and add seam allowances. To check, place facing onthe front section; the neckline must match.SleeveCut out sleeve and cut along the new vertical line. <strong>Label</strong> the new pattern pieces.o Sleeve fronto Sleeve back
CollarWiden the collar by hand to 8cm. Complete labels, markings and seam allowances.Before cutting out, check the fit of the redesigned pattern pieces once more.Seam allowanceso Reduce all seam allowances to 1cm.o Add 1 cm to waistband edge of both top- and bottom back sections.o Add 1 cm to waistband edge of both top- and bottom front sections.o Add 1 cm to top and bottom edge of both front- and back waistbands.o Add 1 cm to the centre dividing line of the sleeve in each case, as well as 2cmhem allowance.Example:
Fabric requirementFabric keyFabric, right Fabric, wrongsidesideSymbols and markings keyCFCBB9Lining, rightsideLining, wrongsideInterfacingCentre FrontCentre BackSheetnumberingReference points – helpin combining theindividual sheetsGrainMarkingpoints onfront sectionsMarking pointson backsectionsPleating indirection ofarrowMarking of dart ends(1cm before the darttip)ButtonmarkingThe figure shows one way of laying out the pattern pieces on a length of folded fabric.Since the pattern pieces are created according to your own measurements andpersonal preferences, they may differ in size and shape from those of the samplearrangement.Fabric, 140cm wide, foldedMaterials and miscellaneousooooTransparent stay tape for holding seams in placeLeather beltOverlockerCoverstitch machine Tip: With the Bernina elasticator (a special serger presser-foot), it’s easy to insertthe stay tape into all the seams.
Cutting outooooooooooo1 x bottom back to fabric fold1 x top back to fabric fold2 x top front2 x bottom front1 x back waistband to fabric fold2 x front waistband2 x front facing2 x sleeve front2 x sleeve back2 x collar to fabric foldRibbon for belt loops, 88 cm x 5cmPreparationArrange pattern pieces on fabric as per the cutting-layout illustration. First cut outpieces, then transfer all markings to the fabric. With open-work (i.e. loosely knit or lacy)knitted fabrics, it may be necessary to use basting thread for marking. Tip: If you don’t have an overlocker or an overlock stitch on your sewing machine,use a narrow, elastic zigzag stitch.Sewing instructionsPreparation:If using open-work knitted fabrics, neaten the pattern pieces beforehand.Belt loopsCut out belt loops in the required length (depending on the belt, approx. 11cm). Neatenlong edges of belt loops with the overlocker. Fold belt loops into thirds so that the longedges overlap and oversew in the centre with the coverstitch machine. Tip:If you don’t have a coverstitch machine, the hems can be sewn with a double needleand your sewing machine.Front:Place the pleats in the bottom-front sections on top of one another as per the markingsand stitch in place. The pleats open towards the side seam. Position belt loops rightsides together near the pleats and pin or baste on.Pin waistband to bottom section as per the markings and sew together.Turn under belt loops and stitch to waistband.
Place the pleats in the top-front section on top of one another as per the markings andstitch in place. Here too, the pleats open towards the side seam. Stitch top-front sectionto waistband as per the markings.Back:Construct pleats and waistband of garment back as for the front, and sew together.Sleeve:With right sides facing, sew together centre seam of the sleeve back and -front.Turn under sleeve hem and hem with the coverstitch machine.Join sleeve front with garment front as per the markings; pin and sew together.Join sleeve back with garment back as per the markings; pin and sew together.CollarSew collar with right sides facing along the outside edge.Turn collar right-side-out; pin to jacket neckline as per markings and stitch.FacingNeaten outside edges and shoulder of facing.With right sides facing, pin facings to front edges of jacket all the way up to theshoulder, as per the markings.Sew together facing and collar in a single operation.Fix the shoulder of the facing in the centre seam of the raglan sleeve with a few stitchesto hold it in place.Sleeve cuffTurn sleeve up 8cm and pin or baste cuff in place in the seam allowance.Side seam:With right sides facing, place front and back of garment together along the side seamsand close in a single operation via the sleeve (this automatically catches the cuff inbetween). Bartack thread ends.
Folded-back facingWith right sides together, fold back facing onto the front section at the hem.Stitch down facing in the hem edge and turn right-side-out.HemFold and iron hem under. Then secure in hem’s width with machine basting stitch orhand-basting. Hem along the basting stitch with the coverstitch machine. Securecoverstitch.Closure edge / finishing the garmentIron under front edge of closure and straightstitch in desired width from the edge.The facing can also be held in place with just a few stitches at the waistband and on theraglan seams.If necessary, secure cuff in the centre seam of the sleeve with a few hand-stitches.Further detailed information can be found in your my <strong>Label</strong> program underHelp> Sewing techniques. This option offers detailed instructions on the proper way tosew belt loops, collars, pockets, linings and much more. It also deals with basic sewingtechniques for beginners.