LTQ Orbitrap XL Hardware Manual
LTQ Orbitrap XL Hardware Manual
LTQ Orbitrap XL Hardware Manual

Create successful ePaper yourself
Turn your PDF publications into a flip-book with our unique Google optimized e-Paper software.
For Research Use Only<br />
Not for use in Diagnostic Procedures<br />
Part of Thermo Fisher Scientific<br />
Thermo Fisher Scientific<br />
<strong>LTQ</strong> <strong>Orbitrap</strong> <strong>XL</strong> <br />
<strong>Hardware</strong> <strong>Manual</strong><br />
Revision B - 1225830
© 2008 Thermo Fisher Scientific Inc. All rights reserved.<br />
PEEK polymer is a trademark of Victrex plc. PEEKSil is a trademark of SGE International Pty. Ltd. SEQUEST<br />
is a registered trademark of University of Washington. Swagelok is a registered trademark of the Crawford<br />
Fitting Company. Teflon is a registered trademark of E. I. du Pont de Nemours & Co. Tygon is a registered<br />
trademark of Saint-Gobain Performance Plastics Company.<br />
All other trademarks are the property of Thermo Fisher Scientific Inc. and its subsidiaries.<br />
Thermo Fisher Scientific Inc. provides this document to its customers with a product purchase to use in the<br />
product operation. This document is copyright protected and any reproduction of the whole or any part of this<br />
document is strictly prohibited, except with the written authorization of Thermo Fisher Scientific Inc.<br />
The contents of this document are subject to change without notice. All technical information in this document<br />
is for reference purposes only. System configurations and specifications in this document supersede all previous<br />
information received by the purchaser.<br />
Thermo Fisher Scientific Inc. makes no representations that this document is complete, accurate or errorfree<br />
and assumes no responsibility and will not be liable for any errors, omissions, damage or loss that<br />
might result from any use of this document, even if the information in the document is followed properly.<br />
This document is not part of any sales contract between Thermo Fisher Scientific Inc. and a purchaser. This<br />
document shall in no way govern or modify any Terms and Conditions of Sale, which Terms and Conditions of<br />
Sale shall govern all conflicting information between the two documents.<br />
Printing History: Revision B printed in September 2008.
Place Declaration of Conformity here
WEEE Compliance<br />
This product is required to comply with the European Union’s Waste Electrical & Electronic<br />
Equipment (WEEE) Directive 2002/96/EC. It is marked with the following symbol:<br />
Thermo Fisher Scientific has contracted with one or more recycling/disposal companies in each EU<br />
Member State, and this product should be disposed of or recycled through them. Further information<br />
on Thermo Fisher Scientific’s compliance with these Directives, the recyclers in your country, and<br />
information on Thermo Fisher Scientific products which may assist the detection of substances<br />
subject to the RoHS Directive are available at www.thermo.com/WEEERoHS.<br />
WEEE Konformität<br />
Dieses Produkt muss die EU Waste Electrical & Electronic Equipment (WEEE) Richtlinie 2002/96/<br />
EC erfüllen. Das Produkt ist durch folgendes Symbol gekennzeichnet:<br />
Thermo Fisher Scientific hat Vereinbarungen getroffen mit Verwertungs-/Entsorgungsanlagen in<br />
allen EU-Mitgliederstaaten und dieses Produkt muss durch diese Firmen wiederverwertet oder<br />
entsorgt werden. Mehr Informationen über die Einhaltung dieser Anweisungen durch Thermo<br />
Fisher Scientific, die Verwerter und Hinweise die Ihnen nützlich sein können, die Thermo Fisher<br />
Scientific Produkte zu identifizieren, die unter diese RoHS Anweisung fallen, finden Sie unter<br />
www.thermo.com/WEEERoHS.
Conformité DEEE<br />
Ce produit doit être conforme à la directive européenne (2002/96/EC) des Déchets d'Equipements<br />
Electriques et Electroniques (DEEE). Il est marqué par le symbole suivant:<br />
Thermo Fisher Scientific s'est associé avec une ou plusieurs compagnies de recyclage dans chaque état<br />
membre de l’union européenne et ce produit devrait être collecté ou recyclé par celles-ci. Davantage<br />
d'informations sur la conformité de Thermo Fisher Scientific à ces directives, les recycleurs dans votre<br />
pays et les informations sur les produits Thermo Fisher Scientific qui peuvent aider la détection des<br />
substances sujettes à la directive RoHS sont disponibles sur www.thermo.com/WEEERoHS.
Read This First<br />
About This Guide<br />
Who Uses This Guide<br />
Scope of This Guide<br />
Welcome to the Thermo Scientific, <strong>LTQ</strong> <strong>Orbitrap</strong> <strong>XL</strong> system! The<br />
<strong>LTQ</strong> <strong>Orbitrap</strong> <strong>XL</strong> is a member of the family of <strong>LTQ</strong> mass<br />
spectrometer (MS) hybrid instruments.<br />
This <strong>LTQ</strong> <strong>Orbitrap</strong> <strong>XL</strong> <strong>Hardware</strong> <strong>Manual</strong> contains a description of the<br />
modes of operation and principle hardware components of your<br />
<strong>LTQ</strong> <strong>Orbitrap</strong> <strong>XL</strong> instrument. In addition, this manual provides<br />
step-by-step instructions for cleaning and maintaining your instrument.<br />
This <strong>LTQ</strong> <strong>Orbitrap</strong> <strong>XL</strong> <strong>Hardware</strong> <strong>Manual</strong> is intended for all personnel<br />
that need a thorough understanding of the instrument (to perform<br />
maintenance or troubleshooting, for example). This manual should be<br />
kept near the instrument to be available for quick reference.<br />
This manual includes the following chapters:<br />
• Chapter 1: “Functional Description” describes the principal<br />
components of the <strong>LTQ</strong> <strong>Orbitrap</strong> <strong>XL</strong>.<br />
• Chapter 2: “Basic System Operations” provides procedures for<br />
shutting down and starting up the <strong>LTQ</strong> <strong>Orbitrap</strong> <strong>XL</strong>.<br />
• Chapter 3: “User Maintenance” outlines the maintenance<br />
procedures that you should perform on a regular basis to maintain<br />
optimum MS detector performance.<br />
• Chapter 4: “Replaceable Parts” lists the replaceable parts for the<br />
MS detector and data system.<br />
Thermo Fisher Scientific <strong>LTQ</strong> <strong>Orbitrap</strong> <strong>XL</strong> <strong>Hardware</strong> <strong>Manual</strong> i
Read This First<br />
Related Documentation<br />
Related Documentation<br />
In addition to this guide, Thermo Fisher Scientific provides the<br />
following documents for <strong>LTQ</strong> <strong>Orbitrap</strong> <strong>XL</strong>:<br />
• <strong>LTQ</strong> <strong>Orbitrap</strong> <strong>XL</strong> / <strong>LTQ</strong> <strong>Orbitrap</strong> Discovery Preinstallation<br />
Requirements Guide<br />
• <strong>LTQ</strong> <strong>Orbitrap</strong> <strong>XL</strong> Getting Started Guide<br />
• <strong>LTQ</strong> <strong>XL</strong> manual set<br />
The software also provides Help.<br />
ii <strong>LTQ</strong> <strong>Orbitrap</strong> <strong>XL</strong> <strong>Hardware</strong> <strong>Manual</strong> Thermo Fisher Scientific
Contacting Us<br />
Assistance<br />
Customer Information Service<br />
Changes to the <strong>Manual</strong><br />
There are several ways to contact Thermo Fisher Scientific.<br />
Read This First<br />
Contacting Us<br />
For technical support and ordering information, visit us on the Web:<br />
www.thermo.com/advancedms<br />
cis.thermo-bremen.com is the Customer Information Service site aimed<br />
at providing instant access to<br />
• latest software updates<br />
• manuals, application reports, and brochures.<br />
Note Thermo Fisher Scientific recommends that you register with the<br />
site as early as possible. ▲<br />
To register, visit register.thermo-bremen.com/form/cis and fill in the<br />
registration form. Once your registration has been finalized, you will<br />
receive confirmation by e-mail.<br />
To suggest changes to this manual, please send your comments (in<br />
German or English) to:<br />
Editors, Technical Documentation<br />
Thermo Fisher Scientific<br />
Hanna-Kunath-Str. 11<br />
28199 Bremen<br />
Germany<br />
documentation.bremen@thermofisher.com<br />
You are encouraged to report errors or omissions in the text or index.<br />
Thank you.<br />
Thermo Fisher Scientific <strong>LTQ</strong> <strong>Orbitrap</strong> <strong>XL</strong> <strong>Hardware</strong> <strong>Manual</strong> iii
Read This First<br />
Typographical Conventions<br />
Typographical Conventions<br />
Data Input<br />
Topic Headings<br />
This section describes typographical conventions that have been<br />
established for Thermo Fisher Scientific manuals.<br />
Throughout this manual, the following conventions indicate data input<br />
and output via the computer:<br />
• Messages displayed on the screen are represented by capitalizing the<br />
initial letter of each word and by italicizing each word.<br />
• Input that you enter by keyboard is identified by quotation marks:<br />
single quotes for single characters, double quotes for strings.<br />
• For brevity, expressions such as “choose File > Directories” are used<br />
rather than “pull down the File menu and choose Directories.”<br />
• Any command enclosed in angle brackets < > represents a single<br />
keystroke. For example, “press ” means press the key labeled<br />
F1.<br />
• Any command that requires pressing two or more keys<br />
simultaneously is shown with a plus sign connecting the keys. For<br />
example, “press + ” means press and hold the <br />
key and then press the key.<br />
• Any button that you click on the screen is represented in bold face<br />
letters. For example, “click on Close”.<br />
The following headings are used to show the organization of topics<br />
within a chapter:<br />
Chapter 1 Chapter Name<br />
Second Level Topics<br />
Third Level Topics<br />
Fourth Level Topics<br />
iv <strong>LTQ</strong> <strong>Orbitrap</strong> <strong>XL</strong> <strong>Hardware</strong> <strong>Manual</strong> Thermo Fisher Scientific
Safety and EMC Information<br />
Read This First<br />
Safety and EMC Information<br />
In accordance with our commitment to customer service and safety, this<br />
instrument has satisfied the requirements for the European CE Mark<br />
including the Low Voltage Directive.<br />
Designed, manufactured and tested in an ISO9001 registered facility,<br />
this instrument has been shipped to you from our manufacturing facility<br />
in a safe condition.<br />
Caution This instrument must be used as described in this manual. Any<br />
use of this instrument in a manner other than described here may result<br />
in instrument damage and/or operator injury. ▲<br />
Notice on Lifting and Handling of Thermo Scientific Instruments<br />
For your safety, and in compliance with international regulations, the<br />
physical handling of this Thermo Scientific instrument requires a team<br />
effort for lifting and/or moving the instrument. This instrument is too<br />
heavy and/or bulky for one person alone to handle safely.<br />
Notice on the Proper Use of Thermo Scientific Instruments<br />
In compliance with international regulations: If this instrument is used<br />
in a manner not specified by Thermo Fisher Scientific, the protection<br />
provided by the instrument could be impaired.<br />
Notice on the Susceptibility to Electromagnetic Transmissions<br />
Your instrument is designed to work in a controlled electromagnetic<br />
environment. Do not use radio frequency transmitters, such as mobile<br />
phones, in close proximity to the instrument.<br />
Thermo Fisher Scientific <strong>LTQ</strong> <strong>Orbitrap</strong> <strong>XL</strong> <strong>Hardware</strong> <strong>Manual</strong> v
Read This First<br />
Safety and EMC Information<br />
Safety and Special Notices<br />
Note Read and understand the various precautionary notes, signs, and<br />
symbols contained inside this manual pertaining to the safe use and<br />
operation of this product before using the device. ▲<br />
Make sure you follow the precautionary statements presented in this<br />
guide. The safety and other special notices appear different from the<br />
main flow of text. Safety and special notices include the following:<br />
Warning Warnings highlight hazards to human beings. Each Warning is<br />
accompanied by a Warning symbol. ▲<br />
Caution Cautions highlight information necessary to protect your<br />
instrument from damage. ▲<br />
Note Notes highlight information that can affect the quality of your<br />
data. In addition, notes often contain information that you might need<br />
if you are having trouble. ▲<br />
vi <strong>LTQ</strong> <strong>Orbitrap</strong> <strong>XL</strong> <strong>Hardware</strong> <strong>Manual</strong> Thermo Fisher Scientific
Identifying Safety Information<br />
General Safety Precautions<br />
Read This First<br />
Safety and EMC Information<br />
The <strong>LTQ</strong> <strong>Orbitrap</strong> <strong>XL</strong> <strong>Hardware</strong> <strong>Manual</strong> contains precautionary<br />
statements that can prevent personal injury, instrument damage, and<br />
loss of data if properly followed. Warning symbols alert the user to check<br />
for hazardous conditions. These appear throughout the manual, where<br />
applicable. The most common warning symbols are:<br />
Warning This general symbol indicates that a hazard is present that<br />
could result in injuries if it is not avoided.<br />
The source of danger is described in the accompanying text. ▲<br />
Warning High Voltages capable of causing personal injury are used in<br />
the instrument. The instrument must be shut down and disconnected<br />
from line power before service is performed. Do not operate the<br />
instrument with the top cover off. Do not remove protective covers from<br />
PCBs. ▲<br />
Warning Treat heated zones with respect. Parts of the instrument might<br />
be very hot and might cause severe burns if touched. Allow hot<br />
components to cool before servicing them. ▲<br />
Warning Wear gloves when handling toxic, carcinogenic, mutagenic, or<br />
corrosive/irritant chemicals. Use approved containers and procedures for<br />
disposal of waste solution. ▲<br />
In addition to the above described, every instrument has specific<br />
hazards. So, be sure to read and comply with the precautions described<br />
in the subsequent chapters of this guide. They will help ensure the safe,<br />
long-term use of your system.<br />
Observe the following safety precautions when you operate or perform<br />
service on your instrument:<br />
• Before plugging in any of the instrument modules or turning on the<br />
power, always make sure that the voltage and fuses are set<br />
appropriately for your local line voltage.<br />
• Only use fuses of the type and current rating specified. Do not use<br />
repaired fuses and do not short-circuit the fuse holder.<br />
Thermo Fisher Scientific <strong>LTQ</strong> <strong>Orbitrap</strong> <strong>XL</strong> <strong>Hardware</strong> <strong>Manual</strong> vii
Read This First<br />
Safety and EMC Information<br />
• The supplied power cord must be inserted into a power outlet with a<br />
protective earth contact (ground). When using an extension cord,<br />
make sure that the cord also has an earth contact.<br />
• Do not change the external or internal grounding connections.<br />
Tampering with or disconnecting these connections could endanger<br />
you and/or damage the system.<br />
Caution The instrument is properly grounded in accordance with<br />
regulations when shipped. You do not need to make any changes to the<br />
electrical connections or to the instrument’s chassis to ensure safe<br />
operation. ▲<br />
• Never run the system without the housing on. Permanent damage<br />
can occur.<br />
• Do not turn the instrument on if you suspect that it has incurred<br />
any kind of electrical damage. Instead, disconnect the power cord<br />
and contact a Service Representative for a product evaluation. Do<br />
not attempt to use the instrument until it has been evaluated.<br />
(Electrical damage may have occurred if the system shows visible<br />
signs of damage, or has been transported under severe stress.)<br />
• Damage can also result if the instrument is stored for prolonged<br />
periods under unfavorable conditions (e.g., subjected to heat, water,<br />
etc.).<br />
• Always disconnect the power cord before attempting any type of<br />
maintenance.<br />
• Capacitors inside the instrument may still be charged even if the<br />
instrument is turned off.<br />
• Never try to repair or replace any component of the system that is<br />
not described in this manual without the assistance of your service<br />
representative.<br />
viii <strong>LTQ</strong> <strong>Orbitrap</strong> <strong>XL</strong> <strong>Hardware</strong> <strong>Manual</strong> Thermo Fisher Scientific
Safety Advice for Possible Contamination<br />
Read This First<br />
Safety and EMC Information<br />
Hazardous Material Might Contaminate Certain Parts of Your<br />
System During Analysis.<br />
In order to protect our employees, we ask you to adhere to special<br />
precautions when returning parts for exchange or repair.<br />
If hazardous materials have contaminated mass spectrometer parts,<br />
Thermo Fisher Scientific can only accept these parts for repair if they<br />
have been properly decontaminated. Materials, which due to their<br />
structure and the applied concentration might be toxic or which in<br />
publications are reported to be toxic, are regarded as hazardous.<br />
Materials that will generate synergetic hazardous effects in combination<br />
with other present materials are also considered hazardous.<br />
Your signature on the Repair-Covering letter confirms that the<br />
returned parts have been decontaminated and are free of hazardous<br />
materials.<br />
The Repair-Covering letter can be ordered from your service engineer or<br />
downloaded from the Customer Information Service (CIS) site. Please<br />
register under http://register.thermo-bremen.com/form/cis.<br />
Parts contaminated by radioisotopes are not subject to return to Thermo<br />
Fisher Scientific – either under warranty or the exchange part program.<br />
If parts of the system may be possibly contaminated by hazardous<br />
material, please make sure the Field engineer is informed before the<br />
engineer starts working on the system.<br />
Thermo Fisher Scientific <strong>LTQ</strong> <strong>Orbitrap</strong> <strong>XL</strong> <strong>Hardware</strong> <strong>Manual</strong> ix
Contents<br />
Chapter 1 Functional Description.............................................................1-1<br />
General Description.......................................................... 1-2<br />
Specifications ................................................................. 1-5<br />
Control Elements.............................................................. 1-6<br />
System Status LEDs ....................................................... 1-6<br />
Control Panels ............................................................... 1-7<br />
Linear Ion Trap............................................................... 1-12<br />
<strong>Orbitrap</strong> Analyzer ........................................................... 1-13<br />
Measuring Principle ..................................................... 1-13<br />
Curved Linear Trap ..................................................... 1-13<br />
Extraction of Ion Packets ............................................. 1-14<br />
Ion Detection............................................................... 1-15<br />
Active Temperature Control ........................................ 1-17<br />
HCD Collision Cell..................................................... 1-18<br />
Vacuum System .............................................................. 1-19<br />
Turbopumps................................................................ 1-20<br />
Forevacuum Pumps...................................................... 1-21<br />
Vacuum System Controls............................................. 1-22<br />
Vacuum System Heating during a System Bakeout ...... 1-24<br />
Gas Supply...................................................................... 1-25<br />
Vent Valve of the Linear Ion Trap ............................... 1-27<br />
Cooling Water Circuit .................................................... 1-28<br />
Recirculating Chiller .................................................... 1-29<br />
Properties of Cooling Water......................................... 1-29<br />
Printed Circuit Boards .................................................... 1-30<br />
Linear Ion Trap Electronics.......................................... 1-31<br />
Electronic Boards at the Right Side of the Instrument.. 1-32<br />
Electronic Boards on the Left Side of the Instrument... 1-45<br />
Chapter 2 Basic System Operations ........................................................2-1<br />
Shutting Down the System in an Emergency .................... 2-2<br />
Behavior of the System in Case of a Main Failure........... 2-2<br />
Placing the System in Standby Condition ......................... 2-4<br />
Shutting Down the System ............................................... 2-5<br />
Starting Up the System after a Shutdown.......................... 2-7<br />
Starting Up the Instrument............................................ 2-7<br />
Setting Up Conditions for Operation............................. 2-8<br />
Resetting the System ....................................................... 2-10<br />
Resetting the Tune and Calibration Parameters to their<br />
Default Values ................................................................ 2-11<br />
Thermo Fisher Scientific <strong>LTQ</strong> <strong>Orbitrap</strong> <strong>XL</strong> <strong>Hardware</strong> <strong>Manual</strong> xi
Contents<br />
Chapter 3 User Maintenance.................................................................... 3-1<br />
General Remarks............................................................... 3-2<br />
Returning Parts .............................................................. 3-3<br />
Cleaning the Surface of the Instrument.......................... 3-3<br />
Baking Out the System ..................................................... 3-4<br />
Bakeout Procedure ......................................................... 3-4<br />
Maintaining the Vacuum System ...................................... 3-6<br />
Exchanging the Lubricant Reservoir of the Turbopumps 3-6<br />
Maintenance of the Recirculating Chiller .......................... 3-7<br />
Reservoir ........................................................................ 3-7<br />
Fluid Bag Filter .............................................................. 3-7<br />
Condenser Filter ............................................................ 3-7<br />
Chapter 4 Replaceable Parts.................................................................... 4-1<br />
Parts Basic System............................................................. 4-2<br />
Parts <strong>Orbitrap</strong> Analyzer.................................................. 4-3<br />
Parts Pumping System <strong>Orbitrap</strong>..................................... 4-3<br />
Parts Gas and Water Supply........................................... 4-5<br />
Electronic Parts ................................................................. 4-7<br />
Electronics - Right Panel................................................ 4-7<br />
Electronics - Left Panel .................................................. 4-8<br />
Electronics Analyzer ....................................................... 4-8<br />
Electronics Main Supply ................................................ 4-9<br />
Glossary .................................................................................... G-1<br />
Index ............................................................................................I-1<br />
xii <strong>LTQ</strong> <strong>Orbitrap</strong> <strong>XL</strong> <strong>Hardware</strong> <strong>Manual</strong> Thermo Fisher Scientific
Figures<br />
<strong>LTQ</strong> <strong>Orbitrap</strong> <strong>XL</strong> front view ................................................................ 1-2<br />
Schematic view of the <strong>LTQ</strong> <strong>Orbitrap</strong> <strong>XL</strong> .............................................. 1-3<br />
Top lid opened ...................................................................................... 1-4<br />
System status LEDs ............................................................................... 1-6<br />
Right side of the <strong>LTQ</strong> <strong>Orbitrap</strong> <strong>XL</strong> ...................................................... 1-7<br />
Upper control panel .............................................................................. 1-8<br />
Power control panel with power control LEDs and switches ................. 1-9<br />
Main power switch .............................................................................. 1-10<br />
External connections to the <strong>LTQ</strong> <strong>Orbitrap</strong> <strong>XL</strong> ................................... 1-11<br />
Schematic view of the <strong>Orbitrap</strong> cell and example of a stable ion<br />
trajectory ............................................................................................. 1-13<br />
Layout of the instrument, also showing the applied voltages ................ 1-14<br />
Principle of electrodynamic squeezing of ions in the <strong>Orbitrap</strong> as the field<br />
strength is increased ............................................................................ 1-15<br />
Approximate shape of ion packets of different m/q after stabilization of<br />
voltages ............................................................................................... 1-16<br />
HCD collision cell and C-Trap ........................................................... 1-18<br />
Schematical view of vacuum system (CLT compartment not shown) .. 1-19<br />
Vacuum components on the left instrument side ................................ 1-20<br />
Vacuum components on the right instrument side .............................. 1-20<br />
Forepumps cabinet .............................................................................. 1-21<br />
Schematical view of the gas supply ...................................................... 1-25<br />
Valve for HCD collision gas ................................................................ 1-26<br />
Nitrogen pressure regulator and gas flow divider ................................. 1-27<br />
Schematical view of cooling water circuit ............................................ 1-28<br />
Electronic connections to linear trap (covers removed) ........................ 1-31<br />
Electronic boards on the right side of the instrument .......................... 1-32<br />
Preamplifier board ............................................................................... 1-33<br />
Data Acquisition unit (covers removed) .............................................. 1-34<br />
Data Acquisition Digital PCI board .................................................... 1-35<br />
Data Acquisition Analog board ........................................................... 1-36<br />
Instrument Control board ................................................................... 1-38<br />
Power Distribution board ................................................................... 1-39<br />
Power Supply 1 board ......................................................................... 1-44<br />
Electronic boards on the left side of the instrument ............................. 1-45<br />
Ion Optic Supply board ...................................................................... 1-46<br />
Central Electrode Pulser board ............................................................ 1-47<br />
Temperature Controller board ............................................................ 1-49<br />
CLT RF unit (cover removed) ............................................................. 1-51<br />
Central Electrode Power Supply board ................................................ 1-52<br />
High Voltage Power Supply board (cover removed) ............................ 1-54<br />
High Voltage Power Supply board with SPI Bus Termination board .. 1-55<br />
Main power switch in Off position ....................................................... 2-2<br />
Thermo Fisher Scientific <strong>LTQ</strong> <strong>Orbitrap</strong> <strong>XL</strong> <strong>Hardware</strong> <strong>Manual</strong> xiii
Figures<br />
Bakeout timer ....................................................................................... 3-5<br />
xiv <strong>LTQ</strong> <strong>Orbitrap</strong> <strong>XL</strong> <strong>Hardware</strong> <strong>Manual</strong> Thermo Fisher Scientific
Tables<br />
System status LEDs of the Product Short Name ................................... 1-6<br />
Circuit breakers of the <strong>LTQ</strong> <strong>Orbitrap</strong> <strong>XL</strong> ............................................. 1-8<br />
Diagnostic LEDs on the Preamplifier board ........................................ 1-34<br />
Diagnostic LEDs of the Data Acquisition Digital PCI board .............. 1-36<br />
Diagnostic LEDs of the Data Acquisition Analog board ...................... 1-37<br />
Diagnostic LEDs of the Power Supply 2 board ................................... 1-37<br />
Diagnostic LEDs of the Instrument Control board ............................. 1-38<br />
Software status LEDs of the Instrument Control board ....................... 1-39<br />
Status LEDs of the Power Distribution board ..................................... 1-41<br />
Working modes of the Power Distribution board ................................ 1-42<br />
Operating states of the Power Distribution board ............................... 1-42<br />
Diagnostic LEDs of the Power Supply 1 board ................................... 1-44<br />
Diagnostic LEDs of the Ion Optic Supply board ................................. 1-47<br />
Diagnostic LEDs of the Central Electrode Pulser board ...................... 1-48<br />
Diagnostic LEDs of the Temperature Controller board ....................... 1-50<br />
Diagnostic LEDs of the CLT RF Main board ..................................... 1-51<br />
Diagnostic LEDs of the Central Electrode Power Supply board .......... 1-53<br />
Diagnostic LEDs of the High Voltage Power Supply board ................ 1-55<br />
User maintenance procedures ................................................................ 3-2<br />
Parts for the <strong>LTQ</strong> <strong>Orbitrap</strong> <strong>XL</strong> ............................................................. 4-1<br />
Parts <strong>LTQ</strong> <strong>Orbitrap</strong> <strong>XL</strong>; 50 Hz (P/N 072 3852) .................................. 4-1<br />
Parts basic system <strong>Orbitrap</strong>-2 (P/N 122 4790) ...................................... 4-2<br />
Parts Upgrade kit <strong>Orbitrap</strong> HCD option (P/N 122 4800) .................... 4-2<br />
Parts <strong>Orbitrap</strong> Installation Kit (P/N 118 8120) .................................... 4-2<br />
Parts <strong>Orbitrap</strong>-2 chamber; complete (P/N 122 4780) ........................... 4-3<br />
Parts pumping system <strong>Orbitrap</strong> (P/N 118 4490) .................................. 4-3<br />
Parts pump kit <strong>Orbitrap</strong> (P/N 117 5000) ............................................. 4-4<br />
Parts pump system <strong>Orbitrap</strong> (P/N 117 5010) ....................................... 4-4<br />
Parts gas supply (P/N 117 7881) ........................................................... 4-5<br />
Upgrade kit gas supply <strong>LTQ</strong> <strong>Orbitrap</strong> <strong>XL</strong> (P/N 122 4820) .................. 4-5<br />
Parts water supply (P/N 117 8460) ...................................................... 4-6<br />
Kit gas-water assembly (P/N 208 7351) ................................................ 4-6<br />
Electronic parts <strong>Orbitrap</strong>-2 (P/N 800 1110) ......................................... 4-7<br />
Parts <strong>Orbitrap</strong>-2 electronics; right panel (P/N 210 1480) ...................... 4-7<br />
Parts Unit data acquisition (P/N 206 4132) .......................................... 4-8<br />
Parts <strong>Orbitrap</strong>-2 electronics; left panel (P/N 208 1020) ........................ 4-8<br />
Parts electronics analyzer <strong>Orbitrap</strong>-2 (P/N 210 0160) ........................... 4-8<br />
Parts electronics main supply <strong>Orbitrap</strong> (P/N 208 1040) ........................ 4-9<br />
Thermo Fisher Scientific <strong>LTQ</strong> <strong>Orbitrap</strong> <strong>XL</strong> <strong>Hardware</strong> <strong>Manual</strong> xv
Chapter 1 Functional Description<br />
This chapter provides an overview of the functional elements of the<br />
<strong>LTQ</strong> <strong>Orbitrap</strong> <strong>XL</strong>. It contains the following topics:<br />
• “General Description” on page 1-2<br />
• “Control Elements” on page 1-6<br />
• “Linear Ion Trap” on page 1-12<br />
• “<strong>Orbitrap</strong> Analyzer” on page 1-13<br />
• “Vacuum System” on page 1-19<br />
• “Gas Supply” on page 1-25<br />
• “Cooling Water Circuit” on page 1-28<br />
• “Printed Circuit Boards” on page 1-30<br />
Thermo Fisher Scientific <strong>LTQ</strong> <strong>Orbitrap</strong> <strong>XL</strong> <strong>Hardware</strong> <strong>Manual</strong> 1-1
Functional Description<br />
General Description<br />
General Description<br />
<strong>LTQ</strong> <strong>Orbitrap</strong> <strong>XL</strong> is a hybrid mass spectrometer incorporating the<br />
<strong>LTQ</strong> <strong>XL</strong> linear trap and the <strong>Orbitrap</strong>. Figure 1-1 shows a front view<br />
of the instrument.<br />
<strong>LTQ</strong> <strong>XL</strong> Linear Ion Trap<br />
Figure 1-1. <strong>LTQ</strong> <strong>Orbitrap</strong> <strong>XL</strong> front view<br />
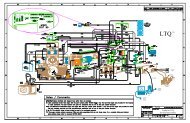
Figure 1-2 on page 1-3 shows the schematic view of the<br />
<strong>LTQ</strong> <strong>Orbitrap</strong> <strong>XL</strong>. The <strong>LTQ</strong> <strong>Orbitrap</strong> <strong>XL</strong> consists of four main<br />
components, which are described in the following topics:<br />
• A linear ion trap (Thermo Scientific <strong>LTQ</strong> <strong>XL</strong>) for sample ionization,<br />
selection, fragmentation, and AGC.<br />
• An intermediate storage device (curved linear trap) that is required<br />
for short pulse injection.<br />
• An <strong>Orbitrap</strong> analyzer for Fourier transformation based analysis.<br />
• A collision cell for performing higher energy CID experiments.<br />
1-2 <strong>LTQ</strong> <strong>Orbitrap</strong> <strong>XL</strong> <strong>Hardware</strong> <strong>Manual</strong> Thermo Fisher Scientific
Figure 1-2. Schematic view of the <strong>LTQ</strong> <strong>Orbitrap</strong> <strong>XL</strong><br />
Thermo Fisher Scientific <strong>LTQ</strong> <strong>Orbitrap</strong> <strong>XL</strong> <strong>Hardware</strong> <strong>Manual</strong> 1-3
Functional Description<br />
General Description<br />
Wheels at the bottom side of the instrument facilitate positioning the<br />
<strong>LTQ</strong> <strong>Orbitrap</strong> <strong>XL</strong> at the intended place in the laboratory. The<br />
instrument is designed to be placed with its rear panel against a wall. To<br />
ensure a sufficient air flow for cooling the instrument, spacers on the<br />
rear panel provide for minimum distance to the wall.<br />
The mains inlet as well as a power outlet for peripheral devices (data<br />
system, for example) are located at the right side of the instrument.<br />
Rotary pumps are hidden under the linear trap and accessible from the<br />
front. The left side panel and the front panel are mounted on hinges and<br />
the right side panel is removable.<br />
The top lid opens upwards to allow easy access for Field Engineers from<br />
the top. See Figure 1-3.<br />
Figure 1-3. Top lid opened<br />
A stand-alone recirculating water chiller is delivered with the<br />
instrument. It is connected to the right side of the instrument.<br />
1-4 <strong>LTQ</strong> <strong>Orbitrap</strong> <strong>XL</strong> <strong>Hardware</strong> <strong>Manual</strong> Thermo Fisher Scientific
Specifications<br />
The <strong>LTQ</strong> <strong>Orbitrap</strong> <strong>XL</strong> has the following measuring properties:<br />
Resolution<br />
(apodized)<br />
Functional Description<br />
General Description<br />
60 000 (FWHM) @ m/z 400<br />
with a scan repetition rate of 1 second<br />
Minimum resolution 7 500,<br />
maximum resolution 100 000 @ m/z 400<br />
Cycle Time 1 scan at 60 000 resolution @ m/z 400 per second<br />
Mass Range m/z 50–2 000; m/z 200–4 000<br />
Mass Accuracy 4 000 between highest and lowest detectable<br />
mass in one spectrum<br />
MS/MS MS/MS and MS n scan functions<br />
Thermo Fisher Scientific <strong>LTQ</strong> <strong>Orbitrap</strong> <strong>XL</strong> <strong>Hardware</strong> <strong>Manual</strong> 1-5
Functional Description<br />
Control Elements<br />
Control Elements<br />
System Status LEDs<br />
The <strong>LTQ</strong> <strong>Orbitrap</strong> <strong>XL</strong> is mainly operated from the desktop computer<br />
(data system). Some control elements for important system functions are<br />
located directly on the instrument. They are described in the following<br />
sections.<br />
Figure 1-4 shows the system status LEDs at the front of the instrument.<br />
Five LEDs indicate the main functions of the system. (See also<br />
Figure 1-5 on page 1-7.) While the Power LED is directly controlled by<br />
the 3 × 230 V input, all other LEDs are controlled by the power<br />
distribution board (Refer to topic “Power Distribution Board” on<br />
page 1-39). Table 1-1 explains the function of the various LEDs.<br />
Figure 1-4. System status LEDs<br />
The system status LEDs at the front panel of the linear ion trap are<br />
described in the <strong>LTQ</strong> <strong>XL</strong> <strong>Hardware</strong> <strong>Manual</strong>.<br />
Table 1-1. System status LEDs of the Product Short Name<br />
LED Status Information<br />
Power Green<br />
Off<br />
Vacuum *<br />
Green<br />
Yellow<br />
Communication Green<br />
System *<br />
Yellow<br />
Green<br />
Yellow<br />
Detect Blue<br />
Off<br />
Main switch on<br />
Main switch off<br />
Operating vacuum reached<br />
Insufficient vacuum or Vacuum Pumps switch off<br />
Communication link between instrument and data system<br />
established<br />
Communication link starting up or Vacuum Pumps switch off<br />
System ready<br />
FT Electronics switch off or Vacuum Pumps switch off<br />
Instrument is scanning<br />
Instrument is not scanning<br />
* These LEDs are flashing when a system bakeout is performed. See topic “Baking Out the System” on<br />
page 3-4.<br />
1-6 <strong>LTQ</strong> <strong>Orbitrap</strong> <strong>XL</strong> <strong>Hardware</strong> <strong>Manual</strong> Thermo Fisher Scientific
Control Panels<br />
Upper Control Panel<br />
Functional Description<br />
Control Elements<br />
Figure 1-5 shows the right side of the <strong>LTQ</strong> <strong>Orbitrap</strong> <strong>XL</strong>. Located here<br />
are the control panels, switches, and the ports for the external<br />
connections (mains supply, gases, Ethernet communication, and cooling<br />
water).<br />
System status LEDs<br />
of linear trap<br />
Forepumps cabinet<br />
System status LEDs of <strong>LTQ</strong> <strong>Orbitrap</strong> <strong>XL</strong><br />
Bakeout timer<br />
Power panel of linear trap<br />
Figure 1-5. Right side of the <strong>LTQ</strong> <strong>Orbitrap</strong> <strong>XL</strong><br />
Cover lid for<br />
bake out<br />
controls<br />
Switches and<br />
control LEDs<br />
Main power<br />
switch<br />
Power connector<br />
For more information about the external connections, refer to topic<br />
“External Connections” on page 1-10.<br />
The upper instrument control panel comprises the bakeout timer, the<br />
bakeout control buttons, and three circuit breakers. To access the upper<br />
control panel, swing open the small lid (opens from left to right). See<br />
Figure 1-5 and Figure 1-6 on page 1-8.<br />
The timer allows setting the duration for the bakeout of the system.<br />
After the duration is set, the bakeout procedure is started by pressing the<br />
green button on the right. A running bakeout procedure can be stopped<br />
by pressing the orange button on the left side. For instructions about<br />
performing a bakeout, refer to topic “Baking Out the System” on<br />
page 3-4.<br />
Thermo Fisher Scientific <strong>LTQ</strong> <strong>Orbitrap</strong> <strong>XL</strong> <strong>Hardware</strong> <strong>Manual</strong> 1-7
Functional Description<br />
Control Elements<br />
Power Control Panel<br />
Bakeout timer<br />
Bakeout control<br />
buttons<br />
Circuit breakers<br />
Figure 1-6. Upper control panel<br />
Cover lid<br />
Note The buttons themselves have no indicator function. A running<br />
bakeout procedure is indicated by flashing Vacuum and System LEDs at<br />
the front side of the instrument. See Figure 1-4 on page 1-6. ▲<br />
Three circuit breakers are located at the bottom of this control panel.<br />
Table 1-2 shows the parts of the <strong>LTQ</strong> <strong>Orbitrap</strong> <strong>XL</strong> that are protected by<br />
the respective circuit breaker. The proper function of each circuit<br />
breaker is signaled by a dedicated LED in the power control panel (for<br />
example, F1 corresponds to L1).<br />
Table 1-2. Circuit breakers of the <strong>LTQ</strong> <strong>Orbitrap</strong> <strong>XL</strong><br />
Circuit breaker Ampere LED Instrument parts<br />
F1 10 L1 Power Distribution<br />
F2 16 L2 Linear ion trap<br />
F3 10 L3 Multiple socket outlets (Data system, LC, heater,<br />
etc.)<br />
In addition to the system status LEDs at the front side (see Figure 1-4<br />
on page 1-6), the <strong>LTQ</strong> <strong>Orbitrap</strong> <strong>XL</strong> has three power control LEDs<br />
above the Vacuum Pumps switch at the right side. See Figure 1-7. They<br />
indicate whether the corresponding circuit breaker is closed and the<br />
respective parts of the instrument have power. (See Table 1-2 on<br />
page 1-8.)<br />
1-8 <strong>LTQ</strong> <strong>Orbitrap</strong> <strong>XL</strong> <strong>Hardware</strong> <strong>Manual</strong> Thermo Fisher Scientific
Power control LEDs<br />
Vacuum Pumps switch<br />
FT Electronics switch<br />
Functional Description<br />
Control Elements<br />
Figure 1-7. Power control panel with power control LEDs and switches<br />
The use of the switches below the power control LEDs changes the<br />
working mode of the power distribution. (See topic “Working Modes of<br />
the Power Distribution” on page 1-48.)<br />
The Vacuum Pumps switch can be set into the positions ON or OFF.<br />
When the switch is in the OFF position, everything but the multiple<br />
socket outlet is switched off.<br />
The FT Electronics switch can be set into the Operating Position (ON)<br />
or into the Service Position (OFF). When the switch is in the Service<br />
position, all components are switched off with exception of the<br />
following:<br />
• Fans<br />
• Heater control<br />
• Power distribution (Refer to the topic “Power Distribution Board”<br />
on page 1-39)<br />
• Pumps (Refer to the topic “Vacuum System” on page 1-19)<br />
• Temperature controller (Refer to the topic “Temperature Controller<br />
Board” on page 1-48)<br />
• Vacuum control<br />
The linear ion trap also remains on because it has a separate Service<br />
switch.<br />
Thermo Fisher Scientific <strong>LTQ</strong> <strong>Orbitrap</strong> <strong>XL</strong> <strong>Hardware</strong> <strong>Manual</strong> 1-9
Functional Description<br />
Control Elements<br />
Main Power Switch<br />
External Connections<br />
The main power switch must be turned 90° clockwise/anti-clockwise to<br />
switch on/off the instrument (see Figure 1-8). Placing the main power<br />
switch in the Off position turns off all power to the <strong>LTQ</strong> <strong>Orbitrap</strong> <strong>XL</strong><br />
(and linear ion trap as well, including the vacuum pumps).<br />
Off<br />
Figure 1-8. Main power switch<br />
1-10 <strong>LTQ</strong> <strong>Orbitrap</strong> <strong>XL</strong> <strong>Hardware</strong> <strong>Manual</strong> Thermo Fisher Scientific<br />
On<br />
Note When the main power switch is in the Off position, you can secure<br />
it with a padlock or a cable tie (to prevent unintended re-powering when<br />
performing maintenance, for example). ▲<br />
Figure 1-9 on page 1-11 shows the lower right side of the instrument<br />
with the external connections for mains supply, gases, cooling water, and<br />
Ethernet communication.<br />
The power connector for the mains supply is located on the center. The<br />
cooling water ports are located below the power connector. (See also<br />
topic “Cooling Water Circuit” on page 1-28.) A Teflon® hose connects<br />
the instrument to the nitrogen gas supply. An analogous port is used for<br />
the HCD collision gas supply. Metal tubing connects the instrument<br />
with the helium gas supply. (See also topic “Gas Supply” on page 1-25.)<br />
Located at the top are two ports for Ethernet cables for connecting the<br />
<strong>LTQ</strong> <strong>Orbitrap</strong> <strong>XL</strong> and the linear ion trap via an Ethernet hub with the<br />
data system computer.<br />
The exhaust hose from the rotary pumps is led backwards below the<br />
instrument, comes out the back of the instrument, and connects the<br />
pumps to the exhaust system in the laboratory.
Ethernet ports<br />
Power outlet for<br />
peripheral devices<br />
Power connector<br />
Helium gas inlet<br />
Collision gas inlet<br />
Inlet for nitrogen gas<br />
Figure 1-9. External connections to the <strong>LTQ</strong> <strong>Orbitrap</strong> <strong>XL</strong><br />
Functional Description<br />
Control Elements<br />
Cooling water inlet port<br />
Cooling water outlet port<br />
The power outlet for peripheral devices (data system, for example) is<br />
located above the mains supply port. The outlet provides the mains<br />
supply for the peripherals via a multiple socket outlet.<br />
Caution Do not connect the recirculating chiller to the peripherals<br />
power outlet!<br />
Furthermore, make sure that the maximum current drawn from the<br />
power outlet does not exceed 16 A. Overloading it (by connecting to<br />
many pieces of equipment to the multiple socket outlet, for example)<br />
may destroy the outlet by excessive heating. ▲<br />
Thermo Fisher Scientific <strong>LTQ</strong> <strong>Orbitrap</strong> <strong>XL</strong> <strong>Hardware</strong> <strong>Manual</strong> 1-11
Functional Description<br />
Linear Ion Trap<br />
Linear Ion Trap<br />
The <strong>LTQ</strong> <strong>Orbitrap</strong> <strong>XL</strong> system can utilize a variety of ionization<br />
techniques such as ESI, APCI, or APPI. Maintenance of the API source,<br />
as well as switching between ionization methods, is vent-free. Ions are<br />
transferred by octapole and “square” quadrupole lenses into an ion trap<br />
that is optimized for axial ion ejection into the curved linear trap. (See<br />
Figure 1-2 on page 1-3.)<br />
The linear ion trap is an independent MS detector (Thermo Scientific<br />
<strong>LTQ</strong> <strong>XL</strong>), which can store, isolate, and fragment ions and then send<br />
them either to the <strong>Orbitrap</strong> for further analysis or to an SEM detector.<br />
The linear ion trap is a unique ion preparation and injection system for<br />
<strong>Orbitrap</strong> MS, because it has greater ion storage capacity than<br />
conventional 3D ion trap devices. The linear ion trap is completely<br />
described in the <strong>LTQ</strong> <strong>XL</strong> <strong>Hardware</strong> <strong>Manual</strong>.<br />
All the ion handling, selection and excitation capabilities of the ion trap<br />
can be used to prepare ions for analysis in the <strong>Orbitrap</strong>. These features<br />
include storage and ejection of all ions, storage of selected masses or<br />
mass ranges, as well as ion isolation. Isolated ions can be excited and<br />
then fragmented as necessary for MS/MS and MSn experiments. The<br />
patented Automatic Gain Control (AGC) provides extended dynamic<br />
range and insures optimized overall performance of the ion trap and<br />
<strong>Orbitrap</strong> MS.<br />
The linear ion trap and the transfer chamber are mounted on a table.<br />
See Figure 1-1 on page 1-2. The table also serves as a housing for the<br />
forepumps. See Figure 1-18 on page 1-21. The Product Short Name<br />
provides power for the linear ion trap – and for the data system.<br />
The linear ion trap is delivered with power connector, gas lines (He, N 2 ,<br />
and collision gas), and vacuum tube lines extending to the ESI source.<br />
On the rear side of the <strong>LTQ</strong> <strong>XL</strong> ion trap is a flange with an O-ring seal.<br />
When the flange is removed, the <strong>Orbitrap</strong> transfer chamber is mounted<br />
to the flange of the linear ion trap. The transfer chamber is held with<br />
supports on the table. The components of the ion optics and the<br />
<strong>Orbitrap</strong> are fixed to the transfer chamber.<br />
1-12 <strong>LTQ</strong> <strong>Orbitrap</strong> <strong>XL</strong> <strong>Hardware</strong> <strong>Manual</strong> Thermo Fisher Scientific
<strong>Orbitrap</strong> Analyzer<br />
Measuring Principle<br />
Curved Linear Trap<br />
Functional Description<br />
<strong>Orbitrap</strong> Analyzer<br />
This section describes the basic principle of the <strong>Orbitrap</strong> mass<br />
analyzer. The heart of the system is an axially-symmetrical mass analyzer.<br />
It consists of a spindle-shape central electrode surrounded by a pair of<br />
bell-shaped outer electrodes. See Figure 1-10. The <strong>Orbitrap</strong> employs<br />
electric fields to capture and confine ions.<br />
Figure 1-10. Schematic view of the <strong>Orbitrap</strong> cell and example of a stable<br />
ion trajectory<br />
In the mass analyzer shown in Figure 1-10, stable ion trajectories rotate<br />
around an axial central electrode with harmonic oscillations along it.<br />
The frequency ω of these harmonic oscillations along the z-axis depends<br />
only on the ion mass-to-charge ratio m/q and the instrumental<br />
constant k:<br />
Thermo Fisher Scientific <strong>LTQ</strong> <strong>Orbitrap</strong> <strong>XL</strong> <strong>Hardware</strong> <strong>Manual</strong> 1-13<br />
w<br />
=<br />
q<br />
m<br />
--- × k<br />
Two split halves of the outer electrode of the <strong>Orbitrap</strong> detect the image<br />
current produced by the oscillating ions. By Fast Fourier Transformation<br />
(FFT) of the image current, the instrument obtains the frequencies of<br />
these axial oscillations and therefore the mass-to-charge ratios of the<br />
ions.<br />
On their way from the linear trap to the <strong>Orbitrap</strong>, ions move through<br />
the gas-free RF octapole (Oct 1) into the gas-filled curved linear trap<br />
(C-Trap). See Figure 1-11 on page 1-14. Ions in the C-Trap are returned<br />
by the trap electrode. Upon their passage, the ions loose enough kinetic<br />
energy to prevent them from leaving the C-Trap through the Gate. The
Functional Description<br />
<strong>Orbitrap</strong> Analyzer<br />
Figure 1-11. Layout of the instrument, also showing the applied voltages<br />
Extraction of Ion Packets<br />
nitrogen collision gas (bath gas) is used for dissipating the kinetic energy<br />
of ions injected from the <strong>LTQ</strong> <strong>XL</strong> and for cooling them down to the axis<br />
of the curved linear trap.<br />
Voltages on the end apertures of the curved trap (Trap and Gate<br />
apertures) are elevated to provide a potential well along its axis. These<br />
voltages may be later ramped up to squeeze ions into a shorter thread<br />
along this axis. The RF to the C-Trap (“Main RF”) is provided by the<br />
CLT RF main board. (See page 1-50.) Trap and gate DC voltages as well<br />
as RF voltages to octapole 1 are all provided by the ion optic supply<br />
board. (See page 1-46.) High voltages to the lenses are provided by the<br />
high voltage power supply board. (See page 1-53.)<br />
For ion extraction, the RF on the rods of the C-Trap is switched off and<br />
extracting voltage pulses are applied to the electrodes, pushing ions<br />
orthogonally to the curved axis through a slot in the inner hyperbolic<br />
electrode. Because of the initial curvature of the curved trap and the<br />
subsequent lenses, the ion beam converges on the entrance into the<br />
<strong>Orbitrap</strong>. The lenses form also differential pumping slots and cause<br />
spatial focusing of the ion beam into the entrance of the <strong>Orbitrap</strong>. Ions<br />
are electrostatically deflected away from the gas jet, thereby eliminating<br />
gas carryover into the <strong>Orbitrap</strong>.<br />
1-14 <strong>LTQ</strong> <strong>Orbitrap</strong> <strong>XL</strong> <strong>Hardware</strong> <strong>Manual</strong> Thermo Fisher Scientific
Ion Detection<br />
Functional Description<br />
<strong>Orbitrap</strong> Analyzer<br />
Owing to the fast pulsing of ions from the curved trap, ions of each<br />
mass-to-charge ratio arrive at the entrance of the <strong>Orbitrap</strong> as short<br />
packets only a few millimeters long. For each mass/charge population,<br />
this corresponds to a spread of flight times of only a few hundred<br />
nanoseconds for mass-to-charge ratios of a few hundred Daltons/charge.<br />
Such durations are considerably shorter than a half-period of axial ion<br />
oscillation in the trap. When ions are injected into the <strong>Orbitrap</strong> at a<br />
position offset from its equator (Figure 1-12), these packets start<br />
coherent axial oscillations without the need for any additional excitation<br />
cycle.<br />
Figure 1-12. Principle of electrodynamic squeezing of ions in the <strong>Orbitrap</strong><br />
as the field strength is increased<br />
The evolution of an ion packet during the increase of the electric field is<br />
shown schematically on Figure 1-12. When the injected ions approach<br />
the opposite electrode for the first time, the increased electric field<br />
(owing to the change of the voltage on the central electrode) contracts<br />
the radius of the ion cloud by a few percent. The applied voltages are<br />
adjusted to prevent collision of the ions with the electrode. A further<br />
increase of the field continues to squeeze the trajectory closer to the axis,<br />
meanwhile allowing for newly arriving ions (normally, with higher m/q)<br />
to enter the trap as well. After ions of all m/q have entered the <strong>Orbitrap</strong><br />
and moved far enough from the outer electrodes, the voltage on the<br />
central electrode is kept constant and image current detection takes<br />
place.<br />
During ion detection, both the central electrode and deflector are<br />
maintained at very stable voltages so that no mass drift can take place.<br />
The outer electrode is split in half at z=0, allowing the ion image current<br />
in the axial direction to be collected. The image current on each of half<br />
of the outer electrode is differentially amplified and then undergoes<br />
analog-to-digital conversion before processing using the fast Fourier<br />
transform algorithm.<br />
Thermo Fisher Scientific <strong>LTQ</strong> <strong>Orbitrap</strong> <strong>XL</strong> <strong>Hardware</strong> <strong>Manual</strong> 1-15
Functional Description<br />
<strong>Orbitrap</strong> Analyzer<br />
Figure 1-13. Approximate shape of ion packets of different m/q after<br />
stabilization of voltages<br />
As mentioned above, stable ion trajectories within the <strong>Orbitrap</strong> combine<br />
axial oscillations along the z-axis with rotation around the central<br />
electrode and vibrations in the radial direction. (See Figure 1-10 on<br />
page 1-13.) For any given m/q, only the frequency of axial oscillations is<br />
completely independent of initial ion parameters, while rotational and<br />
radial frequencies exhibit strong dependence on initial radius and<br />
energy. Therefore, ions of the same mass/charge ratio continue to<br />
oscillate along z together, remaining in-phase for many thousands of<br />
oscillations.<br />
In contrast to the axial oscillations, the frequencies of radial and<br />
rotational motion will vary for ions with slightly different initial<br />
parameters. This means that in the radial direction, ions dephase orders<br />
of magnitude faster than in the axial direction, and the process occurs in<br />
a period of only 50–100 oscillations. After this, the ion packet of a given<br />
m/q assumes the shape of a thin ring, with ions uniformly distributed<br />
along its circumference. (See Figure 1-13.) Because of this angular and<br />
radial smearing, radial and rotational frequencies cannot appear in the<br />
measured spectrum. Meanwhile, axial oscillations will persist, with axial<br />
thickness of the ion ring remaining small compared with the axial<br />
amplitude. Moving from one half outer electrode to the other, this ring<br />
will induce opposite currents on these halves, thus creating a signal to be<br />
detected by differential amplification.<br />
1-16 <strong>LTQ</strong> <strong>Orbitrap</strong> <strong>XL</strong> <strong>Hardware</strong> <strong>Manual</strong> Thermo Fisher Scientific
Active Temperature Control<br />
Peltier Cooling<br />
Functional Description<br />
<strong>Orbitrap</strong> Analyzer<br />
Active temperature control is achieved by monitoring temperature<br />
directly on the <strong>Orbitrap</strong> assembly and compensating any changes in<br />
ambient temperature by a thermoelectric cooler (Peltier element) on the<br />
outside of the UHV chamber. A dedicated temperature controller board<br />
is used for this purpose. See page 1-48.<br />
To allow stable operating conditions in the UHV chamber, it can be<br />
cooled or heated (outgassing) by means of a Peltier element located on<br />
the outside. A second Peltier element is located on the back of the<br />
CE power supply board. See Figure 1-32 on page 1-45.<br />
The Peltier cooling is based on the Peltier Effect, which describes the<br />
effect by which the passage of an electric current through a junction of<br />
two dissimilar materials (thermoelectric materials) causes temperature<br />
differential (cooling effect). The voltage drives the heat to flow from one<br />
side of the Peltier element to the other side, resulting in cooling effects<br />
on one side and heating effects on the other side.<br />
To remove the heat from the hot side of the Peltier elements, they are<br />
connected to the cooling water circuit of the <strong>LTQ</strong> <strong>Orbitrap</strong> <strong>XL</strong>. See<br />
topic “Cooling Water Circuit” on page 1-28 for further information.<br />
Thermo Fisher Scientific <strong>LTQ</strong> <strong>Orbitrap</strong> <strong>XL</strong> <strong>Hardware</strong> <strong>Manual</strong> 1-17
Functional Description<br />
<strong>Orbitrap</strong> Analyzer<br />
HCD Collision Cell<br />
The collision cell consists of a straight multipole mounted inside a metal<br />
tube which is connected in direct line-of-sight to the C-Trap.<br />
Figure 1-14 shows a close-up view of the configuration.<br />
HCD collision cell<br />
Figure 1-14. HCD collision cell and C-Trap<br />
1-18 <strong>LTQ</strong> <strong>Orbitrap</strong> <strong>XL</strong> <strong>Hardware</strong> <strong>Manual</strong> Thermo Fisher Scientific<br />
C-Trap<br />
It is supplied with a collision gas through the open split interface,<br />
providing increased gas pressure inside the multipole. The choice of<br />
collision gas is independent from the gas in the C-Trap. See topic “Gas<br />
Supply” on page 1-25 for details. The front of the tube is equipped with<br />
a lens for tuning transmission and ejection to/from the C-Trap. The ion<br />
optic supply board provides the voltages for the collision cell. (See<br />
page 1-46.)<br />
For HCD (Higher Energy Collisional Dissociation), ions are passed<br />
through the C-Trap into the collision cell. The offset between the<br />
C-Trap and HCD is used to accelerate the parents into the gas-filled<br />
collision cell.
Vacuum System<br />
Pirani Gauge<br />
Fore<br />
Pump<br />
Turbopump TMH 071<br />
(TMP 2)<br />
Fore<br />
Pump<br />
<strong>LTQ</strong> <strong>XL</strong><br />
Functional Description<br />
Vacuum System<br />
Figure 1-15 shows a schematic overview of the vacuum system. The<br />
<strong>Orbitrap</strong> has the following vacuum compartments:<br />
• CLT compartment in the aluminum vacuum chamber (pumped<br />
by the same pump as the linear trap)<br />
• Vacuum chamber (pumped by a water-cooled 60 L/s – for N 2 –<br />
turbopump TMH 071, TMP 1, manufacturer: Pfeiffer)<br />
• Ultra high vacuum chamber (UHV chamber, pumped by a<br />
water-cooled 60 L/s turbopump TMH 071, TMP 2, manufacturer:<br />
Pfeiffer)<br />
• <strong>Orbitrap</strong> chamber (pumped by a 210 L/s – for N 2 – water-cooled<br />
turbopump TMU 262, TMP 3, manufacturer: Pfeiffer)<br />
The forepumps of the linear trap provide the forevacuum for the<br />
turbopumps.<br />
Figure 1-15. Schematical view of vacuum system (CLT compartment not shown) *<br />
* For an abridged version of the parts list, see Table 4-7 on page 4-3.<br />
Cold Ion Gauge<br />
UHV Chamber<br />
<strong>Orbitrap</strong><br />
Chamber<br />
Turbopump TMU 262<br />
(TMP 3)<br />
Vacuum Chamber<br />
Turbopump TMH 071<br />
(TMP 1)<br />
<strong>LTQ</strong> <strong>XL</strong><br />
Thermo Fisher Scientific <strong>LTQ</strong> <strong>Orbitrap</strong> <strong>XL</strong> <strong>Hardware</strong> <strong>Manual</strong> 1-19
Functional Description<br />
Vacuum System<br />
Turbopumps<br />
All parts of the system except for the <strong>Orbitrap</strong> analyzer are mounted in a<br />
aluminum vacuum chamber evacuated by a 60 L/s turbopump (TMP 1,<br />
see Figure 1-16). The rotary vane pumps of the linear trap (see below)<br />
provide the forevacuum for this pump. This chamber is bolted to a<br />
stainless steel welded UHV chamber housing the <strong>Orbitrap</strong>, lenses, and<br />
corresponding electrical connections.<br />
Pirani gauge<br />
Turbopump vacuum chamber (TMP 1)<br />
Figure 1-16. Vacuum components on the left instrument side<br />
The UHV chamber is evacuated down to 10 -8 mbar pressure range by a<br />
60 L/s UHV turbopump (TMP 2, see Figure 1-17).<br />
Preamplifier<br />
Cold ion<br />
gauge<br />
Turbopump<br />
TMU 262<br />
(TMP 3)<br />
Figure 1-17. Vacuum components on the right instrument side<br />
HCD housing<br />
Cooling water<br />
supply for Peltier<br />
element<br />
Turbopump TMH 071<br />
(TMP 2)<br />
1-20 <strong>LTQ</strong> <strong>Orbitrap</strong> <strong>XL</strong> <strong>Hardware</strong> <strong>Manual</strong> Thermo Fisher Scientific
Linear Trap Turbopump<br />
Forevacuum Pumps<br />
Functional Description<br />
Vacuum System<br />
The <strong>Orbitrap</strong> itself is separated from the UHV chamber by differential<br />
apertures and is evacuated down to 10 -10 mbar by a 210 L/s turbopump<br />
(TMP 3, see Figure 1-17 on page 1-20). All turbopumps are equipped<br />
with TC 100 control units (manufacturer: Pfeiffer).<br />
A separate turbopump provides the high vacuum for the linear ion trap.<br />
It it is mounted to the bottom of the vacuum manifold of the linear ion<br />
trap. For more information, refer to the <strong>LTQ</strong> <strong>XL</strong> <strong>Hardware</strong> <strong>Manual</strong>.<br />
The rotary vane pumps from the linear trap serve as forepumps for the<br />
two smaller turbopumps (TMP 1 and TMP 2). The exhaust hose from<br />
the forepumps is led to the back of the instrument and connects them to<br />
the exhaust system in the laboratory. The forepumps are located on a<br />
small cart in the forepumps cabinet below the linear trap. See<br />
Figure 1-18.<br />
Oil mist filters<br />
Figure 1-18. Forepumps cabinet<br />
Forepumps<br />
To minimize the ingress of pump oil into the exhaust system, the outlets<br />
of the forepumps are fitted to oil mist filters. See page 3-6 on<br />
instructions about returning the collected oil to the forepumps.<br />
The forevacuum pumps (forepumps) of the linear trap are powered by<br />
the power panel of the linear ion trap.<br />
Thermo Fisher Scientific <strong>LTQ</strong> <strong>Orbitrap</strong> <strong>XL</strong> <strong>Hardware</strong> <strong>Manual</strong> 1-21
Functional Description<br />
Vacuum System<br />
Vacuum System Controls<br />
Vacuum Gauges<br />
Warning When analyzing hazardous materials, these may be present in<br />
the effluent of the forepumps! The connection to an adequate exhaust<br />
system is mandatory! ▲<br />
Leave the on/off switches of the forepumps always in the On position to<br />
provide the control from the vacuum control panel. Before starting the<br />
pumps, however, make sure that:<br />
• The forevacuum pumps are filled with oil,<br />
• They are connected to the power supply, and<br />
• The gas ballast is shut.<br />
For a detailed description of the forepumps, refer to the handbook of<br />
the manufacturer.<br />
The power distribution board controls all turbopumps via voltage levels.<br />
Refer to topic “Power Distribution Board” on page 1-39. An interface<br />
for RS485 data via the instrument control board connects the<br />
turbopumps with the linear ion trap. (Refer to topic “Instrument<br />
Control Board” on page 1-37.) The linear ion trap has a separate<br />
turbopump controller.<br />
The vacuum is monitored by several vacuum gauges:<br />
• The forevacuum of the<br />
<strong>LTQ</strong> <strong>Orbitrap</strong> <strong>XL</strong> is monitored<br />
by an Active Pirani gauge<br />
(TPR 280, manufacturer:<br />
Pfeiffer) connected to the<br />
<strong>LTQ</strong> <strong>Orbitrap</strong> <strong>XL</strong> forevacuum<br />
line. See photo right and<br />
Figure 1-16 on page 1-20.<br />
• The high vacuum of the <strong>LTQ</strong> <strong>Orbitrap</strong> <strong>XL</strong> is monitored by a Cold<br />
Ion Gauge (IKR 270, manufacturer: Pfeiffer) connected to the<br />
UHV chamber. See Figure 1-17 on page 1-20. Since the gauge<br />
would be contaminated at higher pressures, it is only turned on<br />
when the forevacuum has fallen below a safety threshold<br />
(
Switching on the Vacuum System<br />
Vacuum Failure<br />
Functional Description<br />
Vacuum System<br />
• The linear ion trap vacuum is monitored by a Convectron gauge<br />
and an ion gauge. Refer to the <strong>LTQ</strong> <strong>XL</strong> <strong>Hardware</strong> <strong>Manual</strong> for more<br />
information.<br />
The vacuum gauges of the <strong>LTQ</strong> <strong>Orbitrap</strong> <strong>XL</strong> are connected to the<br />
power distribution board that directly responds to the pressure values.<br />
(Refer to the topic “Power Distribution Board” on page 1-39.) The<br />
analog values are digitized by the instrument control board. (Refer to<br />
the topic “Instrument Control Board” on page 1-37.) They are then<br />
sent as readout values to the data system.<br />
When the vacuum system is switched on, the following occurs:<br />
1. After the Pumps & Electronics switch is switched On, the pumps of<br />
the linear ion trap and the <strong>LTQ</strong> <strong>Orbitrap</strong> <strong>XL</strong> are run up. The Pirani<br />
gauge (see above) controls the <strong>LTQ</strong> <strong>Orbitrap</strong> <strong>XL</strong> low vacuum<br />
pressure as well as the pressure at the forevacuum pumps. Within a<br />
short time, a significant pressure decrease must be observed. The<br />
goodness of the vacuum can be estimated by means of the rotation<br />
speed of the turbopumps (e.g. 80% after 15 min.).<br />
2. If the working pressure is not reached after the preset time, the<br />
complete system is switched off. At the status LED panel of the<br />
power distribution board, an error message (Vacuum Failure) is put<br />
out (see below).<br />
3. The Cold Ion Gauge is only switched on after the low vacuum is<br />
reached. It is then used to monitor the vacuum in the <strong>Orbitrap</strong><br />
region.<br />
In case the pressure in the <strong>LTQ</strong> <strong>Orbitrap</strong> <strong>XL</strong> or the linear ion trap<br />
exceeds a safety threshold, the complete system including linear ion trap,<br />
electronics, and pumps is switched off. However, the power distribution<br />
is kept under current and puts out an error message at the LED panel.<br />
(Refer to the topic “Power Distribution Board” on page 1-39.) It can be<br />
reset by switching the main power switch off and on. (Refer to the topic<br />
“Main Power Switch” on page 1-10.)<br />
Upon venting, the vent valves of the turbopumps on the <strong>Orbitrap</strong><br />
detector stay closed. Only the vent valve of the linear ion trap is used.<br />
(Refer to the topic “Vent Valve of the Linear Ion Trap” on page 1-27.)<br />
Thermo Fisher Scientific <strong>LTQ</strong> <strong>Orbitrap</strong> <strong>XL</strong> <strong>Hardware</strong> <strong>Manual</strong> 1-23
Functional Description<br />
Vacuum System<br />
Vacuum System Heating during a System Bakeout<br />
After the system has been open to the atmosphere (e.g. for maintenance<br />
work), the vacuum deteriorates due to contaminations of the inner parts<br />
of the vacuum system caused by moisture or a power outage. These<br />
contaminations must be removed by heating the vacuum system: a<br />
system bakeout. Refer to the topic “Baking Out the System” on<br />
page 3-4.<br />
1-24 <strong>LTQ</strong> <strong>Orbitrap</strong> <strong>XL</strong> <strong>Hardware</strong> <strong>Manual</strong> Thermo Fisher Scientific
Gas Supply<br />
Functional Description<br />
Gas Supply<br />
Figure 1-19 shows a schematical view of the gas supply in the<br />
instrument. The <strong>LTQ</strong> <strong>Orbitrap</strong> <strong>XL</strong> uses at least two gases for operation:<br />
• Nitrogen,<br />
• Helium, and<br />
Figure 1-19. Schematical view of the gas supply *<br />
* For parts lists of the gas supply, refer to Table 4-10 on page 4-5.<br />
• Argon (optional).<br />
The linear trap requires high-purity (99%) nitrogen for the API sheath<br />
gas and auxiliary/sweep gas. The <strong>Orbitrap</strong> uses nitrogen as collision gas<br />
(bath gas) for the curved linear trap and the HCD collision octapole.<br />
The linear trap requires ultra-high purity (99.999%) helium for the<br />
collision gas.<br />
Thermo Fisher Scientific <strong>LTQ</strong> <strong>Orbitrap</strong> <strong>XL</strong> <strong>Hardware</strong> <strong>Manual</strong> 1-25
Functional Description<br />
Gas Supply<br />
In case argon is used as HCD collision gas, it should be of high purity<br />
(99.99%).<br />
The laboratory gas supply is connected to the inlets at the right side of<br />
the instrument. See Figure 1-9 on page 1-11. Within the instrument,<br />
the helium gas is led from the helium port through a stainless steel<br />
capillary to the right rear side of the linear trap. Nitrogen gas and<br />
HCD collision gas are both led via Teflon tubing to the right side of the<br />
<strong>LTQ</strong> <strong>Orbitrap</strong> <strong>XL</strong>.<br />
Part of the nitrogen gas flow is directed through Teflon tubing via a<br />
pressure regulator to the vent valve of the linear trap. (See below for<br />
further information.) Another part of the nitrogen flow is directed<br />
through Teflon tubing to the vacuum chamber of the <strong>Orbitrap</strong>.<br />
Nitrogen gas pressure to the C-Trap is kept constant by using an<br />
“open-split” interface (gas flow divider, see Figure 1-21 on page 1-27). It<br />
contains a capillary line from the nitrogen line of the instrument to<br />
atmosphere (flow rate: ~20 mL/min), with another capillary leading<br />
from the point of atmospheric pressure into the C-Trap (flow rate:<br />
~0.2 mL/min). For the nitrogen gas to the C-Trap, black PEEKSil<br />
tubing is used (75 μm ID silica capillary in 1/16 in PEEK tubing).<br />
CLT RF Main board housing<br />
Temperature controller board<br />
Figure 1-20. Valve for HCD collision gas<br />
1-26 <strong>LTQ</strong> <strong>Orbitrap</strong> <strong>XL</strong> <strong>Hardware</strong> <strong>Manual</strong> Thermo Fisher Scientific
Vent Valve of the Linear Ion Trap<br />
Functional Description<br />
Gas Supply<br />
The HCD collision gas is also led to a gas flow divider. Part of the gas is<br />
led through a capillary line to the atmosphere (flow rate: ~20 mL/min).<br />
The other part of the gas (flow rate: ~0.5 mL/min) enters the IN port of<br />
a three way valve. The gas leaves the valve through the OUT port and is<br />
led to the collision octapole next to the curved linear trap. 1 For the<br />
HCD collision gas, red PEEKSil tubing is used (100 μm ID silica<br />
capillary in 1/16 in PEEK tubing).<br />
The HCD collision gas valve is located at the left instrument side next<br />
to the temperature controller board. See Figure 1-20 on page 1-26. It is<br />
switched by the software via the power distribution board. (See<br />
page 1-39.)<br />
If the system and pumps are switched off, the system is vented. The vent<br />
valve is controlled by the linear ion trap. The <strong>LTQ</strong> <strong>XL</strong> <strong>Hardware</strong> <strong>Manual</strong><br />
contains further information about the vent valve.<br />
The instrument is vented with nitrogen from the same tubing that<br />
supplies the <strong>LTQ</strong> <strong>XL</strong> sheath gas. See Figure 1-19 above. The vent valve<br />
of the <strong>LTQ</strong> <strong>XL</strong> is attached to a pressure regulator that is set to a venting<br />
pressure of 3–4 psi. The pressure regulator is located at the left side of<br />
the <strong>LTQ</strong> <strong>Orbitrap</strong> <strong>XL</strong>. See Figure 1-21.<br />
Nitrogen pressure regulator<br />
Figure 1-21. Nitrogen pressure regulator and gas flow divider<br />
1 The third port of the valve is closed.<br />
Gas flow divider<br />
Thermo Fisher Scientific <strong>LTQ</strong> <strong>Orbitrap</strong> <strong>XL</strong> <strong>Hardware</strong> <strong>Manual</strong> 1-27
Functional Description<br />
Cooling Water Circuit<br />
Cooling Water Circuit<br />
Figure 1-22. Schematical view of cooling water circuit *<br />
* For a parts list of the cooling water circuit, refer to Table 4-12 on page 4-6.<br />
Figure 1-22 on page 1-28 shows a schematical view of the cooling water<br />
circuit in the <strong>LTQ</strong> <strong>Orbitrap</strong> <strong>XL</strong>. Cooling water at a temperature of<br />
20 °C enters and leaves the instrument at the bottom of the right side.<br />
See Figure 1-9 on page 1-11. First, the fresh water passes through the<br />
turbopumps in the order TMP 3 → TMP 1 → TMP 2. Then it passes<br />
through the heating element (Peltier element) that keeps constant<br />
(±0.5 °C) the preset temperature of the analyzer. Before it leaves the<br />
instrument, the water passes through the other Peltier element at the<br />
back of the central electrode power supply board.<br />
A flow control sensor is connected to the power distribution board and<br />
allows displaying the current flow rate of the cooling water in the<br />
software.<br />
1-28 <strong>LTQ</strong> <strong>Orbitrap</strong> <strong>XL</strong> <strong>Hardware</strong> <strong>Manual</strong> Thermo Fisher Scientific
Recirculating Chiller<br />
Properties of Cooling Water<br />
Functional Description<br />
Cooling Water Circuit<br />
A recirculating chiller (NESLAB ThermoFlex 900) is delivered with<br />
the instrument, making the <strong>LTQ</strong> <strong>Orbitrap</strong> <strong>XL</strong> independent from any<br />
cooling water supply. A wall receptacle provides the electric power for<br />
the chiller. Two water hoses (black), internal diameter 9 mm, wall<br />
thickness 3 mm, length approx. 3 m (~10 ft) are delivered with the<br />
instrument.<br />
For instruction about performing maintenance for the chiller, see topic<br />
“Maintenance of the Recirculating Chiller” on page 3-7. See also the<br />
manufacturer’s manual for the chiller.<br />
The water temperature is not critical, but should be in the range of 20 to<br />
25 °C (68 to 77 °F). Lower temperatures could lead to a condensation of<br />
atmospheric water vapor. It is recommended to use distilled water rather<br />
than de-ionized water due to lower concentration of bacteria and<br />
residual organic matter.<br />
The water should be free of suspended matter to avoid clogging of the<br />
cooling circuit. In special cases, an in-line filter is recommended to<br />
guarantee consistent water quality.<br />
The cooling water should meet the following requirements:<br />
Hardness:
Functional Description<br />
Printed Circuit Boards<br />
Printed Circuit Boards<br />
The <strong>LTQ</strong> <strong>Orbitrap</strong> <strong>XL</strong> is controlled by a PC running the Xcalibur<br />
software suite. The software controls all aspects of the instrument. The<br />
main software elements are the communication with the linear ion trap,<br />
the control of ion detection, and the control of the <strong>Orbitrap</strong> mass<br />
analyzer.<br />
The following pages contain a short overview of the various electronic<br />
boards of the <strong>LTQ</strong> <strong>Orbitrap</strong> <strong>XL</strong>. For each board, its respective location<br />
and function are given. If applicable, the diagnostic LEDs on the board<br />
are described.<br />
The electronics of the <strong>LTQ</strong> <strong>Orbitrap</strong> <strong>XL</strong> contains complicated and<br />
numerous circuits. Therefore, only qualified and skilled electronics<br />
engineers should perform servicing.<br />
A Thermo Fisher Scientific Service Engineer should be called if servicing<br />
is required. It is further recommended to use Thermo Fisher Scientific<br />
spare parts only. When replacing fuses, only use the correct type. Before<br />
calling a Service Engineer, please try to localize the defect via errors<br />
indicated in the software or diagnostics. A precise description of the<br />
defect will ease the repair and reduce the costs.<br />
Warning Parts of the printed circuit boards are at high voltage.<br />
Opening the electronics cabinet is only allowed for maintenance<br />
purposes by qualified personal. ▲<br />
Note Many of the electronic components can be tested by the<br />
<strong>LTQ</strong> <strong>Orbitrap</strong> <strong>XL</strong> diagnostics, which is accessible from the Tune Plus<br />
window. ▲<br />
1-30 <strong>LTQ</strong> <strong>Orbitrap</strong> <strong>XL</strong> <strong>Hardware</strong> <strong>Manual</strong> Thermo Fisher Scientific
Linear Ion Trap Electronics<br />
Functional Description<br />
Printed Circuit Boards<br />
The linear ion trap is connected to the <strong>LTQ</strong> <strong>Orbitrap</strong> <strong>XL</strong> main power<br />
switch. The linear ion trap has a sheet metal back cover. Figure 1-23<br />
shows the electronic connections at the rear side of the linear trap.<br />
Cold Ion Gauge<br />
Figure 1-23. Electronic connections to linear trap (covers removed)<br />
The linear ion trap electronics has two connections with the<br />
<strong>LTQ</strong> <strong>Orbitrap</strong> <strong>XL</strong> electronics:<br />
• Data communication with the internal computer of the<br />
<strong>LTQ</strong> <strong>Orbitrap</strong> <strong>XL</strong>. Refer to the topic “Electronic Boards at the<br />
Right Side of the Instrument” on page 1-32.<br />
• Signal communication (SPI bus) with supply information for the<br />
instrument control board. Refer to the topic “Instrument Control<br />
Board” on page 1-37.<br />
For further information about the linear ion trap electronics, refer to the<br />
<strong>LTQ</strong> <strong>XL</strong> <strong>Hardware</strong> <strong>Manual</strong>.<br />
Thermo Fisher Scientific <strong>LTQ</strong> <strong>Orbitrap</strong> <strong>XL</strong> <strong>Hardware</strong> <strong>Manual</strong> 1-31
Functional Description<br />
Printed Circuit Boards<br />
Electronic Boards at the Right Side of the Instrument<br />
Figure 1-24 shows the parts of the instrument when the right side panel<br />
is opened. A transparent cover protects the lower part.<br />
Preamplifier<br />
Instrument Control<br />
board housing<br />
Power Supply 1<br />
board<br />
Ground wire for<br />
side panel<br />
Figure 1-24. Electronic boards on the right side of the instrument<br />
Computer<br />
housing<br />
Power<br />
Distribution<br />
board<br />
Ground<br />
wire for<br />
side<br />
panel<br />
The side panel is connected to the instrument frame by two<br />
green/yellow ground wires. See bottom of Figure 1-24. The connectors<br />
on the panel are labeled with green-yellow PE (for Protective Earth)<br />
signs. See photo left. Do not forget to reconnect them before closing the<br />
panel!<br />
1-32 <strong>LTQ</strong> <strong>Orbitrap</strong> <strong>XL</strong> <strong>Hardware</strong> <strong>Manual</strong> Thermo Fisher Scientific
Preamplifier<br />
Functional Description<br />
Printed Circuit Boards<br />
Figure 1-25 shows the preamplifier (P/N 207 8900) 1 . The preamplifier<br />
is located in a housing next to the Cold Ion Gauge.<br />
Figure 1-25. Preamplifier board<br />
Cooling water supply<br />
for Peltier element<br />
Cold Ion Gauge<br />
This board is a broadband preamplifier with differential<br />
high-impedance inputs. It serves as a detection amplifier and impedance<br />
converter for the image current created by the oscillating ions. The<br />
output current is transferred to the data acquisition board. It has an<br />
amplification factor of about 60 dB and covers the frequency range from<br />
15 kHz to 10 MHz.<br />
The diagnostic LEDs on the preamplifier are listed in Table 1-3 on<br />
page 1-34. The positions of the diagnostic LEDs on the board are<br />
indicated by white rectangles in Figure 1-25.<br />
1 Part number of complete unit.<br />
Thermo Fisher Scientific <strong>LTQ</strong> <strong>Orbitrap</strong> <strong>XL</strong> <strong>Hardware</strong> <strong>Manual</strong> 1-33
Functional Description<br />
Printed Circuit Boards<br />
Internal Computer<br />
Table 1-3. Diagnostic LEDs on the Preamplifier board<br />
No. Name Color Description Normal Operating<br />
Condition<br />
LD1 Overload Yellow RF output is overloaded Off<br />
LD2 +5 V Green +5 V input voltage present On<br />
LD3 +15 V Green +15 V input voltage present On<br />
LD4 -5 V Green -5 V input voltage present On<br />
LD5 Input off Yellow RF inputs are shortened<br />
(protection)<br />
On, off during<br />
Detect<br />
Figure 1-26 shows the components of the data acquisition unit<br />
(P/N 206 4132). The unit is mounted in a housing located at the right<br />
side of the instrument.<br />
Power Supply 2 board<br />
Instrument Control board<br />
Figure 1-26. Data Acquisition unit (covers removed)<br />
Location of<br />
Data Acquisition Analog board<br />
Data Acquisition<br />
Digital PCI board<br />
Computer housing<br />
The internal computer (P/N 207 6470) contains a computer mainboard<br />
with an ATX power supply. The data acquisition digital PCI board is<br />
directly plugged into the mainboard. The data acquisition analog board<br />
is mounted on top of the computer mainboard.<br />
1-34 <strong>LTQ</strong> <strong>Orbitrap</strong> <strong>XL</strong> <strong>Hardware</strong> <strong>Manual</strong> Thermo Fisher Scientific
Data Acquisition Digital PCI Board<br />
Functional Description<br />
Printed Circuit Boards<br />
Figure 1-27 shows the data acquisition digital PCI board<br />
(P/N 206 0501). It is an add-on board to the internal computer (See<br />
Figure 1-26 on page 1-34.).<br />
Figure 1-27. Data Acquisition Digital PCI board<br />
This board is used to convert detected ion signals to digital form and to<br />
interface to the computer mainboard. The board has two 16 bit parallel<br />
connections to the DAC and the ADC on the data acquisition analog<br />
board, which is used for controlling and reading-back signals. A<br />
high-speed link port channel is also on the board that is used to<br />
communicate with the electronics in the linear ion trap.<br />
While precision timing is derived from the data acquisition analog<br />
board, events with lower requirements use the timer in the internal<br />
computer. This timer is used to check at regular intervals whether the<br />
foreground process works as expected.<br />
Communication takes place not only between the ion trap and the<br />
internal computer of the <strong>LTQ</strong> <strong>Orbitrap</strong> <strong>XL</strong> system, but also between the<br />
ion trap and the data system computer. For further information about<br />
the data system, refer to the <strong>LTQ</strong> <strong>XL</strong> <strong>Hardware</strong> <strong>Manual</strong>.<br />
The diagnostic LEDs listed in Table 1-4 on page 1-36 show the status of<br />
the board. The position of the LEDs on the board is indicated by a<br />
white rectangle in Figure 1-27.<br />
Thermo Fisher Scientific <strong>LTQ</strong> <strong>Orbitrap</strong> <strong>XL</strong> <strong>Hardware</strong> <strong>Manual</strong> 1-35
Functional Description<br />
Printed Circuit Boards<br />
Data Acquisition Analog Board<br />
Table 1-4. Diagnostic LEDs of the Data Acquisition Digital PCI board<br />
Name Color Description Normal Operating Condition<br />
+5 V Green +5 V voltage present On<br />
+3.3 V Green +3.3 V voltage present On<br />
+2.5 V Green +2.5 V voltage present On<br />
Figure 1-28 shows the data acquisition analog board (P/N 206 4150).<br />
Figure 1-28. Data Acquisition Analog board<br />
This board is an add-on board to the mainboard of the internal<br />
computer. See Figure 1-26 on page 1-34. It is used to convert analog to<br />
digital signals for <strong>Orbitrap</strong> experiments, especially for detecting the ions.<br />
The board contains an ADC for the detection of the transient signal,<br />
with a frequency range from 10 kHz to 10 MHz. Three anti-aliasing<br />
filters for the low, middle and high mass range are automatically selected<br />
by the software.<br />
The data acquisition board provides precision timing to control the<br />
acquisition. Events with lower timing requirements on accuracy are<br />
controlled by the linear ion trap.<br />
The diagnostic LEDs listed in Table 1-5 on page 1-37 show the status of<br />
the voltages applied to the board. The position of the LEDs on the<br />
board is indicated by a white rectangle in Figure 1-28.<br />
1-36 <strong>LTQ</strong> <strong>Orbitrap</strong> <strong>XL</strong> <strong>Hardware</strong> <strong>Manual</strong> Thermo Fisher Scientific
Power Supply 2 Board<br />
Instrument Control Board<br />
Table 1-5. Diagnostic LEDs of the Data Acquisition Analog board<br />
Name Color Description Normal Operating Condition<br />
+5 V Green +5 V voltage present On<br />
-5 V Green -5 V voltage present On<br />
+3.3 V Green +3.3 V voltage present On<br />
Functional Description<br />
Printed Circuit Boards<br />
The power supply 2 board (P/N 206 1440) provides the supply voltages<br />
for the data acquisition analog board. It is mounted to the back inside<br />
the housing of the internal computer. See Figure 1-26 on page 1-34.<br />
The diagnostic LEDs listed in Table 1-6 show the status of the voltages<br />
applied to the board.<br />
Table 1-6. Diagnostic LEDs of the Power Supply 2 board<br />
Name Color Description Normal Operating Condition<br />
+5.1 V Green +5.1 V voltage present On<br />
-5.1 V Green -5.1 V voltage present On<br />
+3.3 V Green +3.3 V voltage present On<br />
Figure 1-29 shows the instrument control board (P/N 205 4221). The<br />
instrument control board is located in a housing next to the internal<br />
computer. It is connected to the <strong>LTQ</strong> <strong>Orbitrap</strong> <strong>XL</strong> main power.<br />
The instrument control board is used to interface the <strong>LTQ</strong> <strong>XL</strong> control<br />
electronics to the <strong>Orbitrap</strong> control electronics. Three signal lines are<br />
passed from the <strong>LTQ</strong> <strong>XL</strong>: a digital, parallel (DAC) bus, a serial SPI bus,<br />
and a Link Port Signal line. The instrument control board contains a<br />
micro controller, digital and analog converters, and serial port<br />
connectors.<br />
On the instrument control board, analog signals from vacuum gauges<br />
are converted to digital signals and passed to the data system as well as to<br />
the power distribution board. (See page 1-39.) Turbopumps (Refer to<br />
the topic “Vacuum System” on page 1-19.) are attached to a serial port<br />
connector and this is connected via the signal lines to the linear ion trap.<br />
Thermo Fisher Scientific <strong>LTQ</strong> <strong>Orbitrap</strong> <strong>XL</strong> <strong>Hardware</strong> <strong>Manual</strong> 1-37
Functional Description<br />
Printed Circuit Boards<br />
Figure 1-29. Instrument Control board<br />
Diagnostic LEDs<br />
Status LEDs<br />
The diagnostic LEDs listed in Table 1-7 show the status of applied<br />
voltages to the board. The position of the diagnostic LEDs on the board<br />
is indicated by a white rectangle in Figure 1-29.<br />
Table 1-7. Diagnostic LEDs of the Instrument Control board<br />
No. Name Color Description Normal<br />
Operating Condition<br />
LD1 2.5 V Green 2.55 V Input voltage present On<br />
LD2 3.3 V Green 3.3 V Input voltage present On<br />
LD3 5 V Green 5 V Input voltage present On<br />
LD4 -15 V Green -15 V Input voltage present On<br />
LD5 +15 V Green +15 V Input voltage present On<br />
Additionally, the board has four green LEDs that are directly connected<br />
to the micro controller. They indicate the state of the micro controller<br />
and possible error bits and can be used for software debugging. See<br />
Table 1-8 on page 1-39. The position of the status LEDs on the board is<br />
indicated by a white oval in Figure 1-29 on page 1-38.<br />
1-38 <strong>LTQ</strong> <strong>Orbitrap</strong> <strong>XL</strong> <strong>Hardware</strong> <strong>Manual</strong> Thermo Fisher Scientific
Power Distribution Board<br />
Figure 1-30. Power Distribution board<br />
Table 1-8. Software status LEDs of the Instrument Control board<br />
No. Description Normal Operating Condition<br />
6.1 Micro controller is working properly Permanent flashing of LED<br />
6.2 CAN bus connection to power distribution<br />
board enabled<br />
6.3 Connection to internal computer and <strong>LTQ</strong> <strong>XL</strong><br />
SPI bus enabled<br />
6.4 <strong>Orbitrap</strong> SPI bus enabled On<br />
Flashing on error<br />
On<br />
On<br />
Functional Description<br />
Printed Circuit Boards<br />
Figure 1-30 on page 1-39 shows the power distribution board<br />
(P/N 206 2130) 1 . It is located at the bottom of the right side of the<br />
instrument.<br />
1 Part number of complete unit.<br />
Thermo Fisher Scientific <strong>LTQ</strong> <strong>Orbitrap</strong> <strong>XL</strong> <strong>Hardware</strong> <strong>Manual</strong> 1-39
Functional Description<br />
Printed Circuit Boards<br />
The power distribution board controls the vacuum system and the<br />
system power supplies, including the linear ion trap. Depending on the<br />
quality of the vacuum and the status of the turbo molecular pumps, it<br />
switches the vacuum gauges, the pumps, and the 230 V relays. It<br />
controls external relays with 24 V dc connections. In case of a vacuum<br />
failure, it initiates an automatic power down of the instrument. The<br />
board also switches the valve that controls the flow of the HCD collision<br />
gas.<br />
The power distribution board indicates all system states and error<br />
messages by status LEDs (see Table 1-9 on page 1-41) in the middle of<br />
the left side of the board. A green LED indicates that the status is OK.<br />
An orange LED indicates a status that differs from normal. The position<br />
of the LEDs on the board is indicated by a white oval in Figure 1-30 on<br />
page 1-39.<br />
The system status LEDs on the front side of the instrument (See<br />
Figure 1-4 on page 1-6.) are controlled by the power distribution board.<br />
The information partially comes from external boards (for example, the<br />
Communication LED is controlled by the instrument control board).<br />
(Refer to topic “Instrument Control Board” on page 1-37.)<br />
Diagnostic LEDs show the status of voltages applied from the board to<br />
other devices. The positions of the diagnostic LEDs on the board are<br />
indicated by white rectangles in Figure 1-30 on page 1-39.<br />
1-40 <strong>LTQ</strong> <strong>Orbitrap</strong> <strong>XL</strong> <strong>Hardware</strong> <strong>Manual</strong> Thermo Fisher Scientific
Table 1-9. Status LEDs of the Power Distribution board<br />
LED green LED orange Information given by orange LED<br />
Vacuum High vacuum failure High vacuum pressure > 10 -8 mbar<br />
Comm. No communication with<br />
instrument control board<br />
CAN bus problem or<br />
instrument control board not<br />
working<br />
System System is not ready FT Electronics switch off or<br />
Vacuum Pumps switch off<br />
Scan Instrument is not scanning<br />
Electr. On Service mode FT Electronics switch off<br />
Vac. Units Ok Vacuum measurement<br />
failure<br />
Pirani <strong>Orbitrap</strong> Ok No function, at present<br />
Vacuum gauge defective<br />
Pirani LT Ok Pirani <strong>LTQ</strong> <strong>XL</strong> failure Control signal < 0.5 V<br />
Ion Gauge ON Penning <strong>LTQ</strong> <strong>Orbitrap</strong> <strong>XL</strong> off Forevacuum > 10 -2 mbar<br />
Ion Gauge OK Penning <strong>LTQ</strong> <strong>Orbitrap</strong> <strong>XL</strong><br />
failure<br />
Control signal < 0.5 V<br />
LT Vacuum Work <strong>LTQ</strong> <strong>XL</strong> vacuum failure Vacuum forepump <strong>LTQ</strong> <strong>XL</strong><br />
>10 -1 mbar<br />
Vac. 10 -3 mbar<br />
Vac. 10 -5 mbar<br />
Pumps OK Pumps Off Pump down; leakage<br />
Rough P. 1 ON Forepump #1 failure Forepump defective<br />
Turbo P. 1 ON Turbopump #1 failure Turbopump defective/error *<br />
Rotation 1 OK Turbopump #1 failure 80% rotation speed of turbopump<br />
not reached<br />
Turbo P. 2 ON Turbopump #2 failure Turbopump defective/error *<br />
Rotation 2 OK Turbopump #2 failure 80% rotation speed of turbopump<br />
not reached<br />
Heater Off Heater enabled Heater enabled<br />
LAN Conn. Ok LAN connection failure LAN interrupted (Option)<br />
EI ON No function, at present<br />
A System reset System reset has occured<br />
B Micro controller idle<br />
* An error of turbopump 3 is indicated by an LED directly located on the pump controller.<br />
Functional Description<br />
Printed Circuit Boards<br />
Thermo Fisher Scientific <strong>LTQ</strong> <strong>Orbitrap</strong> <strong>XL</strong> <strong>Hardware</strong> <strong>Manual</strong> 1-41
Functional Description<br />
Printed Circuit Boards<br />
Depending on user actions, the power distribution is switched to various<br />
working modes by the hardware. See Table 1-10.<br />
Table 1-10. Working modes of the Power Distribution board<br />
Action Consequences<br />
a. Main switch off Complete system including linear ion trap and multiple<br />
socket outlets (data system, for example) are without power<br />
b. Vacuum Pumps<br />
switch off<br />
c. FT Electronics<br />
switch off<br />
Everything is switched off<br />
All components are switched off with exception of the<br />
following ones:<br />
• Heater control<br />
• Multiple socket outlets<br />
• Power distribution board<br />
• Pumps<br />
• Vacuum control<br />
• <strong>LTQ</strong> <strong>XL</strong> (has a separate Service switch)<br />
Table 1-11 shows the possible operating states of the power distribution.<br />
Table 1-11. Operating states of the Power Distribution board<br />
Action Consequences<br />
1. Main switch on, Vacuum Pumps switch<br />
off<br />
2. Vacuum Pumps switch on and FT<br />
Electronics switch on<br />
3. Check linear ion trap and<br />
<strong>LTQ</strong> <strong>Orbitrap</strong> <strong>XL</strong> forevacuum pump:<br />
10-0 mbar after 30 s.<br />
4. After the system has started, the Pirani<br />
gauge returns a vacuum < 10 -2 mbar<br />
and both turbopumps reach 80%<br />
rotation speed<br />
5. Vacuum and 80% rotation speed of<br />
turbopumps not reached after preset<br />
time (< 8 min, otherwise the pumps<br />
automatically switch off).<br />
6. One or more vacuum gauges defective<br />
(control signal < 0.5 V).<br />
Everything is switched off<br />
System starts up: pumps and<br />
electronics switched on<br />
If not ok: switch off system and light<br />
error LED * ; power distribution remains<br />
switched on<br />
Switch on Penning gauge<br />
Switch off system (including linear ion<br />
trap) and light error LED * ; power<br />
distribution remains switched on<br />
Light error LED only, otherwise ignore<br />
1-42 <strong>LTQ</strong> <strong>Orbitrap</strong> <strong>XL</strong> <strong>Hardware</strong> <strong>Manual</strong> Thermo Fisher Scientific
Power Supply 1 Board<br />
7. After the operating status is reached,<br />
the pressure at one gauge exceeds the<br />
security threshold for more than the<br />
preset time period:<br />
• Pirani gauge <strong>LTQ</strong> <strong>Orbitrap</strong> <strong>XL</strong><br />
>10-1 mbar<br />
• Penning gauge <strong>LTQ</strong> <strong>Orbitrap</strong> <strong>XL</strong><br />
>10-3 mbar<br />
• Pirani gauge LT forepump >10-1 mbar<br />
Functional Description<br />
Printed Circuit Boards<br />
Table 1-11. Operating states of the Power Distribution board, continued<br />
Action Consequences<br />
8. Rotation speed of a turbopump falls<br />
below 80%<br />
System is shut down with exception of<br />
power distribution (light error LED).<br />
Rebooting of the system by switching<br />
off/on of the main switch.<br />
Shut down system (see 7.);<br />
light LED * of corresponding pump.<br />
9. Service switch linear ion trap off Linear ion trap electronics switched off,<br />
pumps keep on running;<br />
<strong>LTQ</strong> <strong>Orbitrap</strong> <strong>XL</strong> without data link, keeps<br />
on running<br />
10. FT Electronics switch <strong>LTQ</strong> <strong>Orbitrap</strong> <strong>XL</strong><br />
off<br />
11. Failure of linear ion trap or<br />
<strong>LTQ</strong> <strong>Orbitrap</strong> <strong>XL</strong> (e.g. fuse is opened).<br />
<strong>LTQ</strong> <strong>Orbitrap</strong> <strong>XL</strong> electronics switched<br />
off, pumps keep on running;<br />
<strong>LTQ</strong> <strong>Orbitrap</strong> <strong>XL</strong> without data link, keeps<br />
on running<br />
If the vacuum in one part deteriorates,<br />
the complete system is shut down.<br />
12. Mains failure System powers up after the electricity<br />
is available again. All devices reach the<br />
defined state. Linear ion trap and<br />
internal computer must reboot.<br />
* After the shutdown, the LED flashes that represents the reason for the shutdown.<br />
Figure 1-31 on page 1-44 shows the power supply 1 board<br />
(P/N 205 5810). This board is located next to the power distribution<br />
board. It provides the power for the ion optic supply board (Refer to<br />
topic “Ion Optic Supply Board” on page 1-46.) and the instrument<br />
control board. (Refer to topic “Instrument Control Board” on<br />
page 1-37.)<br />
Thermo Fisher Scientific <strong>LTQ</strong> <strong>Orbitrap</strong> <strong>XL</strong> <strong>Hardware</strong> <strong>Manual</strong> 1-43
Functional Description<br />
Printed Circuit Boards<br />
Figure 1-31. Power Supply 1 board<br />
Warning Parts of the power supply 1 board are at high voltage. ▲<br />
The diagnostic LEDs listed in Table 1-12 show the status of the voltages<br />
applied to the board. The position of the LEDs on the board is<br />
indicated by the white rectangles in Figure 1-31.<br />
Table 1-12. Diagnostic LEDs of the Power Supply 1 board<br />
Name Color Description Normal Operating<br />
Condition<br />
+285 V Green +285 V Output voltage present On<br />
-285 V Green -285 V Output voltage present On<br />
Over Current +285 V Red LED lit dark red: Iout > 80 mA<br />
LED lit bright red: output is<br />
short-circuited<br />
Over Current -285 V Red LED lit dark red: Iout > 80 mA<br />
LED lit bright red: output is<br />
short-circuited<br />
+18 V Green +18 V Output voltage present On<br />
-18 V Green -18 V Output voltage present On<br />
+8.5 V Green +8.5 V Output voltage present On<br />
1-44 <strong>LTQ</strong> <strong>Orbitrap</strong> <strong>XL</strong> <strong>Hardware</strong> <strong>Manual</strong> Thermo Fisher Scientific<br />
Off<br />
Off
Electronic Boards on the Left Side of the Instrument<br />
Temperature<br />
Controller board<br />
Central Electrode<br />
Power Supply board<br />
Figure 1-32. Electronic boards on the left side of the instrument<br />
Functional Description<br />
Printed Circuit Boards<br />
Figure 1-32 shows the left side of the instrument with the panel opened.<br />
This side of the instrument contains mostly boards that are part of the<br />
<strong>Orbitrap</strong> control.<br />
Ion Optic Supply board housing<br />
Central Electrode<br />
Pulser board<br />
CLT RF Main board<br />
RF Off & Feedback<br />
board<br />
High Voltage Power<br />
Supply board<br />
The main components on this side are described starting from the top.<br />
Thermo Fisher Scientific <strong>LTQ</strong> <strong>Orbitrap</strong> <strong>XL</strong> <strong>Hardware</strong> <strong>Manual</strong> 1-45
Functional Description<br />
Printed Circuit Boards<br />
Ion Optic Supply Board<br />
Figure 1-33 shows the ion optic supply board (P/N 209 9810) 1 . The<br />
board is located in a housing on top of the left instrument side of the<br />
instrument. This board supplies the voltages and the radio frequency for<br />
the ion guides and interoctapole lenses of the <strong>LTQ</strong> <strong>Orbitrap</strong> <strong>XL</strong>. It has<br />
an RF detector for the RF output control. The board also provides the<br />
trap voltage, gate voltage, and reflector dc voltages as well as the<br />
RF voltages to the octapole 1 of the <strong>Orbitrap</strong>. See topic “<strong>Orbitrap</strong><br />
Analyzer” on page 1-13 for further information. Furthermore, the board<br />
provides the voltages for the HCD collision cell. See page 1-18.<br />
Figure 1-33. Ion Optic Supply board<br />
The diagnostic LEDs listed in Table 1-13 on page 1-47 show the status<br />
of applied voltages to the board. The position of the LEDs on the board<br />
is indicated by white rectangles in Figure 1-33.<br />
Warning Parts of the board are at high voltage. ▲<br />
1 Part number of complete unit.<br />
1-46 <strong>LTQ</strong> <strong>Orbitrap</strong> <strong>XL</strong> <strong>Hardware</strong> <strong>Manual</strong> Thermo Fisher Scientific
Central Electrode Pulser Board<br />
Table 1-13. Diagnostic LEDs of the Ion Optic Supply board<br />
No. Name Color Description Normal Operating<br />
Condition<br />
LD1 +275 V Green +275 V Input voltage<br />
present<br />
LD2 -275 V Green -275 V Input voltage<br />
present<br />
LD3 +29 V Green +29 V Input voltage present On<br />
LD5 +15 V Green +15 V Input voltage present On<br />
LD6 -15 V Green -15 V Input voltage present On<br />
LD7 RF1_ON Blue RF1 generator switched on depending on application;<br />
LED flashes during scanning<br />
LD8 RF2_ON Blue RF2 generator switched on depending on application;<br />
LED flashes during scanning<br />
On<br />
On<br />
Functional Description<br />
Printed Circuit Boards<br />
The central electrode pulser board (P/N 207 9640) 1 is located in a<br />
housing that is mounted to the flange of the UHV chamber.<br />
Figure 1-34. Central Electrode Pulser board<br />
1 Part number of complete unit.<br />
Thermo Fisher Scientific <strong>LTQ</strong> <strong>Orbitrap</strong> <strong>XL</strong> <strong>Hardware</strong> <strong>Manual</strong> 1-47
Functional Description<br />
Printed Circuit Boards<br />
Temperature Controller Board<br />
The board switches the injection and measurement voltages for the<br />
central electrode and the detection electrodes of the <strong>Orbitrap</strong>.<br />
Resistor-capacitor circuits on the board convert the switching pulse into<br />
a smooth transition between the voltages.<br />
The diagnostic LEDs listed in Table 1-14 show the status of the voltages<br />
applied to the board as well as some operating states. The position of the<br />
LEDs on the board is indicated by the white rectangles in Figure 1-34<br />
on page 1-47.<br />
Table 1-14. Diagnostic LEDs of the Central Electrode Pulser board<br />
No. Name Color Description Normal Operating<br />
Condition<br />
LD1 TRIG Green Trigger signal indicator Flashing when<br />
scanning<br />
LD2 PS Green 24V Power Supply is OK On<br />
The temperature controller board (P/N 207 8930) is located on the top<br />
left side of the instrument, next to the CLT RF main board. See<br />
Figure 1-32 on page 1-45. The temperature controller board keeps the<br />
temperature of the analyzer chamber to a preset value. A Peltier element<br />
that can be used for heating as well as for cooling is used as an actuator.<br />
Activation is done via the serial SPI (Serial Peripheral Interface) bus.<br />
1-48 <strong>LTQ</strong> <strong>Orbitrap</strong> <strong>XL</strong> <strong>Hardware</strong> <strong>Manual</strong> Thermo Fisher Scientific
Figure 1-35. Temperature Controller board<br />
Functional Description<br />
Printed Circuit Boards<br />
The diagnostic LEDs listed in Table 1-15 on page 1-50 show the status<br />
of the voltages applied to the board as well as some operating states. The<br />
positions of the LEDs on the board are indicated by the white rectangles<br />
in Figure 1-35.<br />
Thermo Fisher Scientific <strong>LTQ</strong> <strong>Orbitrap</strong> <strong>XL</strong> <strong>Hardware</strong> <strong>Manual</strong> 1-49
Functional Description<br />
Printed Circuit Boards<br />
CLT RF Unit<br />
Table 1-15. Diagnostic LEDs of the Temperature Controller board<br />
No. Name Color Description Normal Operating<br />
Condition<br />
LD1 +15 V Green +15 V Input voltage present On<br />
LD2 -15 V Green -15 V Input voltage present On<br />
LD3 TEC >60C Yellow Temperature of cold side Peltier<br />
element above 60 ºC<br />
LD4 Unit >60C Yellow Temperature of UNIT heat sink<br />
above 60 ºC<br />
LD5 Reg Off Yellow Control switched off Off<br />
LD6 No Term Yellow SPI bus termination board<br />
missing<br />
LD7 SDT enable Green Interface has been addressed<br />
and sends/receives data<br />
Off<br />
Off<br />
Off<br />
Flashing on SPI bus<br />
data transfer<br />
LD8 SEL Green Board has been addressed Flashing on SPI bus<br />
data transfer<br />
LD9 Heating Yellow Peltier element is heating Depending on<br />
system state<br />
LD10 Cooling Yellow Peltier element is cooling Depending on<br />
system state<br />
LD11 UR>0 Yellow Summation voltage controller<br />
>0 V<br />
LD12 UR
Figure 1-36. CLT RF unit (cover removed)<br />
RF off & feedback board<br />
Functional Description<br />
Printed Circuit Boards<br />
The diagnostic LEDs listed in Table 1-16 show the status of the voltages<br />
applied to the board as well as some operating states. The position of the<br />
LEDs on the board is indicated by the white rectangles in Figure 1-36.<br />
Table 1-16. Diagnostic LEDs of the CLT RF Main board<br />
No. Name Color Description Normal Operating<br />
Condition<br />
LD1 NO TERM Yellow SPI bus termination board<br />
missing<br />
LD2 SEND Yellow Interface has been addressed and<br />
sends/receives data<br />
Thermo Fisher Scientific <strong>LTQ</strong> <strong>Orbitrap</strong> <strong>XL</strong> <strong>Hardware</strong> <strong>Manual</strong> 1-51<br />
Off<br />
Flashing on SPI-bus<br />
data transfer<br />
LD3 SEL Green Board has been addressed Flashing on SPI-bus<br />
data transfer<br />
LD4 RF ON Green RF voltage on On<br />
LD5 NO LOCK Yellow PLL has been not locked 50% intensity<br />
LD6 OVL Yellow RF Amplifier overload Off<br />
LD7 OVHEAT Red Heatsink temperature > 73 °C Off
Functional Description<br />
Printed Circuit Boards<br />
Central Electrode Power Supply Board<br />
Figure 1-37. Central Electrode Power Supply board<br />
The central electrode power supply board (P/N 207 9611) 1 is mounted<br />
in a housing on the bottom left side of the instrument. See Figure 1-37.<br />
The board supplies four dc voltages to the <strong>Orbitrap</strong>:<br />
• Two central electrode (CE) voltages: CE HIGH and CE LOW<br />
• Two deflector electrode (DE) voltages: DE HIGH and DE LOW.<br />
For positive ions, the CE voltages are negative and the DE voltages are<br />
positive. The maximum CE voltage is 3 kV and the maximum<br />
DE voltage is 1 kV. The board communicates via the SPI bus.<br />
In addition to a ventilator on the bottom right side, a water-cooled<br />
Peltier element on the rear side of the board serves as means of heat<br />
dissipation.<br />
1 Part number of complete unit.<br />
1-52 <strong>LTQ</strong> <strong>Orbitrap</strong> <strong>XL</strong> <strong>Hardware</strong> <strong>Manual</strong> Thermo Fisher Scientific
High Voltage Power Supply Board<br />
Functional Description<br />
Printed Circuit Boards<br />
The diagnostic LEDs listed in Table 1-17 show the status of the voltages<br />
applied to the board as well as some operating states. The position of the<br />
LEDs on the board is indicated by the red rectangles in Figure 1-37.<br />
Table 1-17. Diagnostic LEDs of the Central Electrode Power Supply board<br />
No. Name Color Description Normal Operating<br />
Condition<br />
LD1 OVL DE HI- Yellow Negative side of Deflector High<br />
Supply has been overloaded<br />
LD2 OVL DE HI+ Yellow Positive side of Deflector High<br />
Supply has been overloaded<br />
LD3 No Term Red SPI bus termination board<br />
missing<br />
LD4 Send Yellow Interface has been addressed<br />
and sends/receives data<br />
Off when HV is<br />
switched on<br />
Off when HV is<br />
switched on<br />
Thermo Fisher Scientific <strong>LTQ</strong> <strong>Orbitrap</strong> <strong>XL</strong> <strong>Hardware</strong> <strong>Manual</strong> 1-53<br />
Off<br />
Flashing on SPI bus<br />
data transfer<br />
LD5 Sel Green Board has been addressed Flashing on SPI bus<br />
data transfer<br />
LD6 Polarity Blue Positive/negative ion mode Off (positive mode)<br />
LD7 OVL CE LO+ Yellow Positive side of Central<br />
Electrode Low Supply has been<br />
overloaded<br />
LD8 OVL CE LO- Yellow Negative side of Central<br />
Electrode Low Supply has been<br />
overloaded<br />
LD9 OVL CE HI+ Yellow Positive side of Central<br />
Electrode High Supply has been<br />
overloaded.<br />
LD10 OVL CE HI- Yellow Negative side of Central<br />
Electrode High Supply has been<br />
overloaded<br />
LD11 OVL DE LO+ Yellow Positive side of Deflector Low<br />
Supply has been overloaded.<br />
LD12 OVL DE LO- Yellow Negative side of Deflector Low<br />
Supply has been overloaded.<br />
Off when HV is<br />
switched on<br />
Off when HV is<br />
switched on<br />
Off when HV is<br />
switched on<br />
Off when HV is<br />
switched on<br />
Off when HV is<br />
switched on<br />
Off when HV is<br />
switched on<br />
LD13 HV ON Green High voltage switched on On when HV is<br />
switched on<br />
The high voltage power supply board (P/N 207 7991) 1 is mounted in a<br />
housing on the bottom left side of the instrument. See Figure 1-32 on<br />
page 1-45. This board provides five dc voltages for the ion optics of the<br />
Product Short Name. Two voltages supply the lenses of the instrument.<br />
Three voltages are applied to the RF CLT main board to be used as<br />
1 Part number of complete unit.
Functional Description<br />
Printed Circuit Boards<br />
Figure 1-38. High Voltage Power Supply board (cover removed)<br />
focusing potentials for the curved linear trap. See topic “<strong>Orbitrap</strong><br />
Analyzer” on page 1-13 for further information. The board<br />
communicates via the SPI bus.<br />
Warning The high voltage power supply board creates voltages up to<br />
3.5 kV! ▲<br />
The diagnostic LEDs listed in Table 1-18 on page 1-55 show the<br />
operating states of the board. The position of the LEDs on the board is<br />
indicated by the white rectangles in Figure 1-38.<br />
1-54 <strong>LTQ</strong> <strong>Orbitrap</strong> <strong>XL</strong> <strong>Hardware</strong> <strong>Manual</strong> Thermo Fisher Scientific
SPI Bus Termination Board<br />
Table 1-18. Diagnostic LEDs of the High Voltage Power Supply board<br />
No. Name Color Description Normal Operating<br />
Condition<br />
LD1 NO TERM Red SPI bus termination board<br />
missing<br />
LD2 SEND Yellow Interface has been addressed<br />
and sends/receives data<br />
Off<br />
Flashing on SPI bus<br />
data transfer<br />
LD3 SEL Green Board has been addressed Flashing on SPI bus<br />
data transfer<br />
LD4 HV ON Green High voltage is switched on On<br />
Functional Description<br />
Printed Circuit Boards<br />
LD5 POLARITY Green Positive/negative ion mode Off (positive mode)<br />
Various boards communicate via the SPI bus, a serial RS485-based bus<br />
system. The SPI bus termination board reduces unwanted signal<br />
reflections. The boards indicate a missing termination (after<br />
maintenance, for example) by LEDs.<br />
The SPI bus termination board (P/N 208 1480) is located at the bottom<br />
left side of the instrument, below the high voltage power supply board.<br />
See Figure 1-39.<br />
SPI bus termination board<br />
Figure 1-39. High Voltage Power Supply board with SPI Bus Termination<br />
board<br />
Thermo Fisher Scientific <strong>LTQ</strong> <strong>Orbitrap</strong> <strong>XL</strong> <strong>Hardware</strong> <strong>Manual</strong> 1-55
Chapter 2 Basic System Operations<br />
Many maintenance procedures for the <strong>LTQ</strong> <strong>Orbitrap</strong> <strong>XL</strong> system require<br />
that the MS detector be shut down. In addition, the <strong>LTQ</strong> <strong>Orbitrap</strong> <strong>XL</strong><br />
system can be placed in Standby condition if the system is not to be used<br />
for 12 h or more.<br />
The following topics are discussed in this chapter:<br />
• “Shutting Down the System in an Emergency” on page 2-2<br />
• “Placing the System in Standby Condition” on page 2-4<br />
• “Shutting Down the System” on page 2-5<br />
• “Starting Up the System after a Shutdown” on page 2-7<br />
• “Resetting the System” on page 2-10<br />
• “Resetting the Tune and Calibration Parameters to their Default<br />
Values” on page 2-11<br />
Thermo Fisher Scientific <strong>LTQ</strong> <strong>Orbitrap</strong> <strong>XL</strong> <strong>Hardware</strong> <strong>Manual</strong> 2-1
Basic System Operations<br />
Shutting Down the System in an Emergency<br />
Shutting Down the System in an Emergency<br />
If you need to turn off the MS detector in an emergency, place the main<br />
power switch (located on the power panel at the right side of the<br />
<strong>LTQ</strong> <strong>Orbitrap</strong> <strong>XL</strong>) in the Off (O) position. This turns off all power to<br />
the instrument, including the linear ion trap, multiple socket outlets for<br />
the data system, and the vacuum pumps. The main power switch must<br />
be turned 90° anti-clockwise to switch off the instrument. See<br />
Figure 2-1.<br />
Figure 2-1. Main power switch in Off position<br />
Behavior of the System in Case of a Main Failure<br />
Off<br />
2-2 <strong>LTQ</strong> <strong>Orbitrap</strong> <strong>XL</strong> <strong>Hardware</strong> <strong>Manual</strong> Thermo Fisher Scientific<br />
On<br />
The instrument is automatically vented by the vent valve of the linear<br />
ion trap. The vent valve vents the system 30 s after power is switched<br />
off.<br />
Although removing power abruptly will not harm any component<br />
within the system, this is not the recommended shutdown procedure to<br />
follow. Refer to topic “Shutting Down the System” on page 2-5 for the<br />
recommended procedure.<br />
Note To separately turn off the recirculating chiller or computer in an<br />
emergency, use the On/Off switches on the chiller and computer,<br />
respectively. ▲<br />
A main power failure has the same consequence as switching off via the<br />
main power switch. If the power is available again, the system is started<br />
up automatically i.e. the pumps are switched on and the vacuum is<br />
created. If the system has been vented during the mains failure, it is<br />
necessary to bake out the system to obtain the operating vacuum. Refer<br />
to the topic “Baking Out the System” on page 3-4.
Basic System Operations<br />
Shutting Down the System in an Emergency<br />
It is not possible to check whether the system was vented. The log file of<br />
the data system indicates a reboot of the system. In case of frequent but<br />
short power failures we recommend installing an uninterruptible power<br />
supply (UPS). If main power failures occur frequently while the system<br />
is not attended (e.g. in the night), we recommend installing a power fail<br />
detector.<br />
Note The intentional venting of the system is performed with the vent<br />
valve of the linear ion trap. ▲<br />
Thermo Fisher Scientific <strong>LTQ</strong> <strong>Orbitrap</strong> <strong>XL</strong> <strong>Hardware</strong> <strong>Manual</strong> 2-3
Basic System Operations<br />
Placing the System in Standby Condition<br />
Placing the System in Standby Condition<br />
The <strong>LTQ</strong> <strong>Orbitrap</strong> <strong>XL</strong> system should not be shut down completely if<br />
you are not going to use it for a short period of time, such as overnight<br />
or over the weekend. When you are not going to operate the system for<br />
12 hours or more, you can leave the system in Standby condition.<br />
Use the following procedure to place the <strong>LTQ</strong> <strong>Orbitrap</strong> <strong>XL</strong> system in<br />
the Standby condition:<br />
1. Wait until data acquisition, if any, is complete.<br />
2. Turn off the flow of sample solution from the LC (or other sample<br />
introduction device).<br />
Note For instructions on how to operate the LC from the front panel,<br />
refer to the manual that came with the LC. ▲<br />
3. From the Tune Plus window, choose Control > Standby (or click on<br />
the On/Standby button to toggle it to Standby) to put the<br />
instrument in Standby condition. The consequences of this user<br />
action are described in the <strong>LTQ</strong> <strong>XL</strong> <strong>Hardware</strong> <strong>Manual</strong>. The System<br />
LED on the front panel of the <strong>LTQ</strong> <strong>XL</strong> is illuminated yellow when<br />
the system is in Standby condition.<br />
4. Leave the LC power On.<br />
5. Leave the autosampler power On.<br />
6. Leave the data system power On.<br />
7. Leave the <strong>LTQ</strong> <strong>Orbitrap</strong> <strong>XL</strong> main power switch in the On position.<br />
2-4 <strong>LTQ</strong> <strong>Orbitrap</strong> <strong>XL</strong> <strong>Hardware</strong> <strong>Manual</strong> Thermo Fisher Scientific
Shutting Down the System<br />
Basic System Operations<br />
Shutting Down the System<br />
The <strong>LTQ</strong> <strong>Orbitrap</strong> <strong>XL</strong> system does not need to be shut down<br />
completely if you are not going to use it for a short period of time, such<br />
as overnight or over a weekend. Refer to the topic “Placing the System in<br />
Standby Condition” on page 2-4. This section describes how to shut<br />
down the system for a maintenance or service procedure.<br />
Use the following procedure to shut down the <strong>LTQ</strong> <strong>Orbitrap</strong> <strong>XL</strong><br />
system:<br />
1. Wait until data acquisition, if any, is complete.<br />
2. Turn off the flow of sample solution from the LC (or other sample<br />
introduction device).<br />
Note For instructions on how to operate the LC from the front panel,<br />
refer to the manual that came with the LC. ▲<br />
3. From the Tune Plus window, choose Control > Off to put the<br />
instrument in Off condition. When you choose Control > Off, all<br />
high voltages are shut off, as are the sheath and auxiliary gas.<br />
4. Put the FT Electronics switch to the OFF position. See Figure 1-7<br />
on page 1-9.<br />
5. Put the Vacuum Pumps switch to the OFF position. See Figure 1-7.<br />
When you place the switch in the OFF position, the following<br />
occurs:<br />
a. All power to the instrument, including the turbomolecular<br />
pumps and the rotary-vane pumps, is turned off.<br />
b. After 30 s, power to the vent valve solenoid of the ion trap is<br />
shut off. The vent valve opens and the vacuum manifold is<br />
vented with nitrogen to atmospheric pressure through a filter.<br />
You can hear a hissing sound as the gas passes through the filter.<br />
6. Leave the main power switch of the <strong>LTQ</strong> <strong>Orbitrap</strong> <strong>XL</strong> in the On<br />
position.<br />
7. During service or maintenance operations that require opening the<br />
vacuum system of the <strong>LTQ</strong> <strong>XL</strong> or <strong>LTQ</strong> <strong>Orbitrap</strong> <strong>XL</strong>, always put the<br />
main switch (main circuit breaker) to the OFF position. You can<br />
Thermo Fisher Scientific <strong>LTQ</strong> <strong>Orbitrap</strong> <strong>XL</strong> <strong>Hardware</strong> <strong>Manual</strong> 2-5
Basic System Operations<br />
Shutting Down the System<br />
secure the main switch with a padlock or tie-wrap to prevent<br />
unintended re-powering.<br />
Warning Allow heated components to cool before you service them<br />
(the ion transfer tube at about 300 °C, for example). ▲<br />
Note If you are planning to perform routine or preventive system<br />
maintenance on the <strong>LTQ</strong> <strong>Orbitrap</strong> <strong>XL</strong> only, you do not need to turn off<br />
the recirculating chiller, LC, autosampler, or data system. In this case,<br />
the shutdown procedure is completed. However, if you do not plan to<br />
operate your system for an extended period of time, you might want to<br />
turn off the recirculating chiller, LC, autosampler, and data system. ▲<br />
2-6 <strong>LTQ</strong> <strong>Orbitrap</strong> <strong>XL</strong> <strong>Hardware</strong> <strong>Manual</strong> Thermo Fisher Scientific
Starting Up the System after a Shutdown<br />
Starting Up the Instrument<br />
Basic System Operations<br />
Starting Up the System after a Shutdown<br />
To start up the <strong>LTQ</strong> <strong>Orbitrap</strong> <strong>XL</strong> after it has been shut down, you need<br />
to do the following:<br />
1. Start up the instrument<br />
2. Set up conditions for operation<br />
Note The recirculating chiller and data system must be running before<br />
you start up the instrument. The instrument will not operate until<br />
software is received from the data system. ▲<br />
Use the following procedure to start up the <strong>LTQ</strong> <strong>Orbitrap</strong> <strong>XL</strong>:<br />
1. Start up the (optional) LC and autosampler as is described in the<br />
manual that came with the LC and autosampler.<br />
2. Start up the data system and the chiller.<br />
3. Turn on the flows of helium, nitrogen, and argon at the tanks, if<br />
they are off.<br />
4. Make sure that the main power switch of the <strong>LTQ</strong> <strong>XL</strong> is in the On<br />
position and the electronics service switch of the <strong>LTQ</strong> <strong>XL</strong> is in the<br />
Operating position.<br />
5. Place the main power switch at the right side of the<br />
<strong>LTQ</strong> <strong>Orbitrap</strong> <strong>XL</strong> in the On position.<br />
6. Put the Vacuum Pumps switch to the ON position. See Figure 1-7<br />
on page 1-9. The rotary-vane pumps and the turbomolecular pumps<br />
are started.<br />
Note Pumping the system after a complete shut down takes hours and<br />
requires overnight baking of the system. ▲<br />
Thermo Fisher Scientific <strong>LTQ</strong> <strong>Orbitrap</strong> <strong>XL</strong> <strong>Hardware</strong> <strong>Manual</strong> 2-7
Basic System Operations<br />
Starting Up the System after a Shutdown<br />
Setting Up Conditions for Operation<br />
7. Put the FT Electronics switch to the ON position. See Figure 1-7.<br />
When you place the FT Electronics switch to the ON position, the<br />
following occurs:<br />
a. Power is provided to all electronic boards. (The electron<br />
multiplier, conversion dynode, 8 kV power to the API source,<br />
main RF voltage, and octapole RF voltage remain off.)<br />
b. The internal computer reboots. After several seconds, the<br />
Communication LED on the front panel is illuminated yellow<br />
to indicate that the data system has started to establish a<br />
communication link.<br />
c. After several more seconds, the Communication LED is<br />
illuminated green to indicate that the data system has<br />
established a communication link. Software for the operation of<br />
the instrument is then transferred from the data system to the<br />
instrument.<br />
d. After 3 min, the System LED of the ion trap is illuminated<br />
yellow to indicate that the software transfer from the data system<br />
is complete and that the instrument is in Standby condition.<br />
Note The Vacuum LED on the front panel of the <strong>LTQ</strong> <strong>XL</strong> is<br />
illuminated green only if the pressure in the vacuum manifold is below<br />
the maximum allowable pressure (5×10 -4 Torr in the analyzer region,<br />
and 2 Torr in the capillary-skimmer region), and the safety interlock<br />
switch on the API source is depressed (that is, the API flange is secured<br />
to the spray shield). ▲<br />
8. Press the Reset button on the <strong>LTQ</strong> <strong>XL</strong> to establish the<br />
communication link between <strong>LTQ</strong> <strong>XL</strong> and internal computer.<br />
If you have an LC or autosampler, start it as is described in the manual<br />
that came with the LC or autosampler. If you do not have either, go to<br />
the topic “Setting Up Conditions for Operation“ below.<br />
Set up your <strong>LTQ</strong> <strong>Orbitrap</strong> <strong>XL</strong> for operation, as follows:<br />
1. Before you begin data acquisition with your <strong>LTQ</strong> <strong>Orbitrap</strong> <strong>XL</strong><br />
system, you need to allow the system to pump down for at least<br />
8 hours. Operation of the system with excessive air and water in the<br />
vacuum manifold can cause reduced sensitivity, tuning problems,<br />
and a reduced lifetime of the electron multiplier.<br />
2-8 <strong>LTQ</strong> <strong>Orbitrap</strong> <strong>XL</strong> <strong>Hardware</strong> <strong>Manual</strong> Thermo Fisher Scientific
Basic System Operations<br />
Starting Up the System after a Shutdown<br />
Note The vacuum in the analyzer system can be improved by an<br />
overnight baking of the system. Refer to the topic “Baking Out the<br />
System” on page 3-4. ▲<br />
2. Ensure that the gas pressures are within the operational limits:<br />
• Helium: 275 ± 70 kPa (2.75 ± 0.7 bar, 40 ±10 psi),<br />
• Nitrogen: 690 ± 140 kPa (6.9 ± 1.4 bar, 100 ± 20 psi).<br />
• Argon: 690 ± 140 kPa (6.9 ± 1.4 bar, 100 ± 20 psi)<br />
Note Air in the helium line must be purged or given sufficient time to<br />
be purged for normal performance. ▲<br />
3. Select the Display Status View button in the Tune Plus window.<br />
Check to see whether the pressure measured by the ion gauge is<br />
≤5 × 10 -9 mbar, and the pressure measured by the Pirani gauge is<br />
around 1 mbar. Compare the values of the other parameters in the<br />
status panel with values that you recorded previously.<br />
4. Continue to set up for ESI or APCI operation as described in<br />
<strong>LTQ</strong> <strong>Orbitrap</strong> <strong>XL</strong> Getting Started manual.<br />
Thermo Fisher Scientific <strong>LTQ</strong> <strong>Orbitrap</strong> <strong>XL</strong> <strong>Hardware</strong> <strong>Manual</strong> 2-9
Basic System Operations<br />
Resetting the System<br />
Resetting the System<br />
If communication between the <strong>LTQ</strong> <strong>Orbitrap</strong> <strong>XL</strong> and data system<br />
computer is lost, it may be necessary to reset the system using the Reset<br />
button of the <strong>LTQ</strong> <strong>XL</strong>.<br />
The procedure given here assumes that the <strong>LTQ</strong> <strong>Orbitrap</strong> <strong>XL</strong> and data<br />
system computer are both powered on and are operational. If the<br />
instrument, data system computer, or both are off, refer to topic<br />
“Starting Up the System after a Shutdown” on page 2-7.<br />
To reset the <strong>LTQ</strong> <strong>Orbitrap</strong> <strong>XL</strong>, press the Reset button of the linear ion<br />
trap. See the <strong>LTQ</strong> <strong>XL</strong> <strong>Hardware</strong> <strong>Manual</strong> for the location of the Reset<br />
button. When you press the Reset button, the following occurs:<br />
1. An interrupt on the mainboard of the internal computer causes the<br />
internal computer to reboot. All LEDs on the front panel are off<br />
except the Power LED.<br />
2. After several seconds, the Communication LED is illuminated<br />
yellow to indicate that the data system and the instrument are<br />
starting to establish a communication link.<br />
3. After several more seconds, the Communication LED is illuminated<br />
green to indicate that the data system and the instrument have<br />
established a communication link. Software for the operation of the<br />
instrument is then transferred from the data system to the<br />
instrument.<br />
4. After 3 min, the software transfer is complete. The System LED is<br />
illuminated either green to indicate that the instrument is functional<br />
and the high voltages are on, or yellow to indicate that the<br />
instrument is functional and it is in Standby condition.<br />
2-10 <strong>LTQ</strong> <strong>Orbitrap</strong> <strong>XL</strong> <strong>Hardware</strong> <strong>Manual</strong> Thermo Fisher Scientific
Basic System Operations<br />
Resetting the Tune and Calibration Parameters to their Default Values<br />
Resetting the Tune and Calibration Parameters to their Default Values<br />
You can reset the <strong>LTQ</strong> <strong>Orbitrap</strong> <strong>XL</strong> system tune and calibration<br />
parameters to their default values at any time. This feature may be useful<br />
if you have manually set some parameters that have resulted in less than<br />
optimum performance. To reset the <strong>LTQ</strong> <strong>Orbitrap</strong> <strong>XL</strong> tune and<br />
calibration parameters to their default values, proceed as follows:<br />
In the Tune Plus window,<br />
• Choose File > Restore Factory Calibration to restore the default<br />
calibration parameters, or<br />
• Choose File > Restore Factory Tune Method to restore the default<br />
tune parameters.<br />
Note Make sure that any problems you might be experiencing are not<br />
due to improper API source settings (spray voltage, sheath and auxiliary<br />
gas flow, ion transfer capillary temperature, etc.) before resetting the<br />
system parameters to their default values. ▲<br />
Thermo Fisher Scientific <strong>LTQ</strong> <strong>Orbitrap</strong> <strong>XL</strong> <strong>Hardware</strong> <strong>Manual</strong> 2-11
Chapter 3 User Maintenance<br />
This chapter describes routine maintenance procedures that must be<br />
performed to ensure optimum performance of the <strong>LTQ</strong> <strong>Orbitrap</strong> <strong>XL</strong>.<br />
Note It is the user’s responsibility to maintain the system properly by<br />
performing the system maintenance procedures on a regular basis. ▲<br />
The following topics are described in this chapter:<br />
• ”General Remarks” on page 3-2<br />
• ”Baking Out the System” on page 3-4<br />
• ”Maintaining the Vacuum System” on page 3-6<br />
• ”Maintenance of the Recirculating Chiller” on page 3-7<br />
Note For instructions on maintaining the <strong>LTQ</strong> <strong>XL</strong> linear trap, refer to<br />
the <strong>LTQ</strong> <strong>XL</strong> <strong>Hardware</strong> <strong>Manual</strong>. For instructions on maintaining LCs or<br />
autosamplers, refer to the manual that comes with the LC or<br />
autosampler. ▲<br />
Thermo Fisher Scientific <strong>LTQ</strong> <strong>Orbitrap</strong> <strong>XL</strong> <strong>Hardware</strong> <strong>Manual</strong> 3-1
User Maintenance<br />
General Remarks<br />
General Remarks<br />
Table 3-1. User maintenance procedures<br />
Preventive maintenance must commence with installation, and must<br />
continue during the warranty period to maintain the warranty. Thermo<br />
Fisher Scientific offers maintenance and service contracts. Contact your<br />
local Thermo Fisher Scientific office for more information. Routine and<br />
infrequent maintenance procedures are listed in Table 3-1.<br />
MS Detector Component Procedure Frequency Procedure Location<br />
Analyzer System bakeout If necessary (e.g. after performing<br />
maintenance work on the vacuum system)<br />
page 3-4<br />
Rotary-vane pumps Add oil If oil level is low Manufacturer’s documentation<br />
Change oil Every 3 months or if oil is cloudy or<br />
discolored<br />
Manufacturer’s documentation<br />
Turbomolecular pumps Exchange lubricant reservoir Yearly Manufacturer’s documentation<br />
page 3-6<br />
Recirculating chiller Check cooling fluid level<br />
Check cooling fluid filter<br />
Check air inlet filter<br />
See manufacturer’s documentation Manufacturer’s documentation<br />
page 3-7<br />
To successfully carry out the procedures listed in this chapter, observe<br />
the following rules:<br />
• Proceed methodically<br />
• Always wear clean, lint-free gloves when handling the components<br />
of the API source, ion optics, mass analyzer, and ion detection<br />
system.<br />
• Always place the components on a clean, lint-free surface.<br />
• Always cover the opening in the top of the vacuum manifold with a<br />
large, lint-free tissue whenever you remove the top cover plate of the<br />
vacuum manifold.<br />
• Never overtighten a screw or use excessive force.<br />
• Dirty tools can contaminate your system. Keep the tools clean and<br />
use them exclusively for maintenance and service work at the<br />
<strong>LTQ</strong> <strong>Orbitrap</strong> <strong>XL</strong>.<br />
• Never insert a test probe (for example, an oscilloscope probe) into<br />
the sockets of female cable connectors on PCBs.<br />
3-2 <strong>LTQ</strong> <strong>Orbitrap</strong> <strong>XL</strong> <strong>Hardware</strong> <strong>Manual</strong> Thermo Fisher Scientific
Returning Parts<br />
Cleaning the Surface of the Instrument<br />
User Maintenance<br />
General Remarks<br />
In order to protect our employees, we ask you for some special<br />
precautions when returning parts for exchange or repair to the factory.<br />
Your signature on the Repair Covering letter confirms that the returned<br />
parts have been de-contaminated and are free of hazardous materials.<br />
Refer to topic ”Safety Advice for Possible Contamination” on page ix for<br />
further information.<br />
Clean the outside of the instrument with a dry cloth. For removing<br />
stains or fingerprints on the surface of the instrument (panels, for<br />
example), slightly dampen the cloth (preferably made of microfiber)<br />
with distilled water.<br />
Caution Prevent any liquids from entering the inside of the<br />
instrument. ▲<br />
Thermo Fisher Scientific <strong>LTQ</strong> <strong>Orbitrap</strong> <strong>XL</strong> <strong>Hardware</strong> <strong>Manual</strong> 3-3
User Maintenance<br />
Baking Out the System<br />
Baking Out the System<br />
Bakeout Procedure<br />
This section provides information and help concerning the system<br />
bakeout of the <strong>LTQ</strong> <strong>Orbitrap</strong> <strong>XL</strong>. The bakeout procedure removes<br />
unwanted gases or molecules (collected or remaining) from the high<br />
vacuum region of the instrument. Ions can collide with those gases or<br />
molecules resulting in lower overall sensitivity. Therefore, we<br />
recommend to bake out the instrument if the high vacuum decreases<br />
noticeable during routine operation.<br />
Bakeout is mandatory after maintenance or service work is performed in<br />
the analyzer region where the system is vented.<br />
Note Pumping down the system after venting takes at least 8 hours, and<br />
usually requires overnight baking of the system. ▲<br />
In case the system has been vented during a power failure, it is necessary<br />
to bake out the system to obtain the operating vacuum. Refer to the<br />
topic ”Behavior of the System in Case of a Main Failure” on page 2-2.<br />
Use the following procedure to perform a system bakeout:<br />
1. Place the system in Standby condition as described in the section<br />
”Placing the System in Standby Condition” on page 2-4.<br />
2. Put the FT Electronics switch at the power control panel into the<br />
ON position.<br />
3. Set the bakeout time by entering the desired time (hh:mm) with the<br />
up/down keys of the bakeout timer. See Figure 3-1 on page 3-5.<br />
4. Start the bakeout procedure by pressing the green start button on<br />
the right. The <strong>LTQ</strong> <strong>Orbitrap</strong> <strong>XL</strong> indicates a running bakeout<br />
procedure by the flashing Vacuum and System LEDs on the front<br />
side of the instrument. See Figure 1-4 on page 1-6.<br />
You can stop a running bakeout procedure by pressing the orange<br />
reset/stop button on the left side. Also press this button after you<br />
have changed the preset bakeout time.<br />
3-4 <strong>LTQ</strong> <strong>Orbitrap</strong> <strong>XL</strong> <strong>Hardware</strong> <strong>Manual</strong> Thermo Fisher Scientific
Bakeout<br />
stop button<br />
Figure 3-1. Bakeout timer<br />
Elapsed time display<br />
Set time display<br />
Up keys<br />
Down keys<br />
Bakeout start button<br />
User Maintenance<br />
Baking Out the System<br />
5. The bakeout procedure is terminated because of two reasons:<br />
• The preset duration has expired, or<br />
• The vacuum has risen above a preset value.<br />
The termination of the baking process is indicated by the status LEDs<br />
(System + Vacuum) on the front side that have stopped flashing.<br />
Thermo Fisher Scientific <strong>LTQ</strong> <strong>Orbitrap</strong> <strong>XL</strong> <strong>Hardware</strong> <strong>Manual</strong> 3-5
User Maintenance<br />
Maintaining the Vacuum System<br />
Maintaining the Vacuum System<br />
Exchanging the Lubricant Reservoir of the Turbopumps<br />
The turbopumps 1 need maintenance work that is briefly outlined below.<br />
Note The manuals of the pump manufacturers give detailed advice<br />
regarding safety, operation, maintenance, and installation. Please note<br />
the warnings and precautions contained in these manuals! ▲<br />
Note For all manipulations at the pumps, note the advice, warnings, and<br />
cautions contained in the pump manuals! ▲<br />
For the turbopumps, we recommend exchanging the lubricant reservoir<br />
in a one-year cycle. At each exchange procedure, the complete lubricant<br />
reservoir must be exchanged!<br />
Note The storage stability of the lubrication oil is limited. The<br />
specification of durability is given by the pump manufacturer. (Refer to<br />
the manuals for the turbopumps.) ▲<br />
Replacements for the turbopump lubricant reservoirs (TMH 071 P:<br />
P/N 017 2350; TMU 262: P/N 105 0160) are available from Thermo<br />
Fisher Scientific.<br />
The disposal of used oil is subject to the relevant regulations.<br />
1For maintenance of the forepumps, refer to the <strong>LTQ</strong> <strong>XL</strong> <strong>Hardware</strong> <strong>Manual</strong> or the pump<br />
manufacturer’s manual.<br />
3-6 <strong>LTQ</strong> <strong>Orbitrap</strong> <strong>XL</strong> <strong>Hardware</strong> <strong>Manual</strong> Thermo Fisher Scientific
Maintenance of the Recirculating Chiller<br />
Reservoir<br />
Fluid Bag Filter<br />
Condenser Filter<br />
User Maintenance<br />
Maintenance of the Recirculating Chiller<br />
For the NESLAB ThermoFlex 900 recirculating chiller, the following<br />
checks should be carried out on a regular basis.<br />
Note For further information and maintenance instructions, refer to the<br />
manufacturer’s manual supplied with the instrument. ▲<br />
Periodically inspect the fluid inside the reservoir. If cleaning is necessary,<br />
flush the reservoir with a cleaning fluid compatible with the circulating<br />
system and the cooling fluid.<br />
The cooling fluid should be replaced periodically. Replacement<br />
frequency depends on the operating environment and amount of usage.<br />
Warning Before changing the operating fluid make sure it is at safe<br />
handling temperature. ▲<br />
The ThermoFlex 900 recirculating chiller installed in the cooling circuit<br />
of the instrument is equipped with a fluid bag filter, which needs to be<br />
replaced on a regular basis. Replacement bags are available from Thermo<br />
Fisher Scientific.<br />
To prevent a loss of cooling capacity and a premature failure of the<br />
cooling system, clean the condenser filter regularly. If necessary, replace<br />
it.<br />
Thermo Fisher Scientific <strong>LTQ</strong> <strong>Orbitrap</strong> <strong>XL</strong> <strong>Hardware</strong> <strong>Manual</strong> 3-7
Chapter 4 Replaceable Parts<br />
This chapter contains part numbers for replaceable and consumable<br />
parts for the MS detector, data system, and kits. To ensure proper results<br />
in servicing the <strong>LTQ</strong> <strong>Orbitrap</strong> <strong>XL</strong> system, order only the parts listed or<br />
their equivalent.<br />
For information on how to order parts, refer to the topic “Customer<br />
Support” in the <strong>LTQ</strong> <strong>Orbitrap</strong> <strong>XL</strong> / <strong>LTQ</strong> <strong>Orbitrap</strong> Discovery<br />
Preinstallation Requirements Guide.<br />
Table 4-1. Parts for the <strong>LTQ</strong> <strong>Orbitrap</strong> <strong>XL</strong><br />
Designation Part No.<br />
<strong>LTQ</strong> <strong>Orbitrap</strong> <strong>XL</strong>; 50 Hz *<br />
072 3852<br />
<strong>LTQ</strong> <strong>Orbitrap</strong> <strong>XL</strong>; 60 Hz<br />
072 3862<br />
Edwards Pumps kit, for <strong>LTQ</strong>-Hybrid 121 6450<br />
Pumps kit 2, <strong>Orbitrap</strong> (ILMVAC) 121 4310<br />
ESI probe, for Ion Max source OPTON-20011<br />
Nanospray II Ion Source †<br />
OPTON-20050<br />
Static Nanospray †<br />
OPTON-20051<br />
Dynamic Nanospray †<br />
OPTON-97017<br />
APCI probe †<br />
OPTON-20012<br />
APPI probe †<br />
OPTON-20026<br />
* Module, for parts list see below.<br />
† Optional equipment.<br />
Table 4-2. Parts <strong>LTQ</strong> <strong>Orbitrap</strong> <strong>XL</strong>; 50 Hz (P/N 072 3852)<br />
Designation Part No.<br />
Basic system <strong>Orbitrap</strong>-2 *<br />
122 4790<br />
<strong>LTQ</strong> <strong>XL</strong> Linear trap MS system, with computer <strong>LTQ</strong>02-10001<br />
Low flow metal needle for API 2 probes OPTON-30004<br />
Dell Laserprinter 1700 106 3385<br />
Software 2.4 Tune <strong>LTQ</strong> <strong>Orbitrap</strong> <strong>XL</strong> 122 8020<br />
Recirculating chiller Neslab ThermoFlex 900 PD-1 230V/50 Hz 101161010000004<br />
Upgrade kit <strong>Orbitrap</strong> HCD option * 122 4800<br />
* Module, for parts list see below.<br />
Thermo Fisher Scientific <strong>LTQ</strong> <strong>Orbitrap</strong> <strong>XL</strong> <strong>Hardware</strong> <strong>Manual</strong> 4-1
Replaceable Parts<br />
Parts Basic System<br />
Parts Basic System<br />
This section contains parts lists for the mechanical components of the<br />
<strong>LTQ</strong> <strong>Orbitrap</strong> <strong>XL</strong>.<br />
Table 4-3. Parts basic system <strong>Orbitrap</strong>-2 (P/N 122 4790)<br />
Pos. No. Qty. Designation Part No.<br />
0010 1 <strong>Orbitrap</strong>-2 chamber; complete *<br />
122 4780<br />
0020 1 <strong>Orbitrap</strong>-D30; complete 116 5000<br />
0030 1 CLT and lens system; complete 122 1200<br />
0040 1 Pumping system <strong>Orbitrap</strong> *<br />
0050 1 Water supply <strong>Orbitrap</strong> *<br />
* Module, for parts list see below.<br />
118 4490<br />
117 8460<br />
0060 1 <strong>Orbitrap</strong> panels 117 2910<br />
0070 1 Mounting devices <strong>Orbitrap</strong>-2 117 7891<br />
0080 1 Gas supply <strong>Orbitrap</strong>-2 *<br />
0090 1 <strong>Orbitrap</strong> Installation Kit *<br />
0100 1 Electronic parts <strong>Orbitrap</strong>-2 *<br />
Table 4-4. Parts Upgrade kit <strong>Orbitrap</strong> HCD option (P/N 122 4800)<br />
117 7881<br />
118 8120<br />
800 1110<br />
Pos. No. Qty. Designation Part No.<br />
0010 1 Collision cell, with mount 122 1320<br />
0020 1 Flange, for options; complete 122 1250<br />
0030 1 Cable kit, Upgrade <strong>LTQ</strong> <strong>Orbitrap</strong> <strong>XL</strong> 122 5100<br />
0040 1 Upgrade kit gas supply <strong>LTQ</strong> <strong>Orbitrap</strong> <strong>XL</strong> *<br />
* Module, for parts list see below.<br />
122 4820<br />
0050 1 Cable, power distribution/valve 210 0310<br />
Table 4-5. Parts <strong>Orbitrap</strong> Installation Kit (P/N 118 8120)<br />
Pos. No. Qty. Designation Part No.<br />
0010 1 <strong>Orbitrap</strong> Installation Kit Ilmvac 1196990<br />
0020 4 One ear clamp; Ø 17.5 114 4910<br />
0030 6 Ferrule, 1/16”, for GVF/16 067 4800<br />
0040 3.0 m * Tube, 1/8" × 2.1- 1.4301 026 1000<br />
0050 3.0 m * Hose; 4 x 1, Teflon 069 0280<br />
0060 6 Clamping piece 8/16 037 0130<br />
0070 1 Contact wrist strap, with coiled cord 119 3050<br />
0080 1 Ferrule, stainless steel; R. 1/8" 052 0950<br />
0090 1 Ferrule, stainless steel; V. 1/8" 052 2520<br />
4-2 <strong>LTQ</strong> <strong>Orbitrap</strong> <strong>XL</strong> <strong>Hardware</strong> <strong>Manual</strong> Thermo Fisher Scientific
Parts <strong>Orbitrap</strong> Analyzer<br />
Parts Pumping System <strong>Orbitrap</strong><br />
Table 4-6. Parts <strong>Orbitrap</strong>-2 chamber; complete (P/N 122 4780)<br />
Replaceable Parts<br />
Parts Basic System<br />
Table 4-5. Parts <strong>Orbitrap</strong> Installation Kit (P/N 118 8120), continued<br />
Pos. No. Qty. Designation Part No.<br />
0100 1 Cap nut, stainless steel; 1/8“ 052 0890<br />
0110 1 Connector; C19 to C14 082-2528<br />
0120 10 Miniature fuse; 5 x 20 mm, 8 A 201 1850<br />
* Specify desired length.<br />
Pos. No. Qty. Designation Part No.<br />
0010 1 UHV chamber; complete 116 6110<br />
0020 1 Vacuum chamber, complete 116 6131<br />
0030 1 Octapole <strong>Orbitrap</strong>, complete 116 6120<br />
0040 4 Washer; 8.4×15×1.5, stainless steel 047 0860<br />
0050 4 Screw; M8×25, silver plated 119 1210<br />
0060 4 Pan head screw; M 2 x 8 DIN 84 A4 045 0720<br />
0070 2 Screw cyl. M 4 x 12 DIN912 045 2800<br />
*<br />
Table 4-7. Parts pumping system <strong>Orbitrap</strong> (P/N 118 4490)<br />
Pos. No. Qty. Designation Part No.<br />
0010 1 Turbomolecular pump TMU262; modified 118 4340<br />
0020 2 Turbomolecular pump; TMH 071 P 114 1500<br />
0040 1 Water cooling for TMH 262 114 9140<br />
0050 5 Water cooling for TMH 071 P 079 4742<br />
0080 1 UHV gauge IKR 270; short 118 1380<br />
0130 1 Compact Pirani Gauge TPR280 115 6400<br />
* For a schematic overview of the vacuum system, refer to Figure 1-15 on page 1-19.<br />
Thermo Fisher Scientific <strong>LTQ</strong> <strong>Orbitrap</strong> <strong>XL</strong> <strong>Hardware</strong> <strong>Manual</strong> 4-3
Replaceable Parts<br />
Parts Basic System<br />
Two kits are available for the pumping system, comprising either<br />
pumps, gauges, and cooling (pump kit <strong>Orbitrap</strong>: P/N 117 5000) or<br />
hoses, clamps, and gaskets (pump system <strong>Orbitrap</strong>: P/N 117 5010):<br />
Table 4-8. Parts pump kit <strong>Orbitrap</strong> (P/N 117 5000)<br />
Pos. No. Qty. Designation Part No.<br />
0010 1 Turbomolecular pump TMU262; modified 118 4340<br />
0020 2 Turbomolecular pump; TMH 071 P 114 1500<br />
0030 1 UHV gauge IKR 270; short 118 1380<br />
0040 1 Compact Pirani Gauge TPR280 115 6400<br />
0050 1 Water cooling for TMH 262 114 9140<br />
0060 5 Water cooling for TMH 071 P 079 4742<br />
0070 1 PVC hose, with steel helix; ID=45 mm, L=1.6 m 118 4330<br />
0080 2 Hose nipple, DN 40, ISO-KF-45 115 9230<br />
0090 1 Venting flange; DN 10, KF-G1/8" 118 4400<br />
0100 1 Splinter shield for turbopumps, with DN 100 CF-F<br />
flange<br />
0110 2 Centering ring, with integrated splinter shield;<br />
DN 63 ISO<br />
Table 4-9. Parts pump system <strong>Orbitrap</strong> (P/N 117 5010)<br />
119 8590<br />
119 8600<br />
Pos. No. Qty. Designation Part No.<br />
0010 2 Gasket; NW 100 CF, copper 055 2440<br />
0020 1 Hose, metal; KF16-KF25 - 250mm 115 4130<br />
0030 1 Gasket; copper, NW 35 055 0480<br />
0040 2 Metal tube, KF NW16×250 052 4260<br />
0050 2 KF Tee piece; NW 16 KF, stainless steel 052 4230<br />
0060 8 Centering ring with o-ring; DN 16, Viton 052 2140<br />
0070 1 Centering ring with o-ring; DN 25, Viton 052 2150<br />
0080 1 Centering ring; NW 16/10, aluminum-Viton 052 2200<br />
0090 6 Clamping ring; NW 10/16, KF 052 1830<br />
0100 1 Clamping ring; NW 20/25, KF 052 1560<br />
0110 1 Reducing cross piece; DN40/DN16 KF 118 4310<br />
0120 1 Metal tube; DN40x500 118 4350<br />
0130 1 Metal tube; DN40x750 118 1290<br />
0140 2 Hose clamp; NW 40 118 1320<br />
0150 4 Centering ring; NW 40 KF, aluminum-Viton 052 2260<br />
0160 4 Tension ring; NW 32/40 KF 118 1250<br />
0170 8 Clamping screw; DN63-100 ISO, aluminum 104 2670<br />
0180 1 Blank flange; NW 16 KF, aluminum 118 1300<br />
4-4 <strong>LTQ</strong> <strong>Orbitrap</strong> <strong>XL</strong> <strong>Hardware</strong> <strong>Manual</strong> Thermo Fisher Scientific
Parts Gas and Water Supply<br />
Replaceable Parts<br />
Parts Basic System<br />
This topic contains parts lists for the gas and water supply of the<br />
<strong>LTQ</strong> <strong>Orbitrap</strong> <strong>XL</strong>. For a schematical overview of the gas supply, refer to<br />
Figure 1-19 on page 1-25.<br />
Table 4-10. Parts gas supply (P/N 117 7881)<br />
Pos. No. Qty. Designation Part No.<br />
0010 2 Bulkhead union; 1/16”, for hose 4 x 1 (for<br />
P/N 069 1130)<br />
115 3660<br />
0020 1 Bulkhead union; 1/8"×1/8" 052 3450<br />
0030 4.5 m * Hose; 4 x 1, Teflon 069 0280<br />
0040 3.5 m * Hose; 4 x 1, polyurethane, blue 069 1130<br />
0050 0.5 m * Capillary 1/16" ID-SS 060 5470<br />
0060 2 Plug-in T-piece; 3 x 6mm 112 8140<br />
0070 1 Stainless steel reducing union; Swagelok,<br />
6 mm-1/16”<br />
* Specify required length.<br />
117 8070<br />
0080 1 T-piece; 1/16" (SS-100-3) 052 3550<br />
0090 1 Coupling; 1/16”, SS-100-6 052 4340<br />
0100 3 PEEKSIL capillary; 1/16", 500 × 0.075 mm 118 6970<br />
0110 1 Reducer Swagelok; 1/8" × 1/16", stainless steel 066 2880<br />
0120 2 Support jack; for hose 4 mm 104 9620<br />
0130 6 Ferrule; 1/16" GVF/16 067 4800<br />
0140 1 N 2 venting <strong>Orbitrap</strong> 119 1480<br />
0150 1 Connector 1/8”, for hose OD 4 mm 112 8680<br />
0160 1 Cap nut; 1/16”, stainless steel 052 0880<br />
0170 3.0 m *<br />
Hose; 2 x 1, PTFE 109 1650<br />
0180 1 Sleeve; Ø 6 mm 104 7320<br />
Table 4-11. Upgrade kit gas supply <strong>LTQ</strong> <strong>Orbitrap</strong> <strong>XL</strong> (P/N 122 4820)<br />
Pos. No. Qty. Designation Part No.<br />
0050 0.10 m *<br />
Capillary 1/16" ID-SS 060 5470<br />
0070 1 Stainless steel reducing union; Swagelok,<br />
6 mm-1/16”<br />
117 8070<br />
0080 1 T-piece; 1/16" (SS-100-3) 052 3550<br />
0090 1 Coupling; 1/16”, SS-100-6 052 4340<br />
0100 2 PEEKSIL capillary; 1/16", 500 × 0.075 mm 118 6970<br />
0130 6 Ferrule; 1/16" GVF/16 067 4800<br />
0190 2 Capillary; PEEKsil, 1/16", 0.1 × 500 mm 122 3420<br />
Thermo Fisher Scientific <strong>LTQ</strong> <strong>Orbitrap</strong> <strong>XL</strong> <strong>Hardware</strong> <strong>Manual</strong> 4-5
Replaceable Parts<br />
Parts Basic System<br />
Table 4-11. Upgrade kit gas supply <strong>LTQ</strong> <strong>Orbitrap</strong> <strong>XL</strong> (P/N 122 4820),<br />
Pos. No. Qty. Designation Part No.<br />
0200 1 Valve, with angle 122 4070<br />
* Specify required length.<br />
Table 4-12. Parts water supply (P/N 117 8460)<br />
Pos. No. Qty. Designation Part No.<br />
0010 2 Quick coupling insert; 9.6 mm 114 1640<br />
0020 2 Quick coupling body; 9.6 mm 113 8960<br />
0030 10 m †<br />
* For a schematic overview of the cooling water circuit, refer to Figure 1-22 on page 1-28.<br />
† Specify required length.<br />
Hose; 9 x 3, black, PVC 104 9540<br />
0040 4 Hose clamp; 1-ear, 14.6–16.8 mm 114 4910<br />
0050 1.5 m † Hose; 4 x 1, Teflon 069 0280<br />
0060 2 Quick coupling insert; Delrin Acetal, NW 6.4 118 5030<br />
0070 2 Quick coupling body; Delrin Acetal, NW 6.4 118 5020<br />
0080 16 Clamping piece 8/16 037 0130<br />
0090 2 Adaptor hose nipple; male, 1/2 x 10 118 5840<br />
0100 1 Flow control sensor 119 1740<br />
Table 4-13. Kit gas-water assembly (P/N 208 7351)<br />
Pos. No. Qty. Designation Part No.<br />
0010 1 Bulkhead union; 1/16”, for hose 4 x 1 (for<br />
P/N 069 1130)<br />
4-6 <strong>LTQ</strong> <strong>Orbitrap</strong> <strong>XL</strong> <strong>Hardware</strong> <strong>Manual</strong> Thermo Fisher Scientific<br />
*<br />
115 3660<br />
0020 1 Bulkhead union; 1/8"×1/8" 052 3450<br />
0030 5.0 m * Hose; 4 x 1, Teflon 069 0280<br />
0040 3.5 m * Hose; 4 x 1, polyurethane, blue 069 1130<br />
0050 3.5 m * Capillary 1/16" ID-SS 060 5470<br />
0060 1 Stainless steel reducer, 1/16" OD - 1/8" ID 066 2880<br />
0070 2 Quick coupling insert; 9.6 mm 114 1640<br />
0080 2 Quick coupling body; 9.6 mm 113 8960<br />
0090 6.0 m * Hose; 9 x 3, black, PVC 104 9540<br />
0100 2 Hose clamp; 1-ear, 14.6–16.8 mm 114 4910<br />
* Specify required length.
Electronic Parts<br />
Electronics - Right Panel<br />
Replaceable Parts<br />
Electronic Parts<br />
This section contains parts list for the electronic components of the<br />
<strong>LTQ</strong> <strong>Orbitrap</strong> <strong>XL</strong>.<br />
Table 4-14. Electronic parts <strong>Orbitrap</strong>-2 (P/N 800 1110)<br />
Pos. No. Qty. Designation Part No.<br />
0050 1 <strong>Orbitrap</strong>-2 Electronics; right panel *<br />
0060 1 <strong>Orbitrap</strong>-2 Electronics; left panel *<br />
0070 1 Electronics analyzer <strong>Orbitrap</strong>-2 *<br />
0080 1 Electronics main supply <strong>Orbitrap</strong> *<br />
* Module, for parts list see below.<br />
210 1480<br />
208 1020<br />
210 0160<br />
208 1040<br />
0090 1 Electronics rear panel assembly <strong>Orbitrap</strong>-2 208 1050<br />
0100 1 Cable kit <strong>Orbitrap</strong>-2 210 1690<br />
0110 1 Cable kit <strong>LTQ</strong>-<strong>Orbitrap</strong> grounding 208 1070<br />
0120 1 Kit <strong>Orbitrap</strong> assembly material 208 1080<br />
0130 1 Subpackage <strong>Orbitrap</strong>-2 assembly 210 1660<br />
0140 1 Kit gas-water assembly †<br />
† Module, see Table 4-13 on page 4-6.<br />
208 7351<br />
The following replaceable parts are available for the electronics at the<br />
right panel of the <strong>LTQ</strong> <strong>Orbitrap</strong> <strong>XL</strong>.<br />
Table 4-15. Parts <strong>Orbitrap</strong>-2 electronics; right panel (P/N 210 1480)<br />
Pos. No. Qty. Designation Part No.<br />
0010 1 Power supply 1 205 5810<br />
0020 1 Power supply 29V/2A 206 4040<br />
0030 1 Power distribution 206 2130<br />
0040 1 Unit PS 24V/20A 208 1130<br />
0050 1 Unit PS +/-15V/2.75A 208 1140<br />
0060 1 KIT E_RIGHT PANEL ASSEMBLY 206 9790<br />
0070 1 Unit data acquisition *<br />
206 4132<br />
0080 1 Instrument control board 205 4221<br />
0085 1 CLT RF TRIGGER board 208 5880<br />
0090 1 LT ANALOG INTERFACE board <strong>Orbitrap</strong>-2 208 1940<br />
0100 1 LT DIGITAL INTERFACE board 208 7180<br />
0110 1 UNIT PS-BASIC LOAD 208 5900<br />
* Module, for parts list see below.<br />
Thermo Fisher Scientific <strong>LTQ</strong> <strong>Orbitrap</strong> <strong>XL</strong> <strong>Hardware</strong> <strong>Manual</strong> 4-7
Replaceable Parts<br />
Electronic Parts<br />
Electronics - Left Panel<br />
Electronics Analyzer<br />
Table 4-16. Parts Unit data acquisition (P/N 206 4132)<br />
Pos. No. Qty. Designation Part No.<br />
0010 1 Housing PC2 FTMS / ORBITRAP 115 5320<br />
0020 1 Network interface card LCS 8038 TXR 208 2140<br />
0030 1 MATRIX-STL FRONTEND-PC <strong>LTQ</strong>-FT 207 6470<br />
0040 1 UNIT_PC POWER SUPPLY PS_ON 209 5950<br />
0050 1 LP DAQ DIGITAL PCI BOARD 206 0501<br />
0060 1 IDC/26POL/1.1M 203 0340<br />
0070 1 DAQ ANALOG FRONT END 206 4150<br />
0080 3 SMB BU-90ø/ST-0ø/0.7M 205 9630<br />
0090 1 IDC/14POL/0.12M 206 3790<br />
0100 2 IDC/40POL/0.10M 205 2190<br />
0110 1 PS2/DAQ ANALOG 205 9710<br />
0120 1 POWER SUPPLY 2 206 1440<br />
0130 1 Load resistor 4R7 206 5230<br />
0140 1 Angle bracket, for PC 121 8680<br />
The following replaceable parts are available for the electronics at the left<br />
panel of the <strong>LTQ</strong> <strong>Orbitrap</strong> <strong>XL</strong>.<br />
Table 4-17. Parts <strong>Orbitrap</strong>-2 electronics; left panel (P/N 208 1020)<br />
Pos. No. Qty. Designation Part No.<br />
0010 1 UNIT HIGH VOLTAGE PS 207 7991<br />
0020 1 UNIT CENTRAL ELECTRODE PS 207 9611<br />
0030 1 LP SPI-BUS-TERMINATION 208 1480<br />
The following replaceable parts are available for the analyzer electronics<br />
of the <strong>LTQ</strong> <strong>Orbitrap</strong> <strong>XL</strong>.<br />
Table 4-18. Parts electronics analyzer <strong>Orbitrap</strong>-2 (P/N 210 0160)<br />
Pos. No. Qty. Designation Part No.<br />
0010 1 UNIT CLT RF SUPPLY 207 9581<br />
0020 1 UNIT CENTRAL ELECTRODE PULSER 207 9640<br />
0030 1 UNIT TEMPERATUR CONTROLLER 207 8930<br />
4-8 <strong>LTQ</strong> <strong>Orbitrap</strong> <strong>XL</strong> <strong>Hardware</strong> <strong>Manual</strong> Thermo Fisher Scientific
Electronics Main Supply<br />
Table 4-18. Parts electronics analyzer <strong>Orbitrap</strong>-2 (P/N 210 0160),<br />
Replaceable Parts<br />
Electronic Parts<br />
Pos. No. Qty. Designation Part No.<br />
0040 1 UNIT PRE AMPLIFIER 207 8900<br />
0060 1 UNIT ION OPTIC SUPPLY, <strong>Orbitrap</strong>-2 209 9810<br />
The following replaceable parts are available for the electronics main<br />
supply of the <strong>LTQ</strong> <strong>Orbitrap</strong> <strong>XL</strong>.<br />
Table 4-19. Parts electronics main supply <strong>Orbitrap</strong> (P/N 208 1040)<br />
Pos. No. Qty. Designation Part No.<br />
0010 1 UNIT SWITCH PANEL 208 1120<br />
0020 1 Mains cable; IEC-CONNECTOR-16A 209 6110<br />
0030 1 Mains cable; MAIN INPUT/LINE FILTER 208 1420<br />
0040 1 KIT BAKEOUT-SWITCHES 207 9040<br />
0050 1 Cable loom, mains supply 208 1110<br />
0070 1 Mains cable; LINE FILTER/MAIN SWITCH 208 1280<br />
0080 1 Mains cable; terminal/<strong>LTQ</strong>-relay 208 1290<br />
0090 1 Mains cable; POWER DIS./SWITCH PANEL 1 208 1300<br />
0100 1 Mains cable; POWER DIS./SWITCH PANEL 2 208 1310<br />
0110 1 Cable; power distribution/<strong>LTQ</strong>-relay 208 1320<br />
0120 1 Cable loom, power distribution/bakeout timer 207 9010<br />
0130 1 Unit bakeout timer <strong>Orbitrap</strong> 208 0960<br />
0140 1 KIT MAINS SUP.ASSEMBLY MAT. 208 1100<br />
0150 1 Cable; BAKEOUT-TIMER/POWER DIS. 208 1470<br />
0160 1 Mains cable; POWER DIS./SOCKET R-PUMP 208 1350<br />
0170 1 Mains cable; <strong>LTQ</strong>-relay/<strong>LTQ</strong>-filter 208 9230<br />
Thermo Fisher Scientific <strong>LTQ</strong> <strong>Orbitrap</strong> <strong>XL</strong> <strong>Hardware</strong> <strong>Manual</strong> 4-9
Glossary<br />
This section lists and defines terms used in this<br />
manual. It also includes acronyms, metric prefixes,<br />
symbols, and abbreviations.<br />
A ampere<br />
ac alternating current<br />
ADC analog-to-digital converter<br />
AGC See Automatic Gain Control (AGC).<br />
APCI See atmospheric pressure chemical<br />
ionization (APCI).<br />
API See atmospheric pressure ionization (API).<br />
APPI See Atmospheric Pressure Photoionization<br />
(APPI).<br />
ASCII American Standard Code for Information<br />
Interchange<br />
atmospheric pressure chemical ionization<br />
(APCI) A soft ionization technique done in an ion<br />
source operating at atmospheric pressure.<br />
Electrons from a corona discharge initiate the<br />
process by ionizing the mobile phase vapor<br />
molecules. A reagent gas forms, which efficiently<br />
produces positive and negative ions of the analyte<br />
through a complex series of chemical reactions.<br />
atmospheric pressure ionization (API)<br />
Ionization performed at atmospheric pressure by<br />
using atmospheric pressure chemical ionization<br />
(APCI), electrospray ionization (ESI), or<br />
nanospray ionization (NSI).<br />
Atmospheric Pressure Photoionization (APPI)<br />
A soft ionization technique in which an ion is<br />
generated from a molecule when it interacts with<br />
a photon from a light source.<br />
Automatic Gain Control (AGC) Sets the ion<br />
injection time to maintain the optimum quantity<br />
of ions for each scan. With AGC on, the scan<br />
function consists of a prescan and an analytical<br />
scan.<br />
auxiliary gas The outer-coaxial gas (nitrogen) that<br />
assists the sheath (inner-coaxial) gas in dispersing<br />
and/or evaporating sample solution as the sample<br />
solution exits the APCI, ESI, or H-ESI nozzle.<br />
Thermo Fisher Scientific <strong>LTQ</strong> <strong>Orbitrap</strong> <strong>XL</strong> <strong>Hardware</strong> <strong>Manual</strong> G-1<br />
b bit<br />
B byte (8 b)<br />
baud rate data transmission speed in events per<br />
second<br />
BTU British thermal unit, a unit of energy<br />
°C degrees Celsius<br />
cfm cubic feet per minute<br />
chemical ionization (CI) The formation of new<br />
ionized species when gaseous molecules interact<br />
with ions. The process can involve transfer of an<br />
electron, proton, or other charged species<br />
between the reactants.<br />
CI See chemical ionization (CI).<br />
CID See collision-induced dissociation (CID).<br />
CLT curved linear trap<br />
cm centimeter<br />
cm 3 cubic centimeter<br />
collision gas A neutral gas used to undergo<br />
collisions with ions.
Glossary: collision-induced dissociation (CID)<br />
collision-induced dissociation (CID) An ion/<br />
neutral process in which an ion is dissociated as a<br />
result of interaction with a neutral target species.<br />
consecutive reaction monitoring (CRM) scan<br />
type A scan type with three or more stages of mass<br />
analysis and in which a particular multi-step<br />
reaction path is monitored.<br />
Convectron gauge A thermocouple bridge gauge<br />
that is sensitive to the pressure as well as the<br />
thermal conductivity of the gas used to measure<br />
pressures between X and Y.<br />
CPU central processing unit (of a computer)<br />
CRM See consecutive reaction monitoring (CRM)<br />
scan type.<br />
C-Trap curved linear trap<br />
control key on the terminal keyboard<br />
d depth<br />
Da dalton<br />
DAC digital-to-analog converter<br />
damping gas Helium gas introduced into the ion<br />
trap mass analyzer that slows the motion of ions<br />
entering the mass analyzer so that the ions can be<br />
trapped by the RF voltage fields in the mass<br />
analyzer.<br />
data-dependent scan A scan mode that uses<br />
specified criteria to select one or more ions of<br />
interest on which to perform subsequent scans,<br />
such as MS/MS or ZoomScan.<br />
dc direct current<br />
divert/inject valve A valve on the mass<br />
spectrometer that can be plumbed as a divert<br />
valve or as a loop injector.<br />
DS data system<br />
DSP digital signal processor<br />
EI electron ionization<br />
electron multiplier A device used for current<br />
amplification through the secondary emission of<br />
electrons. Electron multipliers can have a discrete<br />
dynode or a continuous dynode.<br />
electron transfer dissociation (ETD) A method<br />
of fragmenting peptides and proteins. In electron<br />
transfer dissociation (ETD), singly charged<br />
reagent anions transfer an electron to multiply<br />
protonated peptides within the ion trap mass<br />
analyzer. This leads to a rich ladder of sequence<br />
ions derived from cleavage at the amide groups<br />
along the peptide backbone. Amino acid side<br />
chains and important modifications such as<br />
phosphorylation are left intact.<br />
electrospray ionization (ESI) A type of<br />
atmospheric pressure ionization that is currently<br />
the softest ionization technique available to<br />
transform ions in solution into ions in the gas<br />
phase.<br />
EMBL European Molecular Biology Laboratory<br />
Enter key on the terminal keyboard<br />
ESD electrostatic discharge<br />
ESI See electrospray ionization (ESI).<br />
ETD See electron transfer dissociation (ETD).<br />
eV electron volt<br />
f femto (10 -15)<br />
°F degrees Fahrenheit<br />
.fasta file extension of a SEQUEST® search<br />
database file<br />
ft foot<br />
Fast Fourier Transform (FFT) An algorithm that<br />
performs a Fourier transformation on data. A<br />
Fourier transform is the set of mathematical<br />
formulae by which a time function is converted<br />
G-2 <strong>LTQ</strong> <strong>Orbitrap</strong> <strong>XL</strong> <strong>Hardware</strong> <strong>Manual</strong> Thermo Fisher Scientific
into a frequency-domain function and the<br />
converse.<br />
FFT See Fast Fourier Transform (FFT).<br />
fluoranthene A reagent anion that is used in an<br />
electron transfer dissociation (ETD) experiment.<br />
firmware Software routines stored in read-only<br />
memory. Startup routines and low-level input/<br />
output instructions are stored in firmware.<br />
forepump The pump that evacuates the foreline. A<br />
rotary-vane pump is a type of forepump.<br />
Fourier Transform - Ion Cyclotron Resonance<br />
Mass Spectrometry (FT-ICR MS) A technique<br />
that determines the mass-to-charge ratio of an ion<br />
by measuring its cyclotron frequency in a strong<br />
magnetic field.<br />
fragment ion A charged dissociation product of an<br />
ionic fragmentation. Such an ion can dissociate<br />
further to form other charged molecular or<br />
atomic species of successively lower formula<br />
weights.<br />
fragmentation The dissociation of a molecule or<br />
ion to form fragments, either ionic or neutral.<br />
When a molecule or ion interacts with a particle<br />
(electron, ion, or neutral species) the molecule or<br />
ion absorbs energy and can subsequently fall<br />
apart into a series of charged or neutral<br />
fragments. The mass spectrum of the fragment<br />
ions is unique for the molecule or ion.<br />
FT Fourier Transformation<br />
FT-ICR MS See Fourier Transform - Ion<br />
Cyclotron Resonance Mass Spectrometry (FT-<br />
ICR MS).<br />
FTMS Fourier Transformation Mass Spectroscopy<br />
full-scan type Provides a full mass spectrum of<br />
each analyte or parent ion. With the full-scan<br />
type, the mass analyzer is scanned from the first<br />
mass to the last mass without interruption. Also<br />
known as single-stage full-scan type.<br />
FWHM Full Width at Half Maximum<br />
g gram<br />
G Gauss; giga (10 9 )<br />
GC gas chromatograph; gas chromatography<br />
Glossary: FFT<br />
GC/MS gas chromatography / mass spectrometer<br />
GUI graphical user interface<br />
h hour<br />
h height<br />
handshake A signal that acknowledges that<br />
communication can take place.<br />
HCD Higher Energy Collision Induced<br />
Dissociation<br />
header information Data stored in each data file<br />
that summarizes the information contained in the<br />
file.<br />
H-ESI source Heated-electrospray ionization<br />
(H-ESI) converts ions in solution into ions in the<br />
gas phase by using electrospray ionization (ESI)<br />
in combination with heated auxiliary gas.<br />
high performance liquid chromatography<br />
(HPLC) Liquid chromatography in which the<br />
liquid is driven through the column at high<br />
pressure. Also known as high pressure liquid<br />
chromatography.<br />
HPLC See high performance liquid<br />
chromatography (HPLC).<br />
HV high voltage<br />
Hz hertz (cycles per second)<br />
ID inside diameter<br />
IEC International Electrotechnical Commission<br />
Thermo Fisher Scientific <strong>LTQ</strong> <strong>Orbitrap</strong> <strong>XL</strong> <strong>Hardware</strong> <strong>Manual</strong> G-3
Glossary: IEEE<br />
IEEE Institute of Electrical and Electronics<br />
Engineers<br />
in inch<br />
instrument method A set of experiment<br />
parameters that define Xcalibur operating settings<br />
for the autosampler, liquid chromatograph (LC),<br />
mass spectrometer, divert valve, syringe pump,<br />
and so on. Instrument methods are saved as file<br />
type .meth.<br />
I/O input/output<br />
ion gauge Measures the pressure in the mass<br />
analyzer region (high vacuum region) of the<br />
vacuum manifold.<br />
ion optics Focuses and transmits ions from the<br />
API source to the mass analyzer.<br />
ion source A device that converts samples to gasphase<br />
ions.<br />
k kilo (10 3 , 1000)<br />
K kilo (2 10 , 1024)<br />
KEGG Kyoto Encyclopedia of Genes and<br />
Genomes<br />
kg kilogram<br />
l length<br />
L liter<br />
LAN local area network<br />
lb pound<br />
LC See liquid chromatography (LC).<br />
LC/MS See liquid chromatography / mass<br />
spectrometry (LC/MS).<br />
LED light-emitting diode<br />
liquid chromatography (LC) A form of elution<br />
chromatography in which a sample partitions<br />
between a stationary phase of large surface area<br />
and a liquid mobile phase that percolates over the<br />
stationary phase.<br />
liquid chromatography / mass spectrometry<br />
(LC/MS) An analytical technique in which a highperformance<br />
liquid chromatograph (LC) and a<br />
mass spectrometer (MS) are combined.<br />
μ micro (10 -6 )<br />
m meter; milli (10 -3 )<br />
M mega (10 6 )<br />
M + molecular ion<br />
MALDI See matrix-assisted laser desorption/<br />
ionization (MALDI).<br />
matrix-assisted laser desorption/ionization<br />
(MALDI) Ionization by effect of illumination with<br />
a beam of laser generated light onto a matrix<br />
containing a small proportion of analyte. A mass<br />
spectrometric technique that is used for the<br />
analysis of large biomolecules.<br />
MB Megabyte (1 048 576 bytes)<br />
MH + protonated molecular ion<br />
min minute<br />
mL milliliter<br />
mm millimeter<br />
MRFA A peptide with the amino acid sequence<br />
methionine–arginine–phenylalanine–alanine.<br />
MS mass spectrometer; mass spectrometry<br />
MS MS n power: where n = 1<br />
MS scan modes Scan modes in which only one<br />
stage of mass analysis is performed. The scan<br />
types used with the MS scan modes are full-scan<br />
G-4 <strong>LTQ</strong> <strong>Orbitrap</strong> <strong>XL</strong> <strong>Hardware</strong> <strong>Manual</strong> Thermo Fisher Scientific
type and selected ion monitoring (SIM) scan<br />
type.<br />
MSDS Material Safety Data Sheet<br />
MS/MS Mass spectrometry/mass spectrometry, or<br />
tandem mass spectrometry is an analytical<br />
technique that involves two stages of mass<br />
analysis. In the first stage, ions formed in the ion<br />
source are analyzed by an initial analyzer. In the<br />
second stage, the mass-selected ions are<br />
fragmented and the resultant ionic fragments are<br />
mass analyzed.<br />
MSn scan mode The scan power equal to 1 to 10,<br />
where the scan power is the power n in the<br />
expression MSn. MSn is the most general<br />
expression for the scan mode, which can include<br />
the following:<br />
• The scan mode corresponding to the one stage<br />
of mass analysis in a single-stage full-scan<br />
experiment or a selected ion monitoring (SIM)<br />
experiment<br />
• The scan mode corresponding to the two stages<br />
of mass analysis in a two-stage full-scan<br />
experiment or a selected reaction monitoring<br />
(SRM) experiment<br />
• The scan mode corresponding to the three to<br />
ten stages of mass analysis (n = 3 to n = 10) in a<br />
multi-stage full-scan experiment or a<br />
consecutive reaction monitoring (CRM)<br />
experiment.<br />
See also MS scan modes and MS/MS.<br />
multipole A symmetrical, parallel array of<br />
(usually) four, six, or eight cylindrical rods that<br />
acts as an ion transmission device. An RF voltage<br />
and dc offset voltage are applied to the rods to<br />
create an electrostatic field that efficiently<br />
transmits ions along the axis of the multipole<br />
rods.<br />
m/z Mass-to-charge ratio. An abbreviation used to<br />
denote the quantity formed by dividing the mass<br />
of an ion (in u) by the number of charges carried<br />
Glossary: MSDS<br />
by the ion.<br />
For example, for the ion C 7 H 7 2+ , m/z = 45.5.<br />
n nano (10 -9 )<br />
nanospray ionization (NSI) A type of<br />
electrospray ionization (ESI) that accommodates<br />
very low flow rates of sample and solvent on the<br />
order of 1 to 20 nL/min (for static nanospray) or<br />
100 to 1000 nL/min (for dynamic nanospray).<br />
NCBI National Center for Biotechnology<br />
Information (USA)<br />
NIST National Institute of Standards and<br />
Technology (USA)<br />
NMR Normal Mass Range<br />
NSI See nanospray ionization (NSI).<br />
octapole An octagonal array of cylindrical rods<br />
that acts as an ion transmission device. An RF<br />
voltage and dc offset voltage applied to the rods<br />
create an electrostatic field that transmits the ions<br />
along the axis of the octapole rods.<br />
OD outside diameter<br />
OT <strong>Orbitrap</strong><br />
Ω ohm<br />
p pico (10 -12 )<br />
Pa pascal<br />
PCB printed circuit board<br />
PDA detector Photodiode Array detector is a<br />
linear array of discrete photodiodes on an<br />
integrated circuit chip. It is placed at the image<br />
plane of a spectrometer to allow a range of<br />
wavelengths to be detected simultaneously.<br />
PE protective earth<br />
PID proportional / integral / differential<br />
Thermo Fisher Scientific <strong>LTQ</strong> <strong>Orbitrap</strong> <strong>XL</strong> <strong>Hardware</strong> <strong>Manual</strong> G-5
Glossary: P/N<br />
P/N part number<br />
p-p peak-to-peak voltage<br />
ppm parts per million<br />
PQD pulsed-Q dissociation<br />
psig pounds per square inch, gauge<br />
PTM posttranslational modification<br />
quadrupole A symmetrical, parallel array of four<br />
hyperbolic rods that acts as a mass analyzer or an<br />
ion transmission device. As a mass analyzer, one<br />
pair of opposing rods has an oscillating radio<br />
frequency (RF) voltage superimposed on a<br />
positive direct current (dc) voltage. The other<br />
pair has a negative dc voltage and an RF voltage<br />
that is 180 degrees out of phase with the first pair<br />
of rods. This creates an electrical field (the<br />
quadrupole field) that efficiently transmits ions of<br />
selected mass-to-charge ratios along the axis of<br />
the quadrupole rods.<br />
RAM random access memory<br />
raw data Uncorrected liquid chromatograph and<br />
mass spectrometer data obtained during an<br />
acquisition. Xcalibur and Xcalibur-based software<br />
store this data in a file that has a .raw file<br />
extension.<br />
resolution The ability to distinguish between two<br />
points on the wavelength or mass axis.<br />
retention time (RT) The time after injection at<br />
which a compound elutes. The total time that the<br />
compound is retained on the chromatograph<br />
column.<br />
RF radio frequency<br />
RF lens A multipole rod assembly that is operated<br />
with only radio frequency (RF) voltage on the<br />
rods. In this type of device, virtually all ions have<br />
stable trajectories and pass through the assembly.<br />
RF voltage An ac voltage of constant frequency<br />
and variable amplitude that is applied to the ring<br />
electrode or endcaps of the mass analyzer or to<br />
the rods of a multipole. Because the frequency of<br />
this ac voltage is in the radio frequency (RF)<br />
range, it is referred to as RF voltage.<br />
RMS root mean square<br />
ROM read-only memory<br />
rotary-vane pump A mechanical vacuum pump<br />
that establishes the vacuum necessary for the<br />
proper operation of the turbomolecular pump.<br />
(Also called a roughing pump or forepump.)<br />
RS-232 An accepted industry standard for serial<br />
communication connections. This<br />
Recommended Standard (RS) defines the specific<br />
lines and signal characteristics used by serial<br />
communications controllers to standardize the<br />
transmission of serial data between devices.<br />
RT An abbreviated form of the phrase retention<br />
time (RT). This shortened form is used to save<br />
space when the retention time (in minutes) is<br />
displayed in a header, for example, RT: 0.00-3.75.<br />
s second<br />
selected ion monitoring (SIM) scan type A scan<br />
type in which the mass spectrometer acquires and<br />
records ion current at only one or a few selected<br />
mass-to-charge ratio values.<br />
See also selected reaction monitoring (SRM) scan<br />
type.<br />
selected reaction monitoring (SRM) scan type A<br />
scan type with two stages of mass analysis and in<br />
which a particular reaction or set of reactions,<br />
such as the fragmentation of an ion or the loss of<br />
a neutral moiety, is monitored. In SRM a limited<br />
number of product ions is monitored.<br />
SEM secondary electron multiplier<br />
Serial Peripheral Interface (SPI) hardware and<br />
firmware communications protocol<br />
G-6 <strong>LTQ</strong> <strong>Orbitrap</strong> <strong>XL</strong> <strong>Hardware</strong> <strong>Manual</strong> Thermo Fisher Scientific
serial port An input/output location (channel) for<br />
serial data transmission.<br />
sheath gas The inner coaxial gas (nitrogen), which<br />
is used in the API source to help nebulize the<br />
sample solution into a fine mist as the sample<br />
solution exits the ESI or APCI nozzle.<br />
signal-to-noise ratio (S/N) The ratio of the signal<br />
height (S) to the noise height (N). The signal<br />
height is the baseline corrected peak height. The<br />
noise height is the peak-to-peak height of the<br />
baseline noise.<br />
SIM See selected ion monitoring (SIM) scan type.<br />
skimmer A vacuum baffle between the higher<br />
pressure capillary-skimmer region and the lower<br />
pressure region. The aperture of the skimmer is<br />
offset with respect to the bore of the ion transfer<br />
capillary.<br />
source CID A technique for fragmenting ions in<br />
an atmospheric pressure ionization (API) source.<br />
Collisions occur between the ion and the<br />
background gas, which increase the internal<br />
energy of the ion and stimulate its dissociation.<br />
SPI See Serial Peripheral Interface (SPI).<br />
SRM See selected reaction monitoring (SRM) scan<br />
type.<br />
sweep gas Nitrogen gas that flows out from<br />
behind the sweep cone in the API source. Sweep<br />
gas aids in solvent declustering and adduct<br />
reduction.<br />
syringe pump A device that delivers a solution<br />
from a syringe at a specified rate.<br />
target compound A compound that you want to<br />
identify or quantitate or that a specific protocol<br />
(for example, an EPA method) requires that you<br />
look for. Target compounds are also called<br />
analytes, or target analytes.<br />
TIC See total ion current (TIC).<br />
Torr torr<br />
Glossary: serial port<br />
total ion current (TIC) The sum of the ion<br />
current intensities across the scan range in a mass<br />
spectrum.<br />
tube lens offset The voltage offset from ground<br />
that is applied to the tube lens to focus ions<br />
toward the opening of the skimmer.<br />
See also source CID.<br />
Tune Method A defined set of mass spectrometer<br />
tune parameters for the ion source and mass<br />
analyzer. Tune methods are defined by using the<br />
Tune Plus (LCQ Series, LXQ, and <strong>LTQ</strong>) or Tune<br />
Master (TSQ Quantum) window and saved as<br />
the file type .LCQTune, .<strong>LTQ</strong>Tune, or.TSQTune,<br />
respectively.<br />
A tune method stores tune parameters only.<br />
(Calibration parameters are stored separately, not<br />
with the tune method.)<br />
tune parameters Instrument parameters whose<br />
values vary with the type of experiment.<br />
turbomolecular pump A vacuum pump that<br />
provides a high vacuum for the mass spectrometer<br />
and detector system.<br />
TWA time weighted average<br />
u atomic mass unit<br />
UHV ultra high vacuum<br />
Ultramark 1621 A mixture of<br />
perfluoroalkoxycyclotriphosphazenes used for ion<br />
trap calibration and tuning. It provides ESI singly<br />
charged peaks at m/z 1022.0, 1122.0, 1222.0,<br />
1322.0, 1422.0, 1522.0, 1622.0, 1722.0, 1822.0,<br />
and 1921.9.<br />
UMR Universal Mass Range<br />
V volt<br />
V ac volts alternating current<br />
Thermo Fisher Scientific <strong>LTQ</strong> <strong>Orbitrap</strong> <strong>XL</strong> <strong>Hardware</strong> <strong>Manual</strong> G-7
Glossary: V dc<br />
V dc volts direct current<br />
vacuum manifold A thick-walled, aluminum<br />
chamber with machined flanges on the front and<br />
sides and various electrical feedthroughs and gas<br />
inlets that encloses the API stack, ion optics, mass<br />
analyzer, and ion detection system.<br />
vacuum system Components associated with<br />
lowering the pressure within the mass<br />
spectrometer. A vacuum system includes the<br />
vacuum manifold, pumps, pressure gauges, and<br />
associated electronics.<br />
vent valve A valve that allows the vacuum<br />
manifold to be vented to filtered air or to the gas<br />
supply. A solenoid-operated valve.<br />
vol volume<br />
w width<br />
W watt<br />
G-8 <strong>LTQ</strong> <strong>Orbitrap</strong> <strong>XL</strong> <strong>Hardware</strong> <strong>Manual</strong> Thermo Fisher Scientific
Index<br />
Numerics<br />
017 2350 3-6<br />
105 0160 3-6<br />
117 5000 4-4<br />
117 5010 4-4<br />
118 4490 4-3<br />
205 4221 1-37<br />
205 5810 1-43<br />
206 0501 1-35<br />
206 1440 1-37<br />
206 2130 1-39<br />
206 4132 1-34<br />
206 4150 1-36<br />
207 6470 1-34<br />
207 7991 1-53<br />
207 8900 1-33<br />
207 8930 1-48<br />
207 9581 1-50<br />
207 9591 1-50<br />
207 9611 1-52<br />
207 9640 1-47<br />
208 1480 1-55<br />
208 2540 1-50<br />
209 9810 1-46<br />
A<br />
Active Pirani gauge (APG) 1-22<br />
active temperature control 1-17<br />
AGC 1-12<br />
air flow 1-4<br />
analog signals 1-37<br />
analyzer<br />
chamber temperature 1-48<br />
system 2-9<br />
temperature 1-28<br />
anti-aliasing filters 1-36<br />
API source<br />
safety interlock switch 2-8<br />
settings 2-11<br />
Automatic Gain Control (AGC) 1-12<br />
autosampler 2-6–2-7<br />
auxiliary gas 1-25<br />
axial ion ejection 1-12<br />
axial oscillations 1-13<br />
frequency 1-16<br />
Thermo Fisher Scientific <strong>LTQ</strong> <strong>Orbitrap</strong> <strong>XL</strong> <strong>Hardware</strong> <strong>Manual</strong> I-1<br />
B<br />
bakeout 3-4<br />
controls 1-7–1-8<br />
timer 1-8, 3-4–3-5<br />
bakeout procedure<br />
indication 1-8<br />
starting 1-7, 3-4<br />
stopping 1-7, 3-4<br />
basic system operations 2-1<br />
bath gas 1-14, 1-25<br />
buttons<br />
Display Status View 2-9<br />
On/Standby 2-4<br />
system bakeout 1-7<br />
C<br />
cable tie 1-10<br />
calibration parameters 2-11<br />
CAN bus 1-41<br />
CE voltages 1-52<br />
central electrode 1-13<br />
voltages 1-15, 1-52<br />
central electrode power supply board 1-17, 1-45, 1-52<br />
diagnostic LEDs 1-53<br />
location 1-52<br />
central electrode pulser board 1-45, 1-47<br />
diagnostic LEDs 1-48<br />
location 1-47<br />
changing, the chiller operating fluid 3-7<br />
circuit breakers 1-7–1-8<br />
cleaning, the instrument surface 3-3<br />
CLT compartment 1-19<br />
CLT RF main board 1-14, 1-26, 1-45, 1-51<br />
diagnostic LEDs 1-51, 1-53<br />
location 1-50<br />
CLT RF unit 1-50<br />
CLT RF voltage 1-14<br />
Cold Ion Gauge 1-20, 1-22–1-23, 1-31, 1-33<br />
collision gas 1-14, 1-25<br />
HCD 1-14<br />
inlet 1-11<br />
linear trap 1-25<br />
Communication LED 1-40<br />
communication link 1-6<br />
condenser filter, of recirculating chiller 3-7<br />
control elements 1-6<br />
control panel 1-7
Index: D<br />
control unit, for turbopumps 1-21<br />
cooling water 1-10<br />
circuit 1-17, 1-28–1-29<br />
flow control sensor 1-28<br />
properties 1-29<br />
temperature 1-28<br />
cover lid, for bakeout controls 1-8<br />
C-Trap 1-13–1-14, 1-18, 1-26, 1-50<br />
cycle time 1-5<br />
D<br />
data acquisition analog board 1-34–1-36<br />
diagnostic LEDs 1-37<br />
location 1-34, 1-36<br />
data acquisition digital PCI board 1-34–1-35<br />
diagnostic LEDs 1-36<br />
location 1-34–1-35<br />
data acquisition unit 1-34<br />
data communication 1-31<br />
data system 1-6, 1-10, 1-23, 1-35, 1-37, 2-6–2-7, 2-10<br />
log file 2-3<br />
DE voltages 1-52<br />
default values, of tune and calibration parameters 2-11<br />
deflector electrode (DE) voltages 1-52<br />
Display Status View button 2-9<br />
distilled water 3-3<br />
dynamic range 1-5<br />
E<br />
electric power, for recirculating chiller 1-29<br />
electrodynamic squeezing 1-15<br />
electronic boards<br />
data acquisition analog 1-36<br />
data acquisition digital PCI 1-35<br />
instrument control 1-37<br />
ion optic supply 1-46<br />
left side 1-45<br />
power distribution 1-39<br />
preamplifier 1-33<br />
right side 1-32<br />
electronic connections, linear trap 1-31<br />
emergency shutdown 2-2<br />
error messages 1-23, 1-40, 1-42<br />
Ethernet 1-10<br />
ports 1-11<br />
evacuating, after a complete shut down 3-4<br />
exchanging, the lubricant reservoir of the turbopumps 3-6<br />
exhaust<br />
hose 1-10<br />
system 1-10, 1-21<br />
external calibration 1-5<br />
external connections 1-11<br />
extracting voltage 1-14<br />
extraction, of ion packets 1-14<br />
I-2 <strong>LTQ</strong> <strong>Orbitrap</strong> <strong>XL</strong> <strong>Hardware</strong> <strong>Manual</strong> Thermo Fisher Scientific<br />
F<br />
fingerprints, removing 3-3<br />
flow rates<br />
cooling water 1-28<br />
HCD collision gas 1-27<br />
nitrogen 1-26<br />
fluid bag filter 3-7<br />
focusing potentials 1-54<br />
forepumps 1-21<br />
cabinet 1-7, 1-21<br />
effluent 1-22<br />
linear trap 1-19, 1-21<br />
location 1-7, 1-12, 1-21<br />
oil level 1-22<br />
oil mist filters 1-21, 3-6<br />
power supply 1-22<br />
switches 1-22<br />
front panel 1-4<br />
front side, LEDs 1-6<br />
FT Electronics switch 1-6, 1-9, 1-42, 3-4<br />
fuse 1-43<br />
G<br />
gas ballast 1-22<br />
gas flow dividers 1-27<br />
HCD collision gas 1-27<br />
nitrogen 1-26<br />
gas pressures 2-9<br />
gas supply 1-25<br />
helium 1-10<br />
nitrogen 1-10<br />
schematics 1-25<br />
gate voltage 1-46<br />
gloves 3-2<br />
ground wires 1-32<br />
H<br />
harmonic oscillations 1-13<br />
hazardous materials 1-22<br />
HCD<br />
collision cell 1-46<br />
collision gas 1-26<br />
collision gas supply 1-10<br />
flow rate, of collision gas 1-27<br />
housing 1-20<br />
status, of collision gas valve 1-40<br />
valve for collision gas 1-27<br />
heated components 2-6
heater control 1-42<br />
helium<br />
gas capillary 1-26<br />
inlet 1-11<br />
purging the line 2-9<br />
supply 1-10<br />
high voltage power supply board 1-14, 1-45, 1-54–1-55<br />
diagnostic LEDs 1-55<br />
location 1-53<br />
high voltage, at PCBs 1-30<br />
I<br />
image current 1-13, 1-15, 1-33<br />
instrument<br />
controls 1-7<br />
diagnostics 1-30<br />
forevacuum measurement 1-22<br />
high vacuum measurement 1-22<br />
parts 4-1<br />
rear side 1-7<br />
right side 1-10<br />
shutdown 1-40<br />
switching off 1-10, 2-2<br />
instrument control board 1-37–1-38<br />
diagnostic LEDs 1-38<br />
location 1-32, 1-34, 1-37<br />
software status LEDs 1-39<br />
internal calibration 1-5<br />
internal computer 1-32, 1-34<br />
add-ons 1-35–1-36<br />
data communication 1-31<br />
location 1-34<br />
rebooting 2-10<br />
timer 1-35<br />
ion dephasing 1-16<br />
ion optic supply board 1-14, 1-18, 1-46<br />
diagnostic LEDs 1-47<br />
location 1-45–1-46<br />
ion oscillation 1-15<br />
ion packets 1-15<br />
shape 1-16<br />
ion trajectory 1-13<br />
ionization techniques 1-12<br />
ions<br />
detection 1-15<br />
electrodynamic squeezing 1-15<br />
image current 1-15<br />
packet shape 1-16<br />
L<br />
laboratory<br />
exhaust system 1-21<br />
gas supply 1-26<br />
LC, operating 2-4–2-5<br />
LEDs<br />
power control 1-8<br />
system status 1-6, 1-8<br />
vacuum 1-6<br />
left side panel, of instrument 1-4<br />
lens voltages 1-53<br />
line power 1-10<br />
linear trap 1-12, 1-37<br />
collision gas 1-25<br />
Communication LED 2-8, 2-10<br />
electronics 1-31<br />
forepumps 1-19, 1-21<br />
LEDs 1-6<br />
maintenance 3-1<br />
Power LED 2-8, 2-10<br />
power panel 1-7, 1-21<br />
Reset button 2-10<br />
System LED 2-8, 2-10<br />
system status LEDs 1-7<br />
turbopump 1-21<br />
Vacuum LED 2-8<br />
vacuum measurement 1-23<br />
vent valve 1-23, 1-26–1-27, 2-2–2-3<br />
Link Port Signal line 1-37<br />
location, of nitrogen pressure regulator 1-27<br />
log file 2-3<br />
lubricant reservoir, of turbopumps 3-6<br />
Index: I<br />
Thermo Fisher Scientific <strong>LTQ</strong> <strong>Orbitrap</strong> <strong>XL</strong> <strong>Hardware</strong> <strong>Manual</strong> I-3<br />
M<br />
main circuit breaker 2-5<br />
main power switch 1-6–1-7, 1-10, 1-42, 2-2<br />
Off position 2-2<br />
securing 1-10<br />
main RF supply 1-50<br />
mains failure 1-43, 2-2, 3-4<br />
maintenance 1-12<br />
API source 1-12<br />
linear trap 3-1<br />
procedures 3-2<br />
recirculating chiller 3-7<br />
vacuum system 3-6<br />
mass accuracy 1-5<br />
mass range 1-5<br />
micro controller 1-37–1-38<br />
MS/MS 1-5<br />
multiple socket outlets 1-8, 1-42, 2-2<br />
N<br />
nitrogen 1-25<br />
flow rates 1-26<br />
gas flow 1-26<br />
inlet 1-11
Index: O<br />
O<br />
pressure 1-26<br />
pressure regulator 1-26–1-27<br />
supply 1-10<br />
tubing 1-26–1-27<br />
octapole RF voltages 1-46<br />
oil<br />
level 1-22<br />
mist filters 1-21, 3-6<br />
On/Standby button 2-4<br />
open-split interface 1-26<br />
operating vacuum 1-6<br />
options, power supply 1-32<br />
<strong>Orbitrap</strong><br />
applied voltages 1-14<br />
central electrode 1-48<br />
chamber 1-19<br />
control LEDs 1-7<br />
detection electrodes 1-48<br />
differential pumping 1-14<br />
electrodes 1-13<br />
ion extraction 1-14<br />
ion trajectories 1-16<br />
layout 1-14<br />
lenses 1-14<br />
measuring principle 1-13<br />
principle 1-13<br />
system status LEDs 1-7<br />
voltages 1-14, 1-16<br />
output current 1-33<br />
P<br />
padlock 1-10<br />
parameters<br />
calibration 2-11<br />
default values 2-11<br />
tune 2-11<br />
part numbers 4-1<br />
Peltier element 1-17, 1-48, 1-50<br />
location 1-52<br />
water supply 1-20, 1-33<br />
Penning gauge 1-42<br />
Pirani gauge 1-20, 1-23, 1-42<br />
power<br />
connector 1-7, 1-11<br />
connector for linear trap 1-12<br />
control LEDs 1-9<br />
control panel 1-8–1-9<br />
panel 1-7<br />
supply for linear trap 1-12<br />
power control LEDs 1-9<br />
power distribution<br />
operating states 1-42<br />
resetting 1-23<br />
working modes 1-42<br />
power distribution board 1-6, 1-8–1-9, 1-28, 1-37, 1-39, 1-42<br />
location 1-32, 1-39<br />
status LEDs 1-41<br />
power fail detector 2-3<br />
Power LED 1-6<br />
power outlet, for peripheral devices 1-11<br />
power supply 1 board 1-32, 1-43–1-44<br />
diagnostic LEDs 1-44<br />
location 1-43<br />
power supply 2 board 1-37<br />
diagnostic LEDs 1-37<br />
location 1-34<br />
preamplifier 1-20, 1-33<br />
diagnostic LEDs 1-34<br />
location 1-32–1-33<br />
pressure regulator<br />
location 1-27<br />
nitrogen 1-26–1-27<br />
preventive maintenance 2-6, 3-2<br />
printed circuit boards 1-30<br />
pumping, the system 2-7, 3-4<br />
pumps<br />
exhaust 1-10<br />
forevacuum 1-21<br />
manuals 3-6<br />
oil mist filters 1-21<br />
purging, helium line 2-9<br />
I-4 <strong>LTQ</strong> <strong>Orbitrap</strong> <strong>XL</strong> <strong>Hardware</strong> <strong>Manual</strong> Thermo Fisher Scientific<br />
Q<br />
quality, of vacuum 1-40<br />
R<br />
rear panel 1-4<br />
rebooting, of instrument 2-3<br />
recirculating chiller 1-4, 1-29<br />
condenser filter 3-7<br />
fluid bag filter 3-7<br />
maintenance 3-7<br />
reflector DC voltages 1-46<br />
removing<br />
gases 2-9, 3-4<br />
stains 3-3<br />
repair covering letter 3-3<br />
replaceable parts 4-1<br />
electronics (left panel) 4-8<br />
electronics (right panel) 4-7<br />
electronics analyzer <strong>Orbitrap</strong> 4-8<br />
electronics main supply 4-9<br />
pumping system <strong>Orbitrap</strong> 4-3
eplacements, for turbopump lubricant reservoirs 3-6<br />
reservoir, of recirculating chiller 3-7<br />
resetting<br />
instrument 2-10<br />
system parameters 2-11<br />
tune and calibration parameters 2-11<br />
resolution 1-5<br />
RF CLT main board 1-53<br />
RF off & feedback board 1-45, 1-50–1-51<br />
RF output control 1-46<br />
RF voltage supply 1-50<br />
right side panel, of instrument 1-4<br />
routine maintenance 2-6<br />
S<br />
safety interlock switch 2-8<br />
SEM detector 1-12<br />
serial port connector 1-37<br />
service switch, of linear trap 1-9<br />
setting up, conditions for operation 2-8<br />
sheath gas 1-25<br />
shutdown 1-43, 2-5, 2-7<br />
signal communication 1-31<br />
software 1-28, 1-30, 2-7<br />
debugging 1-38<br />
status LEDs of the instrument control board 1-39<br />
Tune Plus window 2-4<br />
spacers, at rear instrument side 1-4<br />
specifications 1-5<br />
spectrum 1-16<br />
SPI bus 1-31, 1-48, 1-50, 1-52, 1-54<br />
location of termination board 1-55<br />
termination board 1-50–1-51, 1-53, 1-55<br />
stains, removing 3-3<br />
standby condition 2-4<br />
starting up, instrument 2-7<br />
status LEDs, of the power distribution board 1-41<br />
strainer 3-7<br />
sweep gas 1-25<br />
switches<br />
forepumps 1-22<br />
FT Electronics 1-9, 3-4<br />
linear trap 1-9<br />
main power 1-10<br />
Vacuum Pumps 1-9<br />
switching on, the vacuum system 1-23<br />
system<br />
bakeout 1-6–1-7, 1-24, 2-7, 3-4<br />
bakeout timer 1-7<br />
buttons for bakeout 1-7<br />
heating 1-24<br />
pump down time 2-8<br />
rebooting 2-3<br />
resetting 2-10<br />
shutdown 2-2, 2-5<br />
standby 2-4<br />
starting up 2-7<br />
status LEDs 1-6, 1-40<br />
timing 1-35<br />
venting 1-27, 2-2<br />
Index: S<br />
Thermo Fisher Scientific <strong>LTQ</strong> <strong>Orbitrap</strong> <strong>XL</strong> <strong>Hardware</strong> <strong>Manual</strong> I-5<br />
T<br />
temperature<br />
analyzer chamber 1-48<br />
control 1-17<br />
differential 1-17<br />
temperature controller board 1-17, 1-26, 1-45, 1-49<br />
diagnostic LEDs 1-50<br />
location 1-48<br />
thermoelectric elements 1-17<br />
TMP 1 1-19–1-20<br />
TMP 2 1-19–1-20<br />
TMP 3 1-19–1-21<br />
tools 3-2<br />
top lid, of instrument 1-4<br />
transfer chamber 1-12<br />
trap voltage 1-46<br />
tune parameters 2-11<br />
Tune Plus window 1-30, 2-5, 2-9, 2-11<br />
buttons 2-4, 2-9<br />
turbopumps 1-20, 1-37<br />
controller 1-21–1-22<br />
error 1-41<br />
exchanging the lubricant reservoir 3-6<br />
linear trap 1-21<br />
maintenance intervals 3-6<br />
vent valves 1-23<br />
U<br />
UHV chamber 1-17, 1-19–1-20<br />
temperature control 1-17<br />
ultra high vacuum chamber 1-19<br />
uninterruptible power supply 2-3<br />
upper control panel 1-7–1-8<br />
UPS 2-3<br />
user maintenance 3-1–3-2<br />
V<br />
vacuum<br />
chamber 1-19–1-20<br />
compartments 1-19<br />
deterioration 1-24<br />
failure 1-23, 1-40<br />
gauges 1-22, 1-37
Index: W<br />
quality 1-40<br />
safety threshold 1-22–1-23<br />
system 1-10, 1-19<br />
vacuum components<br />
left instrument side 1-20<br />
UHV chamber 1-20<br />
Vacuum LED<br />
instrument 1-6<br />
linear trap 2-8<br />
Vacuum Pumps switch 1-6, 1-9, 1-42<br />
vacuum system<br />
controls 1-22<br />
heating 1-24<br />
maintenance 3-6<br />
moisture 1-24<br />
valve, for HCD collision gas 1-27, 1-40<br />
vent valves 1-27, 2-2–2-3, 2-5<br />
linear trap 1-26, 2-3<br />
venting pressure 1-27<br />
venting, the system 2-3<br />
I-6 <strong>LTQ</strong> <strong>Orbitrap</strong> <strong>XL</strong> <strong>Hardware</strong> <strong>Manual</strong> Thermo Fisher Scientific<br />
W<br />
water 1-10<br />
chiller 1-4<br />
hoses 1-29<br />
ports 1-11<br />
temperature 1-29<br />
wheels, of instrument 1-4<br />
working modes, of the power distribution 1-42<br />
working principle, of the <strong>Orbitrap</strong> 1-3<br />
X<br />
Xcalibur 1-30
Thermo Fisher Scientific Inc.<br />
81 Wyman Street<br />
P.O. Box 9046<br />
Waltham, Massachussetts 02454-9046<br />
United States<br />
www.thermo.com<br />
Part of Thermo Fisher Scientific