FHA-C Series - Harmonic Drive LLC
FHA-C Series - Harmonic Drive LLC
FHA-C Series - Harmonic Drive LLC
- No tags were found...

Create successful ePaper yourself
Turn your PDF publications into a flip-book with our unique Google optimized e-Paper software.
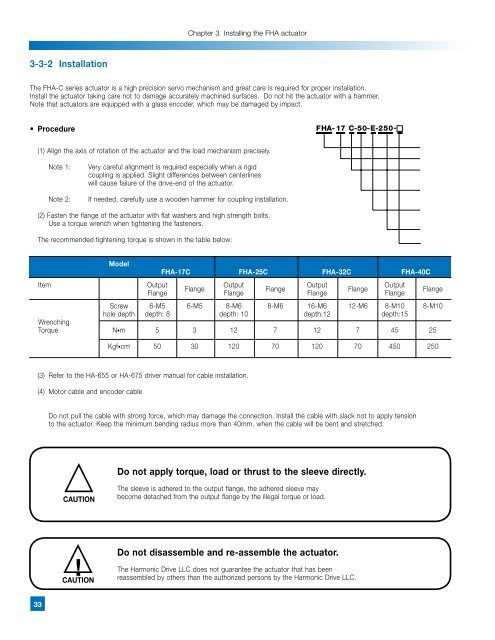
Chapter 3 Installing the <strong>FHA</strong> actuator3-3-2 InstallationThe <strong>FHA</strong>-C series actuator is a high precision servo mechanism and great care is required for proper installation.Install the actuator taking care not to damage accurately machined surfaces. Do not hit the actuator with a hammer.Note that actuators are equipped with a glass encoder, which may be damaged by impact.• Procedure<strong>FHA</strong>- 17 C-50-E -250-(1) Align the axis of rotation of the actuator and the load mechanism precisely.Note 1:Note 2:Very careful alignment is required especially when a rigidcoupling is applied. Slight differences between centerlineswill cause failure of the drive-end of the actuator.If needed, carefully use a wooden hammer for coupling installation.(2) Fasten the flange of the actuator with flat washers and high strength bolts.Use a torque wrench when tightening the fasteners.The recommended tightening torque is shown in the table below:AC servo actuator <strong>FHA</strong> seriesFrame size: 17, 25, 32, 40DesignReduction ratio of harmonic driv50: 1/50100: 1/100Encoder specificationsE: incremental encoderS: absolute encoder (optionaEncoder resolution250 : 2500 p/revOptional specificationsItemModel<strong>FHA</strong>-17C <strong>FHA</strong>-25C <strong>FHA</strong>-32C <strong>FHA</strong>-40COutputOutputOutputOutputFlangeFlangeFlangeFlange Flange Flange FlangeScrew 6-M5 6-M5 8-M6 8-M6 16-M6 12-M6 8-M10 8-M10hole depth depth: 8 depth: 10 depth:12 depth:15WrenchingTorque N•m 5 3 12 7 12 7 45 25Kgf•cm 50 30 120 70 120 70 450 250Flange(3) Refer to the HA-655 or HA-675 driver manual for cable installation.(4) Motor cable and encoder cableDo not pull the cable with strong force, which may damage the connection. Install the cable with slack not to apply tensionto the actuator. Keep the minimum bending radius more than 40mm, when the cable will be bent and stretched.Do not apply torque, load or thrust to the sleeve directly.CAUTIONThe sleeve is adhered to the output flange, the adhered sleeve maybecome detached from the output flange by the illegal torque or load.!CAUTIONDo not disassemble and re-assemble the actuator.The <strong>Harmonic</strong> <strong>Drive</strong> <strong>LLC</strong> does not guarantee the actuator that has beenreassembled by others than the authorized persons by the <strong>Harmonic</strong> <strong>Drive</strong> <strong>LLC</strong>.33