
You also want an ePaper? Increase the reach of your titles
YUMPU automatically turns print PDFs into web optimized ePapers that Google loves.
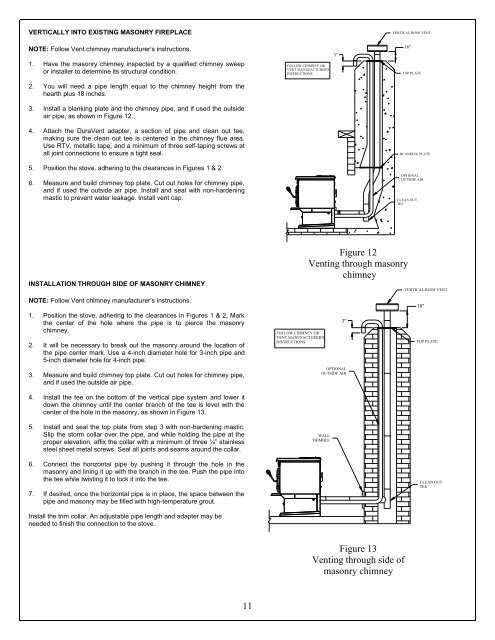
VERTICALLY INTO EXISTING MASONRY FIREPLACENOTE: Follow Vent chimney manufacturer’s instructions.1. Have <strong>the</strong> masonry chimney inspected by a qualified chimney sweepor installer to determine its structural condition.2. You will need a pipe length equal to <strong>the</strong> chimney height from <strong>the</strong>hearth plus 18 inches.3. Install a blanking plate and <strong>the</strong> chimney pipe, and if used <strong>the</strong> outsideair pipe, as shown in Figure 12.4. Attach <strong>the</strong> DuraVent adapter, a section of pipe and clean out tee,making sure <strong>the</strong> clean out tee is centered in <strong>the</strong> chimney flue area.Use RTV, metallic tape, and a minimum of three self-taping screws atall joint connections to ensure a tight seal.5. Position <strong>the</strong> stove, adhering to <strong>the</strong> clearances in Figures 1 & 2.6. Measure and build chimney top plate. Cut out holes for chimney pipe,and if used <strong>the</strong> outside air pipe. Install and seal with non-hardeningmastic to prevent water leakage. Install vent cap.FOLLOW CHIMNEY ORVENT MANUFACTURER'SINSTRUCTIONS3"VERTICAL ROOF VENT18"TOP PLATEBLANKING PLATEOPTIONALOUTSIDE AIRCLEAN OUTTEEINSTALLATION THROUGH SIDE OF MASONRY CHIMNEYNOTE: Follow Vent chimney manufacturer’s instructions.1. Position <strong>the</strong> stove, adhering to <strong>the</strong> clearances in Figures 1 & 2. Mark<strong>the</strong> center of <strong>the</strong> hole where <strong>the</strong> pipe is to pierce <strong>the</strong> masonrychimney.2. It will be necessary to break out <strong>the</strong> masonry around <strong>the</strong> location of<strong>the</strong> pipe center mark. Use a 4-inch diameter hole for 3-inch pipe and5-inch diameter hole for 4-inch pipe.3. Measure and build chimney top plate. Cut out holes for chimney pipe,and if used <strong>the</strong> outside air pipe.FOLLOW CHIMNEY ORVENT MANUFACTURER'SINSTRUCTIONSFigure 12Venting through masonrychimney3"OPTIONALOUTSIDE AIRVERTICAL ROOF VENT18"TOP PLATE4. Install <strong>the</strong> tee on <strong>the</strong> bottom of <strong>the</strong> vertical pipe system and lower itdown <strong>the</strong> chimney until <strong>the</strong> center branch of <strong>the</strong> tee is level with <strong>the</strong>center of <strong>the</strong> hole in <strong>the</strong> masonry, as shown in Figure 13.5. Install and seal <strong>the</strong> top plate from step 3 with non-hardening mastic.Slip <strong>the</strong> storm collar over <strong>the</strong> pipe, and while holding <strong>the</strong> pipe at <strong>the</strong>proper elevation, affix <strong>the</strong> collar with a minimum of three ¼” stainlesssteel sheet metal screws. Seal all joints and seams around <strong>the</strong> collar.WALLTHIMBLE6. Connect <strong>the</strong> horizontal pipe by pushing it through <strong>the</strong> hole in <strong>the</strong>masonry and lining it up with <strong>the</strong> branch in <strong>the</strong> tee. Push <strong>the</strong> pipe into<strong>the</strong> tee while twisting it to lock it into <strong>the</strong> tee.7. If desired, once <strong>the</strong> horizontal pipe is in place, <strong>the</strong> space between <strong>the</strong>pipe and masonry may be filled with high-temperature grout.CLEAN OUTTEEInstall <strong>the</strong> trim collar. An adjustable pipe length and adapter may beneeded to finish <strong>the</strong> connection to <strong>the</strong> stove.Figure 13Venting through side ofmasonry chimney11