IOM - Enviro-Tec
IOM - Enviro-Tec
IOM - Enviro-Tec

You also want an ePaper? Increase the reach of your titles
YUMPU automatically turns print PDFs into web optimized ePapers that Google loves.
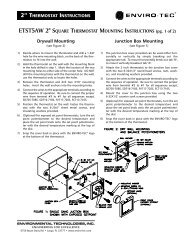
2” THERMOSTAT INSTRUCTIONSAppendix AETST4H 2" SQUARE THERMOSTAT MOUNTING INSTRUCTIONSDrywall Mounting(see Figure 2)1) Decide where to mount the thermostat and drill a 1-3/8"hole for the wire mounting block, on the back of the thermostat,to fit into the wall.2) Hold the thermostat on the wall with the mounting blockin the hole drilled in step 1. Mark the location of the twomounting holes to either side of the center hole. DO NOTdrill the mounting holes with the thermostat on the wall,use the thermostat only to locate the holes.3) Remove the thermostat and drill two 3/16" mountingholes. Insert the wall anchors into the mounting holes.4) Connect the wires to the appropriate terminals accordingto the sequence of operation.5) Position the thermostat on the wall. Fasten the thermostatwith the two 6-20x1" sheet metal screws andinsulating washers provided.6) (Optional) For exposed set point stats, turn the set pointpotentiometer to the desired temperature and place theset point knob onto the set point potentiometer with thedesired temperature marking at the top of the dial.7) Snap the cover back in place with the ENVIRO-TEC ® logoat the bottom of the thermostat.Junction Box Mounting(see Figure 1)1) The junction box cover provided can be used either horizontallyor vertically by simply breaking out theappropriate tab. To mount horizontally break out tab "B",to mount vertically breakout tab "A".2) Attach the 2 inch thermostat to the junction box coverwith the two 6-32X1/2" round head screws, nuts, washers,and insulating washers provided.3) Connect the wires to the appropriate terminals accordingto the sequence of operation.4) Mount the cover to the junction box using the two 6-32X1/2" counter sunk screws provided.5) (Optional) For exposed set point stats, turn the set pointpotentiometer to the desired temperature and place theset point knob onto the set point potentiometer with thedesired temperature marking at the top of the dial.6) Snap the cover back in place with the ENVIRO-TEC ® logoat the bottom of the thermostat.NOTE: The temperature setpoint adjustment on the ETST4H thermostat is reversed from the older (ETSTAT)series thermostats. When using the 600 Series <strong>IOM</strong> manual in conjunction with the ETST4H, the directionof rotation of this setpoint should be reversed from the direction stated in manual's instructions.