Wireless Bluetooth USB Printer Adapter - Icecat.biz
Wireless Bluetooth USB Printer Adapter - Icecat.biz
Wireless Bluetooth USB Printer Adapter - Icecat.biz
You also want an ePaper? Increase the reach of your titles
YUMPU automatically turns print PDFs into web optimized ePapers that Google loves.
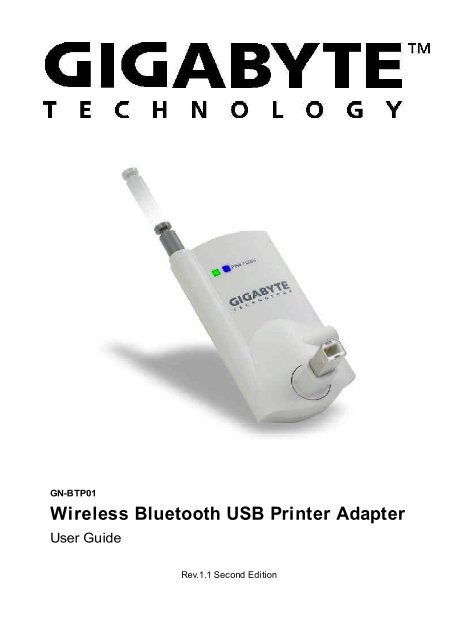
GN-BTP01<strong>Wireless</strong> <strong>Bluetooth</strong> <strong>USB</strong> <strong>Printer</strong> <strong>Adapter</strong>User GuideRev.1.1 Second Edition
GN-BTP01 <strong>Bluetooth</strong> <strong>USB</strong> <strong>Printer</strong> <strong>Adapter</strong>This device complies with Part 15 of the FCC Rules. Operation is subject to the followingtwo conditions:(1) this device may not cause harmful interference, and (2) this devicemust accept any interference received, including interference that may cause undesiredoperation.FEDERAL COMMUNICATIONS COMMISSIONINTERFERENCE STATEMENTThis equipment has been tested and found to comply with the limits for a Class B digitaldevice, pursuant to Part 15 of the FCC Rules. These limits are designed to provide reasonableprotection against harmful interference in a residential installation. This equipmentgenerates, uses and can radiate radio frequency energy and, if not installed andused in accordance with the instructions, may cause harmful interference to radiocommunications. However, there is no guarantee that interference will not occur in a particularinstallation. If this equipment does cause harmful interference to radio or televisionreception, which can be determined by turning the equipment off and on, the user is encouragedto try to correct the interference by one or more of the following measures:-- Reorient or relocate the receiving antenna.-- Increase the separation between the equipment and receiver.-- Connect the equipment into an outlet on a circuit different from that to which the receiveris connected.-- Consult the dealer or an experienced radio/TV technician for help.CAUTION:Any changes or modifications not expressly approved by the party responsible for compliancecould void the user’s authority to operate the equipment.FCC RF Radiation Exposure StatementThis equipment complies with FCC RF radiation exposure limits set forth for an uncontrolledenvironment. This equipment should be installed and operated with a minimumdistance of 20cm between the radiator and your body.The antenna(s) used for this transmitter must not be co-located or operating in conjunctionwith any other antenna or transmitter.
ContentsGN-BTP01 <strong>Bluetooth</strong> <strong>USB</strong> <strong>Printer</strong> <strong>Adapter</strong>Chapter1 Introduction................................................... 41.1 Package Contents ...............................................................................................................41.2 System Requirements........................................................................................................41.3 LED Status ............................................................................................................................41.4 Feature ...................................................................................................................................51.5 Specification.........................................................................................................................5Chapter2 Getting Started ..............................................62.1 Install the <strong>Bluetooth</strong> <strong>USB</strong> <strong>Printer</strong> <strong>Adapter</strong> ....................................................................62.2 How to configure the printer for Windows 2000 .........................................................62.3 An installed <strong>USB</strong> or LTP port printer setting .............................................................113
GN-BTP01 <strong>Bluetooth</strong> <strong>USB</strong> <strong>Printer</strong> <strong>Adapter</strong>Chapter1 IntroductionThe GN-BTP01 <strong>Bluetooth</strong> <strong>USB</strong> <strong>Printer</strong> <strong>Adapter</strong> is a quick and effective solution that willturn your printer quickly into wireless printable machine. The user can print contracts,reports or presentations using your device with <strong>Bluetooth</strong> wireless technology such asadesktop, laptop, PDA or cell phone to the GN-BTP01 installed printer. No wires. No accesspoints. You can whatever you need, whenever you need it.1.1 Package ContentsBefore the installation procedures, please ensure the components are not damaged duringthe shipping. The shipment of the GN-BTP01 includes:-- One Gigabyte GN-BTP01 <strong>Bluetooth</strong> <strong>USB</strong> <strong>Printer</strong> <strong>Adapter</strong>-- One User Guide-- One Power <strong>Adapter</strong> (5V, 2A)-- One Extention <strong>USB</strong> cablePlease contact your local distributor or authorized reseller immediately for any missing ordamaged components. If you require returning the damaged product, you must pack it inthe original packing material or the warranty will be voided.1.2 System Requirements-- A printer with <strong>USB</strong> port1.3 LED StatusDescriptionPower OnData LinkingStatusWhen the Green LED light is on, the GN-BTP01 is receving power.The Blue LED light will flash irregularly.
GN-BTP01 <strong>Bluetooth</strong> <strong>USB</strong> <strong>Printer</strong> <strong>Adapter</strong>1.4 Feature• Remote wake up <strong>Printer</strong>• Highly compatible with versatile printers.• Support client side Widcom <strong>Bluetooth</strong> stack software• High performance radio transceiver• Supporting HCRP & SPP profile• Low power standby mode to enable very efficient Power Management• Weight: 30g+-5g• Dimensions: 80mm x 43mm x 16mm• One-year manufacturer warranty1.5 SpecificationStandardFully <strong>Bluetooth</strong> V1.1 <strong>Bluetooth</strong> operationInterface<strong>USB</strong> male B typeFrequency range2.4~2.483 GHzChannel number 79Modulation FHSS( Frequence hopping spreading spectrum )AntennaExternal antenna supporting diversityCoverage 100 metersRX Sensitivity @ BER 0.1% Typical. -80 dbm, Min -70 dbm ,max -85 dbmLED indicatorsPower on, Link Status5
GN-BTP01 <strong>Bluetooth</strong> <strong>USB</strong> <strong>Printer</strong> <strong>Adapter</strong>Chapter2 Getting StartedNotice: If you have already installed <strong>USB</strong> or LTP port printer, please remove cable andrestart your PC. And then refer to the instruction of Section 2.3.If you don’t have installed the printer drver, please follow the Section2.1 andSection2.2.2.1 Install the <strong>Bluetooth</strong> <strong>USB</strong> <strong>Printer</strong> <strong>Adapter</strong>Step1.Step2.Step3.Step4.Power on the <strong>Printer</strong>.Insert the Blutooth <strong>USB</strong> <strong>Printer</strong> <strong>Adapter</strong> into the <strong>USB</strong> port of the printer.Plug the power firmly into the receptacle on the <strong>Bluetooth</strong> <strong>USB</strong> <strong>Printer</strong> <strong>Adapter</strong>.And then plug the power adapter into an electric service outlet.The connection between <strong>Bluetooth</strong> <strong>USB</strong> <strong>Printer</strong> <strong>Adapter</strong> and printer issuccessfully if the Green LED of the Blutooth <strong>USB</strong> <strong>Printer</strong> <strong>Adapter</strong> is blinking.2.2 How to configure the printer for Windows 2000Step1.Step2.Step3.Step4.Step5.Start the “My <strong>Bluetooth</strong> Places” on your computer.Double click “Entire <strong>Bluetooth</strong> Neighborhood”.It will automatically try to search for other bluetooth device. If not, click “Searchfor devices” (Windows XP user, please click “Veiw devices in range” button.)or “refresh” the list of devices.Wait until the search has finished.Double click the printer icon 'Gigabyte' to pop-up the context menu. Pleaseclick “OK” button to install the printer.
GN-BTP01 <strong>Bluetooth</strong> <strong>USB</strong> <strong>Printer</strong> <strong>Adapter</strong>Step6.Select the manufacturer and model name for your printer and then click OK toinstall printer driver. ( Or click Have Disk to Browse the location of printerdriver and then click OK to install printer driver. )Step7.Select the correct printer name and then click OK to install printer driver. Orclick Have Disk to install the printer driver from Disk or CD-ROM.7
GN-BTP01 <strong>Bluetooth</strong> <strong>USB</strong> <strong>Printer</strong> <strong>Adapter</strong>Step8.The configuration screen of the printer will appear when the printer driver isinstalled completely. Select the <strong>Bluetooth</strong> Port of the printer which you havebeen installed on the Ports page.(For example, ‘port’: Gigabyte, ‘Description’:<strong>Bluetooth</strong> Port, ‘<strong>Printer</strong>’: hp deskjet 920c series ) And then go to the Generalpage.Step9.Click the “Print Test Page” button on the General page. If the test page canprint out successully, the setting is completed. (When data are transmitting, theBlue LED will blinking.) And now, you can use the printer through <strong>Bluetooth</strong><strong>USB</strong> <strong>Printer</strong> <strong>Adapter</strong> to print from any application as you normally would.Notice:Once you had finished the <strong>Bluetooth</strong> printer installation setting, you can printany document through the <strong>Bluetooth</strong> device even the printer does not appearin the “Entire <strong>Bluetooth</strong> Neighborhood”.
GN-BTP01 <strong>Bluetooth</strong> <strong>USB</strong> <strong>Printer</strong> <strong>Adapter</strong>If you have more than two printers with <strong>Bluetooth</strong> <strong>USB</strong> printer adapter or you want tochange a new printer, you need to add port for the new printer or other printers. Pleasefollow the Step10 ~ Step13.Step10.Click the “Add Port” button.Step11.Select “<strong>Bluetooth</strong> <strong>Printer</strong> Port” type and then click “New Port” button.9
GN-BTP01 <strong>Bluetooth</strong> <strong>USB</strong> <strong>Printer</strong> <strong>Adapter</strong>Step12.Please select “Gigabyte” from the list and then click “Connect” button.Step13.The configuration screen of the printer will appear. Now, you can find the newport “Gigabyte(1)” will appear on the port checked list. Please select the newbluetooth port of the printer which you have been installed, and then click“Apply” button. Now, please go to the General Page and click “Print Test Page”button to check if the setup is succussfully. (Please refer to Step9.)
GN-BTP01 <strong>Bluetooth</strong> <strong>USB</strong> <strong>Printer</strong> <strong>Adapter</strong>2.3 An installed <strong>USB</strong> or LTP port printer settingStep1.Step2.Step3.Step4.Step5.Step6.Step7.Step8.Step9.Please remove the printer cable and restart your PC.Power on the <strong>Printer</strong>Insert the <strong>Bluetooth</strong> <strong>USB</strong> <strong>Printer</strong> <strong>Adapter</strong> into the <strong>USB</strong> port of the printer.Plug the power firmly into the receptacle on the <strong>Bluetooth</strong> <strong>USB</strong> <strong>Printer</strong> <strong>Adapter</strong>.And then plug the power adapter into an electricservice outlet.The connection between <strong>Bluetooth</strong> <strong>USB</strong> <strong>Printer</strong> <strong>Adapter</strong> and printer issuccessfully if the Green LED of the Blutooth <strong>USB</strong> <strong>Printer</strong> <strong>Adapter</strong> is blinking.Start the “My <strong>Bluetooth</strong> Places” on your computer.Double click “Entire <strong>Bluetooth</strong> Neighborhood”.It will automatically try to search for other bluetooth device. If not, click “Searchfor devices” (Windows XP user, please click “Veiw devices in range” button.)or “refresh” the list of devices.Wait until the search has finished and check if the printer icon ‘Gigabyte’ is onthe list.Step10.Now, start to configure the printer. Please select “Settings” and “<strong>Printer</strong>s” fromthe Start menu. Right-click the printer which connects with GN-BTP01 andchoose “Properties”.11
GN-BTP01 <strong>Bluetooth</strong> <strong>USB</strong> <strong>Printer</strong> <strong>Adapter</strong>Step11.Select the “Ports” page and click the “Add Port” button.Step12.Select “<strong>Bluetooth</strong> <strong>Printer</strong> Port” type and then click “New Port” button.
GN-BTP01 <strong>Bluetooth</strong> <strong>USB</strong> <strong>Printer</strong> <strong>Adapter</strong>Step13.Please select “Gigabyte” from the list and then click “Connect” button.Step14.The configuration screen of the printer will appear. Now, you can find the newport “Gigabyte(1)” will appear on the port checked list. Please select the newbluetooth port of the printer which you have been installed, and then click“Apply” button. Now, please go to the General Page and click “Print Test Page”button to check if the setup is succussfully. (Please refer to the Section 2.2,Step9)13
GN-BTP01 <strong>Bluetooth</strong> <strong>USB</strong> <strong>Printer</strong> <strong>Adapter</strong>Limited Warranty1-Year WarrantyGigabyte warrants to the original consumer/purchaser that the product free from defects inmaterial and workmanship for no limited time from the original manufactory shipment date.This warranty does not cover the product if it is damaged in the process of being installedor improperly used.Gigabyte may replace or repair the product with either new or reconditioned parts. Repairedor replaced products will be returned to you at the same revision level as receivedor higher at Gigabyte’s option. Gigabyte reverses the right to replace discounted productswith an equivalent generation product.KEEP THIS STUB FOR YOUR PURCHASING RECORDCustomer:Phone No:Address:Email:Model:Serial:Date of Purchase:Place of Purchase:From Whom:Distributor:Customer SatisfactionGIGA-BYTE TECHNOLOGY CO., LTD.No.6, Bau Chiang Road, Hsin-Tien, Taipei Hsien, Taiwan, R.O.C.Tel: 886-2-89124888Fax:886-2-89124007http://www.gigabyte.com.twTechnical SupportE-mail: networksupport@gigabyte.com.tw
15GN-BTP01 <strong>Bluetooth</strong> <strong>USB</strong> <strong>Printer</strong> <strong>Adapter</strong>
www.gigabyte.com.tw25A08-0TP01-F02


