XG-V10XU - diagramas.diagram...
XG-V10XU - diagramas.diagram...
XG-V10XU - diagramas.diagram...
You also want an ePaper? Increase the reach of your titles
YUMPU automatically turns print PDFs into web optimized ePapers that Google loves.
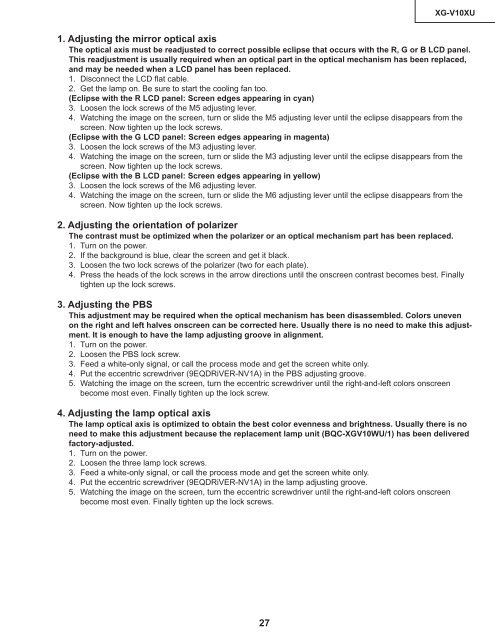
<strong>XG</strong>-<strong>V10XU</strong>1. Adjusting the mirror optical axisThe optical axis must be readjusted to correct possible eclipse that occurs with the R, G or B LCD panel.This readjustment is usually required when an optical part in the optical mechanism has been replaced,and may be needed when a LCD panel has been replaced.1. Disconnect the LCD flat cable.2. Get the lamp on. Be sure to start the cooling fan too.(Eclipse with the R LCD panel: Screen edges appearing in cyan)3. Loosen the lock screws of the M5 adjusting lever.4. Watching the image on the screen, turn or slide the M5 adjusting lever until the eclipse disappears from thescreen. Now tighten up the lock screws.(Eclipse with the G LCD panel: Screen edges appearing in magenta)3. Loosen the lock screws of the M3 adjusting lever.4. Watching the image on the screen, turn or slide the M3 adjusting lever until the eclipse disappears from thescreen. Now tighten up the lock screws.(Eclipse with the B LCD panel: Screen edges appearing in yellow)3. Loosen the lock screws of the M6 adjusting lever.4. Watching the image on the screen, turn or slide the M6 adjusting lever until the eclipse disappears from thescreen. Now tighten up the lock screws.2. Adjusting the orientation of polarizerThe contrast must be optimized when the polarizer or an optical mechanism part has been replaced.1. Turn on the power.2. If the background is blue, clear the screen and get it black.3. Loosen the two lock screws of the polarizer (two for each plate).4. Press the heads of the lock screws in the arrow directions until the onscreen contrast becomes best. Finallytighten up the lock screws.3. Adjusting the PBSThis adjustment may be required when the optical mechanism has been disassembled. Colors unevenon the right and left halves onscreen can be corrected here. Usually there is no need to make this adjustment.It is enough to have the lamp adjusting groove in alignment.1. Turn on the power.2. Loosen the PBS lock screw.3. Feed a white-only signal, or call the process mode and get the screen white only.4. Put the eccentric screwdriver (9EQDRiVER-NV1A) in the PBS adjusting groove.5. Watching the image on the screen, turn the eccentric screwdriver until the right-and-left colors onscreenbecome most even. Finally tighten up the lock screw.4. Adjusting the lamp optical axisThe lamp optical axis is optimized to obtain the best color evenness and brightness. Usually there is noneed to make this adjustment because the replacement lamp unit (BQC-<strong>XG</strong>V10WU/1) has been deliveredfactory-adjusted.1. Turn on the power.2. Loosen the three lamp lock screws.3. Feed a white-only signal, or call the process mode and get the screen white only.4. Put the eccentric screwdriver (9EQDRiVER-NV1A) in the lamp adjusting groove.5. Watching the image on the screen, turn the eccentric screwdriver until the right-and-left colors onscreenbecome most even. Finally tighten up the lock screws.27


