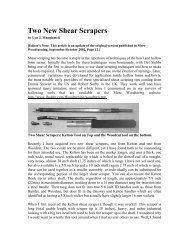
Michael Mocho Demonstration 2009 Symposium of the AAW The ...
Michael Mocho Demonstration 2009 Symposium of the AAW The ...
Michael Mocho Demonstration 2009 Symposium of the AAW The ...

You also want an ePaper? Increase the reach of your titles
YUMPU automatically turns print PDFs into web optimized ePapers that Google loves.
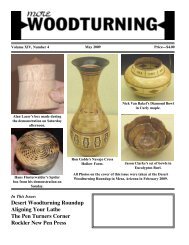
<strong>The</strong> Making <strong>of</strong> an Old Butternut Bowl—A “Reclamation” Projectby Bob Heltman, CMW, <strong>AAW</strong>Most turners who do demonstrationsuse sound wood, likehigh grade kiln dried, unless turninggreen. Many woodturners ingeneral want “good” wood and findproblems dealing with knots, cracks,odd inclusions, or partially decayedwood. Maybe it is because I was ababy in <strong>the</strong> Great De- pression priorto WWII, when you saved and madedo with what you had. Maybe it isalso that I like <strong>the</strong> rare beauty andchallenge coming from workingwith trees that nobody wants. Orfrom stump dumps, blow downs,etc. It seems like a proper frugality,<strong>the</strong> right thing to do. Ecologicallysound! That is what led to this storyabout <strong>the</strong> making <strong>of</strong> a sizeablebutternut salad bowl around 12”diameter.Lightening had hit my powerline between <strong>the</strong> water well andhouse. This led to a lot <strong>of</strong> diggingand rewiring by our friends at CaseElectric and Plumbing. Archie Caseand his Dad spent several longdays at that task, during which <strong>the</strong>ynoticed my collection <strong>of</strong> woodturnings.Mention was made <strong>of</strong> <strong>the</strong>ir oldbutternut (<strong>of</strong>ten called white walnut)tree that had been standing deadfor several years, and whe<strong>the</strong>r Iwanted any <strong>of</strong> <strong>the</strong> wood, and if I didwhe<strong>the</strong>r I’d make <strong>the</strong>m a bowl.Naturally I answered, “YES!”and in a few weeks a number <strong>of</strong> 4foot logs and a root ball showed upoutside my shop studio. Some <strong>of</strong> <strong>the</strong>wood looked downright awful, andbug holes abounded. Some lookedlike #6 shot had been fired at <strong>the</strong>tree. O<strong>the</strong>r holes fit a stout finger.Figure #1 shows <strong>the</strong> remaining butternutlogs.<strong>The</strong> bark had largely rottedaway leaving black staining. Twolarger bowl blanks rest on top, wi<strong>the</strong>nds sealed. Beauty from this!?From some <strong>of</strong> <strong>the</strong> trunk piecesthat were about 10” diameter I madeseveral intermediate sized bowls,and finished 2 to present to <strong>the</strong>Cases, leaving <strong>the</strong>m in a plastic sackhanging on <strong>the</strong>ir back door knob,which <strong>the</strong>y found and enjoyed duringThanksgiving. Figures #2 and #3show a remaining such bowl.For “white” walnut, much <strong>of</strong><strong>the</strong> heartwood seems to have takenon a darker semi-walnut coloring.A recessed rim means faster M&Mscooping!Fig. 1Fig. 2<strong>The</strong> wood shows very nicecolor and figure. Finish is severalsoaking coats <strong>of</strong> lacquer followedby paste wax and buffing.Fig. 3<strong>The</strong>n came <strong>the</strong> challenge withone <strong>of</strong> <strong>the</strong> bigger blanks chainsawedfrom just above <strong>the</strong> root ball. FirstI roughed out <strong>the</strong> piece and putit in a paper bag to season. Eventhough <strong>the</strong> wood was some- whatdried because it came from a longdead tree, rain water soaked it, andsome stresses were re- lieved just byhollowing to wall thickness about10% <strong>of</strong> diameter . In several moreweeks I mounted <strong>the</strong> dry blank andcontinued turning. Very large beetleor worm holes were encountered.<strong>The</strong>se I filled with EZ Poly WoodRebuilder®, which is a combinationglue, structural filler, and sealant.I colored it black with Tempura®black powder pigment. This gaveme a confident sense that <strong>the</strong> woodwould not fly apart or give o<strong>the</strong>rproblems as turning continued.Figure #4 shows <strong>the</strong> outside aftermore turning, tru- ing, and roughsanding. Note that <strong>the</strong> black EZ Polyhas been cut to surface level, and insome places more voids showed upat <strong>the</strong> filled edges. I can fill <strong>the</strong>seareas again with a bit more EZ Poly,[Continued on Next Page]More Woodturning August <strong>2009</strong> Page 11