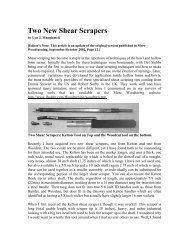
Continued from PreviousPage.<strong>the</strong> tool rest, touching one <strong>of</strong> <strong>the</strong>chalk marks at a time, and rotating<strong>the</strong> bowl by hand, a chalk circle wasformed which was easy to see whileturning. In this manner <strong>the</strong> bowl wasevenly thinned down to <strong>the</strong> area <strong>of</strong><strong>the</strong> base.Standing back, I examined <strong>the</strong>vessel inside and out to sense howit was coming along in general. Ididn’t like <strong>the</strong> appearance <strong>of</strong> <strong>the</strong>black EZ Poly fillings. So, I decidedto carve <strong>the</strong>m back below <strong>the</strong> surfacewith my Dremel Moto-Tool®and use a mix <strong>of</strong> brass key filingsalong with <strong>the</strong> blackened EZ Poly.Figure 13 shows Parts A and B <strong>of</strong><strong>the</strong> EZ Poly, along with <strong>the</strong> piles<strong>of</strong> brass filings and black paint pigmentpowder. This was mixed andpacked into <strong>the</strong> inside voids and ontop <strong>of</strong> <strong>the</strong> older carved away priorfillings. I also putty-knifed <strong>the</strong> mixinto <strong>the</strong> decayed surface with <strong>the</strong>small voids.Looking down into <strong>the</strong> bowl(Figure 15) shows <strong>the</strong> remarkablegrain pattern, <strong>the</strong> black filled voids,and to a much lesser degree <strong>the</strong>whitish area. One’s eye is caughtup in <strong>the</strong> intricacies <strong>of</strong> grain andvaried textures.Fig. 11Fig. 12Fig. 13<strong>The</strong> “pallet” was an old piece<strong>of</strong> plywood, <strong>of</strong>ten sanded betweenuses. <strong>The</strong> partly used foil pouch issealed with a paper clamp betweenapplications.<strong>The</strong> Results....and Let’s Review...Figure 14 shows a side view<strong>of</strong> <strong>the</strong> finished bowl. Size is 11 1/2”dia. by just over 6” tall. <strong>The</strong> shapewas governed by <strong>the</strong> large amount<strong>of</strong> especially bad wood that hadto be cut away in <strong>the</strong> bottom area.White fungus (tremella fuciformis)tends to bleach <strong>the</strong> wood. In thiscase <strong>the</strong>re was no evidence <strong>of</strong> <strong>the</strong>thin black lines that <strong>of</strong>ten evidence<strong>the</strong> outline <strong>of</strong> fungal colonies inspalted wood. So, we see <strong>the</strong> darkergrain in upper center, <strong>the</strong> voids filledwith black EZ Poly containing brasskey filings, and <strong>the</strong> whitish areastretching from bottom center andflowing toward <strong>the</strong> upper right.Fig.14Fig. 15<strong>The</strong> finish was several spraycoats <strong>of</strong> lacquer, followed by pastewax and buffing. This is a sturdybowl, and fine for serving salads orpresentation as a gift.Compared to starting with“sound and perfect” wood, usingdamaged and decayed woodpresents many challenges, someeven unexpected. Shrinkage will beuneven during curing from roughto final cuts. When making finalcuts, <strong>the</strong> decayed wood will tendto “chunk out” in which cases <strong>the</strong>area must be soaked in lacquer,superglue, EZ Poly or some o<strong>the</strong>rfiller, <strong>the</strong>n cut again <strong>The</strong> very finalcut needs a freshly sharpened tool,very light cuts, and even a lightangled scraping cut. Sanding will beuneven, with <strong>the</strong> sand paper tendingto cut more deeply into <strong>the</strong> s<strong>of</strong>tersemi-rotted wood.When finishing, be it oil, lacquer,wax or some combination<strong>the</strong>re<strong>of</strong>, <strong>the</strong> decayed area will soakup more <strong>of</strong> <strong>the</strong> finish, and needmore applications <strong>of</strong> <strong>the</strong> finishingproduct(s). This is hardly <strong>the</strong> sortPage 14 More Woodturning August <strong>2009</strong>
<strong>of</strong> project for a production turnerwho has to get a volume <strong>of</strong> bowls,vases, etc. done for a show orsimilar deadline. <strong>The</strong> time it takesto nurture a vessel made <strong>of</strong> damagedwood into final form and completionis best not counted. This kind<strong>of</strong> project has to be for <strong>the</strong> romance<strong>of</strong> wood, <strong>the</strong> challenges, and a lovefor <strong>the</strong> unusual. My typical easy toread signed bottom. !!Fig. 16Questions andAnswers from <strong>the</strong>InternetShape Shifter ToolsQuestion: This looks very interesting,but as usual, I’m reluctantto put out any bucks for tools (especiallyin this economy) without askingfor opinions from <strong>the</strong> group.www.shapeshiftertools.comSeems like a good way to go...Instead <strong>of</strong> buying an eccentric chuckor an insert for <strong>the</strong> chuck, this goeson <strong>the</strong> spindle and <strong>the</strong> your existingchuck(s) go on it. Has anyone triedone? Maybe Fred??—Mac[Continued on Page 18]Call or Write for your FREE Copy <strong>of</strong> our156 Page Color Catalog!Featuring:• Pen Kits and Supplies• Project Kits• Full Range <strong>of</strong> La<strong>the</strong>s• All Major Brands <strong>of</strong> Chucks• Turning Squares• Dymondwood• Henry Taylor, Hamlet and Sorby Toolsall at <strong>the</strong> best prices!Order Your Free Woodturners Catalog TodayCraft Supplies USA1287 E. 1120 S.Provo, Utah 84606 USATEL: 800-551-8876Overseas Telephone: 001-801-373-0919More Woodturning August <strong>2009</strong> Page 15