SmartCraft gateways - Northstar
SmartCraft gateways - Northstar
SmartCraft gateways - Northstar
- No tags were found...
Create successful ePaper yourself
Turn your PDF publications into a flip-book with our unique Google optimized e-Paper software.
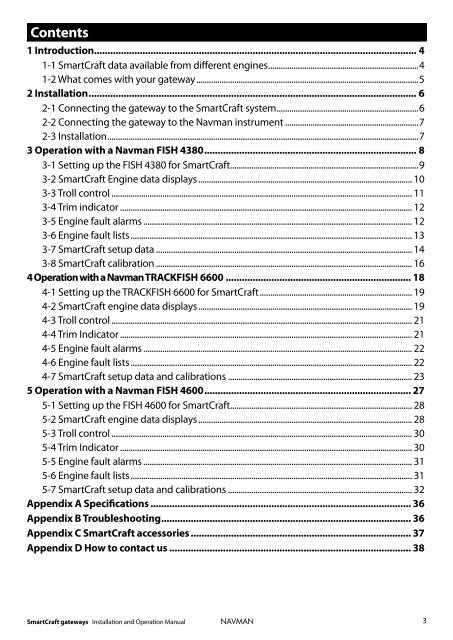
Contents1 Introduction ........................................................................................................................ 41-1 <strong>SmartCraft</strong> data available from different engines .......................................................................41-2 What comes with your gateway .........................................................................................................52 Installation .......................................................................................................................... 62-1 Connecting the gateway to the <strong>SmartCraft</strong> system ...................................................................62-2 Connecting the gateway to the Navman instrument ...............................................................72-3 Installation ...................................................................................................................................................73 Operation with a Navman FISH 4380 ............................................................................... 83-1 Setting up the FISH 4380 for <strong>SmartCraft</strong> .........................................................................................93-2 <strong>SmartCraft</strong> Engine data displays ..................................................................................................... 103-3 Troll control .............................................................................................................................................. 113-4 Trim indicator .......................................................................................................................................... 123-5 Engine fault alarms ............................................................................................................................... 123-6 Engine fault lists ..................................................................................................................................... 133-7 <strong>SmartCraft</strong> setup data ......................................................................................................................... 143-8 <strong>SmartCraft</strong> calibration ......................................................................................................................... 164 Operation with a Navman TRACKFISH 6600 ..................................................................... 184-1 Setting up the TRACKFISH 6600 for <strong>SmartCraft</strong> ........................................................................ 194-2 <strong>SmartCraft</strong> engine data displays ..................................................................................................... 194-3 Troll control .............................................................................................................................................. 214-4 Trim Indicator .......................................................................................................................................... 214-5 Engine fault alarms ............................................................................................................................... 224-6 Engine fault lists ..................................................................................................................................... 224-7 <strong>SmartCraft</strong> setup data and calibrations ....................................................................................... 235 Operation with a Navman FISH 4600 ............................................................................. 275-1 Setting up the FISH 4600 for <strong>SmartCraft</strong> ...................................................................................... 285-2 <strong>SmartCraft</strong> engine data displays ..................................................................................................... 285-3 Troll control .............................................................................................................................................. 305-4 Trim Indicator .......................................................................................................................................... 305-5 Engine fault alarms ............................................................................................................................... 315-6 Engine fault lists ..................................................................................................................................... 315-7 <strong>SmartCraft</strong> setup data and calibrations ....................................................................................... 32Appendix A Specifications ................................................................................................. 36Appendix B Troubleshooting ............................................................................................. 36Appendix C <strong>SmartCraft</strong> accessories .................................................................................. 37Appendix D How to contact us .......................................................................................... 38<strong>SmartCraft</strong> <strong>gateways</strong> Installation and Operation ManualNAVMAN3
1 IntroductionThe Navman <strong>SmartCraft</strong> TM gateway connects oneor two <strong>SmartCraft</strong> capable Mercury petrol/gasolineengines to a <strong>SmartCraft</strong> capable Navman instrument,such as the FISH 4380, FISH 4600 or TRACK-FISH 6600. The single gateway is for single engines,the dual gateway is for twin engines.Adding the gateway extends the functions of theNavman instrument, allowing the instrument to:Display engine data, such as speed, RPM,pressures, tank levels.Control troll speed and display trim.Sound an alarm if it detects an abnormalengine condition.This manual describes:How to install a Navman <strong>SmartCraft</strong> gateway.How to use the <strong>SmartCraft</strong> functions of a Navman<strong>SmartCraft</strong> capable instrument. Refer tothe separate Navman instrument Installationand Operation Manual for information on howto install and use the instrument.The engine data available in a system dependson the type of engine used (see section 1-1). The gateway replaces any fuel flow sensorsthat might be plugged into the Navmaninstrument .It is vital to read this document and the associated<strong>SmartCraft</strong> and Navman installation and operationmanuals before installing or using the system.1-1 <strong>SmartCraft</strong> data available from different enginesThe <strong>SmartCraft</strong> engine data available in a system depends on the type of engine. <strong>SmartCraft</strong> is a digital engine networkprovided on some later model (2002 +) Mercury and Mariner Engines, both in-board and out-board.Engine typeEngine data available4 Stroke 30 - 60V-6 EFIOptimax 75- 115Optimax 135-250Optimax 225 DTSVeradoMercruiser 4.3 LMercruiser 5.0 LMercruiser 5.7 LMercruiser 6.2 LMercruiser 8.1 L496 HOSteering AngleFuel levelOil temperatureOil PressureEngine TrimWater PressureEngine temperatureFuel FlowFuel LevelEngine voltagePitot water (boat) speedRPM4 NAVMAN<strong>SmartCraft</strong> <strong>gateways</strong> Installation and Operation Manual
1-1-1 Tanks and sensorsEngines can have optional level sensors fitted:A two-stroke engine can have one sensorfitted to its oil tank, and one additional sensorfitted to a fuel, oil, water or waste tank.A four stroke engine can have one or twosensors fitted to its fuel, water or waste tanks.If level sensors are fitted: the tank levels can bedisplayed; there are alarms for low tank levels; thetanks must be set up and calibrated (see followingsections:FISH 4380 : Section 3-8-1TRACKFISH 6600 : Section 4-7-1FISH 4600 : Section 5-7-11-2 What comes with your gateway ?Built-in cable to the Navmaninstrument, 1 m (3.3 ft) longBuilt-in cable to the <strong>SmartCraft</strong> system, 300mm (1 ft.) long<strong>SmartCraft</strong> GatewayHoles for mounting screwsGateway LEDS:NAV (orange): Flashes fast when the gateway isexchanging data with the Navman instrument andthe engine key is on.PWR (green): On when power and the enginekey are on.CAN (red): Flashes fast when the gateway is exchangingdata with the <strong>SmartCraft</strong> engine(s) andAlso supplied:• Two mounting screws (8 gauge x 5/8 inch,Pan pozi, self tapping, stainless steel);• warranty card;• this manual.Optional extras for <strong>SmartCraft</strong>Power/fuel splitter cableA power/fuel splitter cable (‘Y’ cable) is requiredfor Navman instruments that do not have aseparate fuel sensor connector (such as the FISH4380, see section 2-2). This cable is included inhardware packages AA005022 and AA005023and is also available separately from your Navmandealer.AA002237Also see Appendix-C<strong>SmartCraft</strong> <strong>gateways</strong> Installation and Operation ManualNAVMAN5
2 InstallationA system in a boat comprises:a. One or two <strong>SmartCraft</strong> capable petrol/gasolineengines; the data available dependson engine type and the sensors fitted (seesection 1-1).b. A single or dual engine gateway.c. A <strong>SmartCraft</strong> capable Navman instrument,such as the FISH 4380, FISH 4600 or TRACK-FISH 6600.d. Other optional Navman instruments and<strong>SmartCraft</strong> displays. See Appendix-CWarning: Correct installation is critical tothe performance of the unit. Before startinginstallation, it is vital to read this manual and thedocumentation that comes with the other parts.Then plan the installation and select where theequipment and cables will be located.Warning: Ensure that any holes that you cutwill not weaken the boat’s structure. If in doubt,consult a qualified boat builder.2-1 Connecting the gateway to the <strong>SmartCraft</strong> systemUsing a Navman cable adaptor: Use a Navman cable adaptor in a single engine system which does nothave optional <strong>SmartCraft</strong> displays. However, a <strong>SmartCraft</strong> junction box should be used if future expansionof the <strong>SmartCraft</strong> system is planned.<strong>SmartCraft</strong> harness 879982T-x(x = length in feet)<strong>SmartCraft</strong> cable adaptor 892452A01PetrolengineSingle engine gatewayUsing a <strong>SmartCraft</strong> junction box: Connect the gateway to a <strong>SmartCraft</strong> Junction box in a twin enginesystem or in any system with optional <strong>SmartCraft</strong> displays.Petrolengine<strong>SmartCraft</strong> harness 879981T-x(x = length in feet)Fit optional <strong>SmartCraft</strong> displays, orfit Mercury weather cap 859318T-2PetrolengineOptional<strong>SmartCraft</strong> junction box878492B-4Single or dual engine gatewayThere must be two <strong>SmartCraft</strong> Terminators in any <strong>SmartCraft</strong> Installation. The Mercury harness 84-879982T-xhas two terminators built-in; the Mercury harness 84-879981T-x has one terminator built-in.Terminatorsmust be positioned at the furthermost ends of the <strong>SmartCraft</strong> network.Refer to a Mercury <strong>SmartCraft</strong> manual, such as Wiring for <strong>SmartCraft</strong> Gauges (Mercury part 90-879939), fordetails of installation configurations and requirements, alternative termination methods and additional<strong>SmartCraft</strong> components such as harnesses, junction boxes and terminators. Also see Appendix CTo use the <strong>SmartCraft</strong> functions, install the <strong>SmartCraft</strong> gateway (see section 2), then go to the System setupmenu on the Navman Instrument and turn <strong>SmartCraft</strong> to On (See Setup > System menu).6 NAVMAN<strong>SmartCraft</strong> <strong>gateways</strong> Installation and Operation Manual
2-2 Connecting the gateway to the Navman instrumentFor a Navman instrument without a white fuelsensor connector (such as a FISH 4380):Power/fuel splittercable (‘Y’ cable)Plug gateway intowhite connectorOther wiring,refer to theinstrument’smanualFor a Navman instrument with a white fuel sensorconnector (such as a FISH 4600 or TRACKFISH6600):Plug gateway intowhite connectorOther wiring,refer to theinstrument’smanualFor any Navman instrument, using a NavBus junction box to connect to power/data cable (blackpower connector):Power/datacable2-3 InstallationFISH 4380Other wiring,refer to theinstrument’smanualNavBusjunction box1 Plan the installation: select where the equipmentand wiring will be installed. Ensurethat gateway can be located on a panel nearthe Navman instrument, where it will notinterfere with the operation of the boat. (eg:cables are long enough for the installationplanned)2 Screw the gateway to the panel using thescrews provided.3 Connect the gateway (see sections 2-1 and2-2). Secure the cables at regular intervals.4 Power up, set up and test the system. Checkthe gateway LEDs:NAV (orange): Flashes fast when gateway isexchanging data with the Navman instrumentand the engine key is on.PWR (green): On when power and the enginekey are on.CAN (red): Flashes fast when gateway is exchangingdata with the <strong>SmartCraft</strong> engine(s)and the engine key is on.FISH 4600,TRACKFISH6600The wires from the gateway to the Navmaninstrument cable can be connected to theinstrument’s power/data cable. This option is notnormally necessary. For more information, refer toyour Navman dealer.Cut white connector off gateway cable. Connectfive gateway cable wires (red, black, blue, orange,brown) to the same colour wires in the power/data cable. An optional Navman NavBus junctionbox simplifies wiring.Important:1 Do not connect any Navman fuel sensors tothe Navman instrument.2 It is not necessary to wire any Navman instrumentfor auto power on.3 The Navman <strong>SmartCraft</strong> capable instrumentsends <strong>SmartCraft</strong> data to otherNavman instruments connected by NavBus.To connect other instruments by NavBus, seethe instrument’s installation and operationmanual. Turn NavBus on in all Navman instrumentsconnected by NavBus; for example, fora Fish 4380, in the Comms setup menu, turnNavBus to On.4 A gateway does not provide data for systemlink gauges.5 To use speed troll control, the Navman instrumentmust have a Navman paddlewheelspeed sensor connected.<strong>SmartCraft</strong> <strong>gateways</strong> Installation and Operation ManualNAVMAN7
3 Operation with a Navman FISH 4380Before a <strong>SmartCraft</strong> gateway is connected, the FISH 4380 functions normally, with no <strong>SmartCraft</strong> functions.When a <strong>SmartCraft</strong> gateway is connected and <strong>SmartCraft</strong> is turned On (see section 3-1), <strong>SmartCraft</strong>functions become available and some standard functions change.<strong>SmartCraft</strong> featuresData displaysEngine performance and tank level displays ............................................................................................. See section 3-2Troll controlAutomatically maintains a set engine idle RPM or idle boat speed ................................................ See section 3-3Trim indicatorDisplays the trim angle when engine trim is adjusted .......................................................................... See section 3-4Alarms<strong>SmartCraft</strong> engine fault alarms ........................................................................................................................ See section 3-5Engine fault list, a list of active <strong>SmartCraft</strong> engine fault alarms ......................................................... See section 3-6Engine fault history, a list of past <strong>SmartCraft</strong> engine fault alarms .................................................... See section 3-6Tank low level alarms ........................................................................................................................................... See section 3-2Setup data and calibrations<strong>SmartCraft</strong> setup data .......................................................................................................................See sections 3-1 and 3-7<strong>SmartCraft</strong> calibrations, Tanks, Trim and Steering angle. ................................................... See section 3-8The <strong>SmartCraft</strong> data available depends on the engine type and the sensors fitted (see section 1-1). To disablethe <strong>SmartCraft</strong> functions, turn <strong>SmartCraft</strong> to Off (see section 3-1); the instrument will now use anyNavman fuel sensors which are connected.To use the <strong>SmartCraft</strong> functions and not the sonar functions, turn Sonar to Off (see section 3-1).Changes to standard functions with <strong>SmartCraft</strong>key: When using troll control, pressing can display the troll window. Press asecond time to display the normal menu of options.Fuel display: The fuel display functions normally, with fuel and speed data coming from the Smart-Craft system rather than from separate sensors connected to the FISH 4380.Fuel setup options:If no fuel tanks have an optional level sensor fitted (see section 1-1-1), then the Smartcraft fuel flow isused to calculate fuel remaining. The fuel setup data is the same as the standard FISH 4380. You musttell the FISH 4380 when you add or remove fuel (see the FISH 4380 Installation and Operation manual).If each fuel tank has an optional level sensor fitted (see section 1-1-1), then these tank levels are usedto calculate fuel remaining. In the Fuel display, Used changes to Trip used, and the only fuelsetup option is Clear trip used. Trip used measures the volume of fuel used until it is resetto zero by selecting Clear trip used in the fuel setup menu. You do not tell the FISH 4380 whenyou add or remove fuel.Engine hours: Engine hours on the Log display come from the <strong>SmartCraft</strong> system.It can not be reset.Simulate mode: Data from the <strong>SmartCraft</strong> engine(s) and sensors is simulated in Simulate mode. The<strong>SmartCraft</strong> features simulated will probably differ from the features available in your system.For more information, see the FISH 4380 Installation and Operation manual.8 NAVMAN<strong>SmartCraft</strong> <strong>gateways</strong> Installation and Operation Manual
3-1 Setting up the FISH 4380 for Smartcraft3-1 Setting up the FISH 4380 for SmartcraftThese features can be used only when the optionalsingle or twin engine <strong>SmartCraft</strong> Gateway has beeninstalled.Press twice to display the Setup menu, thenselect <strong>SmartCraft</strong>.Pressto select On or OffNote: NavBus will be turned on when <strong>SmartCraft</strong>is turned on.SonarSelect:Off: The sonar transducer and the sonarfunctions are disabled. Choose Off to usethe instrument’s <strong>SmartCraft</strong> functions only,On: Normal sonar operation.<strong>SmartCraft</strong>Select:Off: The <strong>SmartCraft</strong> functions and NavBusare disabled. The instrument will now use anyNavman fuel sensors which are connected.On: Normal <strong>SmartCraft</strong> operation.<strong>SmartCraft</strong> <strong>gateways</strong> Installation and Operation ManualNAVMAN9
3-2 <strong>SmartCraft</strong> engine data displaysTo display the <strong>SmartCraft</strong> data, press andselect <strong>SmartCraft</strong>, then press , oror to select one of the four <strong>SmartCraft</strong> displays,shown below.For the Small, Medium and Large gauges:The factory default has gauges appropriateto the type of engine. To change what gaugesare displayed, see section 3-7: Gauge setup.If the boat has twin engines, the red needleSmall: Six small ‘analogue’ gauges:Headerdataor number shows port data, green showsstarboard data.The gauges can be set up to be analogue(dial) or digital (number) (see section 3-7:Gauge type and Speed range).Each display has three items of header data. Toselect what data is displayed, see section 3-7:Header setup.Medium: Two medium & two small ‘analogue’gaugesLarge: Two large ‘analogue’ gaugesTanks: Tank levels (see next page)10 NAVMAN<strong>SmartCraft</strong> <strong>gateways</strong> Installation and Operation Manual
Tank level displayThe tank level display shows the levels from the optionallevel sensors in one or two tanks per engine(see section 1-1-1).Note:Each tank must be set up and calibrated (seesection 3-8-1).An alarm can be set to sound if the level in atank is low (see section 3-8-1). These alarmsare in addition to any <strong>SmartCraft</strong> engine faultlow level alarms (see section 3-5).3-3 Troll controlTroll control allows adjustment of the engine’s idlespeed from the Navman instrument. Troll controlautomatically controls the engine idle speed tomaintain a set engine RPM or boat speed.To use troll control, set Troll window to Onidle or Always and set Troll mode to Speedor RPM (see section 3-7). To use speed troll control,set Speed type to Paddle (see section 3-7).To prohibit troll control, set Troll window to Never(see section 3-7).Engaging troll control1 Set the throttle(s) to idle and the engine(s) ingear. From a main display, press todisplay the Troll control window (see right).2 Press or to set the desired RPM or boatspeed (see notes 1 and 2).3 Press to engage troll control. The FISH4380 automatically controls RPM or speed. Or,press to leave troll control disengaged.Changing RPM or speed while trollcontrol engaged1 From a main display, press to displaythe troll window.2 Press or to change the desired RPM orboat speed (see notes 1 and 2).3 Press .Disengaging troll controlEither move the throttle from idle, or:1 From a main display, press to displaythe troll window.2 Press to disengage troll control.Or, press to leave troll control engaged.1 The range of engine idle RPM adjustmentavailable for both RPM and speed modedepends one engine type. Generally this isbetween 600 and 1000 RPM.2 In speed troll control, the boat might notreach the desired speed if the maximum RPMavailable for troll control is too low or if conditionsare bad.3 Troll control is not available on some Mer-Crusier engines.Note:<strong>SmartCraft</strong> <strong>gateways</strong> Installation and Operation ManualNAVMAN11
3-4 Trim indicatorWhen the engine trim is adjusted, a trim popupwindow can show the new trim angle. To see thiswindow or not, set Trim popup to On or Off (seesection 3-7). The window will automatically disappearafter two seconds, or else press or tomake the window disappear.Before use, calibrate trim (see section 3-8-2).3-5 Engine fault alarmsThere are many <strong>SmartCraft</strong> engine fault alarms.These alarms operate just like the other alarms inthe Navman instrument; when the alarm sounds,press to mute the alarm:Low reserve oil.Low remote oil.RPM over speed.Low oil pressure.High engine voltage.Low engine voltage.A Navman instrument’s low battery alarmmeasures the voltage the instrument; theabove two alarms measure the voltage at theengine.Low block (water) pressure.Engine overheat.Low drive lube.(MerCrusier stern drive only).Water in fuel.Engine Guardian TM active: The EngineGuardian has detected a fault. The fault isdisplayed with the alarm.Engine communication lost: The Navmaninstrument can not receive enginedata from the <strong>SmartCraft</strong> gateway.Check engine: There are many other enginefault alarms. When one of these alarmssounds, the alarm Check engine is displayed.For more information about the alarm,display the list of active alarms or the alarmhistory (see section 3-6).Notes:1 For help when an <strong>SmartCraft</strong> alarm occurs,contact your Mercury dealer.2 These <strong>SmartCraft</strong> alarms are always on. Thealarm values are determined by the enginetype.3 A list of active faults and a fault history can bedisplayed (see section 3-6).12 NAVMAN<strong>SmartCraft</strong> <strong>gateways</strong> Installation and Operation Manual
3-6 Engine fault listsThere are two lists of <strong>SmartCraft</strong> engine faults:1 Engine faults listA list of active engine fault alarms.To display the list, press until theSetup menu is displayed, select Smart-Craft, then select Engine faults.2 Engine faults historyA list of nine recent engine fault alarms.To display the list, press until the Setupmenu is displayed, select <strong>SmartCraft</strong>,then select Engine fault history.When a faults list or history is displayedPress or to page up and down thelist.To display more information about a particularfault:i Press or to select the fault.ii Press to display the information.iii Press or to return to the list.To exit the list, press .To clear the engine fault history:1 From a main display, press until theSetup menu is displayed.2 Select <strong>SmartCraft</strong>, then select Resetfault history.Each engine fault has a priority:Red: CriticalOrange: SevereYellow: WarningBlack: CautionInformation<strong>SmartCraft</strong> <strong>gateways</strong> Installation and Operation ManualNAVMAN13
3-7 <strong>SmartCraft</strong> setup dataTo go to the <strong>SmartCraft</strong> setup data, pressuntil the Setup menu is displayed, then select<strong>SmartCraft</strong>. The setup options are:Engine faults, Engine fault history, Resetfault historySee section 3-6.Troll windowSelect from a menu:On idle: Troll window is displayed whenyou press and the throttle is at idleand the engine is in gear.Always: Troll window is displayed when youpress .Never: Troll window never displayed, trollcontrol is not available.Troll modePress to select what troll mode controls:RPM: Controls engine idle RPM.Speed: Controls engine idle RPM to try toachieve the desired boat speed.See section 3-3, notes 1 and 2Trim popupPress to select:Off: Trim popup window is never displayed.On: Trim popup window is displayed whentrim is changed.Trim popup filterThis filter can stop the trim popup window appearingbecause of engine vibration rather thana trim change.Press , then press or to select a value, thenpress . The values are Off and 1 to 5.Select Off or a low value first. Run the boat at arange of speeds and increase the value if vibrationcauses the trim popup window to appear. If thevalue is high, the trim window will appear slowlywhen trim changes.Speed rangeSet the speed range for an analog speed gauge(see Gauge type below). The options are High,Medium and Low. A higher range displays ahigher maximum speed but the display is morecompressed.Speed typePress to select the source of the water (boat)speed reading:Pitot: The engine’s pitot sensor.Paddle: A Navman paddlewheel sensor.The pitot sensor is more accurate at high speedsbut is not accurate at low speeds. The paddle wheelsensor is more accurate at low speeds. To use trollspeed control, set Speed type to Paddle.Pitot typePress to select 100 psi or 200psi to matchthe pitot type installed on the boat.Gauge typePress to select the type of gauges in the Small,Medium and Large <strong>SmartCraft</strong> displays (see section3-2):Analogue: Dial displays (see also Speedrange above).Digital: Number displays.14 NAVMAN<strong>SmartCraft</strong> <strong>gateways</strong> Installation and Operation Manual
Gauge setupSelect what data is displayed in the gauges onthe three <strong>SmartCraft</strong> gauge displays. Note thatthe factory default has gauges appropriate to thetype of engine.1 To select a gauge display. Press or untilthe display name (Small, Medium, Large orTanks) turns blue.2 Press or to select a gauge.3 Change the gauge:i Press to display a menu of options forthe selected gauge (see right; the optionsavailable will depend on your engine, seesection 1-1).ii Press or to select an option, thenpress .4 Repeat steps 1 to 3 to change more gauges,then press one or more times to return tothe main display.Header setupSelect what data is displayed in the header data onthe four <strong>SmartCraft</strong> displays. The display shows theheader, with the selected data item highlit.1 Press or to select the header item tochange.2 Change the item:i Press to display a menu of options forthe selected item (see right; the optionsavailable will depend on your engine, seesection 1-1).ii Press or to select an option, thenpress .3 Repeat steps 1 and 2 to change more headeritems, then press one or more times toreturn to the main display.<strong>SmartCraft</strong> <strong>gateways</strong> Installation and Operation ManualNAVMAN15
3-8 <strong>SmartCraft</strong> calibrationThere are three <strong>SmartCraft</strong> calibrations.3-8-1 Tanks calibrationIf tanks have level sensors fitted (see section 1-1-1),set the type of tank, the tank alarms and calibrateif required:Press until the Setup menu is displayed,then select Calibrate, then selectTanks.For each tank with a level sensor, follow thesteps below:1 Select Tank, press and select the tankfrom the menu.2 Select Tank type, press and select thetank type from the menu (Unused, Fuel,Water, Oil or Waste).3 The raw level sensor data is the level inthe tank as a percentage of the level whenthe tank is full (100 %). To select how thelevel sensor data is displayed on the Tanksdisplay (see section 3-2), select Displaytype, press and select the type from themenu:Percentage: Display the raw level sensordata. Note:If the sides of the tank are not verticaland straight, then the Percentagelevel sensor data displayed does notcorrespond to the volume in the tank;for example if the sensor shows 50 %,the tank is not 50 % full.For Percentage display type, fuelUsed and Remaining on the Fueldisplay can not be calculated, and aredisplayed as Invalid.Volume: Display a volume calculatedlinearly from the sensor data, for exampleif Tank size (see below) is 500 G andthe sensor shows 50 % of full, then 250G is displayed. Choose this option only ifthe tank has vertical, straight sides andthe tank bottom and top are flat.Calibrated volume: Display avolume calculated non linearly from thesensor data. Choose this option if thetank does not have vertical, straight sides.You must calibrate the tank (see step 6below).4 To set a low level alarm for the tank (see section3-2):iSelect Tank alarm.ii Press to turn the alarm On or Off.iii Press or to set the alarm value. Thealarm will sound if the alarm is On and thetank level is less than the alarm value.iv Finally, press .5 Set the tank size:iSelect Tank size.ii Press or to set the tank size.iii Finally, press .6 If Display type is Calibrated volume,the sensor data must be calibrated.iiiiiiSelect Calibrate.Follow the instructions displayed to addmeasured amounts of fuel.Finally, the display shows Tank size(set in step 5 above), Actual size (thevolume of fuel you added to the tank),and asks Is this correct? Select:Accept to accept the calibration16 NAVMAN<strong>SmartCraft</strong> <strong>gateways</strong> Installation and Operation Manual
Change to change Tank sizeif Tank size is not the same asActual size.3-8-2 Trim calibrationIf the <strong>SmartCraft</strong> system has trim control, calibratethe trim angle display (see section 3-4):1 Press until the Setup menu is displayed,then select Calibrate, then selectTrim.2 Select Installed and press to selectYes.3 Select Calibrate. Follow the instructionsdisplayed.3 Steer the boat to port. If the display needledoes not turn to port, select Polarity andpress to select the other polarity (Normalor Inverted).4 Steer in a straight line, then select Setcenter to calibrate the steering angle.3-8-3 Steering angle calibrationIf the <strong>SmartCraft</strong> system has a steering angle sensor,it must be calibrated.1 There must be little wind and little current.Travel at a typical cruising speed.2 Press until the Setup menu isdisplayed, select Calibrate, then selectSteering angle.<strong>SmartCraft</strong> <strong>gateways</strong> Installation and Operation ManualNAVMAN17
4 Operation with a Navman TRACKFISH 6600Before a <strong>SmartCraft</strong> gateway is connected, the TRACKFISH 6600 functions normally, with no <strong>SmartCraft</strong>functions. When a <strong>SmartCraft</strong> gateway is connected and <strong>SmartCraft</strong> is turned On (see section 4-1),<strong>SmartCraft</strong> functions become available and some standard functions change.<strong>SmartCraft</strong> functionsData displaysEngine performance and tank level displays ............................................................................................. See section 4-2Troll controlAutomatically maintains a set engine idle RPM or idle boat speed ................................................ See section 4-3Trim indicatorDisplays the trim angle when engine trim is adjusted .......................................................................... See section 4-4AlarmsEngine fault alarms ............................................................................................................................................... See section 4-5Engine fault list, a list of active <strong>SmartCraft</strong> engine fault alarms ......................................................... See section 4-6Engine fault history, a list of past <strong>SmartCraft</strong> engine fault alarms .................................................... See section 4-6Tank low level alarms .......................................................................................................................................See section 4-2-1Setup data and calibrations<strong>SmartCraft</strong> setup data ......................................................................................................................See sections 4-1 and 4-2<strong>SmartCraft</strong> calibrations, Tanks, Trim and Steering angle ....................................................................... See section 4-7<strong>SmartCraft</strong> setup data and calibrations .....................................................................................See sections 4-7 and 4-1The <strong>SmartCraft</strong> data available depends on the engine type and the sensors fitted (see section 1-1).Changes to standard functions with <strong>SmartCraft</strong> enabled:key: When using troll control, pressing can display the troll window. Press asecond time to display the normal menu.Fuel: The fuel display functions normally but with fuel and speed data coming from the <strong>SmartCraft</strong>system rather than from separate sensors connected to the TRACKFISH 6600.If there are no optional level sensor(s) fitted to the fuel tanks (see section 1-1-1), then the Smartcraftfuel flow is used to calculate fuel remaining. The fuel setup data is the same as the standard TRACK-FISH 6600. You must tell the TRACKFISH 6600 when you add or remove fuel (see the TRACKFISH 6600Installation and Operation manual).If each fuel tank has an optional level sensor fitted (see section 1-1-1), then these tank levels are usedto calculate fuel remaining. In the Fuel display, Used changes to Trip used, and the only fuelsetup option is Clear trip used. Trip used measures the volume of fuel used until it is resetto zero by selecting Clear trip used in the fuel setup menu. You do not tell the TRACKFISH6600 when you add or remove fuel.Engine hours: Engine hours on the Log display come from the <strong>SmartCraft</strong> system.It can not be reset.Simulate mode: Data from the <strong>SmartCraft</strong> engine(s) and sensors is simulated. The <strong>SmartCraft</strong> datasimulated will probably differ from the data available in your system.For more information, see the TRACKFISH 6600 Installation and Operation manual.18 NAVMAN<strong>SmartCraft</strong> <strong>gateways</strong> Installation and Operation Manual
4-1 Setting up the TRACKFISH 6600 for SmartcraftThere are two <strong>SmartCraft</strong> items in the TRACKFISH6600 System setup menu. To display the Systemmenu, press until the Setup menu is displayed,then select System.SonarSelect: For normal sonar operationDe-select:<strong>SmartCraft</strong>To disable the sonar transducerand sonar functions. For usewith the instrument’s <strong>SmartCraft</strong>functions only,Select: Normal <strong>SmartCraft</strong> operationDe-select: <strong>SmartCraft</strong> functions. The instrumentwill now use any Navman fuelsen sors which are connected.4-2 <strong>SmartCraft</strong> engine data displaysThere are four <strong>SmartCraft</strong> engine displays, shown below.Note: If the boat has twin engines, two needles will appear on most of the gauge displays. The red needleor number shows port engine data, green shows starboard engine data.Data header display areaEngine data display areaNote:<strong>SmartCraft</strong> utilises NavBus comms. NavBus willturn on if <strong>SmartCraft</strong> is turned on.Small: Eight small gaugesDiagnostics: Showseight small gauges.Press , select<strong>SmartCraft</strong>, thenselect Diagnostics.Medium: Two medium, foursmall gaugesCruising: Shows twolarge and four smallgauges. Press, select <strong>SmartCraft</strong>,then select Cruising.Large: Two large gaugesEngine data large:Shows two largegauges. To display this,press , select<strong>SmartCraft</strong>, thenselect Engine datalarge.Tanks: Tank levelsTank status: Showsthe levels in the tanks.To display this, press, select<strong>SmartCraft</strong>, thenselect Tank status.<strong>SmartCraft</strong> <strong>gateways</strong> Installation and Operation ManualNAVMAN19
4-2-1 Tank status displayThe tank level display shows the levels from theoptional level sensors in one or two tanks perengine (see section 1-1-1).Before use, each tank must be set up and calibrated(see section 4-7-1).An alarm can be set to sound if the level in a tankis low (see section 4-7-1). These alarms are in additionto any <strong>SmartCraft</strong> engine fault low level alarms(see section 4-5).4-2-2 Customising the engine datadisplaysTo customise an engine data display, press, select <strong>SmartCraft</strong>, select the displayto customise, and press . Press todisplay the options:3 Repeat steps 1 and 2 to change more dataitems, then press to return to themain display.Gauge setupSelect the data to be displayed in the engine datadisplay areas (not for Tank status display).1 Press , , or to select a gauge tochange.2 Change the gauge:i Press to display a menu of optionsfor the selected gauge (see right;the options available will depend on yourengine, see section 1-1).ii Press or to select an option, thenpress .Data setupSelect the data item to be displayed in the dataheader display area (at the top of the display):1 Press , , or to select the data itemto change.2 Select the item by pressing . this willdisplay a menu of options for the selecteditem (the options available will depend onyour engine, see section 1-1).Press or to select an option, then press.3 Repeat steps 1 to 2 to change more gauges,then press to return to the maindisplay.Gauge typeSelect the type of gauges to be displayed (not forTank status display):Analogue: Dial type displays (see also section4-7: Speed range).Digital: Number type displays.Notes:1 The factory default has gauges appropriate tothe type of engine.2 To further customise the three gauge displays,change Speed range, Speed typeand Pitot type (see section 4-7).20 NAVMAN<strong>SmartCraft</strong> <strong>gateways</strong> Installation and Operation Manual
4-3 Troll controlTroll control allows adjustment of the engine’s idlespeed from the Navman instrument. Troll controlautomatically controls the engine idle speed tomaintain a set engine RPM or boat speed.To use troll control, set Troll window to On idleor Always and set Troll mode to Speed or RPM(see section 4-7).To use speed troll mode, set Speed type to Paddle(see section 4-7).To prohibit troll control, set Troll window toNever (see section 4-7).Engaging troll control1 Set the throttle(s) to idle and the engine(s) ingear. From a main display, press todisplay the Troll control window (see right).2 Press or to set the desired RPM or boatspeed (see notes 1 and 2).3 Press to engage troll control. TheTRACKFISH 6600 automatically controls RPMor speed. Or, press to leave trollcontrol disengaged.Changing RPM or speed while trollcontrol engaged1 From a main display, press to displaythe troll window.2 Press or to change the desired RPM orboat speed (see notes 1 and 2).3 PressDisengaging troll controlEither move the throttle from idle, or:1 From a main display, press to displaythe troll window. Press or to select Off(Disengage) and press2 Or, press to leave troll control engaged.Notes:1 The Troll range of engine idle RPM adjustmentavailable for both RPM and speed modedepends on engine type. Generally this isbetween 600 and 1000 RPM.2 In speed troll control, the boat might notreach the desired speed if the maximum RPMavailable for troll control is too low or if conditionsare bad.3 Troll can not engage unless engine throttle(s)are in idle, and engine(s) are in gear.4 Troll control is not available on some Mer-Crusier TM engines.5 To use speed troll control, the Navman instrumentmust have a Navman paddlewheelspeed sensor connected.4-4 Trim indicatorWhen the optional engine trim is adjusted, a trimpopup window can show the new trim angle. Tosee this window or not, set Trim popup to On orOff (see section 4-7: Trim). The window will automaticallydisappear after two seconds, or else pressto close the window.Before use, calibrate trim (see section 4-7: Trim).<strong>SmartCraft</strong> <strong>gateways</strong> Installation and Operation ManualNAVMAN21
4-5 Engine fault alarmsThere are many <strong>SmartCraft</strong> engine fault alarms.These alarms operate just like the other alarms inthe Navman instrument; when the alarm sounds,press to mute the alarm:Low reserve oil.Low remote oil.RPM over speed.Low oil pressure.High engine voltage.Low engine voltage.A Navman instrument’s low battery alarmmeasures the voltage at the instrument; theabove two alarms measure the voltage at theengine.Low block (water) pressure.Engine overheat.Low drive lube: (MerCrusier stern drive only).Water in fuel.Engine Guardian TM active: The Engine4-6 Engine fault listsThere are two lists of <strong>SmartCraft</strong> engine faults:4-6-1 Engine faults listTo display a list of active engine fault alarms: press, select <strong>SmartCraft</strong>, then select Enginefaults.Guardian has detected a fault. The fault isdisplayed with the alarm.Engine communication lost: The Navmaninstrument can not receive engine data fromthe <strong>SmartCraft</strong> gateway.Check engine: There are many other enginefault alarms. When one of these alarmssounds, the alarm Check engine is displayed.For more information about the alarm,display the list of active alarms or the alarmhistory (see section 4-6).Notes:1 For help when an <strong>SmartCraft</strong> alarm occurs,contact your Mercury dealer.2 These <strong>SmartCraft</strong> alarms are always on. Thealarm values are determined by the enginetype.3 A list of active faults and a fault history can bedisplayed (see section 4-6).When the faults list is displayedPress or to page up and down thelist.To display more information about a particularfault:i Press or to select the fault.ii Press to display the information.iii Press or to return to thelist.To exit the list, press .Each engine fault has a priority:Red: CriticalOrange: SevereYellow: WarningBlack: CautionInformation22 NAVMAN<strong>SmartCraft</strong> <strong>gateways</strong> Installation and Operation Manual
4-6-2 Engine fault historyTo display a list of recent engine fault alarms, press, select <strong>SmartCraft</strong>, then select Enginefault history.When the Engine fault history is displayedPress or to page up and down thelist.To display more information about a particularfault:i Press or to select the fault.ii Press to display the information.iii Press or to return to thelist.To exit the list, press .To clear the engine fault history:Go to the engine fault history display, pressand select Reset fault history.4-7 <strong>SmartCraft</strong> setup data and calibrationsTo go to the <strong>SmartCraft</strong> setup data and calibrations,press until the Setup menu is displayed,then select <strong>SmartCraft</strong>.Note:If there is more than one <strong>SmartCraft</strong> capable Navmaninstrument in a system, some setup data maybe different in each instrument.<strong>SmartCraft</strong> <strong>gateways</strong> Installation and Operation ManualThe setup and calibration options are:TanksSet up and calibrate the tanks (see section 4-7-1).Troll windowSelect from a menu:NAVMANOn idle: Troll window is displayed when youpress and the throttle is at idle and theengine is in gear.Always: Troll window is displayed when youpress .Never: Troll window never displayed, trollcontrol is not available.Troll modeSelect what troll mode controls:RPM: Controls engine idle RPM.Speed: Controls engine idle RPM to try toachieve the desired boat speed.See section 4-3, notes 1 and 2TrimSet up and calibrate the trim display (see section 4-7-2).23
Steering angleSet up and calibrate the steering angle (see section4-7-3).Speed rangeSet the speed range for an analog speed gauge.The options are High, Medium and Low. A higherrange displays a higher maximum speed but thedisplay is more compressed.Speed typeSelect the source of the water (boat) speed reading:Pitot: The engine’s pitot sensor.Paddle: A Navman paddlewheel sensor.The pitot sensor is more accurate at high speedsbut is not accurate at low speeds. The paddlewheelsensor is more accurate at low speeds. To use trollspeed control, set Speed type to Paddle.Pitot typePress to select 100 psi or 200psi to matchthe pitot type installed on the boat.4-7-1 Tanks setup and calibrationSet up and calibrate tanks with level sensors fitted(see section 1-1-1):1 Press until the Setup menu isdisplayed, select <strong>SmartCraft</strong>, then selectTanks.2 For each tank in the boat, select Tank, selectNote:the tank to set up, then set up and calibratethe tank.The displayed Tank size unit uses the setting selectedin the Navman instrument. To change to adifferent unit type, use the Setup > Units menu inthe Navman instrument.For each tank, the options are:Tank typeSelect the tank type (Unused, Fuel, Water, Oilor Waste).Display typeThe data from the level sensor in each tank is thedepth in the tank as a percentage of the depth whenthe tank is full. If the sides of the tank are not verticaland straight, or if the tank top and bottom are notflat, then the level sensor data does not correspondto the volume in the tank; for example if the sensorshows 50 %, the tank is not 50 % full.The Display type option selects how the levelsensor data is displayed:Percentage: Display the percentage levelsensor data. The default is the percentagelevel sensor data. If the tank is calibrated, thena calibrated percentage is displayed.Volume: Display a volume calculated fromthe sensor data. The default is a linear calculation,for example if the tank holds 500 G andthe sensor shows 50 % of full, then 250 G isdisplayed. This is correct if the sides of thetank are vertical and straight and the tank topand bottom are flat. If this is not so, calibratethe tank (see Calibrate below).Tank sizeSet the tank size:i Set the tank size: press or to select adigit, then press or to change the digit.ii Press .Tank alarmTo set a low level alarm for the tank:i Set the alarm value: press or to select adigit, then press or to change the digit.To turn the alarm off, set the alarm value to0. If the alarm value is greater than zero, thealarm will sound if the tank level is less thanthe alarm value.ii Press .CalibrateCalibrate the tank readings if the sides of the tankare not vertical and straight, or if the tank topand bottom are not flat. The following procedurerequires the tank to be filled from empty. The24 NAVMAN<strong>SmartCraft</strong> <strong>gateways</strong> Installation and Operation Manual
Tank Calibration screen will display an amount offuel to add to the tank - select OK each time themeasured amount is added. This will happen anumber of times.iiiiiiEnter the tank size (volume).Follow the on-screen instructions displayedto add measured amounts of fuel. Select OKeach time the measured amount is added.4-7-2 Trim setup and calibrationSet up and calibrate a <strong>SmartCraft</strong> trim control (seesection 4-4). Press until the Setup menu isdisplayed, then select <strong>SmartCraft</strong>, then selectTrim. The options are:InstalledSelect: Trim sensors are installed in theengine(s).De-select: No trim sensors installed in theengine(s).The display shows Tank calibration- Tank profile and asks Is this correct?.Select:OK to accept the calibrationCancel to cancel.iv. If the actual tank size did not match that instep (i), then change the tank size fromthe menu.Trim popupSelect: Trim sensors are installed in theengine(s).De-select: Trim popup window is neverdisplayed.Trim popup f ilterThis filter can stop the trim popup window appearingbecause of engine vibration rather thana trim change.Press , then press or to select avalue, then press . The values are Offand 1 to 5.Select Off or a low value first. Run the boat at arange of speeds and increase the value if vibrationcauses the trim popup window to appear. If thevalue is high, the trim window will appear slowlywhen trim changes.CalibrateFollow the on-screen instructions displayed to calibratethe displayed trim angle, and pressas required.Reset calibrationReset the tank calibration to the default - the displayedvolume is calculated linearly from the sensordata (see Display type above). Any tank calibrationdata will be lost.<strong>SmartCraft</strong> <strong>gateways</strong> Installation and Operation ManualNAVMAN25
4-7-3 Steering angle setup andcalibrationSet up and calibrate the <strong>SmartCraft</strong> steering angledisplay. Press until the Setup menu isdisplayed, then select <strong>SmartCraft</strong>, then selectSteering angle. The options are:InstalledSelect: Steering angle sensor installed.De-select: No steering angle sensor installed.PolaritySteer the boat to port. If the steering angle pointerdoes not move to port, choose the other polarity(Normal or Inverted).Calibrate1 There must be little wind and little current.Travel at a typical cruising speed.2 Steer in a straight line, then select Calibrateto calibrate the steering angle.3 Press enter when steering in a straight line.26 NAVMAN<strong>SmartCraft</strong> <strong>gateways</strong> Installation and Operation Manual
5 Operation with a Navman FISH 4600Before a <strong>SmartCraft</strong> gateway is connected, the FISH 4600 functions normally, with no <strong>SmartCraft</strong> functions.When a <strong>SmartCraft</strong> gateway is connected and <strong>SmartCraft</strong> is turned On (see section 5-1), <strong>SmartCraft</strong>functions become available and some standard functions change.<strong>SmartCraft</strong> functionsData displaysEngine performance and tank level displays ............................................................................................. See section 5-2Troll controlAutomatically maintains a set engine idle RPM or idle boat speed ................................................ See section 5-3Trim indicatorDisplays the trim angle when engine trim is adjusted .......................................................................... See section 5-4Alarms<strong>SmartCraft</strong> engine fault alarms ........................................................................................................................ See section 5-5Engine fault list, a list of active <strong>SmartCraft</strong> engine fault alarms ......................................................... See section 5-6Engine fault history, a list of past <strong>SmartCraft</strong> engine fault alarms .................................................... See section 5-6Tank low level alarms .......................................................................................................................................See section 5-2-1Setup data and calibrations<strong>SmartCraft</strong> setup data ......................................................................................................................See sections 5-6 and 5-8<strong>SmartCraft</strong> calibrations, Tanks, Trim and Steering angle ....................................................................... See section 5-7<strong>SmartCraft</strong> setup data and calibrations .....................................................................................See sections 5-7 and 5-1The <strong>SmartCraft</strong> data available depends on the engine type and the sensors fitted (see section 1-1).Changes to standard functions with <strong>SmartCraft</strong> enabled:key: When using troll control, pressing can display the troll window. Press asecond time to display the normal menu.Fuel: The fuel display functions normally but with fuel and speed data coming from the <strong>SmartCraft</strong>system rather than from separate sensors connected to the FISH 4600.If there are no optional level sensor(s) fitted to the fuel tanks (see section 1-1-1), then the Smartcraftfuel flow is used to calculate fuel remaining. The fuel setup data is the same as the standard FISH4600. You must tell the FISH 4600 when you add or remove fuel (see the FISH 4500/4600 Installationand Operation manual).If each fuel tank has an optional level sensor fitted (see section 1-1-1), then these tank levels are usedto calculate fuel remaining. In the Fuel display, Used changes to Trip used, and the only fuelsetup option is Clear trip used. Trip used measures the volume of fuel used until it is resetto zero by selecting Clear trip used in the fuel setup menu. You do not tell the FISH 4600 whenyou add or remove fuel.Engine hours: Engine hours on the Log display come from the <strong>SmartCraft</strong> system.It can not be reset.Simulate mode: Data from the <strong>SmartCraft</strong> engine(s) and sensors is simulated. The <strong>SmartCraft</strong> datasimulated will probably differ from the data available in your system.For more information, see the FISH 4500/4600 Installation and Operation manual.<strong>SmartCraft</strong> <strong>gateways</strong> Installation and Operation ManualNAVMAN27
5-1 Setting up the FISH 4600 for SmartcraftThere are two <strong>SmartCraft</strong> items in the FISH 4600System setup menu. To display the System menu,press until the Setup menu is displayed,then select System.SonarSelect: For normal sonar operationDe-select:<strong>SmartCraft</strong>To disable the sonar transducerand sonar functions. For usewith the instrument’s <strong>SmartCraft</strong>functions only,Select: Normal <strong>SmartCraft</strong> operationDe-select: <strong>SmartCraft</strong> functions. The instrumentwill now use any Navmanfuel sensors which are connected.Note:<strong>SmartCraft</strong> utilises NavBus comms. NavBus willturn on if <strong>SmartCraft</strong> is turned on.5-2 <strong>SmartCraft</strong> engine data displaysThere are four <strong>SmartCraft</strong> engine displays, shown below.Note: If the boat has twin engines, two needles will appear on most of the gauge displays. The red needleor number shows port engine data, green shows starboard engine data.Engine data display areaData header display areaSmall: Eight small gaugesShows eight smallgauges. Press, select <strong>SmartCraft</strong>,then select Small.Medium: Two medium, foursmall gaugesShows two large andfour small gauges.Press , select<strong>SmartCraft</strong>, thenselect Medium.Large: Two large gaugesShows two largegauges. To display this,press , select<strong>SmartCraft</strong>, thenselect Large.Tanks: Tank levelsShows the levels in thetanks. To display this,press , select<strong>SmartCraft</strong>, thenselect Tanks.28 NAVMAN<strong>SmartCraft</strong> <strong>gateways</strong> Installation and Operation Manual
5-2-1 Tank status displayThe tank level display shows the levels from theoptional level sensors in one or two tanks perengine (see section 1-1-1).Before use, each tank must be set up and calibrated(see section 5-7-1).An alarm can be set to sound if the level in a tankis low (see section 5-7-1). These alarms are in additionto any <strong>SmartCraft</strong> engine fault low level alarms(see section 5-5).ii Press or to select an option, thenpress .3 Repeat steps 1 to 2 to change more gauges,then press to return to the maindisplay.5-2-2 Customising the engine datadisplaysTo customise an engine data display, press ,select <strong>SmartCraft</strong>, select the display to customise.Press to display the available options;Gauge type, Gauge setup, and Header setup, thenpress .Gauge typeSelect the type of gauges to be displayed (not forTank status display):Analogue: Dial type displays (see also section5-7: Speed range).Digital: Number type displays.Notes:1 The factory default has gauges appropriate tothe type of engine.2 To further customise the three gauge displays,change Speed range, Speed typeand Pitot type (see section 5-7)Gauge setupSelect the data to be displayed in the engine datadisplay areas (not for Tank status display).1 Press , , or to select a gauge tochange.2 Change the gauge:i Press to display a menu of optionsfor the selected gauge (see above;the options available will depend on yourengine, see section 1-1).Header setupSelect the data item to be displayed in the dataheader display area (at the top of the display):1 Press , , or to select the data itemto change.2 Select the item by pressing . this willdisplay a menu of options for the selecteditem (the options available will depend onyour engine, see section 1-1).Press or to select an option, then press.3 Repeat steps 1 and 2 to change more dataitems, then press to return to themain display.<strong>SmartCraft</strong> <strong>gateways</strong> Installation and Operation ManualNAVMAN29
5-3 Troll controlTroll control allows adjustment of the engine’s idlespeed from the Navman instrument. Troll controlautomatically controls the engine idle speed tomaintain a set engine RPM or boat speed.To use troll control, set Troll window to On idleor Always and set Troll mode to Speed or RPM(see section 5-7).To use speed troll mode, set Speed type to Paddle(see section 5-7).To prohibit troll control, set Troll window toNever (see section 5-7).Engaging troll control1 Set the throttle(s) to idle and the engine(s) ingear. From a main display, press todisplay the Troll control window (see right).2 Press or to set the desired RPM or boatspeed (see notes 1 and 2).3 Press to engage troll control. TheFISH 4600 automatically controls RPM orspeed. Or, press to leave troll controldisengaged.Changing RPM or speed while trollcontrol engaged1 From a main display, press to displaythe troll window.2 Press or to change the desired RPM orboat speed (see notes 1 and 2).3 PressDisengaging troll controlEither move the throttle from idle, or:1 From a main display, press to displaythe troll window. Press or to select Off(Disengage) and press2 Or, press to leave troll control engaged.Notes:1 The Troll range of engine idle RPM adjustmentavailable for both RPM and speed modedepends on engine type. Generally this isbetween 600 and 1000 RPM.2 In speed troll control, the boat might notreach the desired speed if the maximum RPMavailable for troll control is too low or if conditionsare bad.3 Troll can not engage unless engine throttle(s)are in idle, and engine(s) are in gear.4 Troll control is not available on some Mer-Crusier TM engines.5 To use speed troll control, the Navman instrumentmust have a Navman paddlewheelspeed sensor connected.5-4 Trim indicatorWhen the optional engine trim is adjusted, a trimpopup window can show the new trim angle. Tosee this window or not, set Trim popup to On orOff (see section 5-7: Trim). The window will automaticallydisappear after two seconds, or else pressto close the window.Before use, calibrate trim (see section 5-7: Trim).30 NAVMAN<strong>SmartCraft</strong> <strong>gateways</strong> Installation and Operation Manual
5-5 Engine fault alarmsThere are many <strong>SmartCraft</strong> engine fault alarms.These alarms operate just like the other alarms inthe Navman instrument; when the alarm sounds,press to mute the alarm:Low reserve oil.Low remote oil.RPM over speed.Low oil pressure.High engine voltage.Low engine voltage.A Navman instrument’s low battery alarmmeasures the voltage at the instrument; theabove two alarms measure the voltage at theengine.Low block (water) pressure.Engine overheat.Low drive lube (MerCrusier stern drive only).Water in fuel.Engine Guardian TM active: The Engine5-6 Engine fault listsThere are two lists of <strong>SmartCraft</strong> engine faults:5-6-1 Engine faults listTo display a list of active engine fault alarms: press, select <strong>SmartCraft</strong>, then select Enginefaults.Guardian has detected a fault. The fault isdisplayed with the alarm.Engine communication lost: The Navmaninstrument can not receive engine data fromthe <strong>SmartCraft</strong> gateway.Check engine: There are many other enginefault alarms. When one of these alarmssounds, the alarm Check engine is displayed.For more information about the alarm,display the list of active alarms or the alarmhistory (see section 5-6).Notes:1 For help when an <strong>SmartCraft</strong> alarm occurs,contact your Mercury dealer.2 These <strong>SmartCraft</strong> alarms are always on. Thealarm values are determined by the enginetype.3 A list of active faults and a fault history can bedisplayed (see section 5-6).When the faults list is displayedPress or to page up and down thelist.To display more information about a particularfault:i Press or to select the fault.ii Press to display the information.iii Press or to return to thelist.To exit the list, press .Each engine fault has a priority:Red: CriticalOrange: SevereYellow: WarningBlack: CautionInformation<strong>SmartCraft</strong> <strong>gateways</strong> Installation and Operation ManualNAVMAN31
5-6-2 Engine fault historyTo display a list of recent engine fault alarms, press, select <strong>SmartCraft</strong>, then select Enginefault history.When the Engine fault history is displayedPress or to page up and down thelist.To display more information about a particularfault:i Press or to select the fault.ii Press to display the information.iii Press or to return to thelist.To exit the list, press .To clear the engine fault history:Go to the engine fault history display, pressand select Reset fault history.5-7 <strong>SmartCraft</strong> setup data and calibrationsTo go to the <strong>SmartCraft</strong> setup data and calibrations,press until the Setup menu is displayed,then select <strong>SmartCraft</strong>.Note:If there is more than one <strong>SmartCraft</strong> capable Navmaninstrument in a system, some setup data maybe different in each instrument.The setup and calibration options are:TanksSet up and calibrate the tanks (see section 5-7-1).Troll windowSelect from a menu:On idle: Troll window is displayed when youpress and the throttle is at idle and theengine is in gear.Always: Troll window is displayed when youpress .Never: Troll window never displayed, trollcontrol is not available.Troll modeSelect what troll mode controls:RPM: Controls engine idle RPM.Speed: Controls engine idle RPM to try toachieve the desired boat speed.See section 5-3, notes 1 and 2TrimSet up and calibrate the trim display (see section 5-7-2).32 NAVMAN<strong>SmartCraft</strong> <strong>gateways</strong> Installation and Operation Manual
Steering angleSet up and calibrate the steering angle (see section5-7-3).Speed rangeSet the speed range for an analog speed gauge.The options are High, Medium and Low. A higherrange displays a higher maximum speed but thedisplay is more compressed.Speed typeSelect the source of the water (boat) speed reading:Pitot: The engine’s pitot sensor.Paddle: A Navman paddlewheel sensor.The pitot sensor is more accurate at high speedsbut is not accurate at low speeds. The paddlewheelsensor is more accurate at low speeds. To use trollspeed control, set Speed type to Paddle.Pitot typePress to select 100 psi or 200psi to matchthe pitot type installed on the boat.5-7-1 Tanks setup and calibrationSet up and calibrate tanks with level sensors fitted(see section 1-1-1):1 Press until the Setup menu isdisplayed, select <strong>SmartCraft</strong>, then selectTanks.2 For each tank in the boat, select Tank, selectthe tank to set up, then set up and calibratethe tank.Note:The displayed Tank size unit uses the setting selectedin the Navman instrument. To change to adifferent unit type, use the Setup > Units menu inthe Navman instrument.For each tank, the options are:Tank typeSelect the tank type (Unused, Fuel, Water, Oilor Waste).Display typeThe data from the level sensor in each tank is thedepth in the tank as a percentage of the depth whenthe tank is full. If the sides of the tank are not verticaland straight, or if the tank top and bottom are notflat, then the level sensor data does not correspondto the volume in the tank; for example if the sensorshows 50 %, the tank is not 50 % full.The Display type option selects how the levelsensor data is displayed:Percentage: Display the percentage levelsensor data. The default is the percentagelevel sensor data. If the tank is calibrated, thena calibrated percentage is displayed.Volume: Display a volume calculated fromthe sensor data. The default is a linear calculation,for example if the tank holds 500 G andthe sensor shows 50 % of full, then 250 G isdisplayed. This is correct if the sides of thetank are vertical and straight and the tank topand bottom are flat. If this is not so, calibratethe tank (see Calibrate below).Tank sizeSet the tank size:i Set the tank size: press or to select adigit, then press or to change the digit.ii Press .Tank alarmTo set a low level alarm for the tank:i Set the alarm value: press or to select adigit, then press or to change the digit.To turn the alarm off, set the alarm value to0. If the alarm value is greater than zero, thealarm will sound if the tank level is less thanthe alarm value.ii Press .<strong>SmartCraft</strong> <strong>gateways</strong> Installation and Operation ManualNAVMAN33
CalibrateCalibrate the tank readings if the sides of the tankare not vertical and straight, or if the tank topand bottom are not flat. The following procedurerequires the tank to be filled from empty. TheTank Calibration screen will display an amount offuel to add to the tank - select OK each time themeasured amount is added. This will happen anumber of times.iEnter the tank size (volume).Reset calibrationReset the tank calibration to the default - the displayedvolume is calculated linearly from the sensordata (see Display type above). Any tank calibrationdata will be lost.5-7-2 Trim setup and calibrationSet up and calibrate a <strong>SmartCraft</strong> trim control (seesection 5-4). Press until the Setup menu isdisplayed, then select <strong>SmartCraft</strong>, then selectTrim. The options are:iiiiiFollow the on-screen instructions displayedto add measured amounts of fuel. Select OKeach time the measured amount is added.The display shows Tank calibration- Tank profile and asks Is this correct?.Select:OK to accept the calibrationCancel to cancel.iv. If the actual tank size did not match that instep (i), then change the tank size fromthe menu.InstalledSelect: Trim sensors are installed in theengine(s).De-select: No trim sensors installed in theengine(s).Trim popupSelect: Trim sensors are installed in theengine(s).De-select: Trim popup window is neverdisplayed.Trim popup f ilterThis filter can stop the trim popup window appearingbecause of engine vibration rather thana trim change.Press , then press or to select avalue, then press . The values are Offand 1 to 5.Select Off or a low value first. Run the boat at arange of speeds and increase the value if vibrationcauses the trim popup window to appear. If thevalue is high, the trim window will appear slowlywhen trim changes.CalibrateFollow the on-screen instructions displayed to calibratethe displayed trim angle, and pressas required.34 NAVMAN<strong>SmartCraft</strong> <strong>gateways</strong> Installation and Operation Manual
5-7-3 Steering angle setup andcalibrationSet up and calibrate the <strong>SmartCraft</strong> steering angledisplay. Press until the Setup menu isdisplayed, then select <strong>SmartCraft</strong>, then selectSteering angle. The options are:InstalledSelect: Steering angle sensor installed.De-select: No steering angle sensor installed.PolaritySteer the boat to port. If the steering angle pointerdoes not move to port, choose the other polarity(Normal or Inverted).Calibrate1 There must be little wind and little current.Travel at a typical cruising speed.2 Steer in a straight line, then select Calibrateto calibrate the steering angle.3 Press enter when steering in a straight line.<strong>SmartCraft</strong> <strong>gateways</strong> Installation and Operation ManualNAVMAN35
Appendix A - SpecificationsPhysicalSize 130 x 62 x 26 mm (5.1 x 2.4 x 1.0 in).Operating temperature 0 to 50°C (32 to122°F).Built-in cable to the Navman instrument, 1 m(3.3 ft) long.Built-in cable to <strong>SmartCraft</strong> and engine, 300mm (1 ft) long.ElectricalPower supply 9.0 to 30 V DC, 50 mA.InterfacesNavBus connection to Navman instruments.CAN bus connection to <strong>SmartCraft</strong> system.Standards complianceEMC complianceUSA (FCC): Part 15 Class B.Europe (CE): EN50081-1,EN50082-1,EN55024, EN55022, ISO7637-1.New Zealand and Australia (C Tick) : AS-NZS3548.Cable to Navman instrumentWire SignalRed Power positive, 9 to 30 V DC,50 mABlack Power negativeBrown Power positive from instrumentOrange NavBus +Blue NavBus -Green No connectionYellow No connectionWhite No ConnectionAppendix B - Troubleshooting1 No <strong>SmartCraft</strong> functions available or<strong>SmartCraft</strong> data is zero or is not displayeda Boat engine key is off.bReview installation; check the gateway LEDsare working (see section 2)c <strong>SmartCraft</strong> is disabled in the Navman Instrument.See Setup > System menu.2 Some <strong>SmartCraft</strong> data is not available:The data available depends on engine type(see section 1-1).3 Can not start troll control:a Some MerCruiser engines do not support trollcontrol.bcdSet engine to idle and in gear (see sectionTroll Control).Set Speed type to Paddle (see sectionTroll Control).To use speed troll control, the Navman instrumentmust have a Navman paddlewheelspeed sensor connected.4 Trim window is slow to appear, or appearswhen trim does not change:Change the trim filter (see sectionTrim Setupand Calibration).36 NAVMAN<strong>SmartCraft</strong> <strong>gateways</strong> Installation and Operation Manual
Appendix C - Mercury <strong>SmartCraft</strong> accessories859318T1Termination resistor892452A01Smartcraft cable adaptor(male/male)892453A01<strong>SmartCraft</strong> cable adaptor(female/female)8784924<strong>SmartCraft</strong> junction box– 4 way8784926<strong>SmartCraft</strong> junction box– 6 way8784928<strong>SmartCraft</strong> junction box– 8 way879968T (6, 10, 15, 20, 30)<strong>SmartCraft</strong> wiring harness879981T (10,15, 20, 30)<strong>SmartCraft</strong> wiring harness with1 terminator879982T (20, 30)<strong>SmartCraft</strong> wiring harness with2 terminators859743T2<strong>SmartCraft</strong> accessoryharness (fuel/oil)859318T2<strong>SmartCraft</strong> weather cap<strong>SmartCraft</strong> <strong>gateways</strong> Installation and Operation ManualNAVMAN37
Appendix D How to contact usNORTH AMERICABNT - Marine Electronics30 Sudbury Rd, Acton, MA 01720.Toll Free: +1 866 628 6261Fax: +1 978 897 8264e-mail: sales@navmanusa.comweb: www.navman.comOCEANIAAustraliaNavman Australia Pty. LimitedSuite 2, 408 Victoria RoadGladesville NSW 2111, Australia.Ph: +61 2 9879 9000Fax: +61 2 9879 9001e-mail: sales@navman.com.auweb: www.navman.comNew ZealandAbsolute Marine Ltd.Unit B, 138 Harris Road,East Tamaki, Auckland.Ph: +64 9 273 9273Fax: +64 9 273 9099e-mail: navman@absolutemarine.co.nzPapua New GuineaLohberger Engineering,Lawes Road, Konedobu.PO Box 810, Port Moresby.Ph: +675 321 2122Fax: +675 321 2704e-mail: loheng@online.net.pgweb: www.lohberger.com.pgLATIN AMERICAArgentinaCostanera Uno S.A.Av Pte Ramón S. Castillo y Calle 13Zip 1425 Buenos Aires, Argentina.Ph: +54 11 4312 4545Fax +54 11 4312 5258e-mail:purchase@costanerauno.com.arweb: www.costanerauno.arBrazilEquinautic Com Imp Exp de EquipNauticos Ltda.Rua Ernesto Paiva, 139Clube dos JangadeirosPorto Alegre - RS - BrasilCEP: 91900-200.Ph: +55 51 3268 6675+55 51 3269 2975Fax: +55 51 3268 1034e-mail:equinautic@equinautic.com.brweb: www.equinautic.com.brRealmarineEstrada do Joa 3862,Barra da Tijuca, Rio de Janeiro, Brazil.CEP: 22611-020.Ph: +55 21 2483 9700Fax: +55 21 2495 6823e-mail: tito@realmarine.com.brweb: www.realmarine.com.brChileEquimarManuel Rodrigurez 27Santiago, Chile.Ph: +56 2 698 0055Fax +56 2 698 3765e-mail: mmontecinos@equimar.clMera VennikColon 1148, Talcahuano,4262798, Chile.Ph: +56 41 541 752Fax +56 41 543 489e-mail: meravennik@entel.chile.netMexicoMercury Marine de MexicoAnastacio Bustamente #76Interior 6 Colonia Francisco Zarabia,Zapapan, Jalisco, C.P. 45236 Mexico.Ph: +52 33 3283 1030Fax: +52 33 3283 1034web: www.equinautic.com.brUruguayAlvaro Bermudez, Nautica11300 Montevideo, Uruguay.Ph & Fax: +59 82 628 6562e-mail: alvaro@nautica.com.uyASIAChinaPeaceful Marine Electronics Co. Ltd.Guangzhou, Hong Kong, Dalian,Qingdao, Shanghai1701 Yanjiang Building195 Yan Jiang Zhong Rd. 510115Guangzhou, China.Ph: +86 20 3869 8839Fax: +86 20 3869 8780e-mail: sales@peaceful-marine.comweb: www.peaceful-marine.comIndiaAccess India Overseas Pvt. Ltd.A-98, Sector 21,Noida - 201 301, India.Ph: +91 120 244 2697TeleFax: +91 120 253 7881Mobile: +91 98115 04557e-mail: vkapil@del3.vsnl.net.inEsmario Export EnterprisesBlock No. F-1, 3rd Floor, Surya TowersSardar Patel Rd, Secunderbad 500 003.Ph: +91 40 2784 5163Fax: +91 40 2784 0595e-mail: gjfeee@hd1.vsnl.net.inweb: www.esmario.comKoreaKumhomarine Technology Co. Ltd.#604-842, 2F, 1118-15, Janglim1-Dong,Saha-Gu, Busan, Korea.Ph: +82 51 293 8589Fax: +82 51 265 8984e-mail: info@kumhomarine.comweb: www.kumhomarine.comMaldivesMaizan Electronics Pte. Ltd.Henveyru, 08 Sosunmagu.Male', Maldives.Mobile: +960 78 24 44Ph: +960 32 32 11Fax: +960 32 57 07e-mail: ahmed@maizan.com.mvSingapore and Malaysia, Brunei,Indonesia and PhillipinesRIQ PTE Ltd.Blk 3007, 81 Ubi Road 1, #02-440,Singapore 408701.Ph: +65 6741 3723Fax : +65 6741 3746e-mail: riq@postone.comTaiwanSeafirst International CorporationNo. 281, Hou-An Road, Chien-ChenDist. Kaohsiung, Taiwan R.O.C.Ph: +886 7 831 2688Fax: +886 7 831 5001e-mail: seafirst@seed.net.twweb: www.seafirst.com.twThailandThong Electronics (Thailand) Co. Ltd.923/588 Ta Prong Road, Mahachai,Muang, Samutsakhon 74000, Thailand.Ph: +66 34 411 919Fax: +66 34 422 919e-mail: sales@thongelectronics.comadmins@thongelectronics.comweb: www.thongelectronics.comVietnamHaiDang Co. Ltd.763 Le Hong Phong St. Ward 12District 10, Hochiminh City, VietnamPh: +84 8 863 2159Fax: +84 8 863 2524e-mail: haidang-co@hcm.vnn.vnweb: www.haidangvn.comMIDDLE EASTLebanon and SyriaBalco StoresBalco Building, Moutran Street,Tripoli (via Beirut). - LebanonP.O. Box: 622.Ph: +961 6 624 512Fax: +961 6 628 211e-mail: balco@cyberia.net.lbUnited Arab EmiratesKuwait, Oman, Iran, SaudiArabia, Bahrain and QatarAbdullah Moh’d Ibrahim Trading, oppCreak Rd. Baniyas Road, Dubai.Ph: +971 4 229 1195Fax: +971 4 229 1198e-mail: sales@amitdubai.comAFRICASouth AfricaPertec (Pty) Ltd (Coastal Division)16 Paarden Eiland Road.Paarden Eiland, 7405PO Box 527,Paarden Eiland, 7420Cape Town, South Africa.Ph: +27 21 508 4707Fax: +27 21 508 4888e-mail: info@kfa.co.zaweb: www.pertec.co.zaEUROPEFrance, Belgium and SwitzerlandPlastimo International15, rue Ingénieur Verrière,BP435,56325 Lorient Cedex.Ph: +33 2 97 87 36 36Fax: +33 2 97 87 36 49e-mail: plastimo@plastimo.frweb: www.plastimo.frGermanyNavimo Deutschland15, rue Ingénieur VerrièreBP435- 56325 Lorient Cedex.Ph: +49 6105 92 10 09+49 6105 92 10 10+49 6105 92 10 12Fax: +49 6105 92 10 11e-mail:plastimo.international@plastimo.frwebsite: www.plastimo.deItalyNavimo ItaliaNuova Rade spa, Via del Pontasso 516015 Casella Scrivia (GE).Ph: +39 1096 80162Fax: +39 1096 80150e-mail: info@nuovarade.comweb: www.plastimo.itwww.navman.comHollandNavimo HollandIndustrieweg 4,2871 JE Schoonhoven.Ph: +31 182 320 522Fax: +31 182 320 519e-mail: info@plastimo.nlweb: www.plastimo.nlUnited KingdomNavimo UKHamilton Business ParkBailey Road, Hedge EndSouthhampton, Hants S030 2HE.Ph: +44 01489 778 850Fax: +44 0870 751 1950e-mail: sales@plastimo.co.ukweb: www.plastimo.co.ukSweden, Denmark, Finland andNorwayNavimo NordicLundenvägen 2,473 21 Henån.Ph: +46 304 360 60Fax: +46 304 307 43e-mail: info@plastimo.seweb: www.plastimo.seSpainNavimo EspañaPolígono Industrial de CabreraPlaza Industria, S/N08349 Cabrera de MarBarcelona.Ph: +34 93 750 75 04Fax: +34 93 750 75 34e-mail: plastimo@plastimo.esweb: www.plastimo.esPortugalNavimo PortugalAvenida de India N°401300-299 Lisbon.Ph: +351 21 362 04 57Fax: +351 21 362 29 08e-mail: plastimo@siroco-nautica.ptweb: www.plastimo.comOther countries in EuropePlastimo International15, rue Ingénieur Verrière BP43556325 Lorient Cedex, France.Ph: +33 2 97 87 36 59Fax: +33 2 97 87 36 29e-mail:plastimo.international@plastimo.frweb: www.plastimo.comHEADQUARTERSNavman NZ Limited13-17 Kawana St.Northcote.P.O. Box 68 155,Newton,Auckland,New Zealand.Ph: +64 9 481 0500Fax: +64 9 481 0590e-mail: marine.sales@navman.comweb: www.navman.com38 NAVMAN<strong>SmartCraft</strong> <strong>gateways</strong> Installation and Operation Manual


