M121/M84 - Livorsi Marine, Inc.
M121/M84 - Livorsi Marine, Inc.
M121/M84 - Livorsi Marine, Inc.

You also want an ePaper? Increase the reach of your titles
YUMPU automatically turns print PDFs into web optimized ePapers that Google loves.
10 Sonar fishfinding: Windows ................................................................................................................................................... 4210-1 Sonar history window - no split . . . . . . . . . . . . . . . . . . . . . . . . . . . . . . . . . . . . . . . . . . . . . . . . . . . . . . . . . . . . . . . . . . . . 4210-2 Sonar Zoom and Full Screen Zoom displays . . . . . . . . . . . . . . . . . . . . . . . . . . . . . . . . . . . . . . . . . . . . . . . . . . . . . . . . 4310-3 Sonar Bottom window . . . . . . . . . . . . . . . . . . . . . . . . . . . . . . . . . . . . . . . . . . . . . . . . . . . . . . . . . . . . . . . . . . . . . . . . . . . . . 4410-4 Sonar 50/200 window . . . . . . . . . . . . . . . . . . . . . . . . . . . . . . . . . . . . . . . . . . . . . . . . . . . . . . . . . . . . . . . . . . . . . . . . . . . . . . 4410-5 Sonar A-Scope window . . . . . . . . . . . . . . . . . . . . . . . . . . . . . . . . . . . . . . . . . . . . . . . . . . . . . . . . . . . . . . . . . . . . . . . . . . . . 4511 Gauges window ...................................................................................................................................................................... 4612 Data window .......................................................................................................................................................................... 4613 Fuel functions and display ...................................................................................................................................................... 4713-1 What the fuel computer does . . . . . . . . . . . . . . . . . . . . . . . . . . . . . . . . . . . . . . . . . . . . . . . . . . . . . . . . . . . . . . . . . . . . . . . 4713-2 Fuel display . . . . . . . . . . . . . . . . . . . . . . . . . . . . . . . . . . . . . . . . . . . . . . . . . . . . . . . . . . . . . . . . . . . . . . . . . . . . . . . . . . . . . . . . 4713-3 When you add or remove fuel . . . . . . . . . . . . . . . . . . . . . . . . . . . . . . . . . . . . . . . . . . . . . . . . . . . . . . . . . . . . . . . . . . . . . . 4813-4 Low fuel alarm . . . . . . . . . . . . . . . . . . . . . . . . . . . . . . . . . . . . . . . . . . . . . . . . . . . . . . . . . . . . . . . . . . . . . . . . . . . . . . . . . . . . . 4913-5 Boat speed sensors . . . . . . . . . . . . . . . . . . . . . . . . . . . . . . . . . . . . . . . . . . . . . . . . . . . . . . . . . . . . . . . . . . . . . . . . . . . . . . . . . 4913-6 Fuel consumption curves . . . . . . . . . . . . . . . . . . . . . . . . . . . . . . . . . . . . . . . . . . . . . . . . . . . . . . . . . . . . . . . . . . . . . . . . . . . 5113-7 Calibration . . . . . . . . . . . . . . . . . . . . . . . . . . . . . . . . . . . . . . . . . . . . . . . . . . . . . . . . . . . . . . . . . . . . . . . . . . . . . . . . . . . . . . . . . 5314 Tides window ......................................................................................................................................................................... 5415 User card window ................................................................................................................................................................... 5516 AIS ......................................................................................................................................................................................... 5716-1 Viewing AIS Vessels . . . . . . . . . . . . . . . . . . . . . . . . . . . . . . . . . . . . . . . . . . . . . . . . . . . . . . . . . . . . . . . . . . . . . . . . . . . . . . . . 5716-2 Dangerous Vessels . . . . . . . . . . . . . . . . . . . . . . . . . . . . . . . . . . . . . . . . . . . . . . . . . . . . . . . . . . . . . . . . . . . . . . . . . . . . . . . . . 5816-3 AIS Windows . . . . . . . . . . . . . . . . . . . . . . . . . . . . . . . . . . . . . . . . . . . . . . . . . . . . . . . . . . . . . . . . . . . . . . . . . . . . . . . . . . . . . . . 5817 DSC/Buddy track windows ...................................................................................................................................................... 6017-1 The windows . . . . . . . . . . . . . . . . . . . . . . . . . . . . . . . . . . . . . . . . . . . . . . . . . . . . . . . . . . . . . . . . . . . . . . . . . . . . . . . . . . . . . . . 6017-2 Using the windows . . . . . . . . . . . . . . . . . . . . . . . . . . . . . . . . . . . . . . . . . . . . . . . . . . . . . . . . . . . . . . . . . . . . . . . . . . . . . . . . . 6118 Radar .................................................................................................................................................................................... 6218-1 Radar window . . . . . . . . . . . . . . . . . . . . . . . . . . . . . . . . . . . . . . . . . . . . . . . . . . . . . . . . . . . . . . . . . . . . . . . . . . . . . . . . . . . . . . 6218-2 Radar modes . . . . . . . . . . . . . . . . . . . . . . . . . . . . . . . . . . . . . . . . . . . . . . . . . . . . . . . . . . . . . . . . . . . . . . . . . . . . . . . . . . . . . . . 6318-3 Enabling the radar functionality . . . . . . . . . . . . . . . . . . . . . . . . . . . . . . . . . . . . . . . . . . . . . . . . . . . . . . . . . . . . . . . . . . . . 6318-4 Selecting standby mode or transmit mode . . . . . . . . . . . . . . . . . . . . . . . . . . . . . . . . . . . . . . . . . . . . . . . . . . . . . . . . . 6318-5 Disabling the radar functionality . . . . . . . . . . . . . . . . . . . . . . . . . . . . . . . . . . . . . . . . . . . . . . . . . . . . . . . . . . . . . . . . . . . 6318-6 Adjusting the quality of the radar window . . . . . . . . . . . . . . . . . . . . . . . . . . . . . . . . . . . . . . . . . . . . . . . . . . . . . . . . . 6318-7 Changing the echo expansion setting . . . . . . . . . . . . . . . . . . . . . . . . . . . . . . . . . . . . . . . . . . . . . . . . . . . . . . . . . . . . . . 6518-8 Turning the target trails on or off . . . . . . . . . . . . . . . . . . . . . . . . . . . . . . . . . . . . . . . . . . . . . . . . . . . . . . . . . . . . . . . . . . . 6618-9 Using the VRM/EBL . . . . . . . . . . . . . . . . . . . . . . . . . . . . . . . . . . . . . . . . . . . . . . . . . . . . . . . . . . . . . . . . . . . . . . . . . . . . . . . . . 6618-10 Changing the PPI position . . . . . . . . . . . . . . . . . . . . . . . . . . . . . . . . . . . . . . . . . . . . . . . . . . . . . . . . . . . . . . . . . . . . . . . . . 6818-11 Using the radar guard zones . . . . . . . . . . . . . . . . . . . . . . . . . . . . . . . . . . . . . . . . . . . . . . . . . . . . . . . . . . . . . . . . . . . . . . . 68
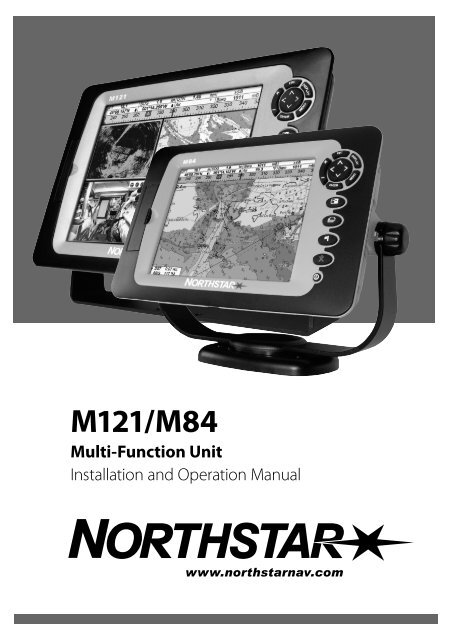
19 Setting up the <strong>M121</strong>/<strong>M84</strong> ....................................................................................................................................................... 7019-1 Setup > System . . . . . . . . . . . . . . . . . . . . . . . . . . . . . . . . . . . . . . . . . . . . . . . . . . . . . . . . . . . . . . . . . . . . . . . . . . . . . . . . . . . . 7119-2 Setup > Chart . . . . . . . . . . . . . . . . . . . . . . . . . . . . . . . . . . . . . . . . . . . . . . . . . . . . . . . . . . . . . . . . . . . . . . . . . . . . . . . . . . . . . 7219-3 Setup > Sonar . . . . . . . . . . . . . . . . . . . . . . . . . . . . . . . . . . . . . . . . . . . . . . . . . . . . . . . . . . . . . . . . . . . . . . . . . . . . . . . . . . . . . . 7519-4 Setup > Radar . . . . . . . . . . . . . . . . . . . . . . . . . . . . . . . . . . . . . . . . . . . . . . . . . . . . . . . . . . . . . . . . . . . . . . . . . . . . . . . . . . . . . . 7619-5 Setup > GPS . . . . . . . . . . . . . . . . . . . . . . . . . . . . . . . . . . . . . . . . . . . . . . . . . . . . . . . . . . . . . . . . . . . . . . . . . . . . . . . . . . . . . . . 7919-6 Setup > Fuel . . . . . . . . . . . . . . . . . . . . . . . . . . . . . . . . . . . . . . . . . . . . . . . . . . . . . . . . . . . . . . . . . . . . . . . . . . . . . . . . . . . . . . . 8019-7 Setup > Track . . . . . . . . . . . . . . . . . . . . . . . . . . . . . . . . . . . . . . . . . . . . . . . . . . . . . . . . . . . . . . . . . . . . . . . . . . . . . . . . . . . . . . . 8119-8 Setup > AIS . . . . . . . . . . . . . . . . . . . . . . . . . . . . . . . . . . . . . . . . . . . . . . . . . . . . . . . . . . . . . . . . . . . . . . . . . . . . . . . . . . . . . . . . . 8219-9 Setup > Logs . . . . . . . . . . . . . . . . . . . . . . . . . . . . . . . . . . . . . . . . . . . . . . . . . . . . . . . . . . . . . . . . . . . . . . . . . . . . . . . . . . . . . . . 8319-10 Setup > Alarms . . . . . . . . . . . . . . . . . . . . . . . . . . . . . . . . . . . . . . . . . . . . . . . . . . . . . . . . . . . . . . . . . . . . . . . . . . . . . . . . . . . . 8419-11 Setup > Units . . . . . . . . . . . . . . . . . . . . . . . . . . . . . . . . . . . . . . . . . . . . . . . . . . . . . . . . . . . . . . . . . . . . . . . . . . . . . . . . . . . . . . 8519-12 Setup > Comms . . . . . . . . . . . . . . . . . . . . . . . . . . . . . . . . . . . . . . . . . . . . . . . . . . . . . . . . . . . . . . . . . . . . . . . . . . . . . . . . . . . 8519-13 Setup > Calibrate . . . . . . . . . . . . . . . . . . . . . . . . . . . . . . . . . . . . . . . . . . . . . . . . . . . . . . . . . . . . . . . . . . . . . . . . . . . . . . . . . . 8619-14 Setup > Time . . . . . . . . . . . . . . . . . . . . . . . . . . . . . . . . . . . . . . . . . . . . . . . . . . . . . . . . . . . . . . . . . . . . . . . . . . . . . . . . . . . . . 8719-15 Setup > Favorites . . . . . . . . . . . . . . . . . . . . . . . . . . . . . . . . . . . . . . . . . . . . . . . . . . . . . . . . . . . . . . . . . . . . . . . . . . . . . . . . . . 8819-16 Setup > Simulate . . . . . . . . . . . . . . . . . . . . . . . . . . . . . . . . . . . . . . . . . . . . . . . . . . . . . . . . . . . . . . . . . . . . . . . . . . . . . . . . . 8820 Installation ........................................................................................................................................................................... 8920-1 Installation: What else comes with my <strong>M121</strong>/<strong>M84</strong>? . . . . . . . . . . . . . . . . . . . . . . . . . . . . . . . . . . . . . . . . . . . . . . . . . . 9020-2 Installation: Options and Accessories . . . . . . . . . . . . . . . . . . . . . . . . . . . . . . . . . . . . . . . . . . . . . . . . . . . . . . . . . . . . . . . 9120-3 Installation: The display unit . . . . . . . . . . . . . . . . . . . . . . . . . . . . . . . . . . . . . . . . . . . . . . . . . . . . . . . . . . . . . . . . . . . . . . . . 9220-4 Installation: Power/data cable . . . . . . . . . . . . . . . . . . . . . . . . . . . . . . . . . . . . . . . . . . . . . . . . . . . . . . . . . . . . . . . . . . . . . . 9420-5 Installation: GPS antenna . . . . . . . . . . . . . . . . . . . . . . . . . . . . . . . . . . . . . . . . . . . . . . . . . . . . . . . . . . . . . . . . . . . . . . . . . . 9520-6 Installation: Sonar transducer . . . . . . . . . . . . . . . . . . . . . . . . . . . . . . . . . . . . . . . . . . . . . . . . . . . . . . . . . . . . . . . . . . . . . . 9620-7 Installation: Northstar petrol/gasoline sensors . . . . . . . . . . . . . . . . . . . . . . . . . . . . . . . . . . . . . . . . . . . . . . . . . . . . . 9620-8 Installation: SmartCraft . . . . . . . . . . . . . . . . . . . . . . . . . . . . . . . . . . . . . . . . . . . . . . . . . . . . . . . . . . . . . . . . . . . . . . . . . . . . . 9720-9 Installation: Radar . . . . . . . . . . . . . . . . . . . . . . . . . . . . . . . . . . . . . . . . . . . . . . . . . . . . . . . . . . . . . . . . . . . . . . . . . . . . . . . . . . 9720-10 Installation: Other NavBus instruments . . . . . . . . . . . . . . . . . . . . . . . . . . . . . . . . . . . . . . . . . . . . . . . . . . . . . . . . . . . . 9820-11 Installation: Other NMEA instruments . . . . . . . . . . . . . . . . . . . . . . . . . . . . . . . . . . . . . . . . . . . . . . . . . . . . . . . . . . . . . 9920-12 Installation: Setup and test . . . . . . . . . . . . . . . . . . . . . . . . . . . . . . . . . . . . . . . . . . . . . . . . . . . . . . . . . . . . . . . . . . . . . . . . 99Appendix A - Specifications ....................................................................................................................................................... 100Appendix B - Troubleshooting ................................................................................................................................................... 103B-1 General problems . . . . . . . . . . . . . . . . . . . . . . . . . . . . . . . . . . . . . . . . . . . . . . . . . . . . . . . . . . . . . . . . . . . . . . . . . . . . . . . . . .103B-2 GPS navigation problems . . . . . . . . . . . . . . . . . . . . . . . . . . . . . . . . . . . . . . . . . . . . . . . . . . . . . . . . . . . . . . . . . . . . . . . . . . .104B-3 Fuel consumption problems . . . . . . . . . . . . . . . . . . . . . . . . . . . . . . . . . . . . . . . . . . . . . . . . . . . . . . . . . . . . . . . . . . . . . . . .104B-4 Sonar fishfinding problems . . . . . . . . . . . . . . . . . . . . . . . . . . . . . . . . . . . . . . . . . . . . . . . . . . . . . . . . . . . . . . . . . . . . . . . .105B-5 Radar problems . . . . . . . . . . . . . . . . . . . . . . . . . . . . . . . . . . . . . . . . . . . . . . . . . . . . . . . . . . . . . . . . . . . . . . . . . . . . . . . . . . . .107Appendix C Glossary and navigation data ................................................................................................................................. 108Appendix D Compliance statements ...........................................................................................................................................111
WarningIt is your sole responsibility to install and use the instrument and transducer(s) in a mannerthat will not cause accidents, personal injury or property damage. Always observe safe boatingpractices.The choice, location, and installation of transducers and other components of the system arecritical to the performance of the system as intended. If in doubt, consult your Northstar dealer.To reduce the risk of misusing or misinterpreting this instrument, you must read and understandall aspects of this Installation and Operation Manual. We also recommend that you practice alloperations using the built-in simulator before using this instrument at sea.Global Positioning System: The Global Positioning System (GPS) is operated by the USGovernment which is solely responsible for its operation, accuracy and maintenance. The GPSis subject to changes which could affect the accuracy and performance of all GPS equipmentanywhere in the world, including this instrument.Electronic Chart: The electronic chart used by this instrument is an aid to navigation designedto supplement, not replace, official government charts. Only official government chartssupplemented by notices to mariners contain the information required for safe and prudentnavigation. Always supplement the electronic information provided by this instrument withother plotting sources such as observations, depth soundings, radar and hand compass bearings.Should the information not agree, the discrepancy must be resolved before proceeding anyfurther.AIS: The AIS features on this chart-plotter are designed as a safety aid only and do not guaranteesafety at sea. AIS transmission is mandatory on some, but not all, vessels. You should checkyour local laws and regulations for requirements in your area. As a result of different legalrequirements, different vessel sizes and uses, you should not assume that your AIS equippedchart-plotter will show the location of ALL vessels in your area. Careful prudence, judgement, andsafe navigation practices should always be exercised. AIS should be used to complement radar,but AIS is not a substitute for radar.Sonar performance: The accuracy of the sonar depth display can be affected by manyfactors, including the type and location of the transducer and water conditions. Never use thisinstrument to gauge depth or other conditions for swimming or diving.Fuel data: Do not rely on this instrument as the sole source of information about fuel availableonboard. You must supplement this instrument’s fuel data with visual or other checks of thefuel available. This is necessary because possible operator errors, such as forgetting to reset thefuel used when filling the tank or running the engine with this instrument not switched on, canrender this instrument inaccurate. Fuel economy can change drastically depending on boatloading and sea conditions. Always carry adequate fuel onboard for the intended trip, plus areserve to allow for unforeseen circumstances.Simulate mode: Never have simulate mode on when you are navigating on the water.Failure to adhere to these warnings may lead to death, serious injury or propertydamage. Northstar disclaims all liability for installation or use of this product thatcauses or contributes to death, injury or property damage or that violates any law.4Northstar <strong>M121</strong>/<strong>M84</strong> Installation and Operation Manual
1 IntroductionQuick reference to the built-in and optional features:Feature Type See RequiresGeneral How to use the keys and windows 2TroubleshootingAppendix BSimulate mode 2-6Glossary of special namesAppendix CSpecificationsAppendix AMOB Man overboard key 2-4Navigation Overview of how to navigate 3-1 GPS fixFinding the boat’s position on the chart 3-2Navigate to any point or to a waypoint 3-1Navigate along a route 3-1Projected course: An estimate of progress 3-4Tracks: records of where the boat has been 3-5GPS receiver status 8-1Saving and loading data with a user card 15 User cardChart data Chart features (built in world chart) 3-2Chart details 3-2-4 & 5 Chart cardTides at a port 14 Chart cardAIS 16Alarms Built in alarms 2-5Boat data Data at top of main displays 2-7-3Compass at top of main displays 2-7-4Dedicated data display 12Fuel Fuel computer, Instrument petrol/gasoline engine 13 Fuel sensorsFuel computer, SmartCraft engines 13 SmartCraftWhat to do when you add or remove fuel 13-1Sounder Overview of the depth sounder 9 SounderDepth, bottom features, water features 9 SounderFishfinder 9 SounderOther boats Track your buddy, polling other boats 17 DSC VHFDistress calls 17 DSC VHF(Continued next page)Northstar <strong>M121</strong>/<strong>M84</strong> Installation and Operation Manual 5
1-3 Plug-in cardsThe <strong>M121</strong>/<strong>M84</strong> can use two kinds of C-MAPSD-Card plug-in cards:1. Chart cards have chart details required fornavigating in a particular region. Whenyou insert a chart card, the extra detailsautomatically appear on the Chart window.You can plug in up to two chart cardsat once. If the chart shows a region notcovered by a chart card, then it displays asimplified built-in world chart.2. User cards store navigation data. A user cardallows navigation data to be transferredto another compatible instrument (seesection 15).CAUTIONHandle plug-in cards carefully. Keep themin their protective cases when not pluggedinto the <strong>M121</strong>/<strong>M84</strong>.Keep the <strong>M121</strong>/<strong>M84</strong> card cover closed at alltimes to prevent moisture from entering thecard compartment.Removing a plug-in card1 2 3Turn the <strong>M121</strong>/<strong>M84</strong> off(see section 2-2).Open the card cover on theright of the display.Inserting a plug-in cardPush the card down until itreleases and can pop up.Lift the card out.Put the card in its case.123Hold the new card with thegold contacts on the far side.Push the card into an emptysocket until it clicks.Close the card cover.Turn the <strong>M121</strong>/<strong>M84</strong> on(see section 2-2).Northstar <strong>M121</strong>/<strong>M84</strong> Installation and Operation Manual 7
1-4 Removing and replacing the display unitIf the <strong>M121</strong>/<strong>M84</strong> is bracket mounted then it caneasily be removed for security.Removing the display unit:1 Turn the <strong>M121</strong>/<strong>M84</strong> off (see section 2-2) andput the dust cover on.2 Loosen the knobs on the mounting bracketand lift the unit off the bracket.3 Unplug the connectors from the <strong>M121</strong>/<strong>M84</strong>;turn each locking collar anticlockwise untilyou can pull the plug out.4 Store the <strong>M121</strong>/<strong>M84</strong> in a dry clean place.Replacing the display unit1 Plug the connectors into the back of thedisplay unit:Match the connector’s color to the socketcolor.Insert each connector and turn thelocking collar clockwise until it is fingertight.Nothing will be damaged if a cable isplugged into the wrong socket by mistake.2 Hold the <strong>M121</strong>/<strong>M84</strong> in place on themounting bracket. Tilt it for best viewing,then hand tighten the knobs on themounting bracket. Remove the dust cover.KnobMounting bracket8Northstar <strong>M121</strong>/<strong>M84</strong> Installation and Operation Manual
2 Basic OperationOverview of the <strong>M121</strong> keys5461378910112qESC– Go back to an earlier menu or window. <strong>Inc</strong>hart mode centers chart at boat’s position.w DISPLAY – This is a powerful key that allows youto setup the display the way you want. Maindisplays can be saved as favorite displays for easyaccess from the key.eMENU– Show a menu of the options for thecurrent active window.r ENTER – Start an action or accept a change.t / – Changes the range on a window eg. Chartor Sonar zoomsy , , , – Cursor keys, to move the cursor orthe selection highlight.u – The key selects which window youare working with. The Active window is indicatedwith a red border.i – The key allows you to quicklyswitch between your saved favorite displays.GOTOo AUTO – For a navigation display: Start navigatingto a point, waypoint or along a route (see section3-1-2). For sonar display: Select a sonar operatingmode (see section 6).a SETUP – The setup key takes you to the setupmenu which allows advanced configuration ofthe <strong>M121</strong>.s – This key places a waypoint on the ActiveChart Window.d – Man overboard (MOB, see section 2-4).f – Turn Instrument on and off (see section 2-2);adjust the backlighting (see section 2-3).1213Northstar <strong>M121</strong>/<strong>M84</strong> Installation and Operation Manual 9
Overview of the <strong>M84</strong> keys5461372qESC– Go back to an earlier menu or window. <strong>Inc</strong>hart mode centers chart at boat’s position.w DISPLAY – This is a powerful key that allows youto setup the display the way you want. Maindisplays can be saved as favorite displays for easyaccess from the key.eMENU– Show a menu of the options for thecurrent active window. The setup menu can beopened by pressing MENUtwice.r ENTER – Start an action or accept a change.t / – Changes the range on a window eg. Chartor Sonar zoomsy , , , – Cursor keys, to move the cursor orthe selection highlight.u – The key selects which window youare working with. The Active window is indicatedwith a red border.i – The key allows you to quicklyswitch between your saved favorite displays.o – This key places a waypoint on the ActiveChart Window.a – Man overboard (MOB, see section 2-4).s – Turn Instrument on and off (see section 2-2);adjust the backlighting (see section 2-3).891011Note: Display refers to ALL windows and the data header/CompassWindow refers to a part of the display in which a particular function is showne.g. The Chart window on a Chart + Sonar display.10Northstar <strong>M121</strong>/<strong>M84</strong> Installation and Operation Manual
2-1 Using the keysIn this manual:Press means to push the key for less than asecond.Hold means to hold the key down.The internal beeper beeps when a key ispressed (to adjust the beep volume, see section19-1).Using the menusOperate the Instrument by selecting items frommenus. Items can be submenus, commands ordata.Selecting a submenuA after a menu item indicates a submenu, forexample Chart . Press or to move thehighlight to the submenu, then press ENTER .Starting a commandPress or to move the highlight to thecommand, for example Goto cursor, then pressENTER .Changing dataFirst press or to move the highlight to thedata to change, then:a) To change a tick boxmeans On or Yesmeans Off or No.Press ENTER or to change the tick box.b) To select an option1 Press ENTER to display the list of options.2 Press or to move the highlight to theoption you want, then press ENTER .c) To change a name or number:1 Press ENTER to display the name or number:2 Press or to select a letter or digit tochange. Press or to change the letter ordigit.Repeat this to change other letters ornumbers.3 Press ENTER to accept the new value. Or pressESC to ignore the changes.d) To change a slider valuePress to decrease the value or to increasethe value.Northstar <strong>M121</strong>/<strong>M84</strong> Installation and Operation Manual 11
2-2 Turning on and off / auto powerTurning on manuallyIf the Instrument is not wired for auto power,press to turn the unit on. If necessary, adjustthe display to be easy to read (see section 2-3).! WARNINGIf the Instrument is not wired for auto powerthen the Instrument does not record enginehours and will not record fuel consumptionif not powered (see section 18-4).Turning off manuallyIf the Instrument is not wired for auto power orif the ignition switch is off, hold down untilthe display turns off.Auto powerIf the Instrument is wired for auto power (seesection 20-4), then:• The Instrument automatically turns on whenyou turn the boat’s ignition switch on.• You can not turn the Instrument off whilethe ignition switch is on.• If Auto power off (see section 19-1) is , theInstrument automatically turns off when youturn the boat’s ignition switch off.• If Auto power off (see section 19-1) is , theInstrument stays on when you turn the boat’signition switch off. You can now turn theInstrument off manually.2-3 Backlight and night modeTo go to the Backlight window, press briefly.BacklightThe display and keys are backlit. To change thebacklight level, select Backlight, then press todim or to brighten.ESCWhen you have finished, pressTip: Press twice to give the brightestscreen, with maximum backlight and Nightmode off.Night modeNight mode sets the palette for all windows.Normal palette, for daytimeA palette optimized for night time.To change mode, highlight Night mode, thenpress or ENTER . To change only the chartpalette, see section 19-1.12Northstar <strong>M121</strong>/<strong>M84</strong> Installation and Operation Manual
2-4 Man overboard (MOB)The MOB feature saves the boat’s position andthen navigates back to this point.! WARNINGMOB will not work if the Instrument doesnot have a GPS fix.1 PressThe Instrument stores the boat’s position asa waypoint called MOB.2 The Instrument changes to the chartwindow, with the MOB waypoint at thecentre of the chart.The chart zooms in for accurate navigation.If the chart can not show the required smallscale, the Instrument changes to plottermode (a white window with crosshatchingand no chart details, see section 19-2).3 The Instrument sets the MOB waypoint tobe the destination to navigate to.If the NMEA output (autopilot) is off(see section 19-12) use the Instrument tomanually navigate to the destination MOBwaypoint (see sections 3-1-1 and 3-1-2).If the NMEA output (autopilot) is on, theInstrument asks if the autopilot is active.Select:No: Use the Instrument to manually navigateto the destination MOB waypoint (seesections 3-1-1 and 3-1-2).Yes: The Instrument asks if the boat is to goto the MOB waypoint.Select:Yes: to immediately start navigating to theMOB waypoint.! WARNINGThis might result in a sudden and dangerousturn.No: disengage the autopilot; then use theInstrument to manually navigate to thedestination MOB waypoint (see sections3-1-1 and 3-1-2).To cancel MOB or set another MOB1 Press again to display a menu.2 Select an option from the menu.Tip: The MOB waypoint remains on the chartafter the MOB has been cancelled. To delete theMOB waypoint, see section 6-2-5.2-5 AlarmsWhen the Instrument detects an alarmcondition, it displays a warning message onthe display, the internal beeper sounds and anyexternal beepers or lights operate.PressESCto clear the alarm. The alarm willsound again if the alarm condition occurs again.The Instrument has user settable alarms (seesection 19-10).Northstar <strong>M121</strong>/<strong>M84</strong> Installation and Operation Manual 13
2-6 Simulate modeIn Simulate mode, the Instrument ignores datafrom the GPS antenna and other transducersand sensors and the Instrument generates thisdata itself. Otherwise, the Instrument functionsnormally.There are two simulate modes:• Normal: Allows a user to become familiarwith the Instrument off the water.• Demo: Simulates a boat moving along aroute and automatically displays differentInstrument functions.To start and stop Simulate mode, and for moreinformation, see section 19-16. In simulatemode, Simulate or Demo flashes at the bottomof the window.! WARNINGNever have Simulate mode on when usingthe Instrument to navigate on the water.2-7 The main windowsTo show one of the main windows full-size, press DISPLAY and select the window.Note1 The windows available depend on the optional sensors and instruments that are installed (seesection 1-1).2 Set up commonly used windows as favorites and press to switch between windows (seesection 2-7-2).14Northstar <strong>M121</strong>/<strong>M84</strong> Installation and Operation Manual
To show one of the other windows full-screen, press DISPLAY , select More... and select the window.PressESCto return from one of thesewindows to the previous window.Northstar <strong>M121</strong>/<strong>M84</strong> Installation and Operation Manual 15
2-7-1 Multi window displaysThe <strong>M121</strong>/<strong>M84</strong> can show up to four windowsat once, for example Chart, Sonar, Gauges andVideo:Adding a window to the displayPress DISPLAY , select Add window and select awindow to add. The <strong>M121</strong>/<strong>M84</strong> automaticallyrearranges the display to show the newwindow.Changing window size1 Press DISPLAY and select Split ratio.2 Press or to change the width of thewindows. If the <strong>M121</strong>/<strong>M84</strong> is displaying threeor four windows, press or to changethe height of the windows.Note: Some windows are fixed in size.3 Press ENTER .Deleting a window from the display1 Press until the window you want todelete has a red border.2 Press DISPLAY and select Delete window.Exchanging two windows on the display1 Press until the first window has a redborder.2 Press DISPLAY , select Replace and select thesecond window.The <strong>M121</strong>/<strong>M84</strong> exchanges the two windows.Replacing a window on the display1 Press until the window that you wantto replace has a red border.2 Press DISPLAY , select Replace and select a newwindow that is not currently visible.Note1 When some windows are small then not allthe data is shown.2 Set up commonly used displays as favoritesand press to switch between displays(see section 2-7-2).The active windowIf there is more than one window displayed, the active window is indicated by a red border. Tochange the active window to the next window, press .Pressing MENU will display the options menu for the active window.Red borderPressPressChart is activeSonar is active16Northstar <strong>M121</strong>/<strong>M84</strong> Installation and Operation Manual
2-7-2 Favorite displaysThe <strong>M121</strong>/<strong>M84</strong> has a list of commonly useddisplays, called favorite displays. There can beup to six favorite displays.Each display can have one or more windowsplus a data header (see section 2-7-3) and acompass (see section 2-7-4). Set up favoritedisplays for common situations, for examplenavigating along a route, travelling in a harbour,fishing.Selecting a favorite display3 Select where in the list to add the newfavorite. If you select an existing favoritedisplay then the new favorite will replace theexisting favorite in the list.To select another favorite, press one ormore times. For example, with six favorites:Adding a favorite display to the list1 Set up the display with the window orwindows you want in the new favorite (seesections 2-7-1 and 2-7-4).2 Press DISPLAY and select Save this display. The<strong>M121</strong>/<strong>M84</strong> displays the favorites list.Deleting a favorite display from the list1 Press MENU twice then select Favorites.2 Highlight the display to delete, press MENUand select Delete.Changing the order of the favorites list1 Press MENU twice then select Favorites.2 Highlight the display to move, press MENUand select Move up or Move down.Northstar <strong>M121</strong>/<strong>M84</strong> Installation and Operation Manual 17
2-7-3 Data headerThe displays can show data at the top, calledthe data header.When you select a window from the displaymenu (see section 2-7) the <strong>M121</strong>/<strong>M84</strong>displays an appropriate data header for thewindow.Each favorite display (see section 2-7-2) hasits own data header. When you pressto recall a favorite display, the <strong>M121</strong>/<strong>M84</strong>recalls the favorite displays data header.Setting the data header for a display1 Press DISPLAY and select Data header.2 To turn the data header on or off:i Select Data.ii Select or .3 To select the size of the data:i Select Size.ii Select the size to display.4 To change the data displayed:i Select Data setup.ii Change a data field:a Press the cursor keys to highlightthe field.b Press ENTER to display a menuof data items.c Select a data item that is availableon your system or select None toleave the field empty.iii Repeat the above step to set the otherdata fields.Tip: If all fields in a line are None then theline will not be displayed and the data headerwill take less space on the display.5 PressESC .Tip: The data header will change when youselect another display. To set a data header thatyou can recall later, set the header as part of afavorites display (see below).Favorites displays and data headersTo set a data header for a favorites display,follow the steps to add a favorite (see section2-7-2 - Adding a favorite display to the list). Instep 1, set the data header for the favorite asdescribed above.2-7-4 CompassThe chart, sonar and highway displays can showa compass at the top of the window.The compass always shows the boat’s courseover ground (COG), a black symbol in themiddle. When the boat is navigating to apoint, the compass also shows bearing to thedestination (BRG), a red symbol.In this example, BRG is 260°M and COG is 321°M.To turn the compass off or on:1 Press MENU and select Data header.2 Set Compass to or .18Northstar <strong>M121</strong>/<strong>M84</strong> Installation and Operation Manual
3 Navigation: ChartThe chart window shows the chart, the boat’s position course and navigation data.3-1 Introduction to navigatingThe Instrument has two ways of navigating, going straight to a point or following a route.3-1-1 Navigating to a pointWhen the Instrument is navigating to apoint, the chart and highway windows shownavigation data:A The boat position .B The destination point marked with a circle.C The boat’s plotted course to the destination.D Two CDI lines, parallel to the boat’s plottedcourse, which indicate the maximumexpected deviation from the plotted course.For more information, see Appendix C.ACIf the Instrument is connected to an autopilot,the Instrument will send data to the autopilotto steer the boat to the destination. Start theautopilot before starting to navigate to thepoint.If the Instrument has no autopilot, steer theboat manually:a use the boat position and destination on thechart or highway windowsb or use navigation data displayed on the dataheader (see section 2-7-3)c or use COG and BRG on the compass (seesection 2-7-4).DDBNote:1 If the XTE alarm is enabled, an alarm willsound if the boat deviates too much from itsintended course (see section 19-10).2 If the arrival radius alarm is enabled, then analarm will sound to show that the boat hasreached the destination(see section 19-10).3 When the destination is reached anarrival warning appears with the optionto cancel navigation (goto or route). Yesthe navigation is cancelled, no navigationcontinues however XTE and highway are nolonger displayed.3-1-2 Going to a waypoint or to a point on thechartA waypoint is a position that you can set on theInstrument chart, for example a fishing spot or apoint on a route (see section 6).Going to a waypoint from the chartwindow1 Go to the chart window.2 Move the cursor to the waypoint: eitheruse the cursor keys or use Find (see section3-2-5).3 Press MENU and select Goto waypoint.Going to a waypoint from the waypointswindow1 Go to the waypoints window.2 Press or to highlight the waypoint to goto.3 Press MENU and select Goto.Northstar <strong>M121</strong>/<strong>M84</strong> Installation and Operation Manual 19
Going to a point on the chart1 Switch to a chart window.2 Move the cursor to the destination point:either use the cursor keys or use Find (seesection 3-2-5).3 Press MENU and select Goto cursor.! WARNINGMake sure the course does not pass overland or dangerous waters.NavigatingThe Instrument navigates to the point asdescribed in section 3-1-1.Cancelling navigatingGo to a Chart window, press MENU and selectCancel goto.Tip: Before starting, create waypoints atpoints of interest. Create a waypoint at thestart of the trip for you to navigate back to (seesection 5-2-1).3-1-3 Following a routePreparingA route is a list of waypoints that the boat canfollow (see section 6).To create waypoints before creating theroute, see section 6-2-1.To create a route, see section 6-2-1.Starting a route from the chart window:1 Go to the chart window.2 Press MENU and select Start Route3 Press or to highlight the route to follow.Press ENTER .4 The Instrument asks for the direction totraverse the route.Select Forward (the order the route wascreated) or Reverse.5 The Instrument displays the chart with theroute marked and starts navigating from thestart of the route.Starting a route from the routes window:1 Go to the routes window.2 Then follow step 3 as in starting a routefrom the chart window above.NavigatingThe Instrument navigates to each waypoint onthe route in turn as described in section 3-1-1.The Instrument stops navigating to thewaypoint at the end of the current leg andstarts the next leg of the route:1 When the boat comes within 0.025 nm ofthe waypoint2 Or when the boat passes the waypoint3 Or if you skip the waypoint.Skipping a waypointTo skip a waypoint, go to a chart window, pressMENUand select Skip. The Instrument startsnavigating straight towards the next waypointon the route.! CAUTIONSkipping a waypoint with the autopilot onmight result in a sudden course change.Cancelling a routeWhen the boat has reached the final waypoint,or to stop the boat following the route at anytime, cancel the route. Go to a chart window,press MENU and select Cancel route.20Northstar <strong>M121</strong>/<strong>M84</strong> Installation and Operation Manual
3-2 Chart windowTo go to the Chart window:• Press DISPLAY and select ChartA typical chart window shows:ABCKFDIFJEGHA Data header. To turn the data off or on or tochange what data is displayed (see section2-7-3)B Compass (see section 2-7-4)C Chart scale (see section 3-2-3)D Boat position (see section 3-2-1)E Boat track (see section 3-5)F Boat course and CDI lines (see Appendix C,CDI).G Distance and bearing of cursor from boatH LandI SeaJ The cursor (see section 3-2-1)K A typical waypoint (see section 6 )Note:To change the types of information displayedon the chart, see section 17-2.To change to a perspective view of the chart,see section 3-2-6.If the region on the chart is covered by achart card then the card’s information isautomatically displayed on the chart. If theregion is not covered by a chart card then thechart displays a simplified built-in world chartwhich is suitable for planning and generalinterest.! WARNINGThe built-in world chart does not showenough detail for navigation. When youuse the <strong>M121</strong>/<strong>M84</strong> to navigate, always use achart card which covers the region.Northstar <strong>M121</strong>/<strong>M84</strong> Installation and Operation Manual 21
3-2-1 Chart modesThe Chart has two modes:Centre on boat modeTo switch to centre on boat mode in the chartwindow, pressESC . The boat is at the centreof the chart. As the boat moves through thewater, the chart automatically scrolls to keep theboat in the centre of the chart. The cursor (seebelow) is turned off.Cursor modeThe keys and are called cursor keys. Toswitch to cursor mode in the chart window, holddown a cursor key. The cursor appears andmoves away from the boat:Press the key which points in the directionthat the cursor will move, for example pressto move the cursor down.Press midway between two of the cursorkeys to make the cursor move diagonally.Hold a cursor key down to make the cursormove continuously across the window.In Cursor mode:The distance ( DST) and bearing ( BRG) ofthe cursor from the boat are displayed at thebottom corner of the window.The chart does not scroll as the boat moves.If the cursor reaches the edge of the window,the chart will scroll.For example, hold down to move thecursor to the right side of the window andthe chart will scroll to the left.3-2-2 Latitude and longitudeLatitude and longitude can be displayed inthe data header. The window is degrees andminutes to three decimal places, about 2 m (6ft) resolution. Normally the position is the boat’sposition, and the latitude and longitude has aboat symbol to show this:36° 29.637’ N or S Latitude175° 09.165’ E or W LongitudeIf the cursor has been moved in the last tenseconds, then the position is the cursor’sposition, and the latitude and longitude has acursor symbol to show this:36° 29.841’ N or S Latitude175° 09.012’ E or W Longitude! WARNINGWhen reading the boat position, make surethe position is not the cursor position.3-2-3 Chart scalePress to zoom in and display a smaller areaof the chart in more detail. Press to zoom outand display a bigger area in less detail.The chart scale is displayed at the top left of thechart:3-2-4 Chart symbols and informationThe chart shows many kinds of symbols, such aswaypoints, ports, marinas, buoys and beacons.If necessary, press or or to choose a chartscale where the symbol is displayed.To see stored information about a symbol:1 Either move the cursor to the symbol on thechart and wait two seconds or use Find tomove the cursor to a symbol for a port orservice (see section 3-2-5).2 A window appears at the bottom of thedisplay with some information about thesymbol.3 To see more detail about a symbol or a list ofassociated items for the symbol, press ENTER :i Select an item to display. If there are moreitems than will fit on the window, pressor to scroll up or down.Select a camera icon to display a photo ofthe item. If the photo is too big to fit onthe window, press , , or to scrollthe photo.Select Tide Station to display a tidechart for the position (see section 14).ii Select other items or pressESCto returnto the chart.22Northstar <strong>M121</strong>/<strong>M84</strong> Installation and Operation Manual
To see stored information about nearby symbolspress MENU and select Chart info. Thenfollow step 3 above.3-2-5 Finding a chart symbolTo find and display a chart symbol:1 Press MENU and select Find.2 Select the type of symbol: Waypoints,Routes, Ports by name, Ports & services, orTide stations.3 For Ports & services: select the type ofservice to find.For Ports by name: press , , or toenter a name or letters contained in the portname, then press ENTER .4 A list of items is displayed. If there are moreitems than will fit on the window, press orto page up and down.For Ports by name: to search for a differentport name, pressESC . Change the name,then press ENTER .5 Select the item and press ENTER . The chartwindow changes to show the item in themiddle of the window.To see stored information about the item,press ENTER (see section 3-2-4).3-2-6 Perspective viewPerspective view shows the chart from anangle instead of from straight above. To turnperspective view on or off, press MENU and setPerspective to or .3-2-7 Turn the radar overlay on or offIf you have a radar installed, you can overlaythe radar screen on your chart screen. This isextremely useful because it can help you to:• interpret the radar image by matching theradar targets with charted objects• quickly identify objects that are not on thechart, such as other boatsThe radar overlay is also very useful inconditions of reduced visibility, at night, or inbusy or hazardous waters.The range, rotation, mode, and centre positionof the radar are all adjusted automatically tomatch your chart.To turn the radar overlay on or off:From the chart window, press MENU and setRadar Overlay option to or .An extra menu item will them be displayed tocontrol the radar and overlay.3-3 Distance and bearing calculatorThe distance and bearing calculator can plota course of one or several legs and show thebearing and length of each leg, as well as thetotal distance along the course. The completedcourse can be converted into a route.To use the distance and bearing calculator:1 Select the Chart window. Press MENU andselect Distance.2 Move the cursor to the start of the first leg. Itdoes not matter if this point is a waypoint ornot. Press ENTER .3 To add a leg to the course, move the cursorto the end of the leg. It does not matter ifthis point is a waypoint or not. The windowshows the bearing and length of the leg, aswell as the total distance along the course.Press ENTER .4 To remove the last leg from the course, pressMENUand select Remove.5 Repeat the above two steps to enter thewhole course.6 To save the new course as a route, pressMENUand select Save. This also saves anynew points on the course as new waypoints,with default names. If necessary, edit theroute later (see section 6-2-2) and edit anynew waypoints later (see section 6-2-3).7 Finally, pressESCto return to the chartwindow.Northstar <strong>M121</strong>/<strong>M84</strong> Installation and Operation Manual 23
3-4 Projected courseIf Projected course is turned on, then theInstrument will display the projected positionbased on the course over ground (COG), speedand a specified time. To turn Projected courseon and off and to set the time, see section 19-2.A Projected positionB Boat’s projected courseC Boat positionABC3-5 Tracks and trackingTracking records the boat’s position to memoryat regular intervals, which can be:Time intervals.Or distance intervals.The track of where the boat has been can bedisplayed on the chart. The Instrument candisplay one track while recording another.To work with tracks, see section 19-7.The Instrument can store five tracks:Track 1 can hold up to 2000 points and isintended to record the normal progress ofthe boat.Tracks 2, 3, 4 and 5 can hold up to 500 pointseach and are intended to record sections tobe retraced accurately, for example enteringa river mouth.Tip: Record a reference tracks and then usethe track to help navigate the same trip later.For example, record a reference track as youleave harbour. Then if you return to harbour andvisibility is poor, select the chart and navigatemanually along the reference track back intothe harbour. Record reference tracks in goodconditions.When recording is on and the track becomesfull then recording continues and the oldestpoints in the track are deleted. The maximumlength of a track depends on the selected trackinterval: a small interval will give a shorter, moredetailed track and a long interval will give alonger, less detailed track, as shown in theseexamples:Time intervalsInterval Track 1 Track 2, 3, 4 or 51 sec 33 minutes 8 minutes10 sec 5.5 hours 1.4 hours1 min 33 hours 8 hoursDistance intervalsInterval Track 1 Track 2, 3, 4 or 50.01 20 51 2,000 50010 20,000 5,000The track lengths are in the current distance units, for examplenm.24Northstar <strong>M121</strong>/<strong>M84</strong> Installation and Operation Manual
4 Video windowPress to zoom inThe video window shows a picture from aChanging the video picturevideo device, such as a camera. The videowindow requires a video device to be installed.4 PressESC .To select the video window, press DISPLAY andselect Video.Adjusting the video picture color1 Press MENU .2 Press or to highlight a control, thenpress or to adjust the control.3 To return the colors to their default settings,select Restore defaults.Press to zoom outPress or to movethe picture sidewaysPress or to movethe picture up and downPressESCto fit thewhole picture in thewindowNorthstar <strong>M121</strong>/<strong>M84</strong> Installation and Operation Manual 25
5 Navigation: Highway windowABFGThe highway window has a bird’s eye view ofthe boat’s course to a destination:To go to the Highway window, press DISPLAY ,select More, then select Highway.DECDThe highway window shows:A Optional data header (see section 2-7-3)B Optional compass (see section 2-7-4)C Destination waypointD Boat’s plotted course to destinationE CDI lines, parallel to the boat’s plottedcourse (see Appendix C, Navigation data,CDI). The CDI lines are like a highway overthe water where the boat will moveF CDI scaleG The boat position is at the bottom, centre ofthe window! WARNINGThe highway window does not show land,dangerous waters or chart symbols.6 Navigation: WaypointsA waypoint is a position that you can set on theInstrument chart, for example a fishing spot ora point on a route. The Instrument can have upto 3000 waypoints. A waypoint can be created,changed or deleted.A waypoint has:A name (up to eight characters).An icon showing what kind of waypoint it is.The available icons are:A position.A color for the waypoint symbol and nameon the chart.A type:Normal: A normal waypoint can benavigated to or included in a route.Danger: A danger waypoint is a pointto avoid. If the boat comes within thedanger radius of a danger waypoint theunit can sound an alarm(see section 19-10).A display option:Controls how the waypoint is displayed onthe chart (see section 19-2):26Northstar <strong>M121</strong>/<strong>M84</strong> Installation and Operation Manual
6-1 Waypoints windowTo go to the waypoints window, press DISPLAY ,select More, then select Waypoints.The waypoints window is a list of the waypointsthat have been entered, each with waypointsymbol, name, latitude and longitude, distanceand bearing from the boat, type and displayoption.If there are more waypoints than will fit on thewindow, press or to scroll up or down apage at a time.6-2 Managing waypoints! WARNINGDo not create a navigation waypoint on landor in dangerous water.6-2-1 Creating a new waypointCreating and editing a new waypoint fromthe chart window1 To create a waypoint at the boat position,pressESCto switch the chart to centre onboat mode.Or, to create a waypoint at a different point,move the cursor to that point on the chart.2 Press ENTER .3 A new waypoint, with the default name anddata is created.4 Change the waypoint data if necessary (seesection 6-2-7).Creating a new waypoint from thewaypoints window1 In the waypoints window, press MENU andselect Create.2 A new waypoint, with a default name anddata, is created at the boat position.3 Change the waypoint data if necessary (seesection 6-2-7).Note: Waypoints can also be created when aroute is created (see section 6-2-1).6-2-2 Moving a waypointMoving a waypoint from the chart window1 In the chart window, move the cursor to thewaypoint to move.2 Press MENU and select Move.3 Move the cursor to the new position andpress ENTER .Moving a waypoint from the waypointswindowTo move a waypoint from the waypointswindow, edit the waypoint (see section 6-2-3)and change the latitude and longitude.6-2-3 Editing a waypointEditing a waypoint from the chart window1 In the chart window, move the cursor to thewaypoint to edit.2 When the waypoint data is displayed, pressENTER .3 Change the waypoint data(see section 6-2-7).Northstar <strong>M121</strong>/<strong>M84</strong> Installation and Operation Manual 27
Editing a waypoint from the waypointswindow1 In the waypoints window, press or tohighlight the waypoint to edit. Press MENUand select Edit.2 Change the waypoint data(see section 6-2-7).6-2-4 Displaying a waypoint on the chartThis goes to the chart window, and shows theselected waypoint at the centre of the window.1 In the waypoints window, press or tohighlight the waypoint to display. Press MENUand select Display.Or, in the Chart window, press MENU , selectFind, then select Waypoints. Select awaypoint from the list.2 The Instrument switches to the chartwindow, with the selected waypoint at thecentre of the chart.6-2-5 Deleting a waypointA waypoint can not be deleted if the boat isnavigating to it or if the waypoint is used inmore than one route. A waypoint that is used inone route can be deleted.! WARNINGWhen a waypoint is deleted from a route,check that the changed route does not crossland or dangerous waters.Deleting a waypoint from the chartwindow1 In the chart window, move the cursor to thewaypoint to delete.2 Press MENU and select Delete.3 Select Yes to confirm.Deleting a waypoint from the waypointswindow1 In the waypoints window, press or tohighlight the waypoint to delete. Press MENUand select Delete.2 Select Yes to confirm.6-2-6 Deleting all waypoints1 In the waypoints window and press MENUand select Delete all.2 Select Yes to confirm.6-2-7 Changing a waypoint’s dataTo change the waypoint data when it isdisplayed in a window:1 Select the data to change.Press ENTER .Use the cursor keys to change the data.Press ENTER .2 If necessary, repeat the above step tochange other data.3 Select Save.6-2-8 Sort WaypointsTo change how the waypoints list is displayed:1 Press MENU and select Sort by.2 Select how to display the list:Name: In alphabetical order by name.Icon: Grouped by icon type.Distance: In order of distance from theboat.An arrow at the top of a column indicates howthe waypoints are sorted.6-2-9 Navigating to a waypointSee section 3-1-2.28Northstar <strong>M121</strong>/<strong>M84</strong> Installation and Operation Manual
7 Navigation: RoutesA route is a list of waypoints that the boat cannavigate along. Routes can be created, changedand deleted.The Instrument can have up to 25 routes. Eachroute can have up to 50 waypoints.A route can:Start and stop at the same waypoint .<strong>Inc</strong>lude waypoints more than once.The Instrument can navigate along a route ineither direction. Waypoints on the route can beskipped.Routes are a powerful feature when theInstrument is connected to an autopilot,allowing the vessel to be automatically guidedalong the route.! WARNINGMake sure that routes do not cross land ordangerous water.7-1 Routes windowThe routes window is a list of the routes thathave been entered, each with route name, startwaypoint, end waypoint, number of legs andtotal distance.To go to the routes window, press DISPLAY , selectMore, then select Routes.If there are more routes than will fit on thewindow, press or to scroll up or down apage at a time.7-2 Managing routes! WARNINGAfter creating or changing a route, displaythe route on the chart and check that itdoes not cross land or dangerous water.7-2-1 Creating a new routeA. Creating a new route from the chartwindowWhile creating the route:Press or to change the range; scroll thechart by moving the cursor to the edge ofthe chart.• A data box at the bottom left of the windowshows the route name and total distance. Ifthe cursor is near a leg, it shows the lengthand bearing of the leg as well.The legs of a route must start and end atwaypoints. If a leg does not start or end atan existing waypoint then a new waypointwill be created automatically (to change thenew waypoint data, see section 6-2-1).You can not use a Danger waypoint in aroute.Northstar <strong>M121</strong>/<strong>M84</strong> Installation and Operation Manual 29
1 In the chart window, press MENU and selectNew route.2 The route is given a default name:i Change the name if necessary.ii Select OK.3 To enter the legs of the route:i Move the cursor to the start of the routeand press ENTER .ii A waypoint is created with a defaultname. To save this waypoint press ENTER ,to edit the waypoint refer to 6-2-3iii Press ENTER a dotted leg line is displayedfrom the cursor to the previous waypointiv Move the cursor to the end of the first legand press ENTER .v Repeat i to iv until the last waypoint inthe route is placed and savedvi PressESCto complete the routeMenu options while creating a route:1 To add a waypoint to the routei Press MENU and select Add.2 To insert a waypoint in the route by breakingone leg into two:i Move the cursor to the leg you want tobreak.ii Press MENU and select Insert.iii Move the cursor to where the new routewaypoint will be.iv Press ENTER .3 To move a waypoint in the route:i Move the cursor to the waypoint tomove.ii Press MENU and select Move.iii Move the cursor to where the waypointwill be.iv Press ENTER .4 To remove a waypoint from the route:i Move the cursor to the waypoint toremove from the route.ii Press MENU and select Remove. Thewaypoint is removed from the route, butthe waypoint is not deleted.5 To start navigating the routei Press MENU and select Start6 To end creating the routei Press MENU and select End7 To delete the routei Press MENU and select Deleteii Select yes to confirm.Tip: The distance and bearing calculator canalso be used to enter a course and save it as aroute (see section 3-3).B. Creating a new route from the routeswindow1 In the routes window, press MENU and selectCreate.2 A new route, with a default name and nowaypoints, is displayed.3 To change the route name:i Select the route name at the top of thewindow and press ENTER .ii Change the name if necessary.iii Press ENTER .4 To insert a waypoint in the route:i Select where the waypoint will be:To insert the first waypoint in a newroute, select Leg 1.To insert a waypoint at the end ofthe route, select the unused leg atthe end of the list of waypoints.Otherwise, select the waypoint toinsert the new waypoint in front of.ii Press ENTER . A list of waypoints isdisplayed. Select the waypoint to use.As waypoints are inserted, the distanceand bearing of each leg is shownautomatically. If the route has morewaypoints than will fit on the window,press or to see them.30Northstar <strong>M121</strong>/<strong>M84</strong> Installation and Operation Manual
5 To remove a waypoint from the route:i Select the waypoint to remove.ii Press MENU and select Remove.6 Repeat this process until the route is finished.7 PressESC .8 Display the route on the chart (see section6-2-3) and check that the route does notcross land or dangerous water.7-2-2 Editing a routeEditing a route from the chart1 In the routes window, select the route toedit. Press MENU and select Edit on chart.2 The selected route is displayed on the chart,with a circle around the first waypoint.3 Edit the route as described in section 6-2-1A, starting at step 4.Editing a route from the routes window1 In the routes window, press or tohighlight the route to edit. Press MENU andselect Edit.2 The selected route is displayed: the routename and a list of the waypoints.3 Edit the route as described in section 6-2-1 B,starting at step 3.7-2-3 Displaying a route on the chartTo view the selected route at the centre of thewindow:1 In the routes window, press or tohighlight the route to window. Press MENUand select Display.Or, in the Chart window, press MENU , selectFind, then select Route. Select a route fromthe list.2 The Instrument displays the selected routeon the chart.7-2-4 Deleting a route1 In the routes window, press or tohighlight the route to delete. Press MENU andselect Delete.2 Select Yes to confirm.7-2-5 Deleting all routes1 In the routes window, press MENU and selectDelete all.2 Select Yes to confirm.7-2-6 Navigating a routeSee section 3-1-3.Northstar <strong>M121</strong>/<strong>M84</strong> Installation and Operation Manual 31
8 SatellitesGPS worldwide navigationThe US Government operates the GPS system.Twenty-four satellites orbit the earth andbroadcast position and time signals. Thepositions of these satellites are constantlychanging. The GPS receiver analyses the signalsfrom the closest satellites and calculates exactlywhere it is on earth. This is called the GPSposition.The accuracy of the GPS position is typicallybetter than 10 m (33 ft) for 95% of the time. AGPS antenna can receive signals from the GPSsatellites when it is almost anywhere on earth.DGPSA DGPS system uses correction signals toremove some of the errors in the GPS position.The Instrument can use one of two types ofDGPS system:WAAS and EGNOS DGPSWAAS and EGNOS are two satellite basedDGPS systems. The correction signals arebroadcast by satellites and are received bythe Instrument’s standard GPS antenna. Theaccuracy of the corrected GPS position istypically better than 5 m (15 ft) for 95% ofthe time.WAAS covers all of the USA and most ofCanada. EGNOS will cover most of WesternEurope when it becomes operational.Differential beacon DGPSDifferential beacons are land based radiotransmitters that broadcast correctionsignals that can be received by a specialreceiver on the boat. Differential beaconsare usually only installed near ports andimportant waterways, and each beaconhas a limited range. The accuracy of thecorrected GPS position is typically betterthan 2 to 5 m (6 to 16 ft).GPS receiverNorthstar GPS units have a sensitive 12-channelreceiver, which tracks signals from all GPSsatellites visible above the horizon and usesmeasurements from all satellites more than 5°above the horizon to calculate the position.Each time a GPS receiver is turned on, itnormally takes about 50 seconds beforeit outputs the first position. Under somecircumstances it will take up to two minutes orlonger.32Northstar <strong>M121</strong>/<strong>M84</strong> Installation and Operation Manual
8-1 Satellite windowThe satellite window has information about theGPS satellites and GPS position.To go to the satellite window, press DISPLAY ,select More, then select Satellite.The satellite window shows:GABCFEDA Status of GPS antenna, for exampleAcquiring, GPS fix, No GPS. Ifthe unit is in Simulate mode it displaysSimulate (see section 2-6).B Time and date from GPS satellites. Time islocal time (UTC [GMT] plus local offset, seesection 19-4)C HDOP: The error in the GPS position causedby satellite geometry. A low value indicatesa more precise fix, a high value a less precisefixD Signal strengths of up to twelve visible GPSsatellites. The higher the bar the stronger thesignalE Boat positionF Positions of visible GPS satellites:Outer circle is horizonInner circle is 45° elevationCentre is directly aboveNorth is at top of windowG If the boat is moving, COG is a line fromcentre9 Sonar fishfinding: IntroductionSonar functions require an optional sonartransducer to be installed and set up.This section explains how to interpret the sonardisplays, when and why to use the differentfrequencies and how fish are detected anddisplayed.It also describes Gain and Range and showsexamples of some of the different sonardisplays.9-1 Using the InstrumentThe Instrument uses a sonar transducerattached to the hull. The transducer generatesan ultrasonic pulse (sound that is above thehearing range of the human ear), which travelsdown towards the bottom at a speed of about4800 ft/sec (1463 m/sec), spreading out into acone shape.When the pulse meets an object, such as a fishor the bottom, it is partly reflected back uptowards the boat as an echo.The depth of the object or bottom is calculatedby the Instrument by measuring the time takenbetween sending a pulse and receiving theecho. When an echo has been returned, thenext pulse is sent.The Instrument converts each echo into anelectronic signal, displayed as a vertical line ofpixels.Northstar <strong>M121</strong>/<strong>M84</strong> Installation and Operation Manual 33
The most recent echo appears on the extremeright of the window, with the older echoesbeing scrolled towards the left, eventuallydisappearing off the window.The scroll speed depends upon the waterdepth and scroll speed setting. See sections19-3 and section 9-2, for more information.The appearance of echoes displayed areaffected by:• The Instrument settings (see sections 19-3,9-5 and 9-6)• Echoes (different fish types, different bottomtypes, wrecks and seaweed; see section 9-2)• Noise (water clarity and bubbles; see section9-2).Cruise, Fishing and Manual ModesThe Instrument has three sonar operatingmodes:• Cruising mode: Use this when on themove. The Instrument automatically adjustsits settings to compensate for water clarityand to display the bottom.• Fishing mode: Use this when fishing. TheInstrument automatically adjusts its settingsto compensate for water clarity and to bestdisplay fish, the bottom and other details.• Manual mode: Use this to fine-tune theInstrument settings by hand. Best resultsare often achieved in manual mode, butpractice and experience are required toobtain the optimum settings for differentconditions.For more information about modes, seesections 9-5 and 9-6.! WARNINGUse the automatic Cruising or Fishingmodes when learning to use the Instrumentor when travelling at speed.9-2 Interpreting the displayThe sonar windows do not show a fixeddistance travelled by the boat; rather, theydisplay a history, showing what has passedbelow the boat during a certain period of time.The history of the sonar signal displayeddepends the depth of the water and the scrollspeed setting.In shallow water, the echoes have a shortdistance to travel between the bottom and theboat. In deep water, the history moves acrossthe window more slowly because the echoestake longer to travel between the bottom andthe boat. For example, when the scroll speedis set to Fast, at depths over 1000 ft (300 m)it takes about 2 minutes for the data to moveacross the window, whereas at 20 ft (6 m) ittakes only about 25 seconds.ADCA School of fishB Single fishC Hard bottoms such as rock and coral showas wide bandsD Soft bottoms such as mud, weed and sandshow as narrow bandsB34Northstar <strong>M121</strong>/<strong>M84</strong> Installation and Operation Manual
The scroll speed can be set by the user todisplay either a longer history with less fishinformation or a shorter history with more fishdetails (see section 19-3).If the boat is anchored, the echoes all comefrom the same area of bottom. This produces aflat bottom trace on the window.The screen shot shows a typical sonar windowwith the Fish symbols turned Off. The sonarpulse generated by the Instrument transducertravels down through the water, spreadingoutwards in a cone shape. The cone width isdependent upon the frequency of the pulse; at50 kHz it is approximately 45°, and at 200 kHz itis approximately 11°.The differences in the cone width affect what isdisplayed. (See section 9-3)Strength of echoesThe colors indicate differences in the strengthof the echo. The strength varies with severalfactors, such as the:• Size of the fish, school of fish or other object.• Depth of the fish or object.• Location of the fish or object. (The areacovered by the ultrasonic pulse is a roughcone shape and the echoes are strongest inthe middle.)• Clarity of water. Particles or air in the waterreduce the strength of the echo.• Composition or density of the object orbottom.CAUTIONPlaning hulls at speed produce air bubblesand turbulent water that bombard thetransducer. The resulting ultrasonic noisemay be picked up by the transducer andobscure the real echoes.Bottom typesMud, weed and sandy bottoms tend to weakenand scatter the sonar pulse, resulting in a weakecho. Hard, rocky or coral bottoms reflect thepulse, resulting in a strong echo.Frequency and cone widthWater Depth ft/m Cone width at 50 kHz Cone width at 200 kHz45˚ cone11˚ coneNorthstar <strong>M121</strong>/<strong>M84</strong> Installation and Operation Manual 35
ShadowsShadows are created around areas wherethe ultrasonic beam cannot ‘see’. These areasinclude hollows on the bottom or beside rocksand ledges, where the strong echoes returnedoff the rocks obscure the weak echoes of thefish and may also create a double bottom trace.See following for an example of the sonarwindow in such an environment. A doublebottom trace is shown on the window.When looking for fish with the wide angled 50kHz frequency, be aware of increased shadows.Use the high frequency 200 kHz in areas thathave rocks and ledges because this frequencyreduces the shadow effect considerably.Example of shadowsSonar window of same areaAABBAAA Fish is visible on the windowB Fish is hidden by the strong echoes off thebottom and is not shown on the window9-3 Single and Dual frequency fishfindingSonar frequenciesThe Instrument has two sonar frequencies, 200kHz and 50 kHz. To select the sonar frequencyto use:1 Go to a sonar window (see section 9).2 Press MENU , select Frequency and select200 kHz, 50 kHz, or Mixed.When to use 200 kHzThe 200 kHz frequency is especially suitablefor use in shallow and medium depth water,typically less than 500 ft (150 m) and whilerunning at speed.At 200 kHz, the narrow cone reduces any noisecaused by air bubbles.36Northstar <strong>M121</strong>/<strong>M84</strong> Installation and Operation Manual
The 200 kHz frequency generates a higherdefinition pulse which produces little shadowand returns excellent detail over a small areaof bottom. Therefore, it gives excellent bottomdiscrimination capability and is particularlygood at showing individual fish, includingbottom dwellers.When to use 50 kHzThe 50 kHz frequency is particularly suitable foruse in deep water, typically greater than 500 ft(150 m).At 50 kHz, the cone covers an area of waterabout four times wider than the 200 kHz coneand penetrates to a greater depth with minimalloss of the return signal.However, it produces a lower definition displaywith more shadow compared to the 200 kHzfrequency. This means that a group of small fish,for example, could be displayed as a single item,while any fish very close to the bottom may notbe found at all.This frequency is useful for getting a deep, wideoverview of the area so that any areas of interestcan be identified and then examined in detailwith the 200 kHz frequency.When to use MixedThe Mixed frequency combines the 200 kHzand the 50 kHz echoes on one sonar window,filling in detailed echoes in the centre of thesonar cone.When to use 50/200 kHzOperating the Instrument at both 50 kHz and200 kHz simultaneously on a split window canbe very useful when operating in shallow tomedium water, typically less than 500 ft (150m), because the 50 kHz section of the windowshows the general area, while the 200 kHzsection can be viewed simultaneously for amore detailed look at any interesting feature.To use 50/200 kHz, select the Split 50/200window (see section 9-4).ABA Narrow angle, more detailed 200 kHz coneB Wide angle, less detailed 50 kHz coneNorthstar <strong>M121</strong>/<strong>M84</strong> Installation and Operation Manual 37
Comparison of the same fish scenario displayed at different frequencies:1 minute ago30 seconds ago Now50 kHz display200 kHz display200/50 kHz display Mixed display38Northstar <strong>M121</strong>/<strong>M84</strong> Installation and Operation Manual
9-4 Fish detection and displayWhere to find fishUnderwater features like reefs, wrecks and rockyoutcrops attract fish. Use the 50 kHz or 50/200kHz frequency window to find these features,then look for fish by passing over the featureslowly several times using the Zoom window(see section 9-2). If there is a current, the fish willoften be found downstream of the feature.When fishing with the Instrument with theFish symbols Off, a weak fuzzy band mayappear between the bottom trace and surface.This might indicate a thermocline - a rapidchange in water temperature, such as the edgeof a warm or cold current. The temperaturedifference can form a barrier which the fishmay not swim through. In fresh water, fish oftencollect around a thermocline.Fish symbolsThe Instrument uses Northstar’s SBN IItechnology to analyze sonar echoes andidentify which are likely to be fish. TheInstrument can be set up to display a fishsymbol and the depth over these echoes (seesection 19-3, Fish symbols). While SBN II is verysophisticated it is not foolproof - there will betimes when the Instrument will not be able todifferentiate between fish and large air bubblesor rubbish.Depending on the strength of a fish signal, theInstrument can display a small, medium or largesymbol (see section 19-3, Fish filter).To see the maximum amount of informationfrom the echoes, turn Fish symbols off. Fishappear as arches on the window.Fish archesIn good conditions, a fish passing through thecone-shaped ultrasonic pulse is displayed asa fish arch. The 50 kHz frequency uses a widercone than the 200 kHz frequency. This makesthe fish arches easier to see.A fish arch starts when a fish enters the weakedge of the sonar cone, generating a weakecho that is displayed as the start of the fisharch. As the fish moves closer to the middle ofthe cone, the distance between the transducerand the fish reduces and the echo is displayedat progressively shallower depths, producinga rising shape. When the fish passes directlybeneath the middle of the cone, the echobecomes strongest and thickest. As the fishpasses out of the middle of the cone thereverse happens with a progressively weakerand deeper echo.There are many reasons why fish arches maynot be seen. For example:• Poor transducer installation (see TransomTransducers Installation Guide).• If the boat is anchored then fish will tend toshow on the window as horizontal lines asthey swim into and out of the transducersonar beam. Slow speeds in deeper watergive the best fish arch returns.• Range is important. It will be much easierto see fish arches when using zoom modeto concentrate on a particular section ofwater, rather than just displaying everythingfrom the surface to the bottom. Zoomingincreases screen resolution and is necessaryfor good fish arches.• It is difficult to get fish arches in shallowwater as the transducer sonar beam is verynarrow near the surface and fish do not staywithin the beam long enough to display anarch. Several fish in shallow water tend todisplay as randomly stacked areas of color.• Wave motion may result in distorted fisharches.Northstar <strong>M121</strong>/<strong>M84</strong> Installation and Operation Manual 39
23Fun fish symbolNormal fish symbolFun symbol + depthFish arch + depth9-5 RangeRange is the vertical depth displayed on theInstrument sonar window. For example, if therange is 100 m, then the sonar window showsdepths between 0 and 100 m. The range isdisplayed at the bottom, right corner of a sonarwindow.The Instrument has two range modes:Auto: The Instrument adjusts the rangeautomatically so that the bottom of thewater is always shown at the bottom of thewindow. Auto range is recommended fornormal operation.To set Auto mode:1 Go to a sonar window (see section 9).2 Press MENU , select Range then Auto.Manual: The Instrument does not adjust therange automatically. If the bottom depth isbelow the range, the bottom will not appearon the window. Manual range is useful ifthe bottom depth changes rapidly, becauseAuto range will cause the window to changerange frequently.To set Manual range or to change the range:1 Go to a sonar window (see section 9).2 Either press to increase range or pressto decrease rangeZoom range and offsetThe sonar Zoom and Bottom windows canshow a magnified part of the range (seesections 9-2 and 9-3).! WARNINGUse the Auto range when learning to usethe Instrument or when travelling at speed.40Northstar <strong>M121</strong>/<strong>M84</strong> Installation and Operation Manual
9-6 Gain and thresholdGain and threshold settings control the amountof detail displayed on a sonar window:Gain: The gain of the sonar receiver. The gainshould be high to display good detail, but ifthe gain is too high then information from thestrong bottom signal is lost and false echoesmight be displayed. There is a separate gainsetting for each sonar frequency, 50 kHz and200 kHz.Threshold: Return echoes less than thethreshold are ignored. The threshold shouldbe as low as possible, but if the threshold istoo low, unwanted noise will be displayed.Threshold is set as a percentage of gain. Forexample, if the threshold is 50 %, then returnechoes less than 50 % of the maximum signalare ignored. There is a separate thresholdsetting for each sonar frequency, 50 kHz and200 kHz.The gain windowTo display or change the current settings forgain, select a sonar window and press ENTER .Select Threshold to display the thresholds.Changing modeThe Instrument has three operating modes, InCruising and Fishing modes, the Instrumentautomatically adjusts gain and threshold forgood performance. In manual mode, you canhand adjust the settings.To change the mode from the Gain window,Select Mode and then select Fishing,Cruising or Manual. When you selectManual, the Instrument reverts to your lastmanual settings.Changing gain and threshold1 In the Gain window, press or to selectthe setting to adjust.2 Press or adjust the setting. TheInstrument changes to Manual mode.Tip: Use the A-scope window to help setgain or threshold manually (see section10-5).This window is called the gain window.Northstar <strong>M121</strong>/<strong>M84</strong> Installation and Operation Manual 41
10 Sonar fishfinding: WindowsTo show the Sonar window, press DISPLAY , thenselect Sonar.There are five kinds of sonar window. To use awindow, press MENU , select Sonar splits,then select the type of window to use:No split: Sonar history window at a single ormixed frequency (see section 10-1).Split zoom: Sonar history plus a zoomedsection (see section 10-2)Full screen zoom: (see section 10-2)Split bottom: Sonar history plus a bottomtrace in a zoomed section (see section 10-3)Split 50/200: Sonar histories at 50 and 200 kHz(see section 10-4)Split A-Scope: Sonar history plus echostrength (see section 10-5)If the window is split, adjust the split ratio ifrequired:1 Press MENU and select Sonar window split.2 Press or to adjust the ratio.3 Press ENTER .10-1 Sonar history window - no splitDAHBCEGFA Optional data header (see section 2-7-3)B Optional compass (see section 2-7-4)C DepthD Color barE BottomF RangeG Fish symbols with depthH Depth lineThe window scrolls from right (most recentechoes) to left (oldest echoes).42Northstar <strong>M121</strong>/<strong>M84</strong> Installation and Operation Manual
10-1-1 Extended history modeTo review an old sonar echo, use and tomove back and forward through the sonarhistory. The time since the echoes shown onthe screen were recorded is displayed at thebottom of the screen. PressESCto return tothe most recent echo.The digital depth shown is always the currentdepth, even in extended history mode.The History Position Bar indicates the age ofthe most resent echo on the screen, and theposition of the current screen in the recordedhistory.History position bar10-2 Sonar Zoom and Full Screen Zoom displaysBDA Divider lineB Depth line marks the centre of the zoomedareaC Zoom barD Zoom sectionE Sonar historyAECThese windows show a zoomed section of thesonar history. The Sonar Zoom display showsthe sonar history on the right and the zoomedsection on the left. The Full Screen Zoomdisplay shows the zoomed section only.The zoom bar on the far right shows the areaof the history that is magnified in the zoomsection:• Press or to adjust the zoom range(the range of depths included in the zoomsection).• If Bottom lock is on, the zoom depth(the depth of the zoom section) is adjustedautomatically so that the bottom is alwaysdisplayed in the zoom section.If Bottom lock is off, press or tomanually adjust the zoom depth. If bottomlock is on it will turn off.Bottom lockTo turn Bottom lock on or off:1 Press MENU and select Bottom lock.2 Select On or Off. Or if Bottom lock ison, pressing or will turn it off.Northstar <strong>M121</strong>/<strong>M84</strong> Installation and Operation Manual 43
10-3 Sonar Bottom windowAA Zoomed bottom signalB Sonar history10-4 Sonar 50/200 windowBThe window shows the sonar history on theright and the bottom signal as a flat trace inthe centre of the zoom section on the left. Theflat trace make it easy to compare the echostrengths shown in the bottom signals. This canhelp to identify the type of bottom and objectsclose to the bottom.The zoom bar on the far right shows the areaof the history that is magnified in the zoomsection:• Use the or keys to adjust the zoomrange.• The Instrument calculates the zoom depthautomatically.It is not necessary to turn Bottom lock on forthis window.The window shows:A the 50 kHz sonar history on the leftB the 200 kHz sonar history on the right.Gain can be set independently for eachfrequency (see section 9-6). Range applies toboth frequencies (see section 9-5).AB44Northstar <strong>M121</strong>/<strong>M84</strong> Installation and Operation Manual
10-5 Sonar A-Scope windowThe window shows the sonar history on theleft and the A-Scope window on the right. TheA-Scope shows:A, B, C, The strengths of echoes being receivednow from different depths - the longer thehorizontal line the stronger the signal:A Unwanted noise echoes.B Echoes from fish and the bottomC The strongest echo, usually from the bottomD A vertical line showing the threshold, theweakest echo to display on the sonar historyE A vertical line showing the gain setting;echoes above this strength will display asthe maximum signal strengthUse the A-Scope while adjusting the gain andthreshold settings manually (see section 9-6).Setting gain and thresholdIt is convenient to use the A-scope windowwhen adjusting gain and threshold manually.Follow this procedure to adjust gain andthreshold for normal circumstances:1 Switch to a sonar window (see section 9). Ifnecessary, press or to adjust range sothat the bottom is displayed.2 If necessary, select the sonar frequency toadjust the settings for. Press MENU , selectFrequency and select 200 kHz or 50kHz.3 Press MENU , select Sonar splits then selectSplit A-scope.ADBCE4 Press ENTER to display the Gain window. Toadjust gain or threshold for a frequency,press or to select the setting to adjust,then press or to change the setting.5 Set threshold to zero.6 Adjust Gain so the peak of the strong signalfrom the bottom just touches the gain line.7 Adjust threshold so that it is just to the rightof the noise.8 PressESCto close the gain window.9 If required, repeat these steps to adjust gainand threshold for the other frequency.Note: Setting the gain higher will display moredetail from weak echoes, like fish, but will loosedetail from the strong echo from the bottom.Fish recognitionThe echo strengths shown on the A-scopecan be useful in recognizing the type of fish.Different species of fish have different sizesand shapes of swim bladders. The air in theswim bladder reflects the ultrasonic pulse, sothe strength of the echo varies between fishspecies according to the size and shape of theswim bladder.When catching fish from a school, note thespecies and the strength of the echo thatit returns on the A-scope. Then, when thatparticular echo is seen again, it is likely to be thesame fish species.Bottom typeThe shape of the echo strengths in the A-Scopecan help you to recognise the type of bottom.Northstar <strong>M121</strong>/<strong>M84</strong> Installation and Operation Manual 45
11 Gauges windowThe Gauges window shows boat data, suchas water speed, as analog gauges. To selectthe Gauges window, press DISPLAY , select More,then select Gauges. Before using the Gaugeswindow, set Speed range, Max RPM and Maxfuel flow (see section 19-13).Selecting a Gauges layoutThe Gauges window can show one of fourgauge layouts. To select a layout from theGauges window, press MENU , select Layout andselect a layout.Changing a gauge layoutYou can change the data displayed on eachgauge in a layout.1 Select the layout to change (see above).2 Press MENU and select Gauge setup.3 Highlight the gauge to change. Press ENTERand select the data to display in the gauge.4 Repeat the above step to change othergauges.5 PressESC .12 Data windowThe data window has large numeric data fieldsand a graph of depth and water temperature ifavailable. To go to the data window, press DISPLAY ,select More, then select Data.To select what data is displayed:1 Press MENU and select Data setup.2 Change a data field:i Press the cursor keys to highlight thefield.ii Press ENTER to display a menu of dataitems.iii Select a data item that is available onyour system or select None to leave thefield empty.3 Repeat the above step to set the other datafields.4 PressESC .46Northstar <strong>M121</strong>/<strong>M84</strong> Installation and Operation Manual
13 Fuel functions and displayThe Fuel functions require optional petrol/gasoline or SmartCraft fuel sensors to be installed and setup.13-1 What the fuel computer doesEach engine has a flow sensor installed tomeasure the engine’s fuel flow.The <strong>M121</strong>/<strong>M84</strong> use these flows, together withboat speed and engine RPM if available toestimate the fuel remaining in the tank(s), fuelused, range and fuel economy. This data isdisplayed on the fuel display (see section 13-2).You can:display the fuel used during a trip(see section 13-2)set low fuel alarms (see section 13-4)make fuel consumption curves - graphsof fuel consumption and boat speed as afunction of engine RPM - to monitor andoptimize boat performance.(see section 13-6)! WARNINGTo ensure the fuel data is accurate:When you add or remove fuel from atank, tell the <strong>M121</strong>/<strong>M84</strong> (see section 13-3)If the boat has petrol/gasoline sensors,calibrate them during installation or ifthe fuel readings seem inaccurate (seesection 13-7)Choose an appropriate type of boatspeed sensor to calculate economy,range and the fuel consumption curve(see section 13-5)If the boat uses a paddlewheel sensorto measure speed, calibrate it duringinstallation or if the speed readings seeminaccurate.13-2 Fuel displayFuel displayTo go to the Fuel display, press DISPLAY , selectMore, then select Fuel.The display differs according to the number ofengines and tanks. If engine RPM is availableand if you have made and selected a FuelConsumption Curve (see section 13-6), pressto switch between a Summary or a Fuel curvedisplay.The Fuel display showsSpeedTo select a boat speed sensor, see section 13-5-1.RPM (if available)If engine RPM is not available, the display showsdepth.Northstar <strong>M121</strong>/<strong>M84</strong> Installation and Operation Manual 47
RemainingThe fuel remaining in the tank(s) is shown as avertical gauge on the right of the display. Theheight of the yellow bar(s) show how much fuelremains in the tank(s). If you have set a low fuelalarm (see section 13-4), a red bar shows thelevel at which the alarm will trigger. If there aretwo tanks, the left bar shows the port tank, theright bar shows the starboard tank.UsedThe fuel used during a trip. On a multi-engineboat, the data for the port engine is on the leftof the display.When you want to start measuring how muchfuel is used, go to the Fuel display and:In a single engine boat, press MENU andselect Clear used.In a multi-engine boat, the fuel used byeach engine and the total fuel used areshown. Press MENU , select Clear usedand select:Port or Starboard to clear the fuel usedby one engineBoth to clear the total fuel used.Fuel flowThe fuel flow for the engine(s). On a multiengine boat, the data for the port engine is onthe left of the display. Use the flows to checkthe load of each engine.RangeThe estimated boat range at the current fuelflow. The value can depend on the type ofspeed sensor (see section 13-5).EconomyThe distance travelled per unit of fuel used. Thevalue can depend on the type of speed sensor(see section 13-5). The larger the value, thebetter the fuel economy. Adjust the throttle andtrim to achieve the best economy.Fuel consumption curveA graph of fuel consumption and boat speedas a function of engine RPM. Use the curve tomonitor and optimize boat performance (seesection 13-6).13-3 When you add or remove fuelWhen you add or remove fuel, you must tellthe <strong>M121</strong>/<strong>M84</strong>, otherwise the fuel data will bemeaningless.A When you completely fill a tankGo to the fuel display and press MENU .Then:On a single-tank boat, select Fill tank.On a multi-tank boat, select Fill tank,then select the tank you have filled.Note: Underfloor fuel tanks are often difficult torefill to the same level twice, due to air pockets.With underfloor fuel tanks:Trim the boat to the same angle in the watereach time you follow procedure A.Mostly use procedure B below when addingfuel, but completely fill the tank and followprocedure A about every tenth time you addfuel.B When you part fill a tank1 Add fuel to a tank and write down howmuch fuel you add.2 From the Fuel display, press MENU and selectAdd fuel.3 On a multi-tank boat, select the tank thatyou have added fuel to.4 Change the number to the amount of fuelthat you added.Note: If you follow procedure B every time youadd fuel, then a small error will accumulate,because it is hard to measure exactly how muchfuel you add. To avoid this, completely fill thetank and follow procedure A about every tenthtime you add fuel.C When you remove fuel1. Before removing fuel, go to the Fuel display,press MENU and select Set remaining.48Northstar <strong>M121</strong>/<strong>M84</strong> Installation and Operation Manual
2. On a multi-tank boat, select the tank thatyou are removing fuel from.3. Write down the value of Remaining for thetank; this is the amount of fuel originally inthe tank.4. Remove fuel from the tank and write downhow much fuel you remove.5. Subtract the amount of fuel you removedfrom the amount of fuel originally in the tankto calculate the amount of fuel now in thetank.6. Change the number on the Set Remainingmenu to the amount of fuel that youcalculated was now in the tank.7. Press ENTERNote: You can also use this procedure whenyou add fuel to a tank. In this case, add the fuelyou have added to the amount of fuel originallyin the tank to calculate the amount of fuel nowin the tank.13-4 Low fuel alarmTo set a low fuel alarm for a tank:1 Press MENU twice, select Fuel, then selectSetup tanks.2 On a multi-tank boat, select the tank to setthe alarm for.3 Select Tank alarm and enter a fuel levelto trigger the low fuel alarm; or enter zero todisable the alarm.When a low fuel alarm is set, the alarm’s fuellevel is shown on the fuel display tank levels asa red bar. The alarm can also be set using theAlarms setup menu (see section 19-10)13-5 Boat speed sensors13-5-1 Selecting a boat speed sensorThe fuel calculations can use boat speeds fromthe GPS, or from a paddlewheel sensor or pitotsensor if these optional sensors are installed:Paddlewheel and pitot sensors measurethe speed through the water; GPS speed isspeed over ground; these sensors can givedifferent values for Range, Economy andthe fuel consumption curves (see section13-5-2).A pitot sensor is more accurate than apaddlewheel sensor at high speeds but isnot accurate at low speeds. A paddlewheelsensor is more accurate than a pitot sensorat low speeds.To select an optional speed sensor1 Press MENU twice, select Fuel, then selectSpeed source.2 To use a paddlewheel or pitot sensor, selectWater speed, otherwise select Groundspeed to use GPS speed.3 If you selected Water speed and you haveboth a paddlewheel sensor and a pitotsensor:i PressESC , select SmartCraft and selectSpeed typeii Select Paddlewheel or Pitot.Tip: You can select a different speed sensorduring a trip.Northstar <strong>M121</strong>/<strong>M84</strong> Installation and Operation Manual 49
13-5-2 Water speed and ground speedA paddlewheel sensor and a pitot sensormeasure water speed, the boat speed throughthe water. A GPS measures ground speed, theboat speed over the bottom of the water. Ifthere is a current, then these speeds will bedifferent, and the log, trip log, economy andrange will be different, as shown below.Water speed is better for measuring the boat’spotential performance, Ground speed is betterfor going to a destination because it takescurrents into account. To select a speed sensor,see section 13-5-1.When the current is from ahead, ground speed is less than water speedWater speed 10 knotsWater speed 10 knotsCurrent 4 knotsGives a ground speed of 6 knotsGives a ground speedof about 8 knots Current 4 knots at 45ºFor this example:If the boat travels for one hour, uses 3 gallons of fuel per hour and has 50 gallons offuel left:Speed Log Economy RangeUsing water speed: 10 knots 10 nm 3.3 nm / gal 165 nmUsing ground speed: 6 knots 6 nm 2.0 nm / gal 100 nmWhen the current is from behind, ground speed is more than water speedWater speed 10 knotsCurrent4 knotsWater speed 10 knotsCurrent 4knots at 45ºGives a ground speed of 14 knotsGives a ground speed of about 13 knotsFor this example:If the boat travels for one hour, uses 3 gallons of fuel and has 50 gallons of fuel left:Speed Log Economy RangeUsing water speed: 10 knots 10 nm 3.3 nm / gal 165 nmUsing ground speed: 14 knots 14 nm 4.7 nm / gal 235 nm50Northstar <strong>M121</strong>/<strong>M84</strong> Installation and Operation Manual
13-6 Fuel consumption curvesA fuel consumption curve shows fuelconsumption (fuel used per unit of distancetravelled) and boat speed as a function ofengine RPM. Fuel consumption curves requireengine RPM, which requires SmartCraft tobe installed. Fuel consumption curves arepowerful tools for assessing boat performancein different conditions and for helping youto run at the most economical speed for theconditions.13-6-1 Making a fuel consumption curveTo make a fuel consumption curve you willneed to run the boat in a straight line for about15 minutes using the engine’s full RPM range.For your first curve, choose a calm day withlight wind and little current; have a typical loadand a freshly cleaned hull. Later, you can makefuel consumption curves for different boat,weather or sea conditions. Compare thesewith your first curve to see how your boat’sperformance changes with conditions.Making a curve1 Start running the boat in a straight line.2 Choose a speed source for the curve (seesection 13-5-1). Normally choose Waterspeed to measure the boat’s potentialperformance.3 Press MENU twice, then select Fuel.4 Select Fuel consumption curve,then select New.5 Enter the comfortable maximum RPM youknow you can achieve for the engine ratherthan the maker’s value.6 The <strong>M121</strong>/<strong>M84</strong> then asks you to set theminimum RPM. Set the throttle to idle; on amulti engine boat set all engines to aboutthe same idle RPM.Now, do not change the engine speed.Wait for about 60 seconds for the boat tostabilise, then press ENTER . Wait while the fuelcomputer records the data.7 The <strong>M121</strong>/<strong>M84</strong> then asks you to set thethrottle to achieve a target RPM. On a multiengine boat set all engines to about thetarget RPM. When the engine RPMs arecorrect, the Target RPM box will turn green.Now, do not change the engine speed.Wait for about 60 seconds for the boat tostabilise, ensuring the Target RPM box staysgreen. Then press ENTER . Wait while the fuelcomputer records the data.8 The <strong>M121</strong>/<strong>M84</strong> repeats the above step torecord data up to the maximum RPM. Thenthe <strong>M121</strong>/<strong>M84</strong> asks if you want to save thecurve. Select Yes. The fuel computer asks fora name for the curve. Change the defaultname if required. Then press ENTER . The<strong>M121</strong>/<strong>M84</strong> stores the new curve.Note To interrupt making the curve at any time,press ENTER .Northstar <strong>M121</strong>/<strong>M84</strong> Installation and Operation Manual 51
13-6-2 Managing fuel consumption curvesRenaming a curve1 Press MENU twice, then select Fuel.2 Select Fuel consumption curve.Select Name and select the name of thecurve to rename.3 Select Rename and press ENTER . Changethe name.13-6-3 Using fuel consumption curvesDeleting a curve1 Press MENU twice, then select Fuel.2 Select Fuel consumption curve.Select Name and select the name of thecurve to delete.3 Select Delete.Selecting a curve1 You must make a fuel consumption curvebefore you can use it (see section 13-6-1).2 On the Fuel display, press MENU , select Fuelconsumption curve and select the name ofthe curve to use.3 On the fuel display, press if necessaryto select Fuel curve and display the fuelconsumption curve.Notea On a multi engine boat, keep the RPM of allengines similar while using a curve.b The shape of the curve depends on the typeof speed sensor you selected when makingthe curve (see sections 13-5-1 and 13-5).Using a curveCompare your boat’s performance now, at thecurrent RPMs, with the boat’s performancewhen you made the curve. You can compareyour boat’s performance now with a curvemade under ideal conditions or with a curvemade under similar conditions.Information in a curveA RPM of the boat now. For a twin engineboat, the RPM is the average of the twoRPMs.B Red curve: boat speeds at differentRPMs recorded when you made this fuelconsumption curve.C Red marker: the boat speed now. Thismarker is below the red curve, showing thatthe boat speed now at this RPM is less thanwhen you recorded the curve.D Blue curve: fuel consumption at differentRPMs recorded when you made this fuelconsumption curve.E Blue marker: the fuel consumption now. Thismarker is below the blue curve, showingthat the fuel consumption now at this RPM isbetter than when you recorded the curve.F If the blue curve has a dip, then running theboat at this RPM will give the best speed forthe least fuel consumption.DAECFB52Northstar <strong>M121</strong>/<strong>M84</strong> Installation and Operation Manual
13-7 CalibrationCalibrate petrol/gasoline fuel flow sensorsduring installation, or if the fuel readings seeminaccurate and the other troubleshootingsuggestions do not help (see Appendix Btroubleshooting).NoteSmartCraft fuel sensors are factory calibratedand should never need recalibrating.On a multi engine boat, calibrate eachengine’s sensor. This can be done at thesame time with a portable tank for eachengine or at different times using oneportable tank.Calibrating a sensor requires accuratemeasurement of the fuel consumption.This is best done using a small portable tank.At least 4 gallons (15 litres) of fuel should beused to ensure an accurate calibration.It is often very difficult to fill underfloor tanksto the same level twice due to air pockets, sothe more fuel used, the more accurate thecalibration.To calibrate the sensor(s):1 Record the level of the fuel in the tank(s).2 Connect the portable tank(s) to the enginethrough the fuel sensor(s).3 Run the engine at normal cruising speeduntil at least 4 gallons (15 litres) of fuel hasbeen used per engine.4 Check the actual amount of fuel used perengine by refilling the portable tank(s) to theoriginal level and noting the reading(s) ofthe fuel dispenser’s gauge.5 Press MENU twice, select Fuel, then selectSetup engines.6 On a single engine boat, select Calibrateand change the displayed value to be equalto the reading of the fuel dispenser’s gauge,then press ENTER .On a multi-engine boat select the engine.Select Calibrate and change thedisplayed value to be equal to the reading ofthe fuel dispenser’s gauge, then press ENTER .Repeat for the other engines.Northstar <strong>M121</strong>/<strong>M84</strong> Installation and Operation Manual 53
14 Tides windowThe tides window is available on Chart cards.The tides window shows tide information at atide station for the selected date.CAUTIONThe tides window requires the local timeoffset to be set to work correctly (seesection 19-14)To show the tides window for the tide stationnearest to the boat, press DISPLAY , select More,then select Tides.To go to the tides window for any tide station:1 From the chart window, press MENU andselect Find.2 Select Tide stations.3 A list of tide stations are displayed. Selectthe tide station to display. The chart redrawswith the tide station centred.4 Press MENU and select Chart info.5 Select Tide height.Choosing the date of the tide chart1 From the tides window, press MENU .2 Select Today, Next day or Prev day.To choose a different date from these, selectSet date, edit the date,press ENTER .The tides window shows data for the chosen dateABNKEGCMD F DLHIJA Tide station name and distance from boatB Current time and chosen date for displayC Tide chartD NightE DawnF DayG DuskH Tide heightI Time cursor, a vertical dotted line. Press orto move cursor sidewaysJ Time of cursor and tide height at that timeK Data for the chosen dateL Tide height cursor, a horizontal dotted line.Press or to move cursor up and down.M Height of cursor on the tide chartN Moon phase for moon at the current timeon the chosen date54Northstar <strong>M121</strong>/<strong>M84</strong> Installation and Operation Manual
15 User card windowA user card is an optional plug-in card that canstore data files (see section 1-3). There are threetypes of files: waypoints, routes or a track.To go to the user card window, press DISPLAY ,select More, then select User card.Loading data from the user card to theInstrumentThis loads one file from the user card to theInstrument:CAUTION1 Before using a user card, remove anychart card and plug the user card in.When you have finished with the usercard, remove the user card and replacethe chart card (see section 1-3).The user card window has:File listA list of the files on any user card in theInstrument. If there are more files than will fiton the window, press or to scroll up ordown a page at a time.Waypoints, RoutesThe number of waypoints and routes currentlyin the Instrument.Track 1 to Track 5The number of points in tracks 1 to 5 currentlyin the Instrument.Note:1 To save Instrument data onto the user card,use the Save command (see below).2 Data stored on the user card and shown onthe file list is not available to be used by theInstrument until loaded into the Instrumentwith the LOAD command (see below).Saving data to the user cardThis saves all the Instrument’s waypoints, all theInstrument’s routes or one of the Instrument’stracks to one file on the user card.1 Press MENU and select Save.2 Select Waypts, Routes or Tracks.3 For Tracks, select the track number tosave.4 The new file is created. Change the nameif required. The new file appears in thefile list.A waypoints file: The new waypoints areadded to any existing waypoints in theInstrument. If a new waypoint has the samename as an existing waypoint but hasdifferent data, the Instrument displays bothwaypoints. Select:Skip: Do not load the new waypoint.Replace: Load the new waypoint andreplace the existing one.Skip all: Do not load any newwaypoints which have the same namesas existing waypoints.Rplc all: Load all new waypointswhich have the same names as existingwaypoints; the new waypoints replacethe existing waypoints.A routes file: The new routes are addedto any existing routes in the Instrument.If a new route has the same name as anexisting route but has different data then theInstrument asks which route to keep.A track file: The new track will replace theexisting track in the Instrument.Northstar <strong>M121</strong>/<strong>M84</strong> Installation and Operation Manual 55
To load a file to the Instrument:1 Select the file to load.2 Press MENU and select Load.Deleting a file from the user card1 Select the file to delete.2 Press MENU and select Delete.3 Select Yes to confirm.Rereading the file informationThis reads the file names from the user card anddisplays them. Reading does not load any filedata into the Instrument. You should not needto do this.1 Press MENU and select Card.2 Select Read.Formatting the user cardFormatting prepares a user card for use. Formatthe card if there is an error message saying thatthe card is not formatted. Any data files on thecard are deleted.1 Press MENU and select Card.2 Select Format.3 Select Yes to confirm.! WARNINGDo not format a chart card.Sorting the file namesThis sorts the displayed file names.1 Press MENU and select Sort.2 Select sort by Name, Type or Time.56Northstar <strong>M121</strong>/<strong>M84</strong> Installation and Operation Manual
16 AISAIS is short for Automatic Identification System.The International Convention for Safety ofLife At Sea (SOLAS) requires all vessels greaterthan 300 tons and all passenger vessels to beequipped with AIS Transponders. All vesselsequipped with AIS permanently broadcastvia one or more of the two dedicated VHFchannels. This transmission may includeinformation about the vessels MMSI-number,its call sign, name, position, course, heading,speed, rate of turn and type of vessel.This unit can receive and display AISinformation when connected to an AIS receiver.Available AIS vessels transmitting in the localarea are shown on the chart when this featureis enabled.The following AIS receivers are supported bythis unit:• Comar SLR200 (external GPS).• Weatherdock Two Channel AIS Receiver“EASY AIS”, Part No. 5-A-013 (external GPS).• NASA <strong>Marine</strong> AIS Engine 2 channel Receiver(external GPS).Other AIS receivers may work but have notbeen tested with this unit.To enable AIS from the system menu check theAIS box. (see section 16-3)16-1 Viewing AIS VesselsA typical AIS window shows:EBADCA AIS VesselB Dangerous VesselC Projected CourseD Data BoxE Range RingsNorthstar <strong>M121</strong>/<strong>M84</strong> Installation and Operation Manual 57
When the cursor is placed over an AIS vessel forat least two seconds, a data box appears at thebottom of the window with information aboutthe AIS vessel.For complete AIS information on the AIS vesselplace the cursor over an AIS vessel for at leasttwo seconds and press .Press either or to clear theinformation.16-2 Dangerous VesselsThe <strong>M121</strong>/<strong>M84</strong> calculates the time of closestpoint of approach (TCPA) and closest point ofapproach (CPA) for each AIS vessel.This is used to determine potential dangerousvessels. If the TCPA and the CPA is belowthe trigger values then it will be considereddangerous. (See section 19-8 for setting thedangerous vessel alarm)A dangerous vessel is indicated on the chart bya red circle around the icon.TCPA 15 minCPA 0.5 nm16-3 AIS WindowsTo go to the AIS windows, press , selectMore, select AIS, then press or to selectone of the two windows: Vessels or Safety msgs(rx).If there are more items than will fit on thewindow, press or to see the others.VesselsThis is a sorted list of vessels currently beingreceived by the AIS receiver. The maximumnumber of vessels that the system will supportis 250. Once maximum is reached, vesselsfurthest away from the current location will bereplaced. A vessel will be removed from the listif no information is received within 6 minutesfrom the last message.Displaying an AIS vessel on the chart1 Press or to select a vessel.2 Press and select Display. TheInstrument switches to chart window, withthe selected vessel position in the middle.58Northstar <strong>M121</strong>/<strong>M84</strong> Installation and Operation Manual
Displaying Full AIS Details1 Press or to select a vessel.2 Press and select More Info or press.This window displays all information forthe selected AIS vessel provided by the AISreceiver.Sorting VesselsPress , select Sort and select one ofthe options.This sorts the list based on the chosencategory.Safety msgs (rx)Safety msgs (rx) are broadcasted messagesreceived by the AIS receiver. This windowdisplays the date and time of messagereceived, MMSI of AIS vessel that broadcastedthe message, and the message itself. Safetymsgs (rx) list will store up to 10 messages. Theoldest message is replaced when the list is full.Northstar <strong>M121</strong>/<strong>M84</strong> Installation and Operation Manual 59
17 DSC/Buddy track windowsBuddy track requires an optional Northstar DSCVHF radio to be installed. Buddy track tracksother boats which have DSC radios connectedto their GPS receivers by NavBus and are in VHFrange. For information on setting up and usingthe VHF radio for buddy track, see the radio’soperation manual.To go to the DSC windows, press DISPLAY , selectMore, then press or to select one of thethree windows: Distress, Poll or Buddy track.If there are more items than will fit on thewindow, press or to see the others.17-1 The windowsDistressBoats that have sent DSC distressmessages and their positions.PollBoats you have manually polledon the VHF radio, and their positionat that time.Buddy trackBuddy boats from your DSC radio.The radio regularly calls the boatsand updates their positions.When your DSC radio receives a distressmessage, the Instrument creates a distresswaypoint at the boat position. Distresswaypoints have default names like DSTRSS01.The Instrument displays a Distress warning.Select:OK to return to what you were doing.Display to switch to Chart and display theposition of the boat sending the distressmessage.Boat positionsThe boat positions on the Instrument can differfrom the true boat positions:Distress: The position is the distresswaypoint, which is where the boat waswhen it sent the distress message.Polled boats: The position is where the boatwas when you last polled the boat.Buddy track: The position is where the boatwas when your radio last polled the boat.60Northstar <strong>M121</strong>/<strong>M84</strong> Installation and Operation Manual
17-2 Using the windowsDisplaying a boat on the chart1 Press or to select a boat.2 Press MENU and select Display. TheInstrument switches to chart window, withthe selected boat position in the middle (seeBoat positions above).Going to a boat1 Press or to select a boat.2 Press MENU and select Goto. The Instrumentstarts navigating to the boat’s position (seeBoat positions 17-1).Creating a waypointPolled and buddy track boats are not waypoints.To create a waypoint at the position of a polledboat (see Boat positions above):1 Press or to select a boat.2 Press MENU and select Createwaypoint. Edit the waypoint data ifrequired (see section 6-2-7).Editing a waypointA distress message creates a waypoint for theboat or you can create a waypoint at a polledboat’s position. To change the data of thesewaypoints:1 Press or to select a boat.2 Press MENU and select Edit waypoint.Edit the waypoint data if required (seesection 6-2-7).BOn a chart window:A Distress boats are distress waypointsB Buddy track boats are buddy symbolsDeleting a boatAt the Distress or Poll windows:1 Press or to select a boat.2 Press MENU and select Delete. The boat isdeleted from that window. Delete any boatwaypoint manually (see section 6-2-5).Buddy track boats automatically disappear fromthe Buddy track window when your DSC radiocan not pick up their signal.Deleting all boatsAt the Distress or Poll windows:1 Press or to select a boat.2 Press MENU and select Delete all. Allboats are deleted from that window and anyboat waypoints are deleted.ANorthstar <strong>M121</strong>/<strong>M84</strong> Installation and Operation Manual 61
18 RadarRadar is the Radio Detection And Rangingsystem. Radar functions require an optionalNorthstar radar system to be installed. Threeradar systems are available; 2 kW, 4 kW, or6 kW.When the radar is operating, the scannertransmits powerful microwave radio pulseswhich are reflected back from any solid objectssuch as land masses or other boats. Theseobjects are called targets and are shown on theradar window.The scanner rotates through 360° so the radarwindow shows all of the area around your boatwithin the range of the scanner, producing amap-like display called the PPI (Plan PositionIndicator).Typically, your boat is in the centre of theradar window with concentric range ringssurrounding it. The range rings help you toquickly estimate the distance to various targets.If you prefer to view the radar overlaid on thechart screen see section 3-2-7.18-1 Radar windowAKBCDGHIJLMEFThe radar window shows:A Distance between each range ring (in thisexample, 1/8 nautical mile)B Range of radar (in this example, shown inlarge digits)C Radar rotation (in this example, North Up)D Radar motion mode (in this example,Relative Mode)E CursorF Distance and bearing to the cursor positionG Compass ringH Range ringI North line (blue)J Heading line (white)K The bearing (in Relative, True, or Magneticmode)L Echo Expansion settingM Interference Rejection setting62Northstar <strong>M121</strong>/<strong>M84</strong> Installation and Operation Manual
18-2 Radar modesThere are four radar modes:• Disabled. This saves on power consumptionand magnetron usage. If the radar isdisabled, it has to warm up and enterstandby mode before it can starttransmitting.• Warming. The radar on and is warming up.This can take up to 90 seconds, dependingon your scanner type.18-3 Enabling the radar functionalityWhen the radar is enabled, it will turn on, warmup, and enter standby mode. The different radarmodes are explained in Section 18-2.To enable the radar functionality:1 Press MENU twice to display the Setup menu,then select System.2 Set Radar to .• Standby. The radar is on and is warmed up. Itis ready to start transmitting immediately.• Transmitting. The radar is actively sendingand receiving microwave radio pulses. Anopen array will be rotating.If you want to save on power but be able tostart transmitting immediately, use standbymode.3 The radar immediately turns on and enterswarm-up mode. A message shows how longthis will take.4 When the warm-up period is complete, theradar enters standby mode and is ready totransmit. To start the radar transmitting, seeSection 18-4.18-4 Selecting standby mode or transmit modeYou can quickly change between these twomodes.18-5 Disabling the radar functionality1 Press MENU twice to display the Setup menu,then select System.2 Set Radar to .18-6 Adjusting the quality of the radar windowCommon problems that can degrade thequality of the radar window include:• sea clutter• rain clutter• false echoes (sometimes called ghostechoes) and background noise• side lobe patterns (false echoes that appearas an arc or a broken arc)1. From the radar window, press MENU and setthe Transmit option to (transmit mode) or(standby mode).3 A warning message appears. If you aresure that you want to disable the radarfunctionality, select Yes.4 The radar enters disabled modeimmediately.• shadows (blind spots)• multiple echoes off the same object• incorrect threshold settingIf the radar is installed at a suitable height andin a suitable location on your boat, side lobepatterns and shadows (blind spots) causedby obstructions such as funnels or masts willbe minimized. If you’re having problems withNorthstar <strong>M121</strong>/<strong>M84</strong> Installation and Operation Manual 63
these, you may need to relocate the radar.Consult the Installation Guide for your Northstarradar or talk to your dealer or installer.Multiple echoes off the same object aremost likely to occur when you are close to alarge target and are usually only a temporarynuisance.You can adjust the radar to reduce the effectsof sea clutter, rain clutter, and interference fromother radars. You can also change the gainmode setting and the gain level setting to helpreduce false echoes.1 From the radar window, press MENU thenselect Presentation.2 Select Adjust Radar and press ENTER .18-6-1 Changing the gain modeUse the radar gain mode to specify whetheryou want to adjust the radar gain yourself orhave it adjusted automatically.To change the radar gain mode:1 From the radar window, press MENU thenselect Adjust Radar.2 Select Gain Mode. There are threechoices:• Manual. Adjust the radar gain yourselfto suit your local conditions andpreferences.• Auto. The radar gain is adjustedautomatically.• Range rider. Select this to adjust theradar gain yourself for a particular radarrange, then have those settings storedand automatically re-used whenever youoperate at that range again.18-6-2 Changing the gain levelUse the radar gain level to adjust the sensitivityof the radar receiver. Ideally, the radar gain levelshould be set so that background noise is justvisible on the radar window.If the radar gain level is too low, weak echoeswon’t be shown. If the radar gain level is toohigh, strong echoes will be difficult to seeamongst the large amount of backgroundnoise.(If the radar Gain Mode is set to Auto and youadjust the gain level manually, the Gain Mode ischanged to Manual.)To change the radar gain level:1 From the radar window, press MENU thenselect Adjust Radar.2 Select Gain Level then use andto decrease or increase the setting.18-6-3 Changing the sea clutter mode(Manual mode)Sea clutter usually appears as confusing,random signals close to your boat on the radarwindow.High waves that can reflect the radar signal willproduce the maximum amount of sea clutter.You can change the sea clutter modeyourself or have it changed automatically tocompensate for the sea conditions.To change the sea clutter mode:1 From the radar window, press MENU thenselect Adjust Radar.2 Select Sea Clutter Mode. There arefour choices:• Manual. Adjust the sea clutter settingyourself.• Harbour. The sea clutter setting isadjusted automatically to suit a harbourenvironment.• Offshore. The sea clutter setting isadjusted automatically to suit an offshoreenvironment.64Northstar <strong>M121</strong>/<strong>M84</strong> Installation and Operation Manual
• Range Rider. Adjust the sea cluttersetting yourself for a particular radarrange, then have those settings storedand automatically re-used whenever youoperate at that range again.18-6-4 Changing the sea clutter levelIf the sea clutter level is set too low, a lot of seaclutter will be displayed. If the sea clutter level isset too high, small targets may not be shown inthe radar window.If the sea clutter mode is set to Harbour orOffshore, and you adjust the sea clutter levelmanually, the sea clutter mode changes toManual.If you are in Range Rider mode when you adjustthe sea clutter level, the sea clutter mode doesnot change to manual but the setting is storedand used automatically whenever you use thesame range again.To change the sea clutter level:1 From the radar window, press MENU thenselect Adjust Radar.2 Select Sea Clutter Level thenuse and to decrease or increase thesetting.18-6-5 Changing the rain clutterRain clutter consists of random dots that canmerge into badly-defined echoes on your radarscreen.The random signals are returned from rain, hail,sleet, or snow and can result in a confusingdisplay.If the rain clutter is set too low, there will beexcessive rain clutter displayed whenever it’sraining. If the rain clutter is set too high, verylarge targets such as the coastline will appear tobe hollow.To change the rain clutter setting:1 From the radar window, press MENU thenselect Adjust Radar.2 Select Rain clutter then use andto decrease or increase the setting.18-6-6 Changing the threshold levelUse this to define the threshold level of theweakest echo that you want to show on theradar screen. The threshold level is shown as apercentage.100% is the maximum threshold level, meaningthat only the strongest echoes are shown. 0% isthe minimum threshold level, meaning that allechoes are shown.To change the threshold level:1 From the radar window, press MENU thenselect Presentation.2 Select Threshold then use and todecrease or increase the setting.18-7 Changing the echo expansion settingIf you have several small targets in view andwant to make them easier to see, use the echoexpansion option. Note that the resolutiondecreases as the target size increases, so usethis option only when target detection andvisibility is more important that the quality ofthe display.To change the echo expansion setting:1 From the radar window, press MENU thenselect Presentation.2 Select Echo Expansion. There arethree choices:• Off. No echo expansion.• 1. Targets expanded x 2.• 2. Targets expanded x 3.Northstar <strong>M121</strong>/<strong>M84</strong> Installation and Operation Manual 65
18-8 Turning the target trails on or offIf you turn the target trails on, each targetleaves a 30 second trail on the radar screen. Youcannot change the length of the target trail.If you turn the target trails off, the targets donot leave trails.Note that if the radar motion mode is set totrue, stationary targets won’t leave a trail.If the radar motion mode is relative, any targetthat is moving relative to your boat will leave atrail.To change the target trails setting:1 From the radar window, press MENU thenselect Presentation.2 Set the Target trails option to(target trails are on) or (target trails areoff).18-9 Using the VRM/EBLUse one, or both of the VRM/EBL (VariableRange Markers/Electronic Bearing Lines) toquickly find the precise range and bearing of atarget.A VRM can be fixed or floating. Use the VRM tofind the range (distance) to the target.• A fixed VRM is shown as a thin, dashed, circlecentred around your boat. Use this to findthe distance of a target from your boat.• You can move the centre of the VRM awayfrom your boat; for example, to measure thedistance between two islands. This is calleda floating VRM.The EBL is shown as a thin, dashed lineextending from the centre of the VRM to theedge of the radar window. Use the EBL to findthe bearing of the target.1 From the radar window, press MENU thenselect VRM/EBL.18-9-1 Finding range and bearing with a fixedVRM/EBL1 From the radar window, press MENU thenselect VRM/EBL.2 Select VRM/EBL then 1 (VRM/EBL 1) or 2(VRM/EBL 2).3 Set Enable to to show the VRM and EBL onthe radar window (or to hide them).4 Select EBL reference if you want to changethe EBL bearing reference. There are twochoices:• °R shows the EBL bearing relative to yourboat’s head.• °M/°T shows the EBL bearing relative tomagnetic North or true North.5 Select Adjust to change the positions ofthe VRM and the EBL so that you can alignthem with the target. Use:• and to decrease and increase theradius of the VRM until it touches thetarget to measure the range.• and to move the EBL until it touchesthe target to measure the bearing.6 The range and bearing of the target isshown at the bottom of the screen.7 If you want to hide (or change thesettings for) the range rings, North line,and/or heading line, press MENU then selectRadar.66Northstar <strong>M121</strong>/<strong>M84</strong> Installation and Operation Manual
8 To clear the VRM/EBL display, press ESC andrepeat steps 1 and 2. Then set Enable to .If you want to find the range and bearing ofanother target, repeat the sequence using theother VRM/EBL. This is shown in a differentpattern.18-9-2 Finding range and bearing with afloating VRM/EBLIf you move the centre of a VRM away fromyour boat it is called a floating VRM. Use thisto measure the range and bearing betweentwo locations on the radar window, such as aheadland and a buoy.1 From the radar window, press MENU thenselect VRM/EBL.2 Select VRM/EBL then 1 (VRM/EBL 1) or 2(VRM/EBL 1).3 Set Enable to to show the VRM and EBL onthe radar window (or to hide them).4 Select EBL reference if you want to changethe EBL bearing reference. There are twochoices:• °R shows the EBL bearing relative to yourboat’s head.• °M/°T shows the EBL bearing relative tomagnetic North or true North.5 Select Set centre to move the VRMand EBL centre away from your boat. Use thearrow keys to move the centre so that it isaligned over the first location.6 Press ENTER to save the new centre position,then press MENU and reselect the VRM/EBL.7 Select Adjust to change the positions of theVRM and the EBL so that you can align themwith the second location. Use:• and to decrease and increase theradius of the VRM until it touches thesecond location to measure the range.• and to move the EBL until it touchesthe second location to measure thebearing.8 The range and bearing of the target isshown at the bottom of the screen.9 If you want to hide (or change the settingsfor) the range rings, North line, and/orheading line, press MENU then select Radar.10 To clear the VRM/EBL display, press ESC andrepeat steps 1 and 2. Then set Enable to .If you want to find the range and bearingbetween two other locations, repeat thesequence using the other VRM/EBL. This isshown in a different pattern.Northstar <strong>M121</strong>/<strong>M84</strong> Installation and Operation Manual 67
18-10 Changing the PPI positionYou can move the PPI (Plan Position Indicator)centre to a different location if you are inRelative motion mode. (If you are in Truemotion mode, the radar automatically positionsthe PPI centre.)To change the PPI position:1 From the radar window, press MENU thenselect Position.2 There are three choices:• Centre. The PPI centre is in the centreof the radar window so that all otherobjects move relative to your boat.• Look Ahead. The PPI centre is positionedso that the radar window is offset fromthe centre to give you the maximumview ahead.• Set. Offset the PPI centre in the radarwindow. (This works only when you areusing relative motion (RM) mode). Usethe arrow keys to move the PPI centreto the new position then press ENTER toconfirm. The new position must allowmost of the radar sweep to appear on theradar window; if it doesn’t, the PPI centrewill be moved as close as possible to thedesired position.18-11 Using the radar guard zonesUse either or both of the two radar guard zonesand alarms to notify you when a target entersor exits a specified area around your boat.You can customize the size and shape of theradar guard zones and set up alarms.1. From the radar window, press MENU thenselect Guard zone.18-11-1 Turning a radar guard zone on or offTwo radar guard zones are available. You canturn either or both on or off.To turn a radar guard zone on or off:1 From the radar window, press MENU thenselect Guard zone.2 Select Zone. There are two choices:• 1 selects radar guard zone 1.• 2 selects radar guard zone 2.18-11-2 Displaying the area covered by a radarguard zone1 From the radar window, press MENU thenselect Guard Zone.2 Select Zone then radar guard zone 1 or radarguard zone 2.3 Set Enable to (show the radar guard zone)or (hide the radar guard zone).18-11-3 Change the setting for a radar guardzone alarmWhen a radar guard zone is on, the guard zonealarm is set automatically but you can changethe setting to suit your preferences.1 From the radar window, press MENU thenselect Guard Zone.2 Select Zone then radar guard zone 1 or radarguard zone 2.3 Select Alarm when. There are three choices:• Enter sounds the alarm only when atarget enters the radar guard zone.• Exit sounds the alarm only when a targetleaves the radar guard zone.• Both sounds the alarm when a targetenters or leaves the radar guard zone.68Northstar <strong>M121</strong>/<strong>M84</strong> Installation and Operation Manual
18-11-4 Adjusting the boundaries of a radarguard zoneTo adjust the boundaries and change the areathat is covered by a radar guard zone:1 From the radar window, press MENU thenselect Guard Zone.2 Select Zone then 1 (radar guard zone 1) or 2(radar guard zone 2).3 Select Adjust to display the currentboundaries of that radar guard zone. Thefollowing information is also shown in thetop left corner:• Guard Zone The number shows the radarguard zone that is selected.• Sector or Circular The shape of the radarguard zone.• INR The distance between the innerboundary and your boat.• OUR The distance between the outerboundary and your boat.• WDT The angular width of the radarguard zone (in degrees).• BRG The bearing of a line drawn fromyour boat through the centre of the radarguard zone (in degrees).4 Use and to select the parameter tochange.5 Then use and to change the parameter.18-11-5 Adjusting the sensitivity of the alarmYou can set the sensitivity of the alarm for theradar guard zones, to define the size of thetarget that will trigger the alarm. The size oftarget is shown as a percentage.100% is maximum sensitivity, meaning that verysmall targets will trigger the guard zone alarm.0% is minimum sensitivity, meaning that onlyvery large targets will trigger the alarm.The same sensitivity setting is applied to bothof the radar guard zones if both are turned on.To set the alarm:1 From the radar window, press MENU thenselect Guard Zone.2 Select Zone then select 1 (radar guard zone1) or 2 (radar guard zone 2).3 Select Alarm sensitivity then use and todecrease or increase the setting.Northstar <strong>M121</strong>/<strong>M84</strong> Installation and Operation Manual 69
19 Setting up the <strong>M121</strong>/<strong>M84</strong>The <strong>M121</strong>/<strong>M84</strong> has a number of advancedfeatures which are set up through the setupmenu. We recommend that you becomefamiliar with the operation of the unit using thedefault settings before making any changes inthese menus.To go to a setup option menu, press SETUP(<strong>M121</strong> only) or press MENU twice, to display thesetup menu, then select an option.Note:1 The Setup menu options are explained inthe following sections.2 Section 2-1 describes how to set or changedata in the setup menus.3 The setup data available will depend on theoptional sensors and instruments installed.System Setup (see section 19-1)Sonar Setup (see section 19-3)Radar Setup (see section 19-4)GPS Setup (see section 19-5)Fuel Setup (see section 19-6)Chart Setup (see section 19-2)Chart General Setup (see section 19-2)Chart Water Setup (see section 19-2)Chart Land Setup (see section 19-2)Chart Other Setup (see section 19-2)Track Setup (see section 19-7)AIS Setup (see section 19-8)Logs Setup (see section 19-9 )Alarms Setup (see section 19-10)Units Setup (see section 19-11)Comms Setup (see section 19-12)Calibrate Setup (see section 19-13)Time Setup (see section 19-14)Favorites Setup (see section 19-15)Simulate Setup (see section 19-16)See the SmartCraft Gateway Instalationand Operation Manual70Northstar <strong>M121</strong>/<strong>M84</strong> Installation and Operation Manual
19-1 Setup > SystemPress MENU twice, then select System:Factory resetThis option returns all of the Instrument settings(except the language, waypoints and routes) tothe default factory settings shown on the setupmenus.AboutThe about window shows:• The software version and date.• The world chart version.• Any card fitted.• The number of waypoints, routes and tracksyou have stored.• Connector wiring information.LanguageSelect the language for the windows. Theoptions are: English, Italian, French, German,Spanish, Dutch, Swedish, Portuguese, Finnishand Greek.Tip: In case you can’t read the currentlanguage, the language setting is found at thetop of the system menu.BacklightSelect the backlight level for the keys anddisplay (see also section 2-3)Night modeNight mode sets the palette for all windowsNormal palette, for daytimeAll windows have a palette optimized fornight time.See also section 2-3. To change only the chartpalette, see section 19-2.Beep volumeSelect the beep volume for key presses.Auto power offSee section 2-2.In the unlikely event of having to contact aNorthstar dealer for service, quote the softwareversion number and date.SonarDisable any sonar transducer and disablesonar functions.A sonar transducer is fitted. Enable sonaroperation.See section 19-3.RadarNo appropriate Radar system is fitted.Disable RADAR.An appropriate Radar receiver is fitted.Enable AIS.See section 19-4.Northstar <strong>M121</strong>/<strong>M84</strong> Installation and Operation Manual 71
SmartCraftNo SmartCraft gateway is fitted. DisableSmartCraft functions.SmartCraft gateway is fitted. EnableSmartCraft operation.See section 20-8.AISNo appropriate AIS receiver is fitted.Disable AIS.An appropriate AIS receiver is fitted.Enable AIS.See section 19-8.Buddy trackNo appropriate Northstar DSC VHF radio isfitted. Disable Buddy track.An appropriate Northstar DSC VHF radio isfitted. Enable Buddy track.See section 20-1019-2 Setup > ChartPress MENU twice, then select Chart:RotationThe options for chart rotation are:North up: North is always at the top ofthe chart window.Track up: The chart is rotated so that theboat direction is to the top of the window.This option is useful for navigating narrowharbours or rivers. The Instrument asks fora course deviation resolution; this is howmuch the boat direction needs to change tomake the chart redraw.Tip: If the chart redraws too frequently,increase the course deviation setting.Course up: This option is only availableif the boat is navigating to a destination. Thechart is rotated so that the plotted course tothe destination is vertical.PaletteSelect the color scheme for the LCD window.The options are:NormalSunlight: Brighter colors, more visible insunlight.Night: Reversed colors for night, topreserve night vision.72Northstar <strong>M121</strong>/<strong>M84</strong> Installation and Operation Manual
Map datumInstrument GPS positions are based on aworldwide reference (datum) known as WGS84. Most paper charts are based on WGS84. However, some paper charts are basedon other datums In these cases, the latitudeand longitude coordinates of objects on theInstrument chart window are different to thelatitude and longitude coordinates of theseobjects on the paper chart. This applies to allobjects, such as the boat, waypoints, tracks,lines of latitude and longitude and cartographicfeatures such as land, rocks, buoys and depthcontours.Use Map datum to select the Instrument mapdatum to match the datum of the paper chart.Then, the latitude and longitude coordinatesof objects displayed on the Instrumentwill change to match the correspondingcoordinates on the paper chart.Setting map datum1 In the Chart setup menu, select Map datum.2 Select the map datum for the paper chartyou are using.3 If you select a datum other than WGS 84the Instrument asks if you want to apply theNMEA datum offset (see below).! WARNINGWhen you change to a chart with a differentdatum, change the Instrument map datumagain.NMEA datum offsetIf you select a map datum other than WGS84, the map datum offset can be applied tolatitude and longitude coordinates sent on theInstrument NMEA output:Latitude and longitude coordinatesdisplayed on any NMEA repeater do notmatch the coordinates on the Instrument.Latitude and longitude coordinatesbroadcast on any NMEA VHF transmitter willbe the same as the coordinates on a WGS 84chart.Latitude and longitude coordinatesdisplayed on any NMEA repeaters match thecoordinates on the Instrument. However,latitude and longitude coordinatesbroadcast on any NMEA VHF transmitter willbe slightly offset from coordinates on a WGS84 chart.Map shift! WARNINGMap shift is for eliminating minor offsets.It should not be used if the correct datumis available. Use map shift with caution:incorrect application will cause incorrectboat positions.Some charts have consistent position errors. Tocorrect this, apply a map shift. After a map shift:The positions of cartographic features (suchas land, rocks, buoys and depth contours)move on the Instrument chart window towhere they should be.The positions of the boat, waypoints,tracks, and lines of latitude and longitudeon the Instrument chart window remainunchanged.Applying a map shift1 Move the boat to a known point on thechart, for example a marina berth.2 In the Chart setup menu, selectMap shift.3 Move the cursor to the position on the chartwhere the boat actually is.4 Press MENU and select Set.5 PressESCto set the new map shift.The boat will now be displayed at itsactual location.Clearing the map shiftClearing the map shift removes any mapshift from the cartographic features on theInstrument chart window.1 In the Chart setup menu, selectMap shift.2 Press MENU and select Clear.3 PressESC .Northstar <strong>M121</strong>/<strong>M84</strong> Installation and Operation Manual 73
General submenuPlotter modeMixing levelsOnly scales available on the chart card can be displayed.If you press or to select a chart scale which is not available, on the chart card, the chart windowwill change to this scale but will only display the boat position and track (if enabled). The rest ofthe window is white with black crosshatch lines and no chart information is displayed. This is usefulto zoom to a small scale to track small boat movements or if there is no detailed chart for an area.Mixes lower detail charts with higher detail charts on chart boundaries.:Lower detail chart is not shown.:Lower detail chart shown; this is slower to redraw.AnticlutterValue added dataProjected courseCDI scaleLat/lon gridBoundariesText/icon sizeWater submenuWater featuresBathymetric[s] linesSpot soundingsBath & sndgs minBath & sndgs maxTidal streamLand submenuLand featuresLand elevationOther submenuWaypointsNamesLightsNav-aidsNames and icons shown. Note: this is independent of the change in detail shown at differentzoom levels.Hides some less important names and icons when they overlap to make the chart clearer.Non marine chart data shownThe Instrument can estimate the course after a given time, based on the current speed and heading(see section 3-4). The options are 2 minutes, 10 minutes, 30 minutes, 1 hour, 2 hours or Off.See Appendix C. The options are 0.05, 0.1, 0.2, 0.5, 1.0, 2.0, 4.0 and 10.0 distance units.displays a latitude and longitude grid.Displays boundaries around areas where more detailed chart coverage is available: Auto shows thenext four detail levels; On shows all.Select the size of chart text and icons.displays nature of sea bed (for example, M shows areas of mud)and tide station icons.Displays underwater depth contours between Bath & dndgs minand max.Displays underwater depth contours between Bath & dndgs minand max.The minimum depth for Bathymetrics and Spot soundings.The maximum depth for Bathymetrics and Spot soundings.displays dynamic tide flows: arrows on a chart showing the present tide stream and orientation(requires a GPS fix and an NT-MAX card)displays land features, for example regions, rivers, roads, railways, airports.displays land contours, shaded like depths (requires an NT Max card)Displays waypoints: Hide all only displays waypoints on any selected route; Selected displayswaypoints with their display option set to Icon or I+N (Icon and Name); Show all displays allwaypoints (see section 5).displays place names.Light House window options: Off hides all light indicators (the icon still shows); No sectorshides sectors; On shows sectors; Animated activates light animation.Note: with light animation enabled, animation only operates chart.Displays signals (fog, radar, radio stations) and buoys. Int and US select the icon format; Simpldraws simpler icons.Attention areas displays attention area boundaries and information icons ; attention areas are important areas,such as restricted anchorages or shallow areas.74Northstar <strong>M121</strong>/<strong>M84</strong> Installation and Operation Manual
19-3 Setup > SonarPress MENU twice, then select Sonar:FrequencyThere is a choice of: 200 kHz, 50 kHz andMixed. For information about selecting asuitable frequency for the water conditions, seesection 9-3.Scroll speedUse this to set the scroll speed on the display.There is a choice of: Very Fast, Fast,Medium, Slow and Pause. The depth ofthe water also affects the speed of the display.Faster scroll speeds combined with a slowboat speed (typically between 2 and 6 knots)shows the most fish detail. Medium or Slowscroll speeds result in sonar information beingdisplayed over a longer period, but with lessdetail (see Section 9-2).Fish symbolsThe Instrument always displays echoes fromfish (fish arches, see section 9-4). If fish symbolsare on, a symbol is displayed over the arch (seesection 9-4). The options are:• Off: No fish symbol is displayed.• Fun or Normal: A fish symbol is displayed.Fish depth labelsWhen this is turned on, the depth of a fish isprinted next to the fish arch.Fish filterUse this to select the minimum fish size that willbe displayed as a fish symbol and to trigger theFish alarm. The options are: Small, Mediumand Large.Fish sensitivitySelects the minimum strength fish echo thatwill be displayed as a fish symbol. Higher valueswill display more fish symbols.Digit sizeUse this to remove or change the size of thedepth window on the sonar windows. There is achoice of: Small, Medium and Large.PaletteUse this to select a color palette. Each colorwithin the palette represents a different echostrength, as shown on the sonar windows.There is a choice of five color palettes: Black,Blue, White, Vivid and 8 color. The firstfour palettes display more detail, and each colorcovers a 1.5 dB signal range. The 8 colorpalette displays less detail, and each colorcovers a 3 dB signal range.Interference filterNo filter, normal setting.Filters the echo signal to remove spikyinterference such as engine noise or depthsounders on nearby boats.Northstar <strong>M121</strong>/<strong>M84</strong> Installation and Operation Manual 75
Noise filterAverages the echo signal to remove rapidchanges. Select Medium or High to give asmoother bottom trace–this may help to detecta deeper bottom; however these settings mayalso remove fish echoes. Select Off for bestfishfinding.Surface clutter filterUse this filter to hide the surface noise. Anysignificant echoes (such as fish) will still bedisplayed.Pulse lengthThis can be used to specify the length ofthe transmitted ultrasonic pulse. A shortpulse length improves the window detail butcontains less energy, therefore it does notpenetrate as deeply into the water as a longerpulse.There is a choice of Auto, Short, Mediumor Long. The Auto setting is recommended.Pulse powerThis can be used to specify the power outputof the transmitted ultrasonic pulse. Low poweroutput conserves the battery and produces aclear display in shallow water.There is a choice of Auto, Low, Medium orHigh. The Auto setting is recommended.19-4 Setup > RadarNote: This option is shown only when the radaris enabled (see Section 18-3)1 Press MENU twice to display the Setupmenu, then select Radar:RotationThe current radar rotation is shown in the topleft corner of the radar screen. If COG data orheading data is not available from a compass,the radar rotation is automatically set to Headup.However, you are strongly recommended touse a good quality product (such as a NorthstarHS02, HS03 or Autopilot) to provide headingdata.If heading data is available from a compass, theoptions are:• North up works only when COG data orheading data from a heading sensor isavailable. North is always at the top of theradar screen.You can easily compare the radar screen to achart in North up.• Head up means that the radar image rotatesunderneath your boat, so the direction inwhich you are heading is pointing to the topof the radar screen. You can easily comparethe visual view in front of your boat with theradar screen.76Northstar <strong>M121</strong>/<strong>M84</strong> Installation and Operation Manual
• Course up works only when COG data orheading data from a heading sensor isavailable and there is an active route. Itmeans that your desired heading is alwayspointing to the top of the radar screen sothat you can compare the leg bearing of theactive route with the radar screen. (If you’rein Course up rotation but don’t have anactive route, the radar uses Head up rotationuntil a route is made active.)Motion modeTrue motion mode is not available if there isno position data, and no heading or COG data.However, you are strongly recommended touse a good quality product (such as a NorthstarHS02, HS03 or Autopilot) to provide headingdata.There are two choices:• Relative (RM). Your boat remains in a fixedlocation on the radar screen and all otherobjects move relative to your position.(You can choose the position of the fixedlocation, see Section 18-10). RM is thedefault.• True (TM). Your boat, and moving targets,move across the radar screen as you travel.All stationary objects remain in a fixedposition. You must have position data, andheading or COG data for this option to beavailable.Interference filterIf the radar on another boat is operating atthe same frequency as your radar, it can causeinterference patterns on the radar window.Interference patterns always appear in adifferent place with each sweep. They can berandomly scattered bright dots or dotted linesthat extend from the centre to the edge of theradar window, often producing a spiral pattern.Generally, the stronger the interference, thewider the interference lines.Use the interference rejection option to reduceboth the interference patterns and the width ofthe interference lines.There are four choices:• Off. Interference rejection is off.• Low operates the interference rejection atminimum strength.• Medium operates the interference rejectionat medium strength.• High operates the interference rejection atmaximum strength. This setting can makeit more difficult to detect some targets andradar beacons. Use this setting only whennecessary.PaletteSelect the color scheme for the radar window.Digit sizeThe range of the radar is shown on the radarwindow; for example 1/16. You can show thisinformation in small, medium or large digits.Range ringThe range rings and compass ring help you toquickly estimate the range and bearing of atarget from your boat.The range ring and compass ring are shown.The number of range rings and the spacinginterval between them is set automaticallyaccording to the range setting. The currentspacing interval is shown in the top left cornerof the radar window.Range ring and compass ring are hidden.North lineWhatever the radar windorotation, you canalways show the blue North line.If the bearing mode is set to:• magnetic, the North line always points tomagnetic North.• true, the North line always points to trueNorth.Show the North line.Hide the North line.Northstar <strong>M121</strong>/<strong>M84</strong> Installation and Operation Manual 77
Heading lineThe heading line is a white line that extendsfrom your boat to the edge of the radarwindow.Show the heading line.Hide the heading line.19-4-1 Setup > Radar > InstallationNote: This option is shown only when the radaris enabled (see Section 18-3)1 Press MENU twice to display the Setupmenu, then select Radar.2 Select Installation:Park positionIf your radar has an open array and youtake it out of enabled mode, the open arraycontinues to rotate for a short distance beforeit finally stops. The stop position is known asthe park position. You can adjust the angle ofthe parking position so that the open arraywill always stop at your preferred position; forexample, facing the bow.1 Select Park position then enter the angle ofthe new park position.Note: You may need to try a few different parkpositions to find the correct one. The strengthof the wind will also affect the park position.Zero bearingUse the zero bearing alignment to rotate theradar image, one degree at a time, so that aknown object dead ahead is directly under theboat’s heading marker.This means that the radar image is alignedwith the displayed chart and the compass.An accurate bearing alignment is particularlyimportant when the radar image is overlaidonto the chart.Adjust this on a chart window with the radaroverlay on.1 Select Zero bearing then use the arrow keysto enter the new bearing angle.Zero rangeThe zero range is also known as the radar rangeoffset and as the trigger delay.If your radar window shows a blank, black circlearound the centre or a solid circle of color atthe centre, you need to adjust the zero rangesetting until this circle disappears or almostdisappears. Ideally, the radar sweep should startat your boat (a radar range of zero).To adjust the zero range setting:1 Position your boat about 45 to 90 m (50to 100 yards) away from and parallel to astraight-walled jetty or similar feature.2 Adjust the gain setting if necessary, so that areasonably good image of the jetty echo isdisplayed on the radar window. At this stage,the jetty echo may appear to be bent.3 Select Zero range then use the arrow keys toadjust the zero range setting until the jettyecho appears as a straight line on the radarwindow.Antenna heightThe Installation Manual for your Northstar radarexplains how to find the optimum height foryour radar scanner (antenna).Select Antenna height then enter the height ofthe antenna above sea level.78Northstar <strong>M121</strong>/<strong>M84</strong> Installation and Operation Manual
19-5 Setup > GPSPress MENU twice, then select GPS:GPS Source• NMEA: Use the external GPS antennasupplied or an external GPS or DGPS sourceconnected via NMEA (see section 20-11).• NavBus: Use an external GPS or DGPSsource connected via NavBus (see section20-10).DGPS SourceRefer to section 20-5Restart GPSRefer to section 20-5Static NavigationWhen the boat stops or moves very slowly,the calculated GPS speed and course becomeerratic. Static navigation allows the erraticvalues to be filtered:• 0.01 to 99.9: If the boat speed is slower thanthis, the speed is displayed as zero and thecourse stays unchanged.• 0 (Off): The calculated speed and course arealways used.Speed and Course FilterWaves and wind cause the boat speed andcourse to fluctuate slightly. To give stablereadings, the Instrument calculates these valuesby taking several measurements and averagingthem.A lower value averages measurements overa shorter period of time. This gives the mostaccurate value but has the most fluctuations.A higherNorthstar <strong>M121</strong>/<strong>M84</strong> Installation and Operation Manual 79
19-6 Setup > FuelFuel functions require optional fuel flow sensorsto be installed. Press MENU twice, then selectFuel:! WARNINGFuel consumption can change drasticallydepending upon the boat loading and thesea conditions. Always carry adequate fuelfor the journey, plus a reserve.SourceSelect the fuel flow sensors to use if the boathas more than one set of fuel sensors. Normallyselect Auto.Num enginesSet the number of engines, or select 0 todisable the fuel functions. If there are twoengines they are called port and starboard.Num tanksSet the number of fuel tanks. If there are twotanks they are called port and starboard.Setup enginesIf the boat has more than one engine, selectEngine and select each engine in turn.For the selected engine, you can enter:From tank: The fuel tank the engine isconnected to.Flow filter: Most engines do not draw fuelfrom the tank at a steady rate. To give a stablefuel flow reading, the <strong>M121</strong>/<strong>M84</strong> calculatesthe flow by taking several measurements andaveraging them. Use the Flow filter to set theperiod over which the fuel flow is averaged.The Flow filter can be set from 0 to 30 seconds.Use the lowest value which gives a stable flow.Usually a value of 5 to 10 seconds will give asatisfactory result for two-stroke carburetorengines. Fuel injected or four-stroke enginesmay require a larger value.This setting affects the Fuel flow and Fueleconomy reading on the Fuel display but itdoes not affect the Fuel used reading.Setup tanksIf the boat has more than one tank, select Tankand select each tank in turn.For the selected tank, you can enter:Tank size: The tank capacity. Northstarrecommends measuring tank size by drainingthe fuel tank, filling it to capacity and using thefuel dispenser’s reading. Beware of air pockets,especially in underfloor tanks.Fuel alarm: See section 13-4.80Northstar <strong>M121</strong>/<strong>M84</strong> Installation and Operation Manual
Fuel consumption curveSee section 13-6.Speed sourceIf both water speed and ground speedare available, select which to use for fuelcalculations (see section 10-5-1).Max fuel flowThe maximum fuel flow from a fuel tank to bedisplayed on an analog fuel flow gauge (seesection 8)Max RPMThe maximum engine RPM to be displayedon an analog RPM gauge. Required only ifNorthstar diesel flow sensors are installed. Enterthe maximum RPM you know you can achievefor the engine rather than the maker’s value.19-7 Setup > TrackPress MENU twice, then select Track: Tracking records and displays the boat’s courseon the chart (see section 3-5). Five differenttracks can be recorded: track 1 has up to 2000points and tracks 2, 3, 4 and 5 have up to 500points each.RecordOff: The Instrument stops recording a track.1 to 5 (select a track number): TheInstrument starts recording the boat’scourse into the selected track.DisplayOff: No track is shown on the chart.1 to 5 (select a track number): Theselected track is shown on the chart.Northstar <strong>M121</strong>/<strong>M84</strong> Installation and Operation Manual 81
Plotting IntervalSelect the plotting and recording interval. Theoptions are Distance or Time.DistanceSelect the distance plotting interval: 0.01, 0.05,0.1, 0.5, 1.0, 2.0, 5.0 or 10.0 distance units.TimeSelect the time plotting interval: 1, 5, 10 or 30seconds or 1 minute.Memory usedThe percentage of memory used in the trackbeing recorded.Tip: Use the user card window to check thenumber of points recorded in each track(see section 15).Send trackThis option is included for compatibility witholder units. For information, see your Northstardealer.Delete trackThe data in the track selected for Record (seeabove) is deleted.19-8 Setup > AISNote: This feature requires an AIS receiver.There are multiple methods to filter AIS vesselsthat are displayed onto the charts.Filter by TypeVessel types that are not selected will be filteredoff the chart. Default is set to all types enabledallowing all vessels to be displayed on the chart.Filter by distanceVessels outside the radius selected from ourcurrent position are filtered off the chart. Defaultvalue is set to 300 nm allowing all vessels to bedisplayed on the chart within that distance.Filter by speedVessels with speed below the value selectedare filtered off the charts. Default is set to 0 nmallowing all vessels to be displayed onto thechart.Show Dangerous OnlyShow only vessels that have a TCPA/CPA belowthe trigger values. This filter will override anyother filter option.Dangerous Vessel AlarmWhen enabled an alarm will activate whenboth the TCPA and CPA are less than the triggervalues.Note: Even when this setting is disabled thedangerous vessels will still be indicated on thechart.TCPA LimitSet the Time of Closet Point of Approach limit.CPA LimitSet the Closet Point of Approach limit.82Northstar <strong>M121</strong>/<strong>M84</strong> Installation and Operation Manual
Projected CourseShow the estimated course of all vessels basedon their current SOG and COG.Range RingsShow a selectable number of range ringsaround the boat. The rings are drawn inmultiples of the current chart scale.Proximity AlarmWhen enabled an alarm will activate when anyAIS vessel is within the proximity alarm radius.19-9 Setup > LogsPress MENU twice, then select Logs: The values can be reset independently of eachother. These log values are saved when the unitis turned off.Reset trip distThis resets the trip distance to zero.Reset total distThis option resets the total distance to zero.Reset engine hoursUse this option to reset the engine hours tozero. This can be useful after an engine serviceor to count the engine hours between serviceintervals.Northstar <strong>M121</strong>/<strong>M84</strong> Installation and Operation Manual 83
19-10 Setup > AlarmsPress MENU twice, then select Alarms:For all alarms select to turn the alarm on orselect to turn the alarm off. For most alarmsthere is a trigger value. The alarm will soundeach time the alarm value equals the triggervalue.For example, the Danger alarm will sound ifthe boat comes closer to a danger waypointthan the trigger value and the Anchor alarmwill sound if the boat moves by more than thetrigger value.You can display the alarm status in the dataheader (see section 2-7-3). The alarm statusshows the symbol for each alarm that is on. Thesymbol is normally black and turns red if thealarm triggers.Symbol Alarm Beeper Alarm sounds when it is on and the:Arrival radiusAnchor alarmBoat is closer to the destination or to a waypoint than the alarm triggervalueBoat moves by more than the alarm trigger valueXTE Boat moves off course by more than the CDI scale (see section 5)DangerBoat comes closer to a danger waypoint than the alarm trigger valueToo shallow 1/ 5sec Depth is less than the alarm trigger valueToo deep 1/ 2sec Depth is greater than the alarm trigger valueFish 1 short beep Echo matches the profile of a fishTemperature 1/ 2sec Temperature equals the alarm trigger valueTemperaturerate1/ 2sec Rate of change of temperature equals the alarm trigger valueLow battery 1/ 2sec Battery voltage is less than the alarm trigger valueLow fuel 1/ 2sec Low fuel remaining equals the alarm trigger value; on a multitank boatyou can set separate alarms for each tank (see section 13-4)Loss of DGPS fixLoss of GPS fixLoss of AISreceivercommunicationDangerousvesselInstrument can not receive the DGPS signal (beacon, WAAS or EGNOS)Instrument can not receive the GPS signal (this alarm is always on)<strong>M121</strong>/<strong>M84</strong> is no longer receiving communication from the AIS receiver(Alarm is on when AIS is enabled)The TCPA/CPA of another vessel is less than the trigger values(see section 13)84Northstar <strong>M121</strong>/<strong>M84</strong> Installation and Operation Manual
19-11 Setup > UnitsPress MENU twice, then select Units:The default units are shown above.Distancenm (nautical miles), mi (miles) or km(kilometers)Distance smallft (feet) or m (metres)Speedkn (knots), mph (miles per hour) or kph(kilometers per hour)Depthft (feet), m (metres) or fa (fathoms)Heightft (feet) or m (metres)FuelLitres, USGal (US gallons) or ImpGal (ImperialGallons)Compass°T (True north) or °M (Magnetic north)Temperature°F (Fahrenheit) or °C (Celsius)Wind (optional)Requires a wind instrument: True or App(Apparent)Note: that the units for wind speed are thespeed units.PressureRequires SmartCraft: kPa or psiBaro (Barometric pressure)Requires a Northstar VHF receiver withbarometer connected by NavBus: InHg or mB.19-12 Setup > CommsUse this feature when the Instrument isconnected to other Northstar instrumentsthrough NavBus or any compatible NMEAinstrument.Press MENU twice, then select Comms:NMEA outNMEA is generally used with third partyinstruments (see section 20-12). Select this totransmit NMEA sentences, for example to anautopilot.NMEA dataUse this to specify which NMEA sentences willbe transmitted (see section 20-12 and AppendixA).Lat/lon dpsSelect the number of decimal points used forlatitude and longitude transmitted in NMEAsentences.Northstar <strong>M121</strong>/<strong>M84</strong> Installation and Operation Manual 85
NavBusNavBus is the preferred method for connectingthe Instrument to other Northstar instruments.Select this if the instruments are connectedusing NavBus.NavBus GroupUse this when a group of Northstar instrumentsare connected together using NavBus, tospecify a group of instruments for backlighting,if required. Then, if the backlight setting on oneinstrument in the group is adjusted, the otherinstruments change automatically. Otherwise,select 0. See section 20-10.19-13 Setup > CalibratePress MENU twice, then select Calibrate:SpeedThis calibrates the speed from a paddlewheelsensor connected to the Instrument. Calibrationmay be required because different hull shapeshave different flow characteristics. Obtain anaccurate measurement of the boat’s speed froma GPS receiver; or by following another boattravelling at a known speed; or by making atimed run over a known distance.Note: for accurate calibration:• The speed from a GPS receiver should begreater than 5 knots.• The speed from another paddlewheeltransducer should be between 5 and 20knots.• Best results are achieved in calm conditionswhere there is minimal current (best at highor low tide).Calibrating speed:1 Travel at a constant, known speed.2 In the Calibrate menu, select Speed.3 Press or to change the displayed speedto the true value.4 Press ENTER .Speed filterWaves and wind cause the boat speed from thepaddlewheel transducer to fluctuate slightly. Togive stable readings, the Instrument calculatesthese values by taking several measurementsand averaging them. Set the Speed filter to thelowest value which gives stable readings. Therange is 1 to 30 seconds or Off (0).TemperatureThe factory settings should be sufficientlyaccurate for normal usage. To calibrate thetemperature readout, first measure the watertemperature with a thermometer known to beaccurate.Use the cursor keys to display the temperaturereadout box, then increase or decrease thevalue to match the measured temperature. Thetemperature can be set from 32° to 99.9°F (0° to37.7°C) with a resolution of 0.1° unit.To change the units between °F (Fahrenheit) or°C (Celsius), see section 19-11.86Northstar <strong>M121</strong>/<strong>M84</strong> Installation and Operation Manual
Temperature filterWater turbulence and currents cause the watertemperature to fluctuate slightly. To give stablereadings, the Instrument calculates these valuesby taking several measurements and averagingthem. Set the Temperature filter to the lowestvalue which gives stable readings. The range is1 to 30 seconds or Off (0).Keel OffsetA depth transducer measures depths belowwhere the transducer is mounted on the boat,usually the bottom of the boat. The Instrumentcalculates the depths to display by adding thekeel offset to all measured depths.A Have a zero keel offset to display depthsbelow the transducer.B Enter a positive keel offset to increase thedisplayed depth. For example to display thetotal depths below the surface, enter thedepth of the transducer below the surface.C Enter a negative keel offset to decrease thedisplayed depth. For example, to display thedepths of clear water below the boat, enterminus the depth of the deepest part of theboat below the transducer.ABCTransducer; depthsmeasured belowhereDepthsmeasuredbelow hereDepths measuredbelow hereSpeed rangeThe maximum reading to display on an analogboat speed gauge (see section 11). Choose arange suitable for your boat.FuelSee section 13-7, Calibrate.19-14 Setup > TimePress MENU twice, then select Time:Local offsetThe difference between local time and UTC(GMT). Change local offset when daylightsaving time starts and ends. The range is 0 to ±13 hours, in 30 minute steps.1 Select Local offset.2 Press or to change the offset, thenpress ENTER .Time formatThe options are 24 hour or 12 hour.Date formatThe options are dd/MMM/yy, MMM/dd/yy,dd/MM/yy or MM/dd/yy.Northstar <strong>M121</strong>/<strong>M84</strong> Installation and Operation Manual 87
19-15 Setup > FavoritesSee section 2-7-2.19-16 Setup > SimulateSimulate mode is a way of becoming familiarwith the Instrument (see section 2-6).Press MENU twice, then select Simulate:SimulateTurn simulate mode offTurn simulate mode on! WARNINGNever have simulate mode on when theInstrument is navigating on the water.ModeThere are two choices for Mode:1 NormalSimulates the boat moving from the selectedstart point at the given speed and heading.The options required for Normal are:Speed: The simulated boat speed to use.Course: The simulated course over ground.Note: To select the start point, go to the chartwindow before starting the simulation. Then:• To start the simulation from the boatposition, pressESCto switch to centre onboat mode.• To start the simulation from a different point,move the cursor to that point on the chart.Tip: To calculate a course, use the cursor (seesection 3-2-1).Tip: As the boat moves, vary Course tosimulate the boat moving off course.2 DemoSimulates a boat moving along a route andautomatically displays different Instrumentfunctions. The options required for Demo are:Speed: The simulated boat speed to use.Route: The route to follow.88Northstar <strong>M121</strong>/<strong>M84</strong> Installation and Operation Manual
20 Installation! WARNINGEnsure that any holes cut are in a safe position and will not weaken the boat’s structure. If indoubt, consult a qualified boat builder.CAUTIONDo not mount any part where it can be used as a hand hold, where it might be submerged orwhere it will interfere with the operation, launching or retrieving of the boat.To help ensure proper operation, do not mount any part or cable within 0.5 m (20”) of the planeof a radar antenna or within 1 m (3 ft) of a compass or source of electrical noise, such as engines,fluorescent lights, and power inverters.When fitting a cable, do not crush or strain the cable. Secure the cable at regular intervals. Ensureno connectors or exposed terminals are in wet area.If the cables supplied are too long, do not shorten the cable; instead coil the cable. Most cablescan be extended with Northstar extension cables. Do not fit more than one extension cable.Northstar <strong>M121</strong>/<strong>M84</strong> Installation and Operation Manual 89
20-1 Installation: What else comes with my <strong>M121</strong>/<strong>M84</strong>?Northstar GPS 124 AntennaGPS 124 Antenna bottom coneGPS 124 Antenna gasketGPS 124 mounting kitSun cover for display unitNote: Place over display when not in useFront BezelNote: Fit this after installing the display unitPower cableMounting bracket and locking knobsBracket mounting screws(5 x14 Gauge self tapping screws)Flush mounting screws(4 x 8 Gauge self tapping screws)Northstar walletContains the following items:• Flush mounting template• LCD cleaning cloth• Warranty card• Quick start guide• CD manual• <strong>M121</strong>/<strong>M84</strong> Installation and operation manual• GPS 124 Antenna Installation and operation manual90Northstar <strong>M121</strong>/<strong>M84</strong> Installation and Operation Manual
20-2 Installation: Options and Accessories• Replacement paddle wheel.• C-MAP NT-MAX, NT+ or NT chart SD cards.• Northstar NavBus junction boxes simplifywiring, particularly if several instruments areconnected. For more information, see theNavBus Installation Manual.Optional sensors and instrumentsExternal alarms: Lights or sounders in theboat to sound alarms through the boat (seesection 20-4).GPS or DGPS antenna: For GPS navigation,see section 20-5.Sonar transducer: For depth sounding andfish finding, see section 20-6.Fuel sensors: For fuel functions. TheInstrument can use these optional fuel flowsensors, fitted to one or two engines:• Northstar petrol/gasoline sensors (seesection 20-7)• SmartCraft fuel sensors (see section 20-8)DSC VHF radio: Tracks other boats withGPS receivers and DSC radios and displaysbarometric pressure (see section 20-10).SmartCraft: With one or two SmartCraftcapable Mercury petrol/gasoline engines, theInstrument can display engine data and trimand can control troll speed (see section 20-8).Radar: For radar functions. A Northstar 2 kW, 4kW or 6 kW radar system must be installed (seesection 20-9).Other instruments: The Instrument canreceive data from other instruments and senddata to other instruments by NavBus or NMEA(see sections 20-11 and 20-12).Please consult your Northstar dealer for moreinformation.Northstar <strong>M121</strong>/<strong>M84</strong> Installation and Operation Manual 91
Connections<strong>M121</strong>1 2 3 4 5 67q Sonar Sonar Transducerw Video in Video Input(Analogue composite[NTSC-PAL])e Comms Not Usedr GPS Northstar 124 GPS Antennat Fuel/Nav - Northstar Fuel TXD- SmartCraft Gatewayy Radar Northstar Radar Processoru Power/data cableWire FunctionBlack Ground: power negative,NMEA ground (Connect bothblack wires to ground)Brown Not UsedWhite NMEA outBlue NavBus-Red Positive power in, 10to 35 V DCOrange NavBus+Yellow Auto power - Connect to redwire (positive power in) toenable Auto power No Autopower - Leave disconnectedor connected to Blackwire (ground)Green External Alarm output or lightout, switches to groundduring alarm condition,200 mA maximum.20-3 Installation: The display unitStart by selecting a suitable mounting positionfor the <strong>M121</strong>/<strong>M84</strong> display unit:• Consider the best possible position forviewing and operating the <strong>M121</strong>/<strong>M84</strong>. Thiswill generally be a relatively shaded area freefrom obstructions.• At least 4” (100 mm) away from the compass,at least 12” (300 mm) away from any radiotransmitter and at least 4 ft (1.2 m) awayfrom any antenna.• For optimum performance and reliabilityconsider mounting the unit where it will notbe unnecessarily exposed to direct sunlight,water and protected from other physicaldamage which could occur during roughsea passages.• If bracket mounting chose a flat area wherethe display will not be subjected excessivevibration.• Select an area with adequate clearance forcabling and access to the power source.• Before drilling any holes ensure thatthe drill area is free from cables or otherobstructions.92Northstar <strong>M121</strong>/<strong>M84</strong> Installation and Operation Manual
There are two mounting arrangements:Flush Mounting the <strong>M121</strong>/<strong>M84</strong>1. Attach the flush mounting template to theselected mounting position using adhesivetape.2. Drill a pilot hole for each of the hole sawcuts shown on the template before cuttingthe larger hole with the hole saw.3. Next cut all the way around the inside of thecut-out line with a saw to remove the wastematerial shown on the template.4. Check that the unit fits correctly in the cutout area. Adjust the fit with a file if required.5. Select a 2-3.5 mm 1/8” drill bit dependingon hardness of material to drill. Smallerdiameter holes will be needed for softwoods and larger diameter pilot holes willbe required if mounting to hard materialssuch as fiberglass (we recommend 3.5 mm(1/8”) for fiberglass and Aluminum).With the selected drill bit drill the 4 pilotholes for the 8 gauge screws used to attachthe unit. These are indicated on the cornersof the mounting template.6. Connect all cables to the rear of the unitbefore placing the unit into the console.7. Firmly secure the unit in place with the 4 x 8gauge self tapping screws.Note: the 5 x 14G self tapping screws are forbracket mounting only.8. To finish off the installation firmly clip thefront bezel in place.Bracket Mounting the <strong>M121</strong>/<strong>M84</strong>An alternative to flush mounting the <strong>M121</strong>/<strong>M84</strong>is to bracket mount the unit. This method hasthe advantage that the display can be easilyremoved when it is not in use. The display maybe tilted for best possible viewing angle whenbracket mounted.Note: The mounting bracket does not allow forrotation of the unit to the left and right.1. Use the mounting bracket as a template tomark the 5 positions of the screw holes.2. Select a suitable drill bit (note: largerdiameter pilot holes may be required ifmounting to fiberglass) and drill 5 pilot holesin the marked positions.3. Secure the mounting bracket using the 5 x14G self tapping screws.4. Slide the <strong>M121</strong>/<strong>M84</strong> into the mountingbracket and secure in place with the bracketknobs.5. To finish off the installation firmly clip thefront bezel in place.Bezel<strong>M121</strong>/<strong>M84</strong><strong>M121</strong>/<strong>M84</strong>Knob8 gauge screws14G self tapping screwsDashMounting bracketNorthstar <strong>M121</strong>/<strong>M84</strong> Installation and Operation Manual 93
20-4 Installation: Power/data cableThe power/data cable has a black locking collar and flying leads.1 Wire the Instrument for auto power to have the Instrument turn on with the boat’s ignition switchor to record engine hours or if the Instrument must add up the total fuel used (for example ifNorthstar petrol/gasoline fuel sensors are installed or if SmartCraft is installed without fuel tanklevel sensors). Otherwise wire for basic power (for more information, see section 2-2).Basic powerPower/data cableBlackRedYellowFuse 2ABlackMain switch12/24 V DCAuto powerWhen wired for Auto Power On the unit will turn on when the ignition switch is on, if you would likethe unit to turn off when the ignition switch is off then set the unit for Auto Power Off (see section2-2 and 17-1)BlackPower/data cableYellowRedFuses 2AIgnitionIgnition switchBlackMain switch12/24 V DC2 Wire any external alarm beepers or lights. The alarm output switches to ground to sound thealarm. If the current is more than 200 mA, fit a relay.3 Connect the power/data cable to the black display unit connector; turn the collar to lock theconnector.BlackPower/data cableRedGreenExternal beepers orlights94Northstar <strong>M121</strong>/<strong>M84</strong> Installation and Operation Manual
20-5 Installation: GPS antennaSelecting an antennaFit one of these GPS antennas:• Normally use the GPS antenna supplied.• An optional differential beacon DGPSantenna to give enhanced accuracy withinrange of land based differential beaconsin areas where WAAS or EGNOS are notavailable. Such a DGPS antenna has both aGPS receiver and a beacon receiver, and itautomatically applies the beacon correctionto the GPS position.• A compatible GPS or DGPS instrument orantenna connected by NavBus (see section20-10) or NMEA (see section 20-11). In thiscase, the Instrument does not need its ownantenna.Note:• To configure the Instrument for differentantenna options, see section 19-4.For more information, contact your Northstardealer.DGPS Source:Enables or disables the satellite based DGPScorrection (see section 8). The options areNone or WAAS/EGNOS. Do not EnableWAAS/EGNOS outside their coverage areasor the accuracy of the position might bedegraded.WAAS covers all of the USA and most of Canada.To use WAAS, the GPS antenna must havea clear view of the sky towards the equator.EGNOS will cover most of Western Europe.Restart GPS:Restarts the GPS receiver, satellite reception willbe lost until the receiver completes its restartand acquires the satellites.Select restart GPS and press ENTER! WARNINGMOB will not work if the Instrument doesnot have a GPS fix.Installing an antennaIf an external antenna is required, install theantenna and fit the antenna cable back tothe display unit. Follow the instructions inthe manual supplied with the antenna. Fit anoptional Northstar extension cable if required.During setup, configure the Instrument for thechosen antenna, see section 19-4.Northstar <strong>M121</strong>/<strong>M84</strong> Installation and Operation Manual 95
20-6 Installation: Sonar transducer! WARNINGDo not install plastic through hulltransducers in solid wooden hulls. Leakagethrough the hull may result.Do not install bronze transducers in metalhulls. This will cause electrolytic corrosionthat may result in damage to the hull ortransducer.BlueSonar cableConnect the transducer to the blue Instrumentconnector; tighten the locking collar.During setupa) set Sonar to (see section 19-1)b) set up the sonar options (see section 19-3)20-7 Installation: Northstar petrol/gasoline sensorsFit the optional petrol/gasoline fuel kit followingthe instructions supplied with the kit.Note:SmartCraft engines have fuel flow sensors,therefore Northstar fuel sensors are notrequired as well.For dual engines, fit two kits.Wire the Instrument for auto power (seesection 20-4).During setup:a) set the fuel data (see section 19-6)White Fuel sensor cable96Northstar <strong>M121</strong>/<strong>M84</strong> Installation and Operation Manual
20-8 Installation: SmartCraftIf the boat has one or two SmartCraft capableMercury petrol/gasoline engines, connect theInstrument to the SmartCraft engines withan optional SmartCraft gateway. The displayunit can display engine data and trim and cancontrol troll speed.Note:Fit a single gateway for single engines and adual gateway for dual engines.SmartCraft engines have fuel flow sensors,therefore Northstar fuel sensors are notrequired as well.If the fuel tank does not have SmartCraftlevel sensors, wire for auto power (seesection 20-4).WhiteSmartCraft GatewayDuring setup enter the SmartCraft setup data.For information on installing, setting up andusing SmartCraft, see the SmartCraft GatewaysInstallation and Operation Manual.20-9 Installation: RadarInstall the Northstar radar as described in theInstallation Manual supplied with the radar.Carefully read the important safety and warninginformation and also the location and wiringguidelines BEFORE installing the radar.Set up the radar as described in section 19-4.RADARRadar cableNorthstar <strong>M121</strong>/<strong>M84</strong> Installation and Operation Manual 97
20-10 Installation: Other NavBus instrumentsNavBus is Northstar’s system for connectinginstruments together to interchange dataand share transducers. When instruments areconnected by NavBus:If the units, alarms or calibration arechanged in one instrument, then thevalues will automatically change in all otherinstruments of the same type.Each instrument can be assigned to a groupof instruments. If the backlight is changed inan instrument in group 1, 2, 3 or 4 then thebacklight will automatically change in theother instruments in the same group.If the backlight is changed in an instrumentin group 0 then no other instruments areaffected.If an alarm sounds, mute it by clearing thealarm on any instrument which can displaythat alarm.NavBus and the InstrumentThe <strong>M121</strong>/<strong>M84</strong> can:Display wind speed and direction from anoptional Northstar Wind instrumentReceive and display depth from an optionalNorthstar depth instrument.Receive and display boat speed and watertemperature from a paddlewheel sensor onan optional Speed instrument.Receive data from an optional NorthstarVHF radio (with NavBus functionality). The<strong>M121</strong>/<strong>M84</strong> can display:Baro: barometric pressureBaro history: barometer historyWeather: a predication, based on changesin barometric pressureFish forecaster: a prediction based onchanges in barometric pressureDSC/Buddy Track: (see section 17)Receive data from an optional GPS orGPS/DGPS source.Send data to optional Northstar instruments,for example to a repeater.During setup for NavBus instruments, setNavBus to and assign the instrument aNavBus group number (see section 19-12)Black20-11-1 Installation: Northstar VHF radioFit and set up the optional Northstar VHFradio (with NavBus functionality) following theinstructions supplied with the radio.BlackPower/data cablePower/data cableOrangeBlueOrangeBlueNavBus wires to otherNavBus instrumentsBlueGreyRadio data cable98Northstar <strong>M121</strong>/<strong>M84</strong> Installation and Operation Manual
20-11 Installation: Other NMEA instrumentsNMEA is an industry standard forinterconnecting instruments. It is not as flexibleor as easy to install as NavBus.The Instrument can:Receive and display wind speed anddirection from an optional compatible windinstrument.Receive and display depth, paddlewheelboat speed and water temperature from anoptional compatible instrument.Receive data from an optional compatibleGPS or GPS/DGPS source.Send GPS position and other navigationdata to an autopilot or other instrument.An autopilot requires APB, APA and VTGsentences (see section 19-12).For information on sending NMEA data to theInstrument, see your Northstar dealer.During setup to send NMEA data to otherinstruments, set NMEA out to and specifythe NMEA data to send (see section 19-12).WhiteBlackPower/data cableWhite NMEA outBlack NMEA groundWhite NMEA in(requires Special Fuel Cable)20-12 Installation: Setup and testSetup and test1 Put a blanking cap on any unused connectoron the back of the display unit. Ensure allconnectors are plugged in and the displayunit is in place.2 If the display unit is bracket mounted, adjusttilt and rotation for best viewing and handtighten the knob.3 Insert any required C-MAP chart card (seesection 1-3).4 Turn the instrument on (see section 2-2).When the Instrument is turned on for thefirst time, it displays an installation menu:i Select the language to use.ii Change the data if necessary (see section2-1)iii When the setup data is correct, pressESC .This data can be changed later(see section 19).5 Enter setup data to set up the Instrumentto your requirements and to set up anyoptional sensors or instruments (see section19).6 At the satellite window, check that it picksup GPS satellites. Wait for the GPS receiverto start up and the fix type to change from‘Acquiring’ to ‘GPS fix’. This should take lessthan two minutes (see section 8).7 Go on a test run to check that the navigationequipment works correctly, particularlywhen a radio trans mitter or radar is used.Northstar <strong>M121</strong>/<strong>M84</strong> Installation and Operation Manual 99
Appendix A - SpecificationsGENERAL<strong>M121</strong> Size: 256 mm (10.08“) H x 385 mm (15.16“) W x78.5 mm (3.09“) D. Allow 3 mm clearance on eachside for dust cover.<strong>M84</strong> Size: 190 mm (7.48“) H x 285 mm (11.22“) W x 76.8mm (3.02“) D. Allow 3 mm clearance on each sidefor dust cover.<strong>M121</strong> Display: 307 mm (12.1”) diagonal, TFT color, 800x 600 pixels.<strong>M84</strong> Display: 213.4 mm (8.4”) diagonal, TFT color, 800x 600 pixels.Backlight: Display and keysSupply voltage: 10.5 to 32 V DC.Supply current: at 13.8 V350 mA min - no backlighting.1A max - full backlighting.External beeper or light output: Switchedto ground to sound alarm, 30 V DC, 200 mAmaximum.Operating temperature: 0° to 50°C (32° to 122°F)ALARMS:User set: Arrival radius, anchor, XTE, danger, tooshallow, too deep, fish, temperature, temperaturerate, low battery, low fuel (optional), loss of DGPSfix, radar guard zone, dangerous AIS vessels.GPS NAVIGATIONChart card: C-MAP SD Card (NT-MAX, NT+ or NT)User card: SD CardWaypoints: Up to 3000, with default or user-definedalphanumeric names up to eight characters.Routes: 25 Routes, with up to 50 points eachTracks: By time or distance, one track of 2000 pointsand four of 500 points.Chart datums121 Chart datums (see next page)One user-defined map shift.Chart scale: 0.05 to 4096 nm for chart (chartdependent) down to 0.01 nm in plotter mode.SONAR FISHFINDING(Optional sonar transducer required)Depth range: 1 m (3 ft) to 1000 m (3300 ft )Sonar output:Power: Variable, up to 600/1000 W RMSDual frequency: 50 khz and 200 kHzDepth acquisition time from startup:Typically 2 seconds at 30 m (100 ft)Temperature:Range 0° to 37.7°C (32° to 99.9°F)Resolution of 0.1° unit.Speed (from paddlewheel transducer):1 to 96.6 kph (57.5 mph, 50 kn).FUEL COMPUTER(Optional fuel sensor(s) required)Engine types:Outboard carburetted two stroke and EFIpetrol/gasoline engines: 50 to 300 hp.Outboard four stroke petrol/gasoline engines: 90to 300 hp.Inboard petrol/gasoline engines: 70 to 400 hp.Flow rate:Minimum: 5 litres per hour (1.3 U.S. gallons per hr).Maximum: 130 litres per hour (34 U.S. gallons per hr).COMMUNICATIONSNavBusConnection to other Northstar instruments.NMEA: NMEA 0183 ver 2 4800 baudInputs from compatible instruments:BWR, DPT, GGA, GLL, GSA, GSV, HDG, HDM, HDT,MTW, MWV, RMC, VHW, VTG and DBTOutputs, for compatible instruments:APA, APB, BWR, DBT, DPT, GGA, GLL, GSA, GSV, RMB,RMC, MTW, VHW, VLW, VTG, XTESTANDARDS COMPLIANCEEMC:USA: FCC Part 15 Class B.Europe: (CE) EN301843-1New Zealand and Australia: (C Tick) IEC60945Environment: IPx6/IPx7/CFR46 (with card holder andconnections in place)Video75Ω BNC Connector. Most PAL and NTSC formatssupported. (PAL BGHI, PAL N, Combination PAL N,PAL M, NTSC M, NTSC N, NTSC 4.43, NTSC-Japanand SECAM)100Northstar <strong>M121</strong>/<strong>M84</strong> Installation and Operation Manual
Physical DimensionsNorthstar <strong>M121</strong><strong>M121</strong>Northstar <strong>M84</strong><strong>M84</strong>Northstar <strong>M121</strong>/<strong>M84</strong> Installation and Operation Manual 101
List of datumsAdindan Afgooye AIN EL ABD 1970American Samoa 1962 Anna 1 Astro 1965 Antigua Island Astro 1943ARC 1950 ARC 1960 Ascension Island 1958Astro Beacon ‘E’ 1945 Astro DOS 71/4 Astro Station 1952Astro Tern Island (Frig) 1961 Australian Geodetic 1966 Australian Geodetic 1984Ayabelle Lighthouse Bellevue (IGN) Bermuda 1957Bissau Bogota Observatory Bukit RimpahCamp Area Astro Campo <strong>Inc</strong>hauspe 1969 Canton Astro 1966Cape Cape Canaveral CarthageChatham Island Astro 1971 Chua Astro Co-ord. Sys.1937 EstoniaCorrego Alegre Dabola Deception IslandDjakarta (Batavia) DOS 1968 Easter Island 1967European 1950 European 1979 Fort Thomas 1955Gan 1970 Geodetic Datum 1949 Graciosa Base Sw 1948Guam 1963 Gunung Segara GUX 1 AstroHerat North Hermannskogel Hjorsey 1955Hong Kong 1963 Hu-Tzu-Shan IndianIndian 1954 Indian 1960 Indian 1975Indonesian 1974 Ireland 1965 ISTS 061 Astro 1968ISTS 073 Astro 1969 Johnston Island 1961 KandawalaKerguelen Island 1949 Kertau 1948 Kusaie Astro 1951L. C. 5 Astro 1961 Leigon Liberia 1964Luzon M’Poraloko Mahe 1971Massawa Merchich Midway Astro 1961Minna Montserrat Island Astro 1958 Nahrwan Masirah Is. OmanNahrwan United Arab Emirates Nahrwan Saudi Arabia Naparima, BWINorth American 1927 North American 1983 North Sahara 1959Observatorio Meteorolog. 1939 Old Egyptian 1907 Old HawaiianOman Ord. Survey Great Britain 1936 Pico de las NievesPitcairn Astro 1967 Point 58 Pointe Noire 1948Porto Santo 1936 Provis. South American 1956 Provis. South Chilean 1963Puerto Rico Pulkovo 1942 Qatar NationalQornoq Reunion Rome 1940S-42 (Pulkovo 1942) Santo (DOS) 1965 Sao BrazSapper Hill 1943 Schwarzeck Selvagem Grande 1938Sierra Leone 1960 S-JTSK South American 1969South Asia Tananarive Observatory 1925 Timbalai 1948Tokyo Tristan Astro 1968 Viti Levu 1916Voirol 1874 Voirol 1960 Wake Island Astro 1952Wake-Eniwetok 1960 WGS 84 YacareZanderij102Northstar <strong>M121</strong>/<strong>M84</strong> Installation and Operation Manual
Appendix B - TroubleshootingThis troubleshooting guide is written withthe assumption that the user has read andunderstood the relevant sections in this manual.It is possible in many cases to solve difficultieswithout having to send the display unit back tothe manufacturer for repair. Please follow thistroubleshooting section before contacting thenearest Northstar dealer.There are no user serviceable parts. Specializedmethods and testing equipment are requiredto ensure that the display unit is reassembledcorrectly and is waterproof. Users who servicethe product themselves will void the warranty.Repairs to the product may only be carried outby a service centre approved by Northstar. If theproduct must be sent into a service centre forrepair, it is essential to send in the transducer(s)at the same time.More information can be found on our Website:www.northstarnav.com.B-1 General problems1-1 The Instrument won’t turn on:a The Instrument is designed to operateon a 12/24 volt battery system, where thevoltage may vary from 10.5 to 32 volts. If anexcessive voltage is supplied, a fuse will betripped, turning the display unit off. Checkthe fuse.b Check that the power cable connector at theback of the display unit is securely pluggedin and the collar is locked in place. The collarmust be secure for watertight connection.c Measure the battery voltage while thebattery is under load - turn on somelights, radio or other electrical equipmentconnected to the battery. If the voltage isless than 12 volts:- the battery terminals or wiring on theterminals may be corroded.- the battery may not be chargingcorrectly or may need replacing.d Inspect the power cable from end to endfor damage such as cuts, breaks, squashedor trapped sections.e Check power wiring (see section 18-4).f Check for corrosion on the power cableconnector and clean or replace if required.g Check fuses that are placed in line with thepower cable. A fuse can be blown despiteappearing to be good or the fuse may becorroded. Test the fuse or replace it with afuse known to be good.1-2 The Instrument won’t turn off:The Instrument may have been wired forAuto power. In this case, the Instrumentcannot be turned off while the ignitionpower is on (see section 2-2).1-3 If the Instrument beeps when turnedon but nothing is displayed:The Instrument may be operating, but thebacklight settings may have been set toolow (see section 2-3).1-4 The wrong language is displayed:See section 19-1.Northstar <strong>M121</strong>/<strong>M84</strong> Installation and Operation Manual 103
B-2 GPS navigation problems2-1 No GPS fix or long time to get fix atstartup:a May occur occasionally if the antenna doesnot have a clear view of the sky. The satellitepositions are constantly changing.b Antenna cable not connected to displayunit.2-2 Instrument GPS position different fromtrue position by more than 10 m (33 ft):a Instrument in simulate mode. Turn simulatemode off (see section 19-16).b The normal error in GPS position will exceed10 m (33 ft) for about 5% of the time.c Under special circumstances the USDepartment of Defence may introduce adeliberate and changing error in the GPSpositions of up to 300 m (1000 ft).2-3 Instrument position different fromsame position on local charts:a Instrument in simulate mode. Turn simulatemode off (see section 19-16).b <strong>Inc</strong>orrect chart datum. Select the correctchart datum (see section 19-2).c Map shift has been applied wrongly. Clearmap shift, then reapply if necessary (seesection 19-2).2-4 Can not see boat on chart:PressESCto switch to centre on boatmode (see section 3-2-1).2-5 The time or date on satellite display iswrong or off:a No GPS fix.b In simulate mode. Turn simulate mode off(see section 19-16).c Local time offset is wrong (see section 17-12).The Local Time Offset must be changedwhen daylight saving time starts or ends.2-6 Autopilot not responding toInstrument; no NMEA output:a NMEA output disabled or the requiredNMEA sentences are not turned on. CheckNMEA settings (see section 19-12).b Check that the instrument is connectedcorrectly.2-7 No DGPS fix or loss of DGPS fix:a To receive a DGPS fix, WAAS/EGNOS must beenabled or an optional DGPS antenna fitted(see section 8).b With WAAS/EGNOS: Boat out of coveragearea (see section 8).c With WAAS: GPS antenna does not havea clear view of the horizon towards theequator.b With beacon DGPS: boat out of range of aDGPS beacon.B-3 Fuel consumption problems3-1 Fuel used or remaining seeminaccurate:a Instrument is not wired for auto power (seesection 20-4).b In rough seas, fuel may surge back and forththrough the fuel transducer, resulting inincorrect readings. Try installing a one-wayvalve between the fuel transducer and thefuel tank.c The Set remaining fuel value mustbe reset after every refuelling (see section113-1).d The fuel tank may not refill to the samecapacity each time due to air pockets.This is particularly noticable with underfloortanks.e Fuel transducers wear out over time andshould be replaced after every 5000 litres offuel.104Northstar <strong>M121</strong>/<strong>M84</strong> Installation and Operation Manual
3-2 Flow indicates no fuel or low fuel:a Check that the number of engines is set to 1(see section 19-6).b Check that the fuel cable connectors aresecurely plugged in and the collar is lockedin place. The collar must be locked in placeto give a watertight connection.c A fuel transducer may be clogged. If so,remove the transducer from the fuel lineand gently blow through it in the oppositedirection to the fuel flow.A fuel filter between the fuel transducer andthe fuel tank must be installed as per thefuel installation guide. Failure to do so willvoid the warranty.d Inspect the fuel cable from end to end fordamage such as cuts, breaks, trapped orsquashed sections.e Check that the fuel filter is clean.3-3 A twin engine installation shows onlyone flow rate:a Check that the number of engines is set to 2(see section 19-6).3-4 Erratic Fuel Flow readings:a The fuel flow transducer may have beenmounted too close to the fuel pump or maybe subject to excessive vibration. Refer tothe installation instructions supplied withthe fuel transducer.b Check for leaks in the fuel line or in the fuelpickup in the tank.c The Flow filter value is not suitable forthe engine. Check that the value is not setto zero, then try increasing the value until asteady flow rate is shown (see section 19-6).3-5 There is no reading for fuel economy:a The boat must be travelling through thewater to generate an Economy reading.b Check that the paddlewheel on thetransducer is spinning freely and that thetwo magnets in the paddlewheel are still inplace.B-4 Sonar fishfinding problems4-1 The Instrument operates erratically:a Check that the transducer does not havedebris (e.g. weed, plastic bag) caughtaround it.b The transducer may have been damagedduring launching, running aground orwhile underway with debris etc. If thetransducer has been impacted, it may havebeen kicked up on the bracket. If it is notphysically damaged, reset the transducerback to its original position. (See theTransom Transducer Installation Guide.)c When the transducer is less that 2 ft (0.6 m)from the bottom, the depth readings maybecome inconsistent and erratic.d Manual Gain may be set too low, which maycause weak bottom echo or no fish signals. Ifin Manual Gain, try increasing the Gain.e Ensure the back of the bottom surface ofthe transducer is slightly lower than thefront and the front is as deep in the water aspossible in order to minimize the generationof bubbles through cavitation. (See theTransom Transducers Installation Guide)f Check the transducer and power cableconnectors at the back of the display unitare securely plugged in and the collars arelocked in place. The collars must be securefor watertight connection.g Inspect the power cable from end to end fordamage such as cuts, breaks, squashed ortrapped sections.h Ensure there is not another fishfinder ordepth sounder turned on, which mayinterfere with this Instrument.Northstar <strong>M121</strong>/<strong>M84</strong> Installation and Operation Manual 105
i Electrical noise from the boat’s engine oran accessory may be interfering with thetransducer(s) and/or the Instrument. Thismay cause the Instrument to automaticallydecrease the Gain unless using Manual Gain.The Instrument thus eliminates weakersignals such as fish or even the bottomfrom the display. This may be checkedby switching off other instruments,accessories (e.g. bilge pump) and themotor until the offending device islocated. To stop problems from electricalnoise, try:- re-routing the power and transducercable(s) away from the boat’s otherelectrical wiring.- routing the display unit’s power cabledirectly to the battery with an in-line fuse.4-2 Bottom is not displayed:a The Instrument may have Manual Rangeselected and the depth may be outsidethe range value selected. Either changethe Instrument to Auto Range or selectanother depth range (see section 8-5).b The depth may be outside the Instrument’srange. While in Auto Range, the display unitwill display “--.-” to indicate that there is nobottom detected. A display of the bottomshould reappear when in shallower water.4-3 The bottom is displayed too far upthe screen:The Instrument may have Manual Rangeselected and the selected Range value istoo high for the depth. Either change theInstrument to Auto Range or select anotherdepth range (see section 8-5)4-4 Bottom echo disappears or erraticdigital reading while the boat is moving:a Ensure the back of the bottom surfaceof the transducer is slightly lower thanthe front and the front is as deep in thewater as possible in order to minimise thegeneration of bubbles through cavitation.(See the Transom Transducers InstallationGuide, for more information.)b The transducer may be in turbulent water.Air bubbles in the water disrupt the echoesreturned, interfering with the Instrument’sability to find the bottom or other targets.This often happens when the boat isreversed. The transducer must be mountedin a smooth flow of water in order for theInstrument to work at all boat speeds.c Electrical noise from the boat’s motor caninterfere with the Instrument. Try somesuppression spark plugs.4-5 There is a double bottom tracedisplayed:a The boat may be in an area that generatesshadows (see section 9-2).b In shallow water, the echoes may bounce.Reduce the gain setting (see section 9-6)and/or reduce the sonar pulse power (seesection 19-3).c Decrease the Range.106Northstar <strong>M121</strong>/<strong>M84</strong> Installation and Operation Manual
B-5 Radar problems5-1 Radar overlay doesn’t appear on thechart screena Ensure that your boat is shown on the radarwindow. If it is, but the radar overlay stillisn’t shown, try zooming in on the chartedarea. (The charted area may be outside themaximum range of the radar).b The threshold or transparency settings forthe radar overlay are not correct (see 18-6).5-2 Radar shows arcs and/or shadowsSide lobe patterns often appear as an arc ora broken arc. Shadows are blind spots.If the radar is installed at a suitable heightand in a suitable location on your boat,side lobe patterns and shadows caused byobstructions such as funnels or masts will beminimized.If you are having problems with these, youmay need to relocate your radar. Consult theInstallation Guide for your radar model foradvice.5-3 Radar shows different patterns oneach sweepInterference patterns always appear in adifferent place with each sweep. They canbe randomly scattered bright dots or dottedlines that extend from the centre to theedge of the radar window, often producinga spiral effect. Generally, the stronger theinterference, the wider the interference lines.a Use the interference rejection feature toreduce interference patterns, and the widthof the interference lines (see 19-4).5-4 Radar shows false echoes and/orbackground noiseFalse echoes and/or background noise canbe produced if the radar sensitivity is toohigh.a Try using the Auto setting for the radar gainmode (see 19-4). If this doesn’t work, or if theradar gain mode is already set to Auto, usethe radar gain setting to reduce the radarsensitivity5-6 Radar shows multiple echoes off thesame objectMultiple echoes off the same object aremost likely to occur when you are closeto a large target, and are usually only atemporary nuisance.5-7 Radar shows random or grouped dotsRain clutter often appears as random dotsthat can merge into badly-defined echoeson the radar window. The random signalsare returned from rain, hail, sleet, or snowand can result in a confusing display5-8 Radar shows random signals in centreSea clutter usually appears as confusing,random signals around your boat. Highwaves will produce the maximum amount ofsea clutter.You can optimize your radar window toreduce the effects of sea clutter (see section18-6-4).Northstar <strong>M121</strong>/<strong>M84</strong> Installation and Operation Manual 107
Appendix C Glossary and navigation dataAir temp - Air temperature (requires Northstar721 VHF radio).Alarm status - Shows the symbol (see section19-10) for each alarm that is on. The symbolis normally black and turns red if the alarmtriggers.Attention Area - An important area on a chart,such as a restricted anchorage or a shallow area(see section 19-2).AIS - Automatic Identification System. A Systemwhere vessel information (location, course,speed, etc.) is broadcast by VHF radio, for useby other vessels in navigation and collisionavoidance.Bathymetric line - A depth contour line onthe chart.Chart card - A plug-in card that stores chartdata for a region (see section 1-3).C-MAP chart card - See Chart card.C-MAP user card - See User card.CPA - Closest Point of Approach. The closestdistance two vessels will come to each otherbased on their current course and speed.Cursor - A symbol on the display (seesection 3-2).DGPS - Differential Global Positioning System.A navigation tool based on GPS with someerrors corrected (see section 7).DSC - Digital Selective Calling. A featureof marine radios enabling communicationbetween specific vessels, as well as distressalerts.DTN - Distance to the next position the<strong>M121</strong>/<strong>M84</strong> is navigating to, either a waypoint orthe cursor.Fish forecaster - An estimate of the likelihoodof catching fish based on barometric pressure.The more fishes that show the higher thelikelihood (requires Northstar 721 VHF radio).Gear - The gear the engine is in (requiresSmartCraft).Goto - A simple way of navigating straight to awaypoint or to the cursor position (see section3-1).GPS - Global Positioning System. A satellitebasednavigation tool (see section 7).Leg - The straight segments of a route betweenwaypoints. A route with four waypoints hasthree legs.MMSI - Maritime Mobile Service Identity.Unique identification number for a vessel, foruse in Digital Selective Calling.MOB - Man overboard.MOB function - Starts navigating back tothe place where someone fell overboard (seesection 2-4).NavBus - A way of connecting Northstarinstruments together to share data (see section20-10).NMEA - National <strong>Marine</strong> ElectronicsAssociation.NMEA 0183 - A standard for interfacing marineelectronic devices (see section 20-11).Radar guard zone - An area around theboat, set up by the operator and defined bydistance and bearing. If an object (e.g. anotherboat) enters the radar guard zone, an alarm isactivated.Rain clutter - Heavy rain or snow can causeinterference with the radar image.Range (radar) - The distance between thecentre of the radar image and the outer rangering. The scale is shown in the top left corner ofthe radar window.Range rings - Concentric circles extendingfrom your boat (usually at the centre of theradar window) and used to estimate distancesto objects. The scale is shown in the top leftcorner of the radar window.Route - Two or more waypoints linked insequence to form a course for the boat (seesection 7).108Northstar <strong>M121</strong>/<strong>M84</strong> Installation and Operation Manual
SmartCraft - A feature of Mercury <strong>Marine</strong>engines for monitoring engine performance.TCPA - Time to Closest Point of Approach.Time until the closest point of approach for twovessels.Sea clutter - Rough seas can causeinterference with the radar image.Sonar status - A summary of sonar settings.TTN - Time to the next position the <strong>M121</strong>/<strong>M84</strong>is navigating to, either a waypoint or the cursor.User card - A plug-in card that storeswaypoints, routes and tracks (see section 1-2).UTC - Universal Time Coordinated orCoordinated Universal Time, which is a standardworld time, formerly called Greenwich MeanTime (GMT).VHF - Very High Frequency. The frequencyrange used by marine radios.Waypoint - A position that you can set on theInstrument chart, for example a fishing spot or apoint on a route (see section 5).Weather - An estimate of the weather basedon barometric pressure (requires Northstar 721VHF radio).Northstar <strong>M121</strong>/<strong>M84</strong> Installation and Operation Manual 109
Navigation dataBRG Bearing to Destination: Bearing to the destination from the boat.BRG Bearing to cursor: Bearing to cursor from boat (cursor mode, see section 3-2-1)CDI Course Deviation Indicator: When the boat is navigating to a point, the chart and highway windowsshow a parallel line on either side of the plotted course. These two lines are called the Course DeviationIndicator (CDI) lines. The distance from the plotted course to a CDI line is the CDI scale.Set the CDI scale (see section 17-2) to the maximum distance that the boat should deviate from theplotted course. The chart and highway windows show the CDI lines, which are like a highway over thewater where the boat will move. The windows show how far the boat has deviated from the plottedcourse and if the boat is approaching a CDI line. If the XTE alarm is enabled (see section 17-8) an alarmwill sound if the boat reaches a CDI line.COG Course Over Ground: Direction in which the boat is moving over the ground.CTS Course To Steer: Optimum course to steer to return to the plotted course.DTG Distance To Go: Distance from the boat to the destination.ETA Expected Time of Arrival: At the destination, assuming that SOG and COG remain constant.DST Distance from boat to cursor (cursor mode, see section 3-2)SOG Speed Over Ground: Current boat speed over the ground. This is not necessarily the same as the boatspeed through the water nor the speed at which it is approaching the destination.STR Steering: The difference between COG and CTS.TTG Time To Go: The estimated time to reach the destination.XTE Cross Track Error: The distance from the boat to the nearest point of the plotted course. XTE may havea letter: R means steer to the right to return to the plotted course, L means steer to the left.VMG Velocity Made Good: The speed at which the boat is approaching the destination.DestinationDestinationSOG (speed)DTG (distance)VMG (speed)PlottedcourseXTE(distance)STRCOGBRGBoatpositionCTSCDI lineCDI linePlottedcourseStartBoat positionCDI scale(distance)StartCDI scale(distance)110Northstar <strong>M121</strong>/<strong>M84</strong> Installation and Operation Manual
Appendix D Compliance statementsFCC StatementNote: This equipment has been tested and found to comply with the limits for a Class B digitaldevice, pursuant to Part 15 of the FCC Rules. These limits are designed to provide reasonableprotection against harmful interference in a normal installation. This equipment generates, usesand can radiate radio frequency energy and, if not installed and used in accordance with theinstructions, may cause harmful interference to radio communications. However, there is noguarantee that interference will not occur in a particular installation. If this equipment does causeharmful interference to radio or television reception, which can be determined by turning theequipment off and on, the user is encouraged to try to correct the interference by one or moreof the following measures:Reorient or relocate the receiving antenna.<strong>Inc</strong>rease the separation between the equipment and receiver.Connect the equipment into an output on a circuit different from that to which thereceiver is connected.Consult the dealer or an experienced technician for help.A shielded cable must be used when connecting a peripheral to the serial ports.Industry CanadaOperation is subject to the following two conditions (1) this device may not cause interference,and (2) this device must accept any interference, including interference that may causeundesired operation of the device.Hereby, Northstar New Zealand, declares that this <strong>M121</strong>/<strong>M84</strong> is in compliance with the essentialrequirements and other relevant provisions of Directive 1999/5/EC.Northstar <strong>M121</strong>/<strong>M84</strong> Installation and Operation Manual 111
AMERICAS30 Sudbury Road,Acton, MA 01720, USAPh: +1 978.897.6600Ph: +1 800.628.4487Fax: +1 978.897.7241sales@bntmarine.comEUROPEUnit 2, Ocean Quay,Belvidere Rd, Southampton,SO14 5QY, ENGLANDPh: +44 2380 339922Fax: +44 2380 330345northstaruk@northstarnav.comAUSTRALIAPO Box 479,Gladesville, NSW 2111,AUSTRALIAPh: +61 2 9879 9060Fax: +61 2 9879 9009northstaraus@northstarnav.comNEW ZEALANDPO Box 68 155,Newton, AucklandAuckland, NEW ZEALANDPh: +64 9 481 0500Fax: +64 9 481 0590northstarnz@northstarnav.comwww.northstarnav.comMade in New ZealandMN000638A-G