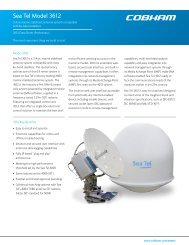
User Manual Dual C or Quad Ku Band TVRO Antenna (9497B-21)
User Manual Dual C or Quad Ku Band TVRO Antenna (9497B-21)
User Manual Dual C or Quad Ku Band TVRO Antenna (9497B-21)
- No tags were found...

You also want an ePaper? Increase the reach of your titles
YUMPU automatically turns print PDFs into web optimized ePapers that Google loves.
Maintenance and Troubleshooting<strong>9497B</strong>-<strong>21</strong> C/<strong>Ku</strong>-<strong>Band</strong> <strong>TVRO</strong>7.2.4. Azimuth & Elevation DriveRefer to the Azimuth & Elevation Drive check procedure in the Functional Testing section of this manual.7.2.5. Test TrackingRefer to the four quadrant Tracking check procedure in the Functional Testing section of this manual.7.2.6. Visual Inspection - Radome & PedestalConduct a good, th<strong>or</strong>ough, visual inspection of the radome and antenna pedestal. Visually inspect the insidesurface of the radome top and of the antenna pedestal. Look f<strong>or</strong> water <strong>or</strong> condensation, rust <strong>or</strong> c<strong>or</strong>rosion,white fiberglass powder residue, loose wiring connections, loose hardware, loose <strong>or</strong> broken belts <strong>or</strong> any othersigns of wear <strong>or</strong> damage.1. Radome Inspection - All the radome flanges are properly sealed to prevent wind, saltwater sprayand rain from being able to enter the radome. Re-seal any open (“leaky”) areas with marineapproved silicone sealant. If heavy condensation, <strong>or</strong> standing water, is found inside the radome,isolate and seal the leak, and then dry out the radome. Small (1/8 inch) holes may be drilled in thebase pan of the radome to allow standing water to “weep” out.2. <strong>Antenna</strong> Pedestal Inspection - The shock/vibration springs and/<strong>or</strong> wire rope Isolat<strong>or</strong>s should not befrayed, completely compressed, <strong>or</strong> otherwise damaged. The plated and painted parts should not berusted <strong>or</strong> c<strong>or</strong>roded. The harnesses should not be frayed and all the connect<strong>or</strong>s should be properlyfastened and tightened. All hardware should be tight (no loose assemblies <strong>or</strong> counter-weights).Replace, re-coat, repair and/<strong>or</strong> tighten as necessary.7.2.7. Mechanical ChecksTurn the pedestal power supply OFF1. Inspect inside of radome f<strong>or</strong> signs that the dish <strong>or</strong> feed have been rubbing against the inside of thefiberglass radome.2. Rotate the pedestal through its full range of azimuth motion. The antenna should rotate freely andeasily with light finger pressure.3. Rotate the pedestal through full range of elevation rotation. The antenna should rotate freely andeasily with light finger pressure.4. Rotate the pedestal through full range of cross-level rotation. The antenna should rotate freely andeasily with light finger pressure.5. Rotate the level cage through the full 90 degrees of rotation from CCW stop to CW stop. The levelcage antenna should rotate freely and easily with light finger pressure. Attached cables should notcause the cage to spring back m<strong>or</strong>e that a few degrees from either stop when released.6. Inspect all drive belts f<strong>or</strong> wear (black dust on/under the area of the belt).7. Inspect AZ Drive chain. IF chain is beginning to show signs of rust <strong>or</strong> c<strong>or</strong>rosion, apply a light coatof light duty oil to the chain. Wipe excess oil off to leave a light coating on the chain. DO NOTover-lubricate.7.2.8. Check BalanceCheck the balance of the antenna, re-balance as needed (refer to the Balancing the <strong>Antenna</strong> procedurebelow).7.2.9. Observe <strong>Antenna</strong> InitializationObserve the <strong>Antenna</strong> Initialization as described in the Troubleshooting section below.7.3. Troubleshooting7.3.1. The<strong>or</strong>y Of Stabilization OperationThe antenna system is mounted on a three axis stabilization assembly that provides free motion with 3degrees of freedom. This assembly allows the inertia of the antenna system to hold the antenna pointedmotionless in inertial space while the ship rolls, pitches and yaws beneath the assembly. Three low frictiont<strong>or</strong>que mot<strong>or</strong>s attached to each of the three free axes of the assembly provide the required f<strong>or</strong>ce toovercome the disturbing t<strong>or</strong>que imposed on the antenna system by cable restraints, bearing friction and7-2