VistaScan Mini manual - PROFI - dental equipment
VistaScan Mini manual - PROFI - dental equipment
VistaScan Mini manual - PROFI - dental equipment

You also want an ePaper? Increase the reach of your titles
YUMPU automatically turns print PDFs into web optimized ePapers that Google loves.
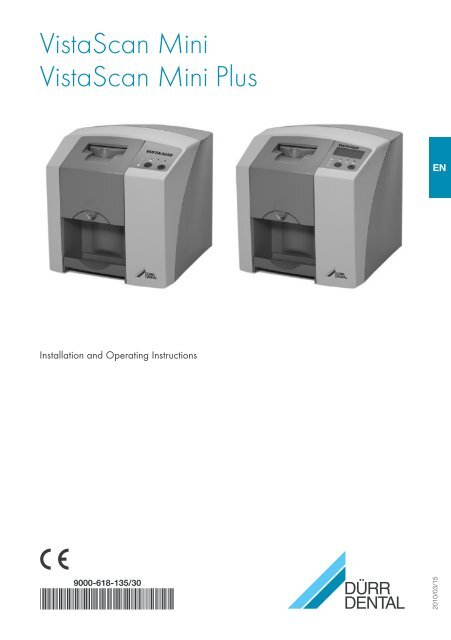
<strong>VistaScan</strong> <strong>Mini</strong><strong>VistaScan</strong> <strong>Mini</strong> PlusENInstallation and Operating Instructions9000-618-135/30*9000-618-135/30*2010/03/15
ContentsImportant Information1. General .. . . . . . . . . . . . . . . . . . . . . . . . . . . . . . 41.1 Note on Conformity . . . . . . . . . . . . . . . . 41.2 General Notes .. . . . . . . . . . . . . . . . . . . . 41.3 Disposal of appliance . . . . . . . . . . . . . 41.4 Notes concerning medical appliances .. . . . . . . . . . . . . . . . 41.5 Notes on EMC and medical products . . . . . . . . . . . . . . . . . . 51.6 Correct usage . . . . . . . . . . . . . . . . . . . . . 51.7 Incorrect usage .. . . . . . . . . . . . . . . . . . . 51.8 Connecting peripheral appliances . . . 51.9 Using image plates .. . . . . . . . . . . . . . . 51.10 Using software .. . . . . . . . . . . . . . . . . . . 52. Safety .. . . . . . . . . . . . . . . . . . . . . . . . . . . . . . . . 62.1 General Safety Notes .. . . . . . . . . . . . . . 62.2 Electrical safety instructions .. . . . . . . . 63. Warnings and symbols .. . . . . . . . . . . . . . . 73.1 Installation and operating Instructions . . . . . . . . . . . . . . 73.2 <strong>VistaScan</strong> <strong>Mini</strong> .. . . . . . . . . . . . . . . . . . . . 74. Delivery Contents .. . . . . . . . . . . . . . . . . . . . 84.1 Special accessories .. . . . . . . . . . . . . . . 94.2 Disposable materials . . . . . . . . . . . . . . . 95. System requirements . . . . . . . . . . . . . . . . 105.1 Monitor .. . . . . . . . . . . . . . . . . . . . . . . . . 105.2 PC system . . . . . . . . . . . . . . . . . . . . . . . 106. Technical Data .. . . . . . . . . . . . . . . . . . . . . . 116.1 <strong>VistaScan</strong> <strong>Mini</strong> .. . . . . . . . . . . . . . . . . . . 116.2 Environmental conditions .. . . . . . . . . 117. Functional layout .. . . . . . . . . . . . . . . . . . . . 127.1 Function of individual components .. . . . . . . . . . . . 138. Functional Description .. . . . . . . . . . . . . . 14Use of the Appliance13 Image plate .. . . . . . . . . . . . . . . . . . . . . . . . . 1913.1 General .. . . . . . . . . . . . . . . . . . . . . . . . 1913.2 Working with image plates .. . . . . . . 2013.3 Storingimage plates .. . . . . . . . . . . . . 2014. Light protection covers . . . . . . . . . . . . . . 2115. Bite protector.. . . . . . . . . . . . . . . . . . . . . . . . 2116. Protective cover.. . . . . . . . . . . . . . . . . . . . . 2217. Storage box with image platestorage tray. . . . . . . . . . . . . . . . . . . . . . . . . . 2218. X-ray . . . . . . . . . . . . . . . . . . . . . . . . . . . . . . . . 2318.1 Preparing to X-ray .. . . . . . . . . . . . . . . 2318.2 X-ray exposures .. . . . . . . . . . . . . . . . 2418.3 Preparing to scan image data . . . . . 2518.4 Scanning the image data .. . . . . . . . . 2618.5 Erasing the image data .. . . . . . . . . . 2919. Disinfection and Cleaning .. . . . . . . . . . . 3019.1. Light protection covers . . . . . . . . . . . 3019.2 Image plates .. . . . . . . . . . . . . . . . . . . 3019.3 Protective cover .. . . . . . . . . . . . . . . . . 3019.4. Storage box with image platestorage tray .. . . . . . . . . . . . . . . . . . . . . 3119.5 <strong>VistaScan</strong> <strong>Mini</strong> . . . . . . . . . . . . . . . . . . 3220. Maintenance. . . . . . . . . . . . . . . . . . . . . . . . . 33Trouble-shooting21. Tips for Operators and Technicians .. . 3421.1 General notes on <strong>VistaScan</strong> <strong>Mini</strong> .. . 3421.2 Display error message .. . . . . . . . . . . 38AppendixImage process times .. . . . . . . . . . . . . . . . . . . . 39File size (uncompressed) .. . . . . . . . . . . . . . . . 39ENMounting9. Transport and packing.. . . . . . . . . . . . . . . 1510. Set-up .. . . . . . . . . . . . . . . . . . . . . . . . . . . . . . 1510.1 Room for set-up . . . . . . . . . . . . . . . . . 1510.2 Set-up alternatives . . . . . . . . . . . . . . . 1611. Electrical connection .. . . . . . . . . . . . . . . . 1612. Start-up and first use .. . . . . . . . . . . . . . . . 1712.1 <strong>VistaScan</strong> <strong>Mini</strong> . . . . . . . . . . . . . . . . . . 1712.2 X-ray device settings .. . . . . . . . . . . . . 1812.3. Commissioning and ConstancyChecks* .. . . . . . . . . . . . . . . . . . . . . . . . 18 3
1. GeneralImportantInformation1.1 Note on ConformityThis product has been tested for conformityaccording to the appropriate directives as laiddown by the European Union and has beenfound to conform to all the required specifications.EN1.2 General Notes• These Installation and Operating Instructionsform an integral part of the unit. They mustbe kept close to the unit at all times. Preciseobservance of these instructions is a preconditionfor use of the unit for the intendedpurpose and for its correct operation.New personnel must be made aware of thecontents, and they should be passed on tofuture operating staff.• Safety for the operator as well as trouble-freeoperation of the unit are only ensured if use ismade of original <strong>equipment</strong> parts. In addition,only those parts and accessories listedin the Installation and Operating Instructionsor specifically approved by Dürr Dental maybe used with this appliance. In the case thataccessories, parts or disposable materialsfrom third party suppliers are used, then DürrDental cannot guarantee the safe operation orsmooth running of the unit. No liability on thepart of the manufacturer will be accepted inthe case that damage arises through the useof non-approved accessories.• Dürr Dental are only responsible for the <strong>equipment</strong>with regard to safety, reliability and properfunctioning where assembly, resettings,changes or modifications, extensions andrepairs have been carried out by Dürr Dentalor an agency authorized by Dürr Dental and ifthe <strong>equipment</strong> is used in conformity with theInstallation and Operating Instructions.• These Installation and Operating Instructionsconform to the relevant version of the <strong>equipment</strong>and the underlying safety standardsvalid at the time of going to press. All circuits,processes, names, software and appliancesquoted are protected under industrial propertyrights.• This translation of the Installation and OperatingInstructions has been carried out in goodfaith. The manufacturer bears no liabilities inthe case of a mistake in the translation. Theenclosed German version of the Installationand Operating Instructions is the original; inthe case of any confusion please consult yourdealer or our hotline service.• Any reprinting of the technical documentation,in whole or in part, is subject to prior approvalof Dürr Dental being given in writing.• Retain the packaging for possible return of theproduct to the manufacturers. Only the originalpackaging provides adequate protectionduring transport of the unit.• Should return of the product to the manufacturersbe necessary during the guaranteeperiod, Dürr Dental accepts no responsibilityfor damage occurring during transport wherethe original packaging was not used!Ensure that the packaging is kept out of thereach of children.1.3 Disposal of applianceAppliance• The EU-guidlines 2002/96/EG - WEEE(Waste Electric and Electronic Equipment) ) of27th January 2003 and the current integrationinto national law states that <strong>dental</strong> productscome under the above-mentioned guidelinesand, within the European Union, are subject tospecial disposal measures.Image plateWhen disposing of image plates observe localand regional rules and regulations.If you have any questions concerning disposalof the product, please contact Dürr Dental oryour specialist <strong>dental</strong> supplier.1.4 Notes concerning medicalappliances• This product is a technical medical applianceand, as such, may only be operated bysuch persons who, as a result of training orexperience, can be confidently expected tooperate it correctly and safely for patients andstaff alike.• Do not lie multi-socket units on the floor.Observe standard EN 60601‐1‐1 when usingmulti-socket units.• Other systems should not be plugged into thesame multi-socket unit.4
1.5 Notes on EMC and medicalproductsMedical products should be treated with respectwhen it comes to electro-magnetic compatibilityand special safety measures must be taken.Special instructions concerning electro-magneticcompatibility for medical products canbe found in our special leaflet, order number9000‐606‐67/30, or the information can befound on the internet (www.duerr.de) in theTechnical Documentation download pages.• Portable and mobile HF-communicationappliances can interfere with the effectivenessof electrical medical appliances.• <strong>VistaScan</strong> <strong>Mini</strong> should not be used in thevicinity of other appliances or stored or usedon top or underneath other appliances. Where<strong>VistaScan</strong> <strong>Mini</strong> is nevertheless used in thevicinity of other appliances or is stored or keptabove or below other appliances, then theunit in its configuration as used should be verycarefully monitored in order to ensure normaland trouble-free operation.1.6 Correct usage• <strong>VistaScan</strong> <strong>Mini</strong> has been solely designed forthe optical scanning and editing of image datausing image plates.• This appliance is not suitable for monitoringpatients over longer periods of time.• Correct Usage of the appliance also involvesobserving the Installation and OperatingInstructions and adhering to those instructionsconcerning set-up, operating and maintenance.Every usage which is not in accordance with theCorrect Usage above will lead to the guaranteesand warranties of Dürr Dental becomingnull and void.The operator is liable for any damage arisingthrough incorrect usage.• Correct Usage also involves observing all localand national regulations concerning healthand safety at work and radiation prevention.1.7 Incorrect usageAny usage above and beyond that describedhere is to be considered as incorrect usage ofthe appliance. The manufacturer is not liable forany damages arising from incorrect usage. Theoperator bears all risks and liabilities.This appliance must not be used inoperating theatres or similar rooms,or any room where dangers such ascombustion of flammable materialscould result.1.8 Connecting peripheralappliances• Only peripheral devices (computer, monitor,printer) may be connected to this appliancewhich conform to standard IEC 60950-1 (EN60950/1).The computer must be out of the vicinity ofthe patients according to IEC 60601-1-1(EN 60601-1-1). If for any reason this is notpossible then the computer set up must beinstalled according to the IEC 60601-1 -1 (EN60601-1).• Appliances may only be connected togetheror connected to any other assemblies wherecomplete and utter safety of the patients,operators and staff and of the environment willnot be affected in any way.Where any doubts remain concerning thesafety when connecting to other units thenthe operator is obliged to ascertain that suchconnection can in no way affect the safetyof operator, patient or other staff by referringto the manufacturer or a fully qualified andcompetent expert.1.9 Using image plates<strong>VistaScan</strong> <strong>Mini</strong> may only be used in combinationwith Dürr Dental PLUS image plates.See also the section on image plates.1.10 Using softwareOnly use x-ray software, e.g. DBSWIN fromversion 5.0, which has been specifically approvedby Dürr Dental. Further information can befound on the internet under www.duerr.de.ENThe operating systems Windows XP Professional32-bit from Service Pack 3 up and WindowsVista Ultimate 32-bit Home Premium or betterare supported. 5
EN2. Safety2.1 General Safety NotesThis appliance has been designed andconstructed by Dürr Dental so that correctusage of the appliance is virtually free of anypossible injury or danger. In spite of this, wefeel it is our duty to mention the following safetymeasures in order to prevent any possibledanger.• When using this appliance all local and relevantregulations must be observed!Converting or modifying the appliance inany way is strictly prohibited. In such cases,any and all guarantees immediately becomeinvalid. The operation of modified appliancescan be punishable by law. In the interests oftrouble-free operation the operator is responsiblefor observing these regulations.• Installation must be carried out by a technicalexpert.• Before every use the operator must checkthe functional safety and the condition of theappliance.• The operator must be knowledgeable in theoperation of the appliance.• The product is not designed to be used inmedical treatment areas where there existsthe danger of explosion. Areas where explosionscould occur are those where flammableanesthetic material, skin cleansers, oxygenand skin disinfectants are present. Thisappliance is not to be used in areas where theatmosphere could cause fire.2.2 Electrical safety instructions• The appliance may only be connected to acorrectly installed earthed safety socket.• Before connecting to the electricity supplythe appliance must be inspected and checkedthat the supply voltage and the supplyfrequency correspond to that of the localelectrical supply.• Before initial use and start-up the applianceand all supply lines must be checked for anysigns of damage. Damaged supply lines andconnections must be replaced immediately.• Never come into contact with patients andopen plug-in connections on the appliance atthe same time.• When using the appliance observe all therelevant electrical safety procedures.Before opening the unit unplug at themains and remove all power!6
3. Warnings and symbols3.1 Installation andoperating InstructionsIn the operating instructions the following warningsand symbols have been used:Information and/or mandatory regulationsor prohibitions for the preventionof personal injury or substantialproperty damageSpecial instructions concerning economicusage of the appliance and othernotes.Unplug at the mains and remove allpower!3.2 <strong>VistaScan</strong> <strong>Mini</strong>The model identification plate can be found onthe rear side of the <strong>VistaScan</strong> <strong>Mini</strong>.The following terminology and/or symbols areused in conjunction with this appliance, modelidentification plate and power unit:Warning LaserWarning dangerous voltage.Protection class 2Laser beam class 3BENON / OFF keyOperational LED, greenStandbyOperational LED, blueData transmissionOperational LED, yellowCleaning modeOnly use once (disposable)Wear protective glovesIP20REFSNDate of manufacturerObserve notes in accompanying documentation!Dispose of correctly according to EUdirective (2002/96/EG-WEE)Fuse typeOrder No. / Model No.Serial No.CE/labeling without Notified Body Nummer<strong>VistaScan</strong> <strong>Mini</strong><strong>VistaScan</strong> <strong>Mini</strong> Plus 7
4. Delivery Contents<strong>VistaScan</strong> <strong>Mini</strong> 2141-01<strong>VistaScan</strong> <strong>Mini</strong> . . . . . . . . . . . . . . 2141-000-50Power unit . . . . . . . . . . . . . . . . . 9000-150-54Data cable (USB 3m) . . . . . . . . 9000-119-067Data cable (RJ 45 3m) . . . . . . . 9000-119-071software DBSWIN Standard . . . . 2100-725-022 Dürr image plates -Size 0- 2x3 (22x35 mm). . . . . . . 2130-040-504 Dürr image plates -Size 2- 3x4 (31x41 mm). . . . . . . 2130-042-50EN Light protection covers -Size 0- 2x3 (100 pieces) . . . . . . 2130-070-00Light protection covers -Size 2- 3x4 (300 pieces) . . . . . . 2130-072-00Image plate tray . . . . . . . . . . . . . 2141-002-00Protective cover. . . . . . . . . . . . . 2141-003-01Cleaning wipes for image plates. . . . . . . . . . . . . . . CCB351B1001Installation and Operating Instructions . . . . . . . 9000-618-135<strong>VistaScan</strong> <strong>Mini</strong> Plus 2141-21<strong>VistaScan</strong> <strong>Mini</strong> Plus. . . . . . . . . . . 2141-000-80Power unit . . . . . . . . . . . . . . . . . 9000-150-54Data cable (USB 3m) . . . . . . . . 9000-119-067Data cable (RJ 45 3m) . . . . . . . 9000-119-071software DBSWIN Standard . . . . 2100-725-022 Dürr image plates -Size 0- 2x3 (22x35 mm). . . . . . . 2130-040-504 Dürr image plates -Size 2- 3x4 (31x41 mm). . . . . . . 2130-042-50Light protection covers -Size 0- 2x3 (100 pieces) . . . . . . 2130-070-00Light protection covers -Size 2- 3x4 (300 pieces) . . . . . . 2130-072-00Image plate tray . . . . . . . . . . . . . 2141-002-00Protective cover. . . . . . . . . . . . . 2141-003-01Cleaning wipes for image plates. . . . . . . . . . . . . . . CCB351B1001Installation and Operating Instructions . . . . . . . 9000-618-1358
4.1 Special accessoriesThe following parts are not supplied with thecontents of delivery.Please order as required!Wall mounting bracket. . . . . . . . . 2141-001-00Test body Intra - Extra . . . . . . . . 2121-060-522 Dürr image plates -Size 0- 2x3 (22x35 mm). . . . . . . 2130-040-502 Dürr image plates -Size 1- 2x4 (24x40 mm). . . . . . . 2130-041-504 Dürr image plates -Size 2- 3x4 (31x41 mm). . . . . . . 2130-042-502 Dürr image plates -Size 3- 2.7x5.4 . . . . . . . . . . . . . 2130-043-501 Dürr image plate -Size 4- 5.7x7.6 . . . . . . . . . . . . . 2130-044-50Data cable (USB 5m) . . . . . . . . 9000-119-027Data cable (RJ 45 5m) . . . . . . . 9000-118-036The usage of other components, transformersand cables as those specificallylisted under accessories, can lead toeither increased signal output or reducethe resistance to interference of thesystem.4.2 Disposable materialsFD 350 Disinfectant wipes. . . . . CDF350C0140FD 333 Quick-acting disinfectant. . . . . . CDF333C6150FD 322 Quick-acting disinfectant. . . . . . CDF333C6150Light protection covers -Size 0- 2x3 (100 pieces) . . . . . . 2130-070-00Light protection covers -Size 1- 2x4 (100 pieces) . . . . . . 2130-071-00Light protection covers -Size 2- 3x4 (300 pieces) . . . . . . 2130-072-00Light protection covers -Size 3- 4 2.7x5.4 (100 pieces). . 2130-073-00Light protection covers -Size 4- 5.7x7.6 (100 pieces) . . . 2130-074-00Light protection covers Plus-Size 0- 2x3 (100 pieces) . . . . . . 2130-070-50Light protection covers Plus-Size 2- 3x4 (300 pieces) . . . . . . 2130-072-50Bite protectors-Size 4- (100 pieces). . . . . . . . . . 2130-074-03Cleaning wipes for image plates. . . . . . . . . . . . . . . CCB351B1001EN 9
5. System requirementsTo operate <strong>VistaScan</strong> <strong>Mini</strong> the components listedunder sections 5.1 and 5.2 will be required.These are not included with the standard DeliveryContents supplied with <strong>VistaScan</strong> <strong>Mini</strong>.EN5.1 MonitorMonitors designed for digital x-ray processeswith a higher light intensity and broad contrastrange should be used. Strong room lighting,direct sunlight and reflections all serve to reducethe diagnostic capabilities of the X-ray exposures.See also the supplied system explanantionin No.: 9501-21-016 suppplied.5.2 PC systemPlease refer to the leaflet on minimumPC system requirements, ordernumber 9000-618-148/01, or underwww.duerr.de.10
6. Technical Data6.1 <strong>VistaScan</strong> <strong>Mini</strong>Electrical Detailspower unitVoltage (V) . . . . . . . . . . . . . . . . . . . . . .100 - 240Maximum fluctuation in rated current (%). . . . . . . . . . +/- 10Frequency (Hz). . . . . . . . . . . . . . . . . . . . 50 - 60Current (A) . . . . . . . . . . . . . . . . . . . . . . max. 0,8Current consumption (W) . . . . . . . . . . . . . . .
7. Functional layout1 2EN31345671281191012
7.1 Function of individualcomponents1. Image plateThe image plate serves as the exposure mediumfor X-rays and stores the image data.2 Light protection covers• Light protection covers protect the patientfrom infection by contaminated image plates.• Reduces the risk of damage to the imageplate in the patient's mouth.• Protects the image plate from contaminationand dirt.• Prevent image data on the image plate frombeing erased.3. Operational LEDsGeneral information concerning the operatingstate of the appliance is displayed.LED green:ready for operation is displayedLED blue:status of data communication is displayedLED yellow:status of the cleaning operation is displayed4. Cleaning keyPressing the key will set the unit into thecleaning position or return the unit from thecleaning position back into position ready foroperation.5. On / Off keySwitch on: press the On / Off key.Switch off: press the On / Off key for 2 seconds.The appliance shuts down, the green and blueLEDs blink alternately.Complete shut down: press the On / Off keycontinuously until all the LEDs go out.7. CoverCovers the moving parts of the film feed section.This can be removed for cleaning and disinfecting.8. Display (only <strong>VistaScan</strong> <strong>Mini</strong> Plus)This display module presents, depending onthe software used, various information on theappliance status, e.g. in combination with DBS-WIN the patient name, room used or the toothnumber.ENIn the case that an error message isdisplayed, see section on Tips for Operatorsand Service Technician.9. Cover lockUnlocks the cover for opening.10. Film collection trayAfter scanning and erasure the image plates fallinto the detachable film collection tray.11. Interior image transportInside the unit the image plates are transportedthrough the film scanning and film erasure units.12. Feed slotThe film feed slot is where the image plates,inside their opened light protection covers, areplaced so that the film catch takes hold and thefilm is fed to the image plate transport system.13. Storage box withimage plate storage trayAfter taking the image plates from the film deposittray they can be placed in the storage box.6. Status LEDsDisplays information on status of image platetransport.LED red:FaultLED yellow:Image plate transport occupiedLED green:New image plates can be fed in 13
8. Functional Description<strong>VistaScan</strong> <strong>Mini</strong> transforms the image data storedon an intraoral image plate into a digital X-ray. This image can then be viewed and editedusing the connected PC system.Image platePhotomultiplierLaser sourceENX-rayThe intraoral image plate (1) is placed inside thedisinfected light protection cover (2), placed intothe patient's mouth and exposed.After exposure the light protection cover is againdisinfected.Scanning the image dataPressing the On / Off key (5) will switch on the<strong>VistaScan</strong> <strong>Mini</strong>. This activates the scanningmode using x-ray software, e.g. DBSWIN fromversion 5.Once the green status LED (6) is lit, the imageplate in its prepared (opened) light protectioncover can be placed centrally on thefilm feed tray (12).The image plate is now pushed carefully out ofits secured and opened light protection coverinto the film transport (11) using the fingers. Thelight protection cover stays in position at the filmfeed slot. As soon as the light protection coveris released, it can be removed.Parabolic mirrorReflection layerRotating discPentaprismFurther X-ray imagesAfter removing the image plates from the filmfilm collection tray it is recommended that theybe repacked into a light protection cover. Thepacked image plate can then be placed in theimage plate storage tray (13).If used carefully it is possible to reuse the imageplates several hundred times. Before reuse theimage plates should be checked for signs of dirtor damage. Damaged image plates must not bereused.Once taken up by the film transport (11) theimage plate is fed to the scanner unit. Herethe image data on the image plate is scannedusing a laser and the information transmittedto the PC. A window on the monitor shows theprogress of this procedure.After scanning the image plate proceeds to theerasure unit, where any remaining image data iserased. Afterwards the image plate falls into thecollection tray (10).14
MountingOnly suitably qualified personnel arepermitted to set up, to install or tooperate the appliance.9. Transport and packing• Check that the delivery contents are completeand check for any signs of transport damage.• Completely empty the packaging.• Do not expose the <strong>VistaScan</strong> <strong>Mini</strong> to anystrong shocks which could damage the appliance.Damage through shock.During operation and the switchingoff process (blue and green operationalLEDs blinking alternately) ensurethat the appliance is not moved inany way whatsoever, as the movingparts must be allowed to stop movingcompletely.EN10. Set-up10.1 Room for set-up• The <strong>VistaScan</strong> <strong>Mini</strong> should be set up in aclosed, dry and well-ventilated room.• The room temperature should not fall below +10°C or exceed + 35°C.Danger of short circuit due tobuild up of condensation.The system can only be put intooperation once the appliance haswarmed up to room temperature andit is dry.• Installation in a purpose-built room, e.g. in aboiler room or in a wet room is not permitted.• Do not expose the <strong>VistaScan</strong> <strong>Mini</strong> to directsunlight. It may be necessary to reduce theamount of light within the room. The maximumlight intensity is 1000 Lux.• There must be no source of interference in theroom for set-up (e.g. strong magnetic field).Any such disturbances can interfere with theoperation of the <strong>VistaScan</strong> <strong>Mini</strong>. 15
10.2 Set-up alternativesTable Set-up<strong>VistaScan</strong> <strong>Mini</strong> can just as well be mounted ona table.In order to avoid problems whenscanning the image data, the <strong>VistaScan</strong><strong>Mini</strong> should be set up so that will not besubject to knocks, vibration or similar.ENWall mountingThe <strong>VistaScan</strong> <strong>Mini</strong> can be mounted onto anywall using the special wall mounting bracket(order number 2141-001-00).Installation of the wall mounting bracketcan be found in the instruction leafletorder number 9000-618-162/01111. Electrical connectionBefore initial start-up compare the operatingvoltage of 24 V DC and the supply voltage100 V - 240 V are consistent with the informationon the model identification plate.The connection ports are in the recesses on therear side of the appliance.• Where inconsistent remove any incorrect(country-specific) adapter/plug.• Connect appropriate country-specific adapter/plug.• Remove the cover on the rear side of the<strong>VistaScan</strong> <strong>Mini</strong>.• Insert connector of the power unit to theconnection ports of the <strong>VistaScan</strong> <strong>Mini</strong>.• Secure cable with a cable clip.• Place the power cable into the power outletsocket.• Replace the cover.When operating this appliance the rearside cover must be correctly fitted.216
12. Start-up and first use12.1 <strong>VistaScan</strong> <strong>Mini</strong>Installation and configuration may onlybe carried out by a Dürr Dental trainedand certified person or one of our ownservice technicians.34141516171819Carry out installation andconfiguration according to theoperating instructions supplied, ordernumber 9000-618-145/01.<strong>VistaScan</strong> <strong>Mini</strong> is equipped with four connectionports which are located under the cover on therear side of the unit:14. 24 V - ConnectionThe 24 V -connection provides the power tooperate the <strong>VistaScan</strong> <strong>Mini</strong>.15. Reset buttonPressing and holding the Reset button for 15- 20 seconds while switching on returns all networksettings of the unit to the original factorysettings. Reset is confirmed and the <strong>VistaScan</strong><strong>Mini</strong> Plus display shows "Factory Reset".16. AUX-connectionThe AUX-connection is used for diagnosispurposes by our Service Technician. The AUXconnectioncan be used to connect auxiliarydevices for testing and for trouble-shooting.Only use auxiliary devices specificallyapproved or manufactured by DürrDental.EN17. Network connection status LEDsThe status LEDs for networking show whetherconnection to a network has been establishedand whether data can be transmitted.18. Network connection<strong>VistaScan</strong> <strong>Mini</strong> can be operated as part of anetwork.19. USB-connection<strong>VistaScan</strong> <strong>Mini</strong> can be operated using USBconnections.Where <strong>VistaScan</strong> <strong>Mini</strong> is connected toboth USB and a network, the networktakes priority. 17
12.2 X-ray device settingsCheck the following appliance-specific standard values and adapt as required.Reference conditions:• Adult patientParameterDC-emitter, 7 mA,tube length 20 cmDC-emitter, 7 mA,tube length 30 cmENrecommendedexposure time (s)recommendedexposure time (s)upper jaw 60kV 70kV 60kV 70kVincisors 0.1 0.08 0.2 0.16pre-molars 0,125 0.1 0.25 0.2molars 0.16 0,125 0.32 0.25lower jaw 60kV 70kV 60kV 70kVincisors 0.1 0.08 0.2 0.16pre-molars 0,125 0.1 0.25 0.2molars 0,125 0.1 0.25 0.2Bitewing 0.16 0,125 0.32 0.25Where it is possible to set the x-ray tube to 60 kV, this setting should be selected.The usual exposure values for F-Film (e.g. Kodak Insight) can be used.12.3. Commissioning and Constancy Checks*Before the appliance can be used the first time a handover test (commissioning test) of theX-ray system must be carried out according to national and local regulations. The test body forIntra / Extra (order number 2121-060-52) will be required.The Constancy Check of the X-ray system must be carried out by surgery staff at frequentintervals. The Constancy Check is based on those results obtained during the handover test.* observe all rules and regulations!18
inactive side:Use of the Appliance5active side:13 Image plateImage plates are toxic: for thisreason image plates must be placedin a light protection cover beforeplacing into the mouth of a patient.In the case of a patient swallowingan image plate or a part of one thena doctor must be consulted immediatelyand the image plate removed.If a patient damages a light protectioncover when biting on it, then themouth must be rinsed out thoroughlywith copious amounts of water.EN13.1 General<strong>VistaScan</strong> should only be used in combinationwith PLUS image plates from Dürr Dental. Theuse of image plates from other manufacturerscould result in poorer image quality.Exposure of the image plate must always becarried out on the active side:active side:• the active side is light blue. This side is alsomarked with a positioning guide.inactive side:• the inactive side is black. This is printed withthe size, manufacturer´s information and theword "Back". Furthermore, the inactive sideis surrounded by a silver edge which makespositioning together with the light protectioncover into the patient's mouth easier. In onecorner there is a silver dot; this replaces theslight indentation found on conventional X-rayfilm. This dot should always be set in thedirection of the occlusal plane. This allowseasier orientation of the X-ray exposure. 19
13.2 Working with image platesImage plates must be visibly checked for signsof damage. Damaged image plates (e.g. a tornouter layer, or visible scratches, which will affectthe diagnostic assessment) must be replaced.• image plates are flexible like X-ray film.• do not bend or subject to pressure.• do not scratch or get dirty.• do not put in an autoclaveEN613.3 Storingimage plates• store image plates in a dark place.• do not store in hot or moist conditions.• store intraoral image plates in a light protectioncover of the appropriate size.• if an image plate is stored for longer than 24hours, then it should be erased again beforethe next X-ray exposure. See scetion 19.5• protect from direct sunlight and ultravioletbeams.• if stored in the X-ray room itself then theimage plates must be protected from preexposurecaused by X-ray radiation.720
14. Light protection coverslight protection cover• light protection covers protect the patient frominfection by contaminated image plates.• protect the image plate from contaminationand dirt.• protect the image plates from stray light.• is available in different sizes just like imageplates. Choose the most appropriate size.The light protection cover is adisposable article and must not bereused.EN8For information on using light protectioncovers see the appropriate instructionsfor use, order number 9000-618-30/30.15. Bite protectorThe bite protector protects the image plate fromdamage through the patient biting down toohard on it during an X-ray exposure.For information on using the bite protectorsee the appropriate instructions foruse, order number 9000-618-101/01.9 21
16. Protective coverThe protective cover is designed to protect the<strong>VistaScan</strong> <strong>Mini</strong> from dust and dirt when standingfor long periods.• Pull the protective cover, with the yellow markingtowards the front, forwards over the unituntil it is completely covered.• When not in use store the protective cover ina clean dry place.ENDanger of suffocationKeep the protective cover away fromchildren.1017. Storage box with imageplate storage trayAfter taking the image plates from the film deposittray they can be placed in the storage box.Place the the image plate storage tray into thestorage box before using it.1122
18. X-rayObserve the notes on hygiene regulationsunder section 17. Cleaning andDisinfection.1218.1 Preparing to X-rayImage plates can be prematurelyexposed by natural X-ray radiation or bystray X-ray radiation.• The image plate should be erased beforeusing it for the first time or after storage ofmore than 24 hours. Refer to section 16.5Erasure of image data• Slide the image plate completely into the lightprotection cover. The black (inactive) side ofthe image plate must be visible.• Peel off the white sticky strip and press firmlyto close the opening of the light protectioncover.The light protection cover is adisposable article and must not bereused.EN13• The light protection cover must be disinfectedusing a disinfectant wipe before positioninginside the patient's mouth (e.g. with Dürr FD350). Alternatively, use a disinfectant spray(e.g. Dürr FD 322, FD 333) on a soft, fluff-freecloth instead of a disinfectant wipe.14 23
18.2 X-ray exposuresDanger of infection!When placing the image plate into thepatient's mouth always wear protectivegloves.ENThe image plates are marked with asymbol . The symbol is visible in theX-ray exposure, and makes orientationduring diagnosis easier.The image plate should be placed in thepatent's mouth so that the symbol willnot affect the diagnostic usefulness ofthe X-ray exposure.1516• Place the image plate inside the light protectioncover as normal into the patient's mouth.The silver point on the inactive side must facethe occlusal area. The active side of the imageplate must point in the direction of the X-raytube.Damage to the image plateOnly use handling systems which willnot cause any damage to either thelight protection cover or the imageplates. Handling systems whichhave sharp edges should be avoidedwhere possible. We strongly recommendusing the Dürr Dental imageplate and film handling system set,order number 2130-981-50; andDürr Dental image plate and film handlingupgrade set for endo-exposures,order number 2130-981-51.• Set exposure time and settings on the X-rayappliance.• Produce an X-ray exposure.The image data present on the imageplate must be processed and scannedwithin 30 minutes of exposure.24
18.3 Preparing to scan image data17Danger of infection!Wear protective gloves when removingimage plates from the patient's mouth.• Remove the image plate inside its light protectioncover from the patient's mouth.• If the light protection cover or the glovesare considerably dirty, e.g. from blood, thenbefore disinfection the cover must be given aquick dry clean, e.g. by wiping with a cleanpiece of lint.• Clean and disinfect the light protection coverand the gloves with a disinfectant wipe (e.g.Dürr Dental FD 350).Alternatively, use a disinfectant spray (e.g.Dürr FD 322, FD 333) on a soft, fluff-free clothinstead of a disinfectant wipe.• Lay the image plate down in the light protectioncover in the disinfectant wipe.• Take off the protective gloves, disinfect thehands (e.g. with Dürr Dental HD 410) andclean (e.g. with Dürr Dental HD 430, HD 435).ENDamage to the <strong>VistaScan</strong> <strong>Mini</strong>Before handling the image plates,hands should be completely cleanand free of any traces of powderfrom protective gloves.This powder can damage the opticalscanning unit of <strong>VistaScan</strong> <strong>Mini</strong>during the scanning procedure of theimage plate.18 25
ENOperational LEDsOperationalNot ready for communicationCleaning positionCover or film feed not correctlymountedShut down processOn Off Blinking18.4 Scanning the image dataContamination of the <strong>VistaScan</strong> <strong>Mini</strong>The image plates must be clean andabsolutely hygienic before scanningof the image data.Otherwise there could be a loss ofimage data or even to the transfer ofbacteria.• Switch on PC and monitor.• Switch on the <strong>VistaScan</strong> <strong>Mini</strong> at the On/Offswitch (5).After switching on the appliance needsto go through initialisation. The displayon the <strong>VistaScan</strong> <strong>Mini</strong> Plus will show"INIT SYSTEM". When ready bothmodels display a green operating LED.Additionally <strong>VistaScan</strong> <strong>Mini</strong> Plus displaysmessage "READY".Transport slot status LEDsProblemImage plate currently being processedFilm feed slot readyRadiation deflectorswitches from standby mode to setvalueOn Off BlinkingExample using image editing softwareDBSWINFurther information on recording pictures,storage and editing can be foundin the handbook to DBSWIN underMenu [Help], [Contents].Start DBSWIN.• Select the desired patient record.• Choose the correct exposure values from theX-ray module.• Set desired resolution .• Click option "Scan".Confusing patient X-raysThe software ensures that the x-raysare always allotted to patients oneafter the other in the order of activatedpatients.In order to avoid confusing theseX-rays from those of other patientsonly X-ray exposures for this (one)patient should be scannned at onetime. <strong>VistaScan</strong> <strong>Mini</strong> Plus underDBSWIN provides additional data,e.g. patient number, room on thedisplay.26
Operational LED and status LED are both green:When the <strong>VistaScan</strong> <strong>Mini</strong> is started fromthe Standby-Mode, then the green statusLED blinks. Additionally, <strong>VistaScan</strong><strong>Mini</strong> Plus will show a progress bar onthe display. As soon as the appliance isready for use, the status LED will showgreen.• Open the light protection cover straightalong the dahesive adge (V-cut).19Loss of image dataImage data on the image plate willbe lost when exposed to light. Neverhandle exposed image plates withoutthe light protection cover.• Place the light protection cover with its imageplate centrally and parallel (opened side of thelight protection cover should face down, inactiveside of the image plate to face operator)onto the feed insert transport. The film grip mechanism automatically movesforwards and takes hold of the light protectioncover with the image plate.• Slide the image plate out of its light protectioncover downwards into the appliance until theimage plate is automatically taken up by thetransport. The light protection cover is heldby the grip mechanism and is not taken up bythe appliance.ENScanner progress can be monitored ona small inner window on the PC screen.20 27
EN21Status LED is yellow:• Do not feed any more image plates.• Once the scanning process has beencompleted the grip mechanism automaticallyreturns to start. Remove the empty lightprotection cover. Status LED changes fromyellow to green.• The X-ray exposure will be saved in DBSWIN.• Either insert a new image plate for scanning orturn off the appliance at the On/Off switch.When the On/Off switch is pressed for3 seconds then the appliance shutsdown. This can take a few moments(green and blue LEDs blink alternately,additionally for <strong>VistaScan</strong> <strong>Mini</strong> Plus thedisplay will show a progress bar). Theappliance will shut down completely.Do not move the appliance during thisphase.When switched off the <strong>VistaScan</strong> <strong>Mini</strong> can becovered and protected using the protectivecover.28
18.5 Erasing the image dataAfter scanning the image plate passes automaticallythrough the erasure unit. Image data stillheld on the image plate will be erased. Afterwardsthe image plate falls into the collectiontray.22Special mode "Erase"The image plate must be erased again if:• the image plate has been stored and not usedfor longer than 24 hours.• the data on the image plate durch has notbeen (completely) erased due to a malfunction ENof the <strong>VistaScan</strong> <strong>Mini</strong>. (Error message fromsoftware)The special mode enables the erasureunit in <strong>VistaScan</strong> to be activated alone.No image data will be transmitted to thesoftware.To erase again:• Choose the special mode "Erase" in the software.• Place the open light protection cover with itsimage plate in the insert slot.• Slide the image plate out of its light protectioncover downwards into the appliance until theimage plate is automatically taken up by thetransport. 29
19. Disinfection andCleaningOnly use disinfection and cleaningagents specifically approved or manufacturedby Dürr Dental.Other cleaning agents and disinfectantscould damage the <strong>VistaScan</strong> <strong>Mini</strong> andits accessories.EN2319.1. Light protection covers• The light protection cover must be disinfectedusing a disinfectant wipe before positioninginside the patient's mouth and after extraction(e.g. with Dürr Dental FD 350). Alternatively,use a disinfectant spray (e.g. Dürr FD 322,FD 333) on a soft, fluff-free cloth instead of adisinfectant wipe. Observe the active workingtime of the solution carefully. The fluids mustbe completely dried.19.2 Image platesDamage to image platesDo not put image plates in the autoclave!Disinfectant baths will destroy imageplates!We strongly recommend the use ofspecial cleaning cloths for image plates,order number CCB351B100124• Dirt on either side should be cleaned off usinga soft non-fluffy cloth. Remaining dirt can be removed with a specialcleaning agent from the cleaning set and byapplying a circular wiping motion.• Before reusage, the image plate must becompletely dry.19.3 Protective coverThe protective cover can be cleaned using adamp cloth, and then disinfected using a disinfectionwipe (e.g. Dürr Dental FD 350).30
19.4. Storage box with image platestorage trayStorage boxWhere the surface shows signs of contaminationor visible dirt, clean and disinfect the unit.• Clean the surfaces using a damp cloth.For disinfection, use a disinfectant spray(e.g. Dürr FD 366 sensitiv) on a soft, fluff-freecloth.Image plate storage trayWhere the surface shows signs of contaminationor visible dirt, clean and disinfect the unit.ENThe surface can be cleaned using a damp cloth,and then disinfected using a disinfection wipe(e.g. Dürr Dental FD 350).Additional the image plate storage tray could bedisinfected/sterilised with• Thermal disinfector• Autoclave.Do not exceed a temperatureof 134 °C. 31
19.5 <strong>VistaScan</strong> <strong>Mini</strong>1.Damage to the <strong>VistaScan</strong> <strong>Mini</strong>Fluids must not be allowed to enterthe inner parts of the appliance,therefore do not use spray disinfectionor cleaning solutions on the<strong>VistaScan</strong> <strong>Mini</strong>!Appliance surfacesWhere the outer surfaces of the appliance showsigns of contamination or visible dirt, clean anddisinfect the unit.• Clean the upper surfaces of the <strong>VistaScan</strong><strong>Mini</strong> using a damp cloth, and then use a disinfectionwipe (e.g. Dürr Dental FD 350).• Any dirt present at the entry and exit areasmust be cleaned before scanning.EN252.Film feed slotWhere the film feed slot shows signs of contaminationor visible dirt, clean and disinfect theunit.• Press cleaning button.The film grip moves to a central position. Theyellow LED is lit. The display on the <strong>VistaScan</strong><strong>Mini</strong> Plus will show "CLEANING POSITION".• Unlock the cover by pressing the lockingcatch and lift the cover upwards at the sametime and remove.• Lift the film catch upwards and remove.26Damage to the <strong>VistaScan</strong> <strong>Mini</strong>No parts of the <strong>VistaScan</strong> <strong>Mini</strong>should ever be disinfected usinga thermal disinfector or with theautoclave. The plastic parts will bedestroyed by the heat!• Internal parts can be cleaned using a dampcloth, and then disinfected using a disinfectionwipe (e.g. Dürr Dental FD 350).• The cover and the film catch mechanism canbe disinfected using an instrument disinfectant(e.g. Dürr Dental ID 213).• Replace film catch mechanism.• Replace cover.• Press button for cleaning.The film grip moves to a central position. Thegreen LED is lit.2732
20. MaintenanceAfter 3 years a thorough service should becarried out of the complete unit by a Dürr Dentaltrained and certified technician or one of ourservice technicians.EN 33
Trouble-shooting21. Tips for Operators and TechniciansRepairs may only be carried out by suitably qualified personnel or our own service technicians.21.1 General notes on <strong>VistaScan</strong> <strong>Mini</strong>Problem Probable cause SolutionEN 1. <strong>VistaScan</strong> <strong>Mini</strong> does • No supply voltage• Check the mains cable and allnot switch onconnections• Check the main fuse box tobuilding• Check the power unit, whethergreen LED lights2. <strong>VistaScan</strong> <strong>Mini</strong>quickly switches offagain3. Status or operationLED does not lightup4. Loud noises duringoperation after switchingon5. Image editingsoftware does notrecognise <strong>VistaScan</strong><strong>Mini</strong>6. Appliance does notreact• On/Off switch defective• Mains cable or one of the plugshas not been inserted correctly• Hardware defective• Mains supply voltage too low• LED defective• If the noises persist longer than30 seconds, then the beam baffleis defective• Inform your Service Technician• Check the mains cable and allconnections• Inform your Service Technician• Check the supply voltage• Inform your Service Technician• Inform your Service Technician• <strong>VistaScan</strong> <strong>Mini</strong> not switched on • Switch on <strong>VistaScan</strong><strong>Mini</strong>• Connecting cable between Vista-Scan <strong>Mini</strong> and PC loose• PC does not register connectionto <strong>VistaScan</strong> <strong>Mini</strong>• Hardware fault• <strong>VistaScan</strong> <strong>Mini</strong> has not completedstart procedure• Firewall is blocking <strong>VistaScan</strong><strong>Mini</strong>• Check USB cable/network cable• USB-driver not installed or inactive• Check USB cable/network cable• Check the IP-addressesn andthe subnet-masks• Inform your Service Technician• Appliance needs 20-30 secondsto completely switch on.Repeat after sufficient time.• Set up ports for the appliance inFirewall.34
Problem Probable cause Solution7. X-ray exposure doesnot appear on themonitor after scanning• Image plate has been put in ligthprotection cover upside downand the inactive side scanned• Image data on the image platehas been erased, e.g. by ambientlight• Problem with the hardware• X-ray device is faulty• No image data on the image plate8. X-ray too dark / light • Incorrect brightness/ contrastsetting in the software9. Image presented asmirror image10. Ghost images andshadows on theX-ray exposure11. Image is very fainton the scanningwindowsoftware cannotpiece the datatogether to form acomplete picture12. <strong>VistaScan</strong> <strong>Mini</strong>does not appear inthe options list in<strong>VistaScan</strong>Config• The exposed image plate hasbeen contaminated by ambientlight• X-ray dosis too low• Image plate incorrectly placed inlight protection cover• Image plate was placed in thelight protection cover or in mouthof patient upside down• Image data on the image platehas not been sufficiently erased• The X-ray dose used for theimage plate was too low• Amplification level too low (HVvalue)• Unsuitable scanning mode used• Threshold setting too high• Appliance is set up behind arouter.• Rescan the image plate asquickly as possible• Image data on the plate must bescanned as quickly as possibleafter extraction• Inform your Service Technician• Inform your Service Technician• Expose the image plate• Set the brightness of the X-rayimage using the software• Place the image plate into thelight protection cover and insertat film feed slot.• Check X-ray parameters• Place image plate correctly.The black side (printed) of theimage plate must be visiblethrough the transparent side ofthe light protection cover.• Place and align the image platecorrectly• Check the erasure settings• Inform your Service Technician• Replace the erasure unit• Inform your Service Technician• Replace the erasure unit• Increase the amplification (HVvalue)• Choose a suitable scanningmode• Reduce the settings• The IP address, without intermediaterouter, needs to beconfigured for <strong>VistaScan</strong> <strong>Mini</strong>Net.• Connect the router again.• Enter IP address into <strong>VistaScan</strong>-Config <strong>manual</strong>ly and registerappliance.EN 35
ENProblem Probable cause Solution13. <strong>VistaScan</strong> <strong>Mini</strong>appears in theoptions list in Vista-ScanConfig, butno connection ispossible14. Error messageappears on startingX-ray module inDBSWIN15. X-ray exposure hasstripes on image16. Warning message:"Too much ambientlight"17. Pale stripes inscanning window• The subnet-masks of PC and<strong>VistaScan</strong> <strong>Mini</strong> do not coincide• <strong>VistaScan</strong> <strong>Mini</strong> Net has a conflictwith another appliance• Image plate has been exposed• Part of the image plate was exposedto light during handling• Image plate was dirty or scratched• Too much ambient light around<strong>VistaScan</strong> <strong>Mini</strong>• Too much stray light enteredduring scanning18. Blue LED blinks • No connection between Vista-Scan <strong>Mini</strong> and PC19. Error message"E2490"• Data memory full in <strong>VistaScan</strong><strong>Mini</strong>• A connection was broken off whilethe software was addressing the<strong>VistaScan</strong> <strong>Mini</strong>.• Check subnet-masks and alter ifnecessary• Set <strong>VistaScan</strong>/<strong>VistaScan</strong> <strong>Mini</strong>to "Demo without Scanner" in"<strong>VistaScan</strong>Config".• Only use the image plate within24 hours of data erasure.• Do not expose used imageplates to light. Exposure andthe scanning of the image datashould be carried out within halfan hour.• Clean the image plate by wipingcarefully using a soft cloth andspecial cleaning agent takenfrom the cleaning set. All imageplates with scratches must bereplaced immediately• Darken the room• Rotate the <strong>VistaScan</strong> <strong>Mini</strong> sothat no direct light falls on thefilm entry slot• Darken the room• Rotate the <strong>VistaScan</strong> <strong>Mini</strong> sothat no direct light falls on thefilm entry slot• Activate <strong>VistaScan</strong> <strong>Mini</strong> usingsoftware• USB-driver not installed or inactive• Check data cable• Use software to set up state ofreadiness. The image data willautomatically be transmittedfrom <strong>VistaScan</strong> <strong>Mini</strong> to the software• Reconnect the units and repeatthe operation.36
37EN
EN21.2 Display error messageProblem Probable cause Solution1. Error code -1010 • Appliance temperature too high • Allow the appliance to coolon display.• Inform your Service Technician2. Error code -1022on display.3. Error code -1100on display.4. Error code -1104on display.5. Error code -1116on display.6. Error code -1117on display.7. Error code -1118on display.8. Error code -1121on display.9. Error code -1153on display.10. Error code -1154on display.11. Error code -1160on display.12. Error code -1170on display.• Assembly has not been initialised• Scan process has exceededallotted time• Problem with erasure unit• Transport drive blocked• Position not correct on insertion• Housing open• Transport guide slide not in place• Problem in sub-assembly• Problem with internaldata communication• Final RPM for radiation deflectornot achieved• SOL-Sensor Timeout• Problem in software, updatesoftware if necessary• Inform your Service Technician• Inform your Service Technician• Check the belt drive, blockageduring scanning (image platestuck in unit)• Inform your Service Technician• Replace the erasure unit• Clear blockage• Inform your Service Technician• Inform your Service Technician• Check transport (smooth running,drive belt)• Close housing• Press button for cleaning.• Put slide in position• Switch the appliance off and onagain• Switch the appliance off and onagain• Inform your Service Technician• Replace the radiation deflectorsub-assembly if problem arisesfrequently• Switch appliance off and on,possible fault with laser or SOLsensor• Inform your Service Technician38
AppendixImage process timesTime taken between insertion of the image plate to complete scanning of the image data taking imageplate format and pixel size into account.The times listed here are approximate times which have been rounded up.Theor. resolution LP/40 25 20 10mmPixel size µm 12.5 20 25 50DBSWIN Scan modeINTRA supermax. 40LP/mm (2000dpi)INTRA optimal max. 25LP/mm (1270dpi)INTRA high20LP/mm (1000dpi)INTRA rapid10LP/mm (500dpi)Intra 2x3 26s 16s 13s 6sIntra 2x4 32s 20s 16s 8sIntra 3x4 32s 20s 16s 8sIntra 2.7x5.4 40s 25s 20s 10sIntra 5.7x7.6 53s 33s 27s 14sENFile size (uncompressed)File sizes in MB - will depend largely on the actual image plate format and the pixel size.The file sizes here are approximate sizes which have been rounded up. The file sizes can be considerablyreduced by using a suitable compression program.Theor. resolution LP/40 25 20 10mmPixel size µm 12.5 20 25 50DBSWIN Scan modeINTRA supermax. 40LP/mm (2000dpi)INTRA optimal max. 25LP/mm (1270dpi)INTRA high20LP/mm (1000dpi)INTRA rapid10LP/mm (500dpi)Intra 2x3 10.4 4.6 2.6 0.65Intra 2x4 13 5.7 3.2 0.8Intra 3x4 17 6.4 4.3 1.1Intra 2.7x5.4 20 7.1 4.9 1.2Intra 5.7x7.6 58 21.4 14.5 3.6 39
DÜRR DENTAL AGHöpfigheimer Strasse 17D-74321 Bietigheim-BissingenGermanyFon: +49 7142 705-0www.duerr.deinfo@duerr.de