SIEM/ESM Upgrade Checklist - McAfee
SIEM/ESM Upgrade Checklist - McAfee
SIEM/ESM Upgrade Checklist - McAfee
- No tags were found...

Create successful ePaper yourself
Turn your PDF publications into a flip-book with our unique Google optimized e-Paper software.
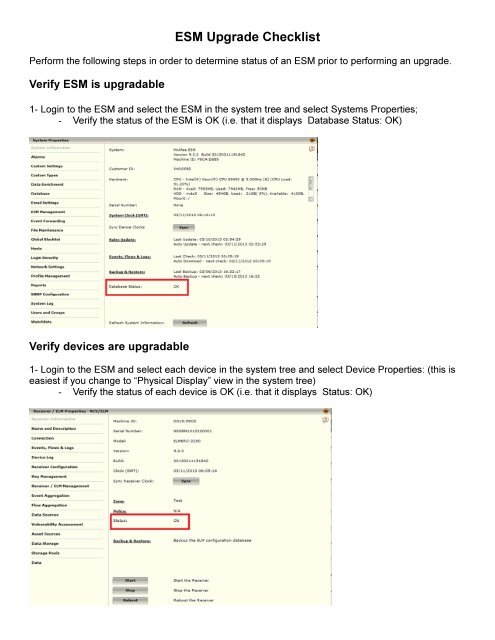
Another activity is that you should ensure the soft raid subsystem is running with two active drives. You can issue thefollowing command via any one of the three methods:Command:• In the <strong>McAfee</strong> <strong>ESM</strong> Interface, click the <strong>ESM</strong> System Properties button. Click on the <strong>ESM</strong>Management tab and then click the Terminal button. You will need to write those settings to theIPS by clicking the Write button.• SSH into the <strong>ESM</strong>• With a monitor/keyboard connected to the system.cat /proc/mdstatThe output will look something like this:Personalities : [raid1]md_d127 : active raid1 sda[0](W) sdb[1](W)488386496 blocks [2/2] [UU]unused devices: This is a properly functional raid which can be upgraded.The active drives are identified by [UU]. If however this line shows [_U] or [U_] then a drive is not part of the raid.If this is the case please contact Support before proceeding with the upgrade.You should also vereify the large RAID is in a good state. For the larger Raidset run one of these three commands:(dependent of the RAID card installed)Command 1: (Areca Controllers)Type the command:cli32 or cli64The output will look like:Copyright (c) 2004-2011 Areca, Inc. All Rights Reserved.Areca CLI, Version: 1.86, Arclib: 310, Date: Nov 1 2011( Linux )S # Name Type Interface==================================================[*] 1 ARC-1261 Raid Controller PCI==================================================CMD Description==========================================================main Show Command Categories.set General Settings.rsf RaidSet Functions.vsf VolumeSet Functions.disk Physical Drive Functions.sys System Functions.net Ethernet Functions.
event Event Functions.hw Hardware Monitor Functions.mail Mail Notification Functions.snmp SNMP Functions.ntp NTP Functions.exit Exit CLI.==========================================================Command Format: [Sub-Command] [Parameters].Note: Use -h or -help to get details.CLI>Type the command:rsf infoThe output will look like:# Name Disks TotalCap FreeCap DiskChannels State===============================================================================1 Raid Set # 00 12 12000.0GB 0.0GB 123456789ABC Normal===============================================================================GuiErrMsg: Success.CLI>Type the commandexitCommand 2: (3ware Controllers)Type the commandtw_cliThe output will look like://<strong>McAfee</strong>>Type the command/c4 show(NOTE: for non-<strong>ESM</strong> devices it will be /c0 show OR type the show command by itself to the /cX value)The output will look like:Unit UnitType Status %RCmpl %V/I/M Stripe Size(GB) Cache AVrfy------------------------------------------------------------------------------u0 RAID-10 DEGRADED - - 64K 6519.19 RiW ONu1 RAID-10 INOPERABLE - - 64K 6519.19 Ri ONu2 RAID-10 INOPERABLE - - 64K 6519.19 Ri ONVPort Status Unit Size Type Phy Encl-Slot Model------------------------------------------------------------------------------p0 OK u0 931.51 GB SATA 0 - ST31000340NSp1 OK u0 931.51 GB SATA 1 - ST31000340NSp2 SMART-FAILURE u0 931.51 GB SATA 2 - ST31000340NSp3 OK u0 931.51 GB SATA 3 - ST31000340NSp4 OK u0 931.51 GB SATA 4 - ST31000340NSp5 OK u0 931.51 GB SATA 5 - ST31000340NS
Type the commandexitCommand 3: (INTEL/LSI Controllers)/opt/MegaRAID/MegaCli/MegaCli64 -AdpAllInfo -a0 | lessLook for the section that says:Device Present================Virtual Drives : 2Degraded : 0Offline : 0Physical Devices : 11Disks : 10Critical Disks : 0Failed Disks : 0If this is the case please contact Support before proceeding with the upgrade.Run a backupA minimum for this step should be that you backup the system configuration. It is suggested that you backup the entiredatabase. This can be performed by using the Backup feature of the <strong>ESM</strong>.To manually backup the system settings:1. Access the System Information screen by clicking on the System node in the System Navigation Tree and onthe Properties icon in the Actions Toolbar.2. Click on Backup & Restore. The Backup & Restore dialog opens.From here, you can either manually backup the <strong>ESM</strong> settings alone or backup a copy of the <strong>ESM</strong> settings and the data onthe system.Backup <strong>ESM</strong> SettingsTo save a copy of the <strong>ESM</strong> settings only, do the following:a. Click on the Backup Now button. The Backup Progress dialog will open informing you of the progress of thebackup.b. When the backup is completed successfully, the Backup Details screen will open informing you that the backupwas completed successfully and giving you details regarding the backup file, such as which files it contains andthe number of records backed up. To close this screen, click OK. The Backup Details screen can be accessed atany time from the File Maintenance screen.c. The Backup Progress dialog gives you the option to download the backup file to a location that you select onyour computer. To do so, click on the Download button. You will be prompted to delete the backup file. If you donot delete the file, it will remain on the <strong>ESM</strong> and will be accessible through File Maintenance.d. If you don't want to download the backup to your computer, click Close when the backup is complete. A copy ofthe <strong>ESM</strong> settings and data will be save on the <strong>ESM</strong> and can be accessed using the File Maintenance feature.Backup <strong>ESM</strong> Settings and All DataWarning: When you perform a full backup, the <strong>ESM</strong> will go offline. Depending on the size of your database, it could beoffline for an extended length of time.To perform a full backup of the <strong>ESM</strong> settings and the data on the system to a remote location, do the following:
a. Click on the Remote Location radio button in the Backup Location field.b. Fill in the Remote Location fields (see the Backup Event, Flow, and Log Data to a Remote Location section).c. Click on the Full Backup Now button. To proceed with the backup, click Yes. You will be logged out andinformed on the progress of the backup.