Models SG-WAC-15ESE SG-WAC-18ESE SG-WAC ... - Air & Water
Models SG-WAC-15ESE SG-WAC-18ESE SG-WAC ... - Air & Water
Models SG-WAC-15ESE SG-WAC-18ESE SG-WAC ... - Air & Water

Create successful ePaper yourself
Turn your PDF publications into a flip-book with our unique Google optimized e-Paper software.
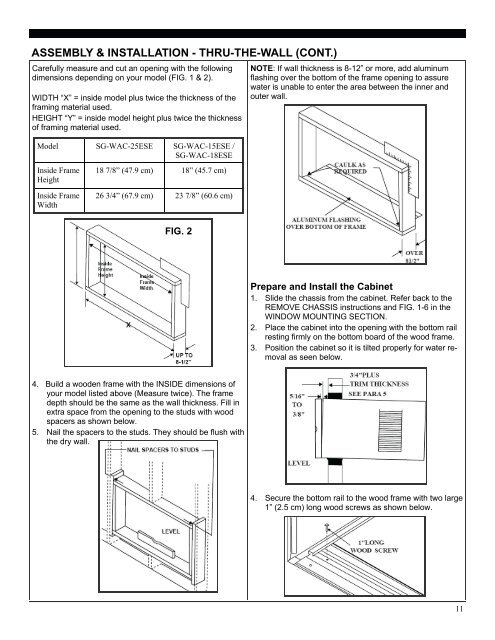
ASSEMBLY & INSTALLATION - THRU-THE-WALL (CONT.)Carefully measure and cut an opening with the followingdimensions depending on your model (FIG. 1 & 2).WIDTH “X” = inside model plus twice the thickness of theframing material used.HEIGHT “Y” = inside model height plus twice the thicknessof framing material used.Model <strong>SG</strong>-<strong>WAC</strong>-25ESE <strong>SG</strong>-<strong>WAC</strong>-<strong>15ESE</strong> /<strong>SG</strong>-<strong>WAC</strong>-<strong>18ESE</strong>NOTE: If wall thickness is 8-12” or more, add aluminumflashing over the bottom of the frame opening to assurewater is unable to enter the area between the inner andouter wall.Inside FrameHeightInside FrameWidth18 7/8” (47.9 cm) 18” (45.7 cm)26 3/4” (67.9 cm) 23 7/8” (60.6 cm)FIG. 2Prepare and Install the Cabinet1. Slide the chassis from the cabinet. Refer back to theREMOVE CHASSIS instructions and FIG. 1-6 in theWINDOW MOUNTING SECTION.2. Place the cabinet into the opening with the bottom railresting firmly on the bottom board of the wood frame.3. Position the cabinet so it is tilted properly for water removalas seen below.4. Build a wooden frame with the INSIDE dimensions ofyour model listed above (Measure twice). The framedepth should be the same as the wall thickness. Fill inextra space from the opening to the studs with woodspacers as shown below.5. Nail the spacers to the studs. They should be flush withthe dry wall.4. Secure the bottom rail to the wood frame with two large1” (2.5 cm) long wood screws as shown below.11