NX-700/700H
NX-700/700H
NX-700/700H
- No tags were found...

You also want an ePaper? Increase the reach of your titles
YUMPU automatically turns print PDFs into web optimized ePapers that Google loves.
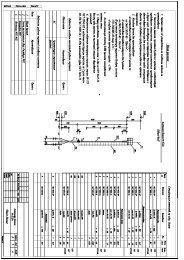
<strong>NX</strong>-<strong>700</strong>/<strong>700</strong>HINSTALLATION6. GPS Receiver Connection6-1. Installing the GPS receiver1. Remove the cabinet, top packing and shielding plate ofthe transceiver.2. Remove the front panel from the transceiver.3. Attach two cushions to the top of the GPS receiver.4. Attach the GPS receiver to the shield case with twocushions as shown in Figure 6-2.5. Solder each lead of the GPS receiver to a necessary locationof each landing on the component side of the TX-RXunit (A/2).6. Place the GPS antenna cable in the hollow at the rear ofthe chassis. (Fig. 6-2 q )Note: If the GPS receiver is installed, cut the base of theconvex tab of the top packing with a pair of nippers, orsimilar tool. (Fig. 6-3 w )If the convex tab of the top packing is cut off, the waterproofing property is no longer guaranteed.Note: You must setup using the KPG-111D.3M Double coated cushionNo. 4016 (or No. 4416)30 x 25 mmGPS receiver3M Double coated cushionNo. 4016 (or No. 4416)30 x 25 mmTX-RX unit (A/2)Solder landOPT10OPT11AGND26P_RD26P_TDTXD2RXD2OPT1OPT3OPT4OPT55V_1DTIOPT8TXOOPT7OPT2OPT9RXEOTXIRXEIOPT6POW33V5V_2DGNDGPS receiverFig. 6-2Fig. 6-3Fig. 6-112