Installation And Servicing Instructions - Heatingspares247.com
Installation And Servicing Instructions - Heatingspares247.com
Installation And Servicing Instructions - Heatingspares247.com
- No tags were found...

You also want an ePaper? Increase the reach of your titles
YUMPU automatically turns print PDFs into web optimized ePapers that Google loves.
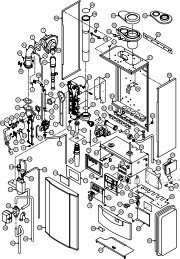
WD209/1/2000 Chapter 7 : Replacement Of Parts The Keston Celsius 25 & 25P7.8 CONDENSATE TRAP (Fig. 5.7.2 item 57)i) Isolate the appliance (Section 7.1)ii) Gain access (Section 7.2)iii) Disconnect the condensate line from the base of the heat exchanger.iv) Disconnect the condense lines from the projection of the condensate trap fromthe base of the cabinet.v) Withdraw the condensate trap.vi) Mop up any spilled condensate.vii) Reassemble (Section 7.3)NB:When re-fitting the condensate trap pour water onto the condensate hosefrom the base of the heat exchanger until nearly full. Then reconnect thecondensate hose to the base of the heat exchanger.7.9 PUMP (Fig 5.7.2 item 52)i) Isolate the appliance (Section 7.1)ii) Gain Access (section 7.2)iii) Isolate the waterways to the pump using the pump isolation valves (Fig 5.7.2 item51)iv) Disconnect the pump electrical cable from the connections box of the pump headtaking note of the correct position.v) Remove the four allen bolts securing the pump head to the pump back plate.vi)vii)Remove the pump head.If using a standard Grundfos UPS15-60 pump head as replacementa) Remove the electrical cover to the new pump head.b) Remove the capacitor and link wire in the 8-way terminal block in thenew pump head and discard.viii) Reassemble (Section 7.3)<strong>Installation</strong> & <strong>Servicing</strong> <strong>Instructions</strong> Page : 44