- Page 1 and 2:
Technical Reference GuideProduct Ov
- Page 3 and 4:
For SafetyKey to SymbolsThe symbols
- Page 6 and 7:
About this ManualAim of the ManualT
- Page 8 and 9:
■ Option Specifications .........
- Page 10 and 11:
■ Additional Functions and Functi
- Page 13 and 14:
Chapter 1 Product OverviewProduct O
- Page 15 and 16:
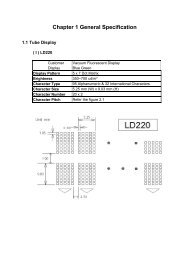
Chapter 1 Product OverviewColors•
- Page 17 and 18:
Chapter 1 Product OverviewPower Swi
- Page 19 and 20:
Chapter 1 Product OverviewOfflineTh
- Page 21 and 22:
Chapter 1 Product OverviewUnrecover
- Page 24:
Product SpecificationsPrinting meth
- Page 28 and 29:
58 mm paper width printingThe print
- Page 30 and 31:
Paper SpecificationsPaper typesForm
- Page 32 and 33:
Environmental ConditionsTemperature
- Page 34 and 35:
Option SpecificationsPower Supply U
- Page 36 and 37:
Installing the PrinterYou can insta
- Page 38 and 39:
4Paste the enclosed 2 small strips
- Page 40 and 41:
For Serial InterfaceWhen using the
- Page 42 and 43:
For Parallel InterfaceWhen using th
- Page 44:
For Ethernet/Wireless LAN/USB Inter
- Page 48 and 49:
Setting the Memory Switches(Customi
- Page 50 and 51:
Setting the print speedSelectable f
- Page 52 and 53:
Setting the power supply unit capac
- Page 54 and 55:
Connecting the Printer to the Host
- Page 56 and 57:
For Parallel InterfaceParallel inte
- Page 58 and 59:
Y connection (only with the UB-U01I
- Page 60 and 61:
For Ethernet InterfaceConnect the p
- Page 62 and 63:
For Wireless LAN InterfaceFor detai
- Page 64 and 65:
Drawer Connection CircuitryF.G1Draw
- Page 66 and 67:
Connecting the Optional External Bu
- Page 68 and 69:
Installation Procedures123Turn off
- Page 70 and 71:
Attaching the Connector CoverWhen u
- Page 72 and 73:
Arranging the CablesRoute the cable
- Page 74 and 75:
ESC/POS CommandsESC/POS is the Epso
- Page 76 and 77: Define downloaded bit imagePrint do
- Page 78 and 79: Commands for sub-functionsInitializ
- Page 80 and 81: SoftwareTM Virtual Port Driver:This
- Page 82 and 83: How to Get Drivers, Manuals, and th
- Page 84 and 85: 3Press the Feed button while the pr
- Page 86 and 87: NV Graphics Print ModeYou can confi
- Page 88 and 89: Memory Switch Setting ModeYou can c
- Page 90 and 91: 3Install the roll paper in the corr
- Page 92 and 93: 45Close the cutter cover.Open the r
- Page 94 and 95: Preparing for TransportFollow the s
- Page 96 and 97: Printable Area (for 80 mm Width Pap
- Page 98 and 99: USB Low Power Consumption ModeWith
- Page 100 and 101: Additional Functions and Functional
- Page 102 and 103: Customized ValueFor the TM-T88V, th
- Page 104 and 105: 104
- Page 106 and 107: Functions of each connector pinPin
- Page 108 and 109: IEEE 1284 Parallel InterfaceModesTh
- Page 110 and 111: PinSourceCompatibilityModeNibble Mo
- Page 112 and 113: Character Code TablesThe character
- Page 114 and 115: 114Page 1 (Katakana)HEX 8 9 A B C D
- Page 116 and 117: 116Page 3 (PC860: Portuguese)HEX 8
- Page 118 and 119: 118Page 5 (PC865: Nordic)HEX 8 9 A
- Page 120 and 121: 120Page 12 (PC853: Turkish)HEX 8 9
- Page 122 and 123: 122Page 14 (PC737: Greek)HEX 8 9 A
- Page 124 and 125: 124Page 16 (WPC1252)HEX 8 9 A B C D
- Page 128 and 129: 128Page 20 (KU42: Thai)HEX 8 9 A B
- Page 130 and 131: 130Page 26 (TIS18: Thai)HEX 8 9 A B
- Page 132 and 133: 132Page 31 (TCVN-3: Vientamese)HEX
- Page 134 and 135: 134Page 33 (WPC775: Baltic Rim)HEX
- Page 136 and 137: 136Page 35 (PC861: Icelandic)HEX 8
- Page 138 and 139: 138Page 37 (PC864: Arabic)HEX 8 9 A
- Page 140 and 141: 140Page 39 (ISO8859-2: Latin2)HEX 8
- Page 142 and 143: 142Page 41 (PC1098: Farci)HEX 8 9 A
- Page 144 and 145: 144Page 43 (PC1119: Lithuanian)HEX
- Page 146 and 147: 146Page 45 (WPC1250: Latin 2)HEX 8
- Page 148 and 149: 148Page 47 (WPC1253: Greek)HEX 8 9
- Page 150 and 151: 150Page 49 (WPC1255: Hebrew)HEX 8 9
- Page 152 and 153: 152Page 51 (WPC1257: Baltic Rim)HEX
- Page 154 and 155: 154Page 53 (KZ1048: Kazakhstan)HEX
- Page 156: International Character SetsCountry