- Page 1 and 2: Operating InstructionsOperating Ins
- Page 3 and 4: Operating Instructions2.7.1 Convert
- Page 5 and 6: Operating InstructionsScreen shots
- Page 7 and 8: Operating Instructions1 Product Int
- Page 9 and 10: Operating Instructions1.2.2 Closing
- Page 11 and 12: Operating InstructionsNote• If th
- Page 13 and 14: Operating Instructions1.5 Setting R
- Page 15 and 16: Operating InstructionsNote• You c
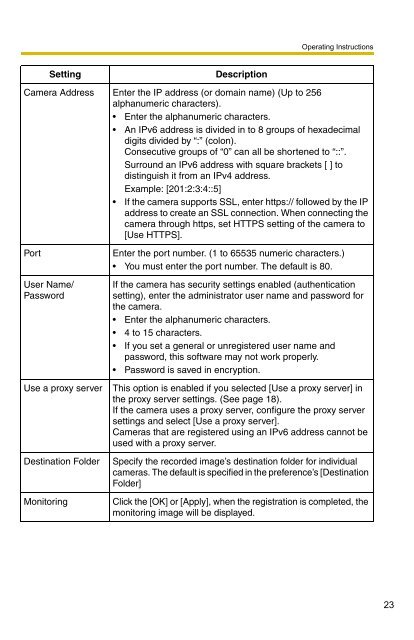
- Page 17 and 18: Operating Instructions• Recording
- Page 19 and 20: Operating InstructionsProxy Server
- Page 24 and 25: Operating Instructions2.1.2 Setting
- Page 26 and 27: Operating Instructions• If you ha
- Page 28 and 29: Operating Instructions[Limit the de
- Page 30 and 31: Operating InstructionsSettingCell S
- Page 32 and 33: Operating InstructionsSetting the a
- Page 34 and 35: Operating InstructionsConfigure com
- Page 36 and 37: Operating Instructions[About Comman
- Page 38 and 39: Operating Instructions2.2 Network C
- Page 40 and 41: Operating InstructionsSingle-Monito
- Page 42 and 43: Operating InstructionsNote• When
- Page 44 and 45: Operating InstructionsSettings Page
- Page 46 and 47: Operating InstructionsCamera Operat
- Page 48 and 49: Operating InstructionsDisplay ModeS
- Page 50 and 51: Operating Instructions2.3 Monitorin
- Page 52 and 53: Operating InstructionsClick to cent
- Page 54 and 55: Operating InstructionsZooming in an
- Page 56 and 57: Operating Instructions2.4 Recording
- Page 58 and 59: Operating Instructions2.4.3 Motion
- Page 60 and 61: Operating Instructions2.4.5 Timer R
- Page 62 and 63: Operating InstructionsSettingEnable
- Page 64 and 65: Operating InstructionsSetting Keywo
- Page 66 and 67: Operating InstructionsDisplaying Ti
- Page 68 and 69: Operating Instructions2.5.1 Display
- Page 70 and 71: Operating Instructions2.5.2 Searchi
- Page 72 and 73:
Operating Instructions2.5.3 Confirm
- Page 74 and 75:
Operating Instructions2.5.4 Playbac
- Page 76 and 77:
Operating InstructionsStandard disp
- Page 78 and 79:
Operating Instructions2.6.2 Multi-M
- Page 80 and 81:
Operating InstructionsSettingSpecif
- Page 82 and 83:
Operating InstructionsEnlarged Disp
- Page 84 and 85:
Operating InstructionsDisplaying Ca
- Page 86 and 87:
Operating Instructions2.6.3 Setting
- Page 88 and 89:
Operating InstructionsSettingPlayba
- Page 90 and 91:
Operating Instructions2.6.5 Recorde
- Page 92 and 93:
Operating Instructions2.7 Editing R
- Page 94 and 95:
Operating Instructions• The save
- Page 96 and 97:
Operating Instructions4. Select the
- Page 98 and 99:
Operating Instructions4. Select the
- Page 100 and 101:
Operating Instructions5. Click [OK]
- Page 102 and 103:
Operating Instructions• When copy
- Page 104 and 105:
Operating Instructions2.7.4 Changin
- Page 106 and 107:
Operating Instructions3. On the sna
- Page 108 and 109:
Operating Instructions2.8 Use Remot
- Page 110 and 111:
Operating Instructions2.8.1 Configu
- Page 112 and 113:
Operating Instructions[Remote Clien
- Page 114 and 115:
Operating Instructions• The [Remo
- Page 116 and 117:
Operating InstructionsNote• When
- Page 118 and 119:
Operating Instructions[Download Rec
- Page 120 and 121:
Operating Instructions[Analyzing Re
- Page 122 and 123:
Operating Instructions2.9.2 Exporti
- Page 124 and 125:
Operating Instructions2.9.3 Copying
- Page 126 and 127:
Operating Instructions• A deletio
- Page 128 and 129:
Operating Instructions4. Click [OK]
- Page 130 and 131:
Operating InstructionsWhen you have
- Page 132 and 133:
Operating Instructions5. Select the
- Page 134 and 135:
Operating InstructionsExecuting log
- Page 136 and 137:
Operating Instructions2.10 Specific
- Page 138 and 139:
Operating InstructionsTable 2CPU: P
- Page 140 and 141:
Operating InstructionsProblemTimer
- Page 142 and 143:
Operating InstructionsMessageSet De
- Page 144 and 145:
Operating InstructionsThe aspect ra
- Page 146 and 147:
Operating InstructionsConnection to
- Page 148 and 149:
Operating InstructionsMessageRecord
- Page 150 and 151:
Operating InstructionsMessageThe se
- Page 152 and 153:
Operating InstructionsThe selected
- Page 154 and 155:
Operating InstructionsMessageRecord
- Page 156 and 157:
Operating InstructionsMessageIf cam
- Page 158 and 159:
Operating InstructionsMessageEnter
- Page 160 and 161:
Operating Instructions2.13 Default
- Page 162 and 163:
Operating InstructionsPreferencesRe
- Page 164 and 165:
Operating InstructionsSettingsMotio
- Page 166 and 167:
Operating InstructionsWindowItemsMu
- Page 168 and 169:
168Operating Instructions