User Manual Version 3.2 - Parallels Plesk Panel
User Manual Version 3.2 - Parallels Plesk Panel
User Manual Version 3.2 - Parallels Plesk Panel

You also want an ePaper? Increase the reach of your titles
YUMPU automatically turns print PDFs into web optimized ePapers that Google loves.
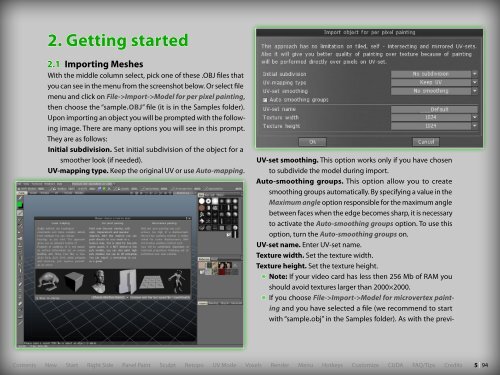
2. Getting started2.1 Importing MeshesWith the middle column select, pick one of these .OBJ files thatyou can see in the menu from the screenshot below. Or select filemenu and click on File->Import->Model for per pixel painting,then choose the “sample.obj” file (it is in the Samples folder).Upon importing an object you will be prompted with the followingimage. There are many options you will see in this prompt.They are as follows:Initial subdivision. Set initial subdivision of the object for asmoother look (if needed).UV-mapping type. Keep the original UV or use Auto-mapping.UV-set smoothing. This option works only if you have chosento subdivide the model during import.Auto-smoothing groups. This option allow you to createsmoothing groups automatically. By specifying a value in theMaximum angle option responsible for the maximum anglebetween faces when the edge becomes sharp, it is necessaryto activate the Auto-smoothing groups option. To use thisoption, turn the Auto-smoothing groups on.UV-set name. Enter UV-set name.Texture width. Set the texture width.Texture height. Set the texture height.• Note: If your video card has less then 256 Mb of RAM youshould avoid textures larger than 2000×2000.• If you choose File->Import->Model for microvertex paintingand you have selected a file (we recommend to startwith “sample.obj” in the Samples folder). As with the previ-Contents New Start Right Side <strong>Panel</strong> Paint Sculpt Retopo UV Mode Voxels Render Menu Hotkeys Customize CUDA FAQ/Tips Credits5 | 94