Manuale Officina LGW 523-627 - lombardini service
Manuale Officina LGW 523-627 - lombardini service
Manuale Officina LGW 523-627 - lombardini service

You also want an ePaper? Increase the reach of your titles
YUMPU automatically turns print PDFs into web optimized ePapers that Google loves.
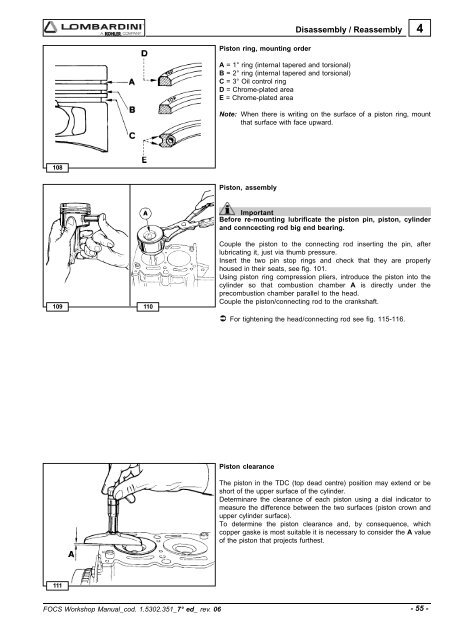
Disassembly / Reassembly4Piston ring, mounting orderA = 1° ring (internal tapered and torsional)B = 2° ring (internal tapered and torsional)C = 3° Oil control ringD = Chrome-plated areaE = Chrome-plated areaNote: When there is writing on the surface of a piston ring, mountthat surface with face upward.108Piston, assembly109110ImportantBefore re-mounting lubrificate the piston pin, piston, cylinderand conncecting rod big end bearing.Couple the piston to the connecting rod inserting the pin, afterlubricating it, just via thumb pressure.Insert the two pin stop rings and check that they are properlyhoused in their seats, see fig. 101.Using piston ring compression pliers, introduce the piston into thecylinder so that combustion chamber A is directly under theprecombustion chamber parallel to the head.Couple the piston/connecting rod to the crankshaft. For tightening the head/connecting rod see fig. 115-116.Piston clearanceThe piston in the TDC (top dead centre) position may extend or beshort of the upper surface of the cylinder.Determinare the clearance of each piston using a dial indicator tomeasure the difference between the two surfaces (piston crown andupper cylinder surface).To determine the piston clearance and, by consequence, whichcopper gaske is most suitable it is necessary to consider the A valueof the piston that projects furthest.111FOCS Workshop Manual_cod. 1.5302.351_7° ed_ rev. 06- 55 -