Manuale Officina LGW 523-627 - lombardini service
Manuale Officina LGW 523-627 - lombardini service
Manuale Officina LGW 523-627 - lombardini service

You also want an ePaper? Increase the reach of your titles
YUMPU automatically turns print PDFs into web optimized ePapers that Google loves.
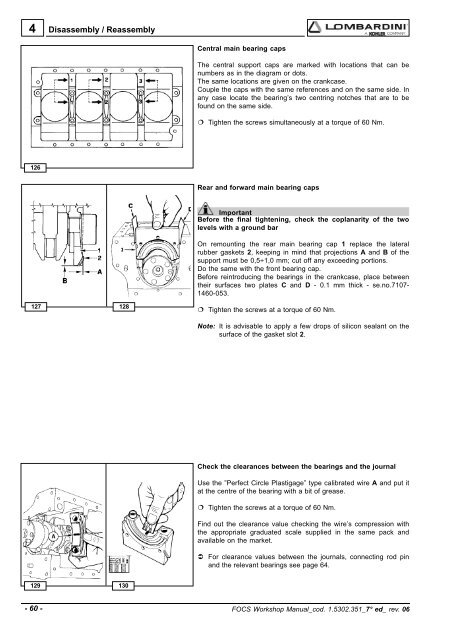
4Disassembly / ReassemblyCentral main bearing capsThe central support caps are marked with locations that can benumbers as in the diagram or dots.The same locations are given on the crankcase.Couple the caps with the same references and on the same side. Inany case locate the bearing’s two centring notches that are to befound on the same side. Tighten the screws simultaneously at a torque of 60 Nm.126Rear and forward main bearing caps127128ImportantBefore the final tightening, check the coplanarity of the twolevels with a ground barOn remounting the rear main bearing cap 1 replace the lateralrubber gaskets 2, keeping in mind that projections A and B of thesupport must be 0,5÷1,0 mm; cut off any exceeding portions.Do the same with the front bearing cap.Before reintroducing the bearings in the crankcase, place betweentheir surfaces two plates C and D - 0.1 mm thick - se.no.7107-1460-053. Tighten the screws at a torque of 60 Nm.Note: It is advisable to apply a few drops of silicon sealant on thesurface of the gasket slot 2.Check the clearances between the bearings and the journalUse the ”Perfect Circle Plastigage” type calibrated wire A and put itat the centre of the bearing with a bit of grease. Tighten the screws at a torque of 60 Nm.Find out the clearance value checking the wire’s compression withthe appropriate graduated scale supplied in the same pack andavailable on the market. For clearance values between the journals, connecting rod pinand the relevant bearings see page 64.129130- 60 - FOCS Workshop Manual_cod. 1.5302.351_7° ed_ rev. 06