56701-IPI only
56701-IPI only
56701-IPI only

Create successful ePaper yourself
Turn your PDF publications into a flip-book with our unique Google optimized e-Paper software.
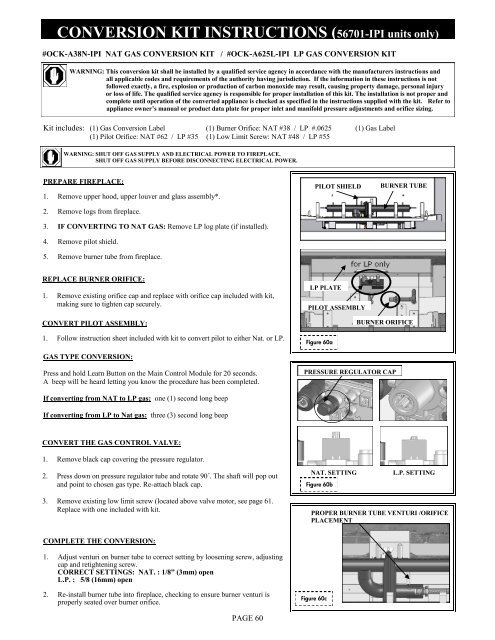
CONVERSION KIT INSTRUCTIONS (<strong>56701</strong>-<strong>IPI</strong> units <strong>only</strong>)#OCK-A38N-<strong>IPI</strong> NAT GAS CONVERSION KIT / #OCK-A625L-<strong>IPI</strong> LP GAS CONVERSION KITWARNING: This conversion kit shall be installed by a qualified service agency in accordance with the manufacturers instructions andall applicable codes and requirements of the authority having jurisdiction. If the information in these instructions is notfollowed exactly, a fire, explosion or production of carbon monoxide may result, causing property damage, personal injuryor loss of life. The qualified service agency is responsible for proper installation of this kit. The installation is not proper andcomplete until operation of the converted appliance is checked as specified in the instructions supplied with the kit. Refer toappliance owner‟s manual or product data plate for proper inlet and manifold pressure adjustments and orifice sizing.Kit includes: (1) Gas Conversion Label (1) Burner Orifice: NAT #38 / LP #.0625 (1) Gas Label(1) Pilot Orifice: NAT #62 / LP #35 (1) Low Limit Screw: NAT #48 / LP #55WARNING: SHUT OFF GAS SUPPLY AND ELECTRICAL POWER TO FIREPLACE.SHUT OFF GAS SUPPLY BEFORE DISCONNECTING ELECTRICAL POWER.PREPARE FIREPLACE:1. Remove upper hood, upper louver and glass assembly*.2. Remove logs from fireplace.3. IF CONVERTING TO NAT GAS: Remove LP log plate (if installed).4. Remove pilot shield.5. Remove burner tube from fireplace.PILOT SHIELDBURNER TUBEREPLACE BURNER ORIFICE:1. Remove existing orifice cap and replace with orifice cap included with kit,making sure to tighten cap securely.LP PLATEPILOT ASSEMBLYCONVERT PILOT ASSEMBLY:BURNER ORIFICE1. Follow instruction sheet included with kit to convert pilot to either Nat. or LP.Figure 60aGAS TYPE CONVERSION:Press and hold Learn Button on the Main Control Module for 20 seconds.A beep will be heard letting you know the procedure has been completed.PRESSURE REGULATOR CAPIf converting from NAT to LP gas: one (1) second long beepIf converting from LP to Nat gas: three (3) second long beepCONVERT THE GAS CONTROL VALVE:1. Remove black cap covering the pressure regulator.2. Press down on pressure regulator tube and rotate 90˚. The shaft will pop outand point to chosen gas type. Re-attach black cap.NAT. SETTINGFigure 60bL.P. SETTING3. Remove existing low limit screw (located above valve motor, see page 61.Replace with one included with kit.PROPER BURNER TUBE VENTURI /ORIFICEPLACEMENTCOMPLETE THE CONVERSION:1. Adjust venturi on burner tube to correct setting by loosening screw, adjustingcap and retightening screw.CORRECT SETTINGS: NAT. : 1/8” (3mm) openL.P. : 5/8 (16mm) open2. Re-install burner tube into fireplace, checking to ensure burner venturi isproperly seated over burner orifice.Figure 60cPAGE 60