052930E-002One Touch non auto - Carefree of Colorado
052930E-002One Touch non auto - Carefree of Colorado
052930E-002One Touch non auto - Carefree of Colorado

You also want an ePaper? Increase the reach of your titles
YUMPU automatically turns print PDFs into web optimized ePapers that Google loves.
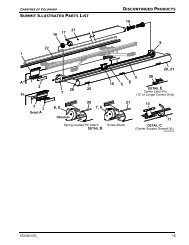
<strong>052930E</strong>-002B. Route two, 14-gauge wires from the power control moduleup to and through the hole in the side wall <strong>of</strong> the RV.Use the wire joints provided to connect the two, 14-guagewires to the two leads on the two pronged connector. Plugthe two pronged connector into the two pronged outlet inthe power control module.Tip: Conceal the two, 14 guage wires behind corner trimmolding or inside cabinets. If surface wiring is the onlyoption, obtain aftermarket concealment raceways to safelyroute the wires.C. Connect the wires running from the two prongedconnector to the terminals at the rear <strong>of</strong> the outlet using thespade connectors provided.D. Apply silicon sealant or putty tape to the back <strong>of</strong> theflange and place the outlet in the hole with the tab slots atthe 12 o’clock and 3 o’clock positions. Mount the outlet tothe side <strong>of</strong> the RV using the screws provided. Carefullytrim excess sealant from around the outlet. After installationthe rubber cover may also be removed if desiredE. Plug the electrical harness from the front arm assemblyinto the outlet on the side <strong>of</strong> the RV.Note: Align the tabs on the plug with the slots in thereceptacle, (at the 12 o’clock and 3 o’clock positions), insertthe plug fully and twist 1/8th <strong>of</strong> a turn clockwise untilthe metallic clip firmly latches in place. To disconnect, pullback on the metallic clip with your thumb while twisting theplug counter-clockwise 1/8th <strong>of</strong> a turn. Pull the plug straightout <strong>of</strong> the outlet.Tip: Allow a downward loop to form in the harness out<strong>of</strong> the outlet to prevent rainwater from entering the plug.Gas ShockSet CollarUpper Carriage<strong>Carefree</strong> ONE-<strong>Touch</strong> AwningTractioner is installed in step 10b.(2) If the motor runs in the reverse direction, it willbe necessary to push the switch out <strong>of</strong> the Power ControlSwitch panel, flip it upside down and reinstall.(3) The Power Control Switch panel may now bemounted in place.C. Have available the 9/64 hex wrench provided. Retractthe awning until the roller assembly makes onecomplete turn. While holding on to the Lower Carriage onthe motorized arm assembly, cut and remove the cable tieattaching the Upper Carriage and Lower Carriage together.Move the Lower Carriage up until it touches theUpper Carriage (figure 9). Tighten the clamping screws onthe Lower Carriage with the 9/64 hex wrench. Repeat thisprocedure on the <strong>non</strong>-motorized arm assembly.D. Extend the awning until the rafters are at the maximumopen position allowed by the Rafter Elbow Stop (figure 10).The Gas Shocks on both the armassemblies should be compressed 1/4” - 3/4” at this time.Jog the power switch slightly to retract and tighten thecanopy fabric.Step Nine:Verify Operationadjust LowerCarriageA. Extend awning completely out. If awning will not extendfully adjust both rafters “longer” by removing the screws(figure 10a) and increasing length <strong>of</strong> both ends <strong>of</strong> the raftersthe same amount. If canopy extends but rafter does notlock out (figure 10) then “shorten” the rafter so the “elbowstop” completely locks out against the rafter “inner channel“.figure 9Note: Webbing notRafter Inner ChannelB. Extend the awning until the roller assembly stopsturning. At this point the fabric will be slightly slack. Theawning should deploy evenly; refer to the troubleshootingguide if it does not.Note: (1) For Alumaguard models it may be necessaryto assist the deployment <strong>of</strong> the awning away from the RV forsteps 9A through 9F. Until the AlumaguardPage 10Rafter Outer ChannelOuter Bumper Stopfigure 10Elbow Stop