JRC FB 500 terminal JUE-500 new software ver. 11.33 release
JRC FB 500 terminal JUE-500 new software ver. 11.33 release
JRC FB 500 terminal JUE-500 new software ver. 11.33 release

You also want an ePaper? Increase the reach of your titles
YUMPU automatically turns print PDFs into web optimized ePapers that Google loves.
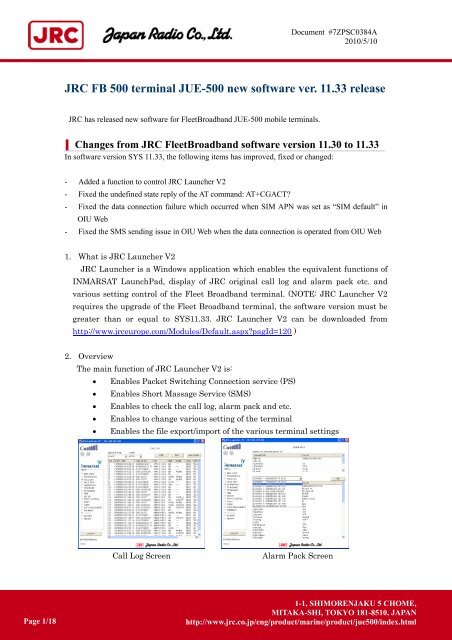
Document #7ZPSC0384A2010/5/10<strong>JRC</strong> <strong>FB</strong> <strong>500</strong> <strong>terminal</strong> <strong>JUE</strong>-<strong>500</strong> <strong>new</strong> <strong>software</strong> <strong>ver</strong>. <strong>11.33</strong> <strong>release</strong><strong>JRC</strong> has <strong>release</strong>d <strong>new</strong> <strong>software</strong> for FleetBroadband <strong>JUE</strong>-<strong>500</strong> mobile <strong>terminal</strong>s.Changes from <strong>JRC</strong> FleetBroadband <strong>software</strong> <strong>ver</strong>sion 11.30 to <strong>11.33</strong>In <strong>software</strong> <strong>ver</strong>sion SYS <strong>11.33</strong>, the following items has improved, fixed or changed:- Added a function to control <strong>JRC</strong> Launcher V2- Fixed the undefined state reply of the AT command: AT+CGACT?- Fixed the data connection failure which occurred when SIM APN was set as “SIM default” inOIU Web- Fixed the SMS sending issue in OIU Web when the data connection is operated from OIU Web1. What is <strong>JRC</strong> Launcher V2<strong>JRC</strong> Launcher is a Windows application which enables the equivalent functions ofINMARSAT LaunchPad, display of <strong>JRC</strong> original call log and alarm pack etc. andvarious setting control of the Fleet Broadband <strong>terminal</strong>. (NOTE: <strong>JRC</strong> Launcher V2requires the upgrade of the Fleet Broadband <strong>terminal</strong>, the <strong>software</strong> <strong>ver</strong>sion must begreater than or equal to SYS<strong>11.33</strong>. <strong>JRC</strong> Launcher V2 can be downloaded fromhttp://www.jrceurope.com/Modules/Default.aspx?pagId=120 )2. O<strong>ver</strong>viewThe main function of <strong>JRC</strong> Launcher V2 is:• Enables Packet Switching Connection service (PS)• Enables Short Massage Service (SMS)• Enables to check the call log, alarm pack and etc.• Enables to change various setting of the <strong>terminal</strong>• Enables the file export/import of the various <strong>terminal</strong> settingsCall Log ScreenAlarm Pack ScreenPage 1/181-1, SHIMORENJAKU 5 CHOME,MITAKA-SHI, TOKYO 181-8510, JAPANhttp://www.jrc.co.jp/eng/product/marine/product/jue<strong>500</strong>/index.html
Document #7ZPSC0384A2010/5/10Software updating procedureUpdate <strong>JUE</strong>-<strong>500</strong> <strong>software</strong> with following procedure a) to d).* Do not connect any router or other equipment, only <strong>JUE</strong>-<strong>500</strong> OIU is allowed to connect, between<strong>JUE</strong>-<strong>500</strong> and a PC when updating <strong>JUE</strong>-<strong>500</strong>. Also, PC must be on the same network as <strong>JUE</strong>-<strong>500</strong>.a). Confirm the connection<strong>JUE</strong>-<strong>500</strong> <strong>software</strong> updating is executed by a PC with dedicated application for PC.Prepare a PC and connect it to your <strong>JUE</strong>-<strong>500</strong>. (For details, refer to “1. Confirm the connection ”)* Windows XP/Vista OS is required.b) Download the latest <strong>software</strong> for <strong>JUE</strong>-<strong>500</strong>Confirm the website to check whether the latest <strong>software</strong> is uploaded or not, from the PC connectedto Internet. Download if the latest <strong>software</strong> is uploaded. (For details, refer to “2. Downloading thelatest <strong>software</strong>”)c) Update <strong>JUE</strong>-<strong>500</strong> <strong>software</strong>Update the <strong>JUE</strong>-<strong>500</strong> <strong>software</strong> by the downloaded <strong>software</strong>. (For details, refer to “3. Update<strong>JUE</strong>-<strong>500</strong> <strong>software</strong>”)d) Confirm the updated <strong>software</strong> <strong>ver</strong>sionConfirm the <strong>software</strong> <strong>ver</strong>sion after updating, to check that <strong>JUE</strong>-<strong>500</strong> <strong>software</strong> is correctly updated ornot. (For details, refer to “4. Confirm the update <strong>software</strong> <strong>ver</strong>sion”)Page 2/181-1, SHIMORENJAKU 5 CHOME,MITAKA-SHI, TOKYO 181-8510, JAPANhttp://www.jrc.co.jp/eng/product/marine/product/jue<strong>500</strong>/index.html
Document #7ZPSC0384A2010/5/101. Confirm the connection1. Prepare a PC and connect it to Ethernet port of <strong>JUE</strong>-<strong>500</strong>, with LAN straight cable. When theOIU is connected to the BDE, connect LAN straight cable with the OIU’s Ethernet port. * Donot connect any router or other equipment, only <strong>JUE</strong>-<strong>500</strong> OIU is allowed to connect, between<strong>JUE</strong>-<strong>500</strong> and a PC when updating <strong>JUE</strong>-<strong>500</strong>. Also, PC must be on the same network as<strong>JUE</strong>-<strong>500</strong>.Power supplyLAN straight cablePCHandset<strong>JUE</strong>-<strong>500</strong> Below Deck Unit<strong>JUE</strong>-<strong>500</strong> OIU<strong>JUE</strong>-<strong>500</strong> Above Deck UnitLAN straight cablePCWhen OIU is connectedPage 3/181-1, SHIMORENJAKU 5 CHOME,MITAKA-SHI, TOKYO 181-8510, JAPANhttp://www.jrc.co.jp/eng/product/marine/product/jue<strong>500</strong>/index.html
Document #7ZPSC0384A2010/5/102. Set the LAN port IP address (being connected to Ethernet port of <strong>JUE</strong>-<strong>500</strong>) of your PC, to beon the same network as <strong>JUE</strong>-<strong>500</strong> by the following procedure.NOTE・ Skip this procedure when you already set the LAN port to DHCP (set the IP address setting as[Obtain an IP address automatically]) and BDE’s DHCP setting enable.・ Current BDE’s DHCP setting can be referred at the Handset menu, ADMIN - Input secretcode (default value 0001) - Port - Ethernet - BDE’s IP address (press OK) - BDE’ssubnet mask (press OK) - DHCP setting. Press on hook button and close the menu afteryou confirm the DHCP setting.i). Confirm BDE’s IP address from the Handset.・BDE’s DHCP setting can be referred at the Handset menu, ADMIN - Input secret code(default value 0001) - Port - Ethernet.ii). Select [start]-[Control Panel].・ [Control Panel] window is displayed.Page 4/181-1, SHIMORENJAKU 5 CHOME,MITAKA-SHI, TOKYO 181-8510, JAPANhttp://www.jrc.co.jp/eng/product/marine/product/jue<strong>500</strong>/index.html
Document #7ZPSC0384A2010/5/10iii). Double click [Network Connections].・ [Network Connections] window is displayed.iv). Select [Local Area Connection] and right-click, then click [Properties] from displayed menu.・[Local Area Connection Properties] dialogue box is displayed.・ Confirm that [General] tab is displayed on the front of the screen.Page 5/181-1, SHIMORENJAKU 5 CHOME,MITAKA-SHI, TOKYO 181-8510, JAPANhttp://www.jrc.co.jp/eng/product/marine/product/jue<strong>500</strong>/index.html
Document #7ZPSC0384A2010/5/10v). Select [Internet Protocol (TCP/IP)] and click [Properties] button.・[Internet Protocol (TCP/IP) Properties] dialogue box is displayed.・Select [Use the following IP address] and input [IP address] and [Subnet mask] to be on thesame network as <strong>JUE</strong>-<strong>500</strong>. Do not input any IP address for [Default gateway].e.g. When the BDE’s IP address is 192.168.128.100Input 192.168.128.101 for [IP address] and 255.255.255.0 for [Subnet mask].・Select [Use the following DNS ser<strong>ver</strong> addresses] and do not input any DNS addresses for[Preferred DNS ser<strong>ver</strong>] and [Alternate DNS ser<strong>ver</strong>].vi). Click [OK] button.・Screen is returned to [Local Area Connection Properties] dialogue box.vii). Click [OK] button.・If message of rebooting is displayed, reboot a PC.Page 6/181-1, SHIMORENJAKU 5 CHOME,MITAKA-SHI, TOKYO 181-8510, JAPANhttp://www.jrc.co.jp/eng/product/marine/product/jue<strong>500</strong>/index.html
Document #7ZPSC0384A2010/5/102. Downloading the latest <strong>software</strong>The latest <strong>software</strong> of <strong>JUE</strong>-<strong>500</strong> is uploaded on the HP of Inmarsat.The URL is as follows:http://www.inmarsat.com/Support/FleetBroadband/Firmware.aspxIf the <strong>software</strong>’s <strong>ver</strong>sion on the HP is larger than the <strong>JUE</strong>-<strong>500</strong>’s <strong>software</strong> <strong>ver</strong>sion, download the<strong>software</strong> from HP.Software <strong>ver</strong>sion of <strong>JUE</strong>-<strong>500</strong> can be displayed on the Handset screen with following operation: Status - Unit Info - Mainte No.- SYSPage 7/181-1, SHIMORENJAKU 5 CHOME,MITAKA-SHI, TOKYO 181-8510, JAPANhttp://www.jrc.co.jp/eng/product/marine/product/jue<strong>500</strong>/index.html
Document #7ZPSC0384A2010/5/103. Update <strong>JUE</strong>-<strong>500</strong> <strong>software</strong>Note・Do not turn OFF the power supply of <strong>JUE</strong>-<strong>500</strong> and/or PC during the <strong>software</strong> forwarding or updating・Software forwarding or updating takes up to 25 minutes.1. Activate your <strong>JUE</strong>-<strong>500</strong> and confirm that initialization is completed.* [Initialize] is displayed during initialization on the Handset screen.Initialize2. Execute the downloaded <strong>software</strong> file [<strong>JUE</strong>-<strong>500</strong>_1xxx.exe]. Double click the icon.3. Following dialog box is displayed. Click [Unzip] button.Default unzip folder is C:¥Program Files¥Japan Radio Company¥<strong>JUE</strong>-<strong>500</strong> Upgrader¥.Page 8/181-1, SHIMORENJAKU 5 CHOME,MITAKA-SHI, TOKYO 181-8510, JAPANhttp://www.jrc.co.jp/eng/product/marine/product/jue<strong>500</strong>/index.html
Document #7ZPSC0384A2010/5/104. Following dialog box is displayed. Click [OK] button.5. Select [Complete upgrade now] and click [OK] button. [BganX Upgrader] is activated.Page 9/181-1, SHIMORENJAKU 5 CHOME,MITAKA-SHI, TOKYO 181-8510, JAPANhttp://www.jrc.co.jp/eng/product/marine/product/jue<strong>500</strong>/index.html
Document #7ZPSC0384A2010/5/105.1. If the PC cannot connect with BDEIf your PC cannot connect with BDE, below screen is displayed.In this case, assumable cause is changed BDE’s IP address.Set the current BDE’s IP address into the textbox which displays below IP address, and then select[Tool] – [Get System Version] from Window’s menu. Current BDE’ IP address can be referredat the Handset menu, ADMIN - Input secret code (default value 0001) - Port - Ethernet.Page 10/181-1, SHIMORENJAKU 5 CHOME,MITAKA-SHI, TOKYO 181-8510, JAPANhttp://www.jrc.co.jp/eng/product/marine/product/jue<strong>500</strong>/index.html
Document #7ZPSC0384A2010/5/105.2. If the PC cannot connect with the OIUIf your PC cannot connected with the OIU, below screen is displayed.Select [Yes] when the OIU is connected with BDE, and select [No] when the OIU is notconnected with BDE.When [Yes] is selected, below screen is displayed.In this case, assumable cause is changed the OIU’s IP address.Set the current the OIU’s IP address into the textbox which displays below IP address, and thenselect [Tool] – [Get System Version] from Window’s menuCurrent OIU’s IP address can be referred at the Handset menu, ADMIN - Input secret code(default value 0001) - Option - IPPage 11/181-1, SHIMORENJAKU 5 CHOME,MITAKA-SHI, TOKYO 181-8510, JAPANhttp://www.jrc.co.jp/eng/product/marine/product/jue<strong>500</strong>/index.html
Document #7ZPSC0384A2010/5/105.3. If the PC cannot still connect with BDE after the BDE IP confirmationIf your PC cannot connect with BDE after the BDE IP confirmation, below screen is displayed.In this case, assumable cause is changed PC’s IP address.Confirm the PC’s IP address is set to be on the same network as the BDE. Refer to “1. Confirmthe connection” step (2) to confirm PC’s IP address setting.e.g. When the BDE’s IP address is 192.168.128.100Page 12/181-1, SHIMORENJAKU 5 CHOME,MITAKA-SHI, TOKYO 181-8510, JAPANhttp://www.jrc.co.jp/eng/product/marine/product/jue<strong>500</strong>/index.html
Document #7ZPSC0384A2010/5/106. [Upgrade] button turns to active when installation is ready. Click [Upgrade] button. After that,click [Yes] button in confirmation window. Forwarding of the file is started.Page 13/181-1, SHIMORENJAKU 5 CHOME,MITAKA-SHI, TOKYO 181-8510, JAPANhttp://www.jrc.co.jp/eng/product/marine/product/jue<strong>500</strong>/index.html
Document #7ZPSC0384A2010/5/107. Following dialog box is displayed when file forwarding is completed. <strong>JUE</strong>-<strong>500</strong> rebootsautomatically after se<strong>ver</strong>al tens of seconds, and starts <strong>software</strong> updating.Click [OK] button to close this dialog box.8. [SW UPDATE] is displayed on the Handset screen during <strong>software</strong> updating.SW UPDATE9. <strong>JUE</strong>-<strong>500</strong> reboots when <strong>software</strong> updating is successfully completed.Page 14/181-1, SHIMORENJAKU 5 CHOME,MITAKA-SHI, TOKYO 181-8510, JAPANhttp://www.jrc.co.jp/eng/product/marine/product/jue<strong>500</strong>/index.html
Document #7ZPSC0384A2010/5/109.1. When <strong>software</strong> update is failedUpdate is failed when following phenomenon is generated.A) [Upload file failed ] dialog box is displayed on the PC.B) [BDE Update Error] or [ADE Update Error] is displayed on the Handset screen.BDE UpdateError XADE UpdateError XC) Although the <strong>software</strong> is transferred and <strong>JUE</strong>-<strong>500</strong> rebooted, updating is not completed evenpast 25 minutes or more since its start.To improve above a) to c), update again with referring to [Reco<strong>ver</strong>y procedure when <strong>software</strong> updateis failed] (next page).Page 15/181-1, SHIMORENJAKU 5 CHOME,MITAKA-SHI, TOKYO 181-8510, JAPANhttp://www.jrc.co.jp/eng/product/marine/product/jue<strong>500</strong>/index.html
Document #7ZPSC0384A2010/5/109.2. Reco<strong>ver</strong>y procedure when <strong>software</strong> update is failedA) Turn OFF the power supply of <strong>JUE</strong>-<strong>500</strong>.B) Quit [<strong>JUE</strong>-<strong>500</strong> Upgrader], if it is still activating.C) Turn ON the power supply of <strong>JUE</strong>-<strong>500</strong> with pressing the right side button of the Handset.Right side buttonRight side buttonD) Leave your finger from PTT button when Ready LED of BDE starts to blink.E) Confirm the Handset screen transition, it displays [Initialize] and [Safe Mode].InitializeSafe ModeF) Repeat from the 2nd procedure of [3 . Update <strong>JUE</strong>-<strong>500</strong> <strong>software</strong>].Page 16/181-1, SHIMORENJAKU 5 CHOME,MITAKA-SHI, TOKYO 181-8510, JAPANhttp://www.jrc.co.jp/eng/product/marine/product/jue<strong>500</strong>/index.html
Document #7ZPSC0384A2010/5/109.3. Software downgrading procedureIf you have any problems caused by upgrading, you can downgrade the <strong>software</strong>.A) Turn OFF the power supply of <strong>JUE</strong>-<strong>500</strong>.B) Quit [<strong>JUE</strong>-<strong>500</strong> Upgrader], if it is still activating.C) Turn ON the power supply of <strong>JUE</strong>-<strong>500</strong> with pressing the right side button of the Handset.Right side buttonRight side buttonD) Leave your finger from PTT button when Ready LED of BDE starts to blink.E) Confirm the Handset screen transition, it displays [Initialize] and [Safe Mode].InitializeSafe ModeF) Repeat from the 2nd procedure of [3 . Update <strong>JUE</strong>-<strong>500</strong> <strong>software</strong>]. Use [<strong>JUE</strong>-<strong>500</strong>_1xxx.exe] inCD-ROM of <strong>JUE</strong>-<strong>500</strong> to execute, instead of the downloaded file [<strong>JUE</strong>-<strong>500</strong>_1xxx.exe].Page 17/181-1, SHIMORENJAKU 5 CHOME,MITAKA-SHI, TOKYO 181-8510, JAPANhttp://www.jrc.co.jp/eng/product/marine/product/jue<strong>500</strong>/index.html
Document #7ZPSC0384A2010/5/104. Confirm the updated <strong>software</strong> <strong>ver</strong>sionCheck that the <strong>software</strong> <strong>ver</strong>sion is correctly updated or not, from the following the Handset menu, Status - Unit Info - Mainte No. - SYSWhen the update is succeeded, SYS No. is changed to the same number as the [1xxx] of the <strong>software</strong>file [<strong>JUE</strong>-<strong>500</strong>_1xxx.exe]Unit Info menu screen1 Status2 SMS5 Unit Info6 ID1 Version2 Mainte No.3 ADE4 BDEOK2. Mainte No. display screenSYS…System Package maintenance No.<strong>11.33</strong>CM…Core Module maintenance No.5.0.3.7IB BOOT …Interface Board Boot maintenance No.01.50IB MAIN…Interface Board maintenance No.11.28ADE BOOT …ADE Boot maintenance No.2.1ADE MAIN …ADE maintenance No.15.11HS…Handset maintenance No.00.05OIU BOOT…OIU Boot maintenance No.1.0.4OIU KERNEL …OIU Kernel maintenance No.1.0.3OIU RFS1.0.3…OIU RFS maintenance No.OIU MAIN12.10…OIU maintenance No.Page 18/181-1, SHIMORENJAKU 5 CHOME,MITAKA-SHI, TOKYO 181-8510, JAPANhttp://www.jrc.co.jp/eng/product/marine/product/jue<strong>500</strong>/index.html