

320386-001 - AO Smith Water Heaters
320386-001 - AO Smith Water Heaters
320386-001 - AO Smith Water Heaters

You also want an ePaper? Increase the reach of your titles
YUMPU automatically turns print PDFs into web optimized ePapers that Google loves.
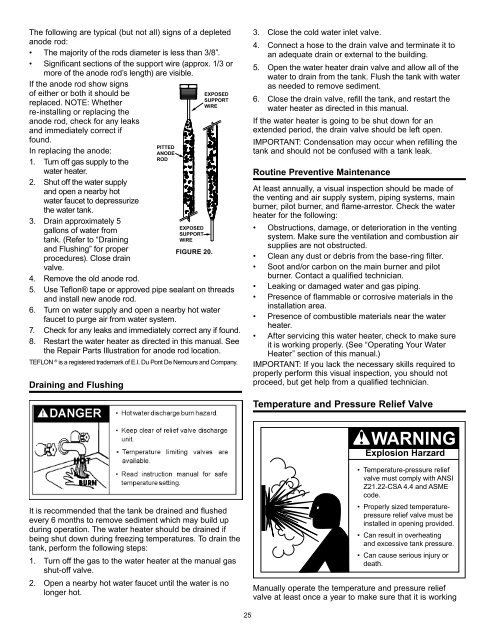
The following are typical (but not all) signs of a depletedanode rod:• The majority of the rods diameter is less than 3/8”.• Significant sections of the support wire (approx. 1/3 ormore of the anode rod’s length) are visible.If the anode rod show signsof either or both it should bereplaced. NOTE: Whetherre-installing or replacing theanode rod, check for any leaksand immediately correct iffound.In replacing the anode:1. Turn off gas supply to thewater heater.2. Shut off the water supplyand open a nearby hotwater faucet to depressurizethe water tank.3. Drain approximately 5gallons of water fromtank. (Refer to “Drainingand Flushing” for properprocedures). Close drainvalve.4. Remove the old anode rod.5. Use Teflon® tape or approved pipe sealant on threadsand install new anode rod.6. Turn on water supply and open a nearby hot waterfaucet to purge air from water system.7. Check for any leaks and immediately correct any if found.8. Restart the water heater as directed in this manual. Seethe Repair Parts Illustration for anode rod location.TEFLON ® is a registered trademark of E.I. Du Pont De Nemours and Company.Draining and FlushingPITTEDANODERODEXPOSEDSUPPORTWIREFIGURE 20.EXPOSEDSUPPORTWIRE3. Close the cold water inlet valve.4. Connect a hose to the drain valve and terminate it toan adequate drain or external to the building.5. Open the water heater drain valve and allow all of thewater to drain from the tank. Flush the tank with wateras needed to remove sediment.6. Close the drain valve, refill the tank, and restart thewater heater as directed in this manual.If the water heater is going to be shut down for anextended period, the drain valve should be left open.IMPORTANT: Condensation may occur when refilling thetank and should not be confused with a tank leak.Routine Preventive MaintenanceAt least annually, a visual inspection should be made ofthe venting and air supply system, piping systems, mainburner, pilot burner, and flame-arrestor. Check the waterheater for the following:• Obstructions, damage, or deterioration in the ventingsystem. Make sure the ventilation and combustion airsupplies are not obstructed.• Clean any dust or debris from the base-ring filter.• Soot and/or carbon on the main burner and pilotburner. Contact a qualified technician.• Leaking or damaged water and gas piping.• Presence of flammable or corrosive materials in theinstallation area.• Presence of combustible materials near the waterheater.• After servicing this water heater, check to make sureit is working properly. (See “Operating Your <strong>Water</strong>Heater” section of this manual.)IMPORTANT: If you lack the necessary skills required toproperly perform this visual inspection, you should notproceed, but get help from a qualified technician.Temperature and Pressure Relief ValveExplosion HarzardIt is recommended that the tank be drained and flushedevery 6 months to remove sediment which may build upduring operation. The water heater should be drained ifbeing shut down during freezing temperatures. To drain thetank, perform the following steps:1. Turn off the gas to the water heater at the manual gasshut-off valve.2. Open a nearby hot water faucet until the water is nolonger hot.• Temperature-pressure reliefvalve must comply with ANSIZ21.22-CSA 4.4 and ASMEcode.• Properly sized temperaturepressurerelief valve must beinstalled in opening provided.• Can result in overheatingand excessive tank pressure.• Can cause serious injury ordeath.Manually operate the temperature and pressure reliefvalve at least once a year to make sure that it is working25


