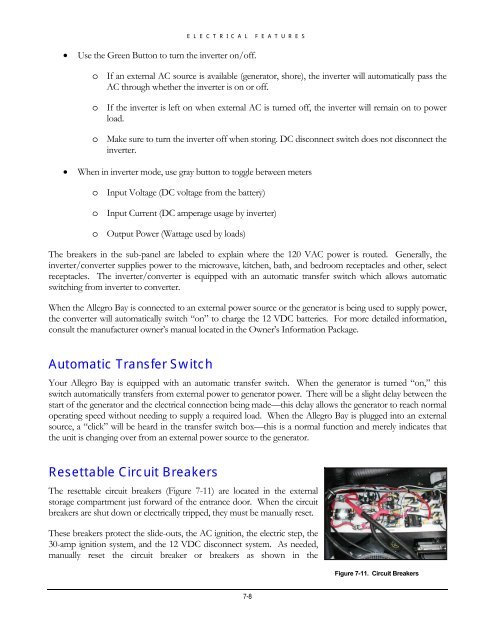
ELECTRICAL FEATURES• Use the Green Button to turn the inverter on/off.o If an external AC source is available (generator, shore), the inverter will automatically pass theAC through whether the inverter is on or off.o If the inverter is left on when external AC is turned off, the inverter will remain on to powerload.o Make sure to turn the inverter off when storing. DC disconnect switch does not disconnect theinverter.• When in inverter mode, use gray button to toggle between meterso Input Voltage (DC voltage from the battery)o Input Current (DC amperage usage by inverter)o Output Power (Wattage used by loads)The breakers in the sub-panel are labeled to explain where the 120 VAC power is routed. Generally, theinverter/converter supplies power to the microwave, kitchen, bath, and bedroom receptacles and other, selectreceptacles. The inverter/converter is equipped with an automatic transfer switch which allows automaticswitching from inverter to converter.When the <strong>Allegro</strong> <strong>Bay</strong> is connected to an external power source or the generator is being used to supply power,the converter will automatically switch “on” to charge the 12 VDC batteries. For more detailed information,consult the manufacturer owner’s manual located in the Owner’s Information Package.Automatic Transfer SwitchYour <strong>Allegro</strong> <strong>Bay</strong> is equipped with an automatic transfer switch. When the generator is turned “on,” thisswitch automatically transfers from external power to generator power. There will be a slight delay between thestart of the generator and the electrical connection being made—this delay allows the generator to reach normaloperating speed without needing to supply a required load. When the <strong>Allegro</strong> <strong>Bay</strong> is plugged into an externalsource, a “click” will be heard in the transfer switch box—this is a normal function and merely indicates thatthe unit is changing over from an external power source to the generator.Resettable Circuit BreakersThe resettable circuit breakers (Figure 7-11) are located in the externalstorage compartment just forward of the entrance door. When the circuitbreakers are shut down or electrically tripped, they must be manually reset.These breakers protect the slide-outs, the AC ignition, the electric step, the30-amp ignition system, and the 12 VDC disconnect system. As needed,manually reset the circuit breaker or breakers as shown in theFigure 7-11. Circuit Breakers7-8
ELECTRICAL FEATURESaccompanying figure.Be careful when working around these connections as an accidental electrical short to ground (i.e., momentarilyconnecting the “positive” or “hot” terminal to any part of the chassis) can be hazardous and harmful. Towardsthis end, don’t store in this particular storage compartment anything which may move around in transit andsubsequently cause any electrical short circuits or anything that is flammable.Fuse BlocksSome of the electrical circuitry within the motor home is protected by various fusing systems. Some of thesefuse blocks are immediately accessible from the driver’s side underneath the dashboard.The electrical circuits protected by the under-dash fuse block (Figure 7-12) include: headlights, panel light fordashboard, tail lights, optional jacks, turn signals, cruise control, engine computer, accessory fuses, heater anddash air conditioning.Figure 7-12. Fuse BlocksAdditionally, there is another chassis fuse panel which works in conjunction withthe chassis fuse panel and provides comparable protection for the above-listedcircuits.Locatedbeneath theaccess panelon thedashboard(Figure 7-13)are two additional, fuse panels; thesepanels protect the following electricalsystems: mirrors, optional satellite jacks,camera, optional power windows, dashtrim, lighter, map light, optional powerseats, and radio.Figure 7-13. In-Dashboard Fuse BlocksShould there be any electrical failure ofthese components or systems, the first troubleshooting procedure should be to check the fuses and haveavailable replacements to replace any blown fuses, as may be warranted.As an aid to extracting and/or installing fuses in the fuse blocks, one may wish to buy an inexpensive fusepuller at any electronics or hardware store. This useful tool makes the installation or removal of fuses mucheasier and prevents inadvertent damage to nearby fuses or the fuse block itself.Whenever a fuse has been “blown” and is to be extracted and replaced, it is good practice to examine the wiringgoing to that particular fuse to see if there is any noticeable degradation (e.g., wiring insulation nicked, missing,or melted) which may indicate damage beyond the fusing proper.7-9
- Page 1 and 2:
2008Allegro BayOwner’s ManualTiff
- Page 3 and 4:
ALLEGRO BAY OWNER’S MANUALTIFFIN
- Page 5:
ALLEGRO BAY OWNER’S MANUALTelevis
- Page 8 and 9:
GENERAL INFORMATIONChapter1GENERAL
- Page 10 and 11:
GENERAL INFORMATION1. Read the warr
- Page 12 and 13:
Owner’s Information PackageGENERA
- Page 14:
GENERAL INFORMATIONWeighing Procedu
- Page 17 and 18:
DRIVING & SAFETY INSTRUCTIONSSafety
- Page 19 and 20:
DRIVING & SAFETY INSTRUCTIONS• Ch
- Page 21 and 22:
DRIVING & SAFETY INSTRUCTIONSexcess
- Page 23 and 24:
DRIVING & SAFETY INSTRUCTIONSmainta
- Page 25 and 26: DRIVING & SAFETY INSTRUCTIONSfurnac
- Page 28 and 29: HEATING & AIR CONDITIONINGChapter3H
- Page 30 and 31: HEATING & AIR CONDITIONINGAny acces
- Page 32 and 33: HEATING & AIR CONDITIONINGpropane f
- Page 34: HEATING & AIR CONDITIONINGdetector
- Page 37 and 38: MAJOR APPLIANCES & ACCESSORIESRefri
- Page 39 and 40: MAJOR APPLIANCES & ACCESSORIESOn th
- Page 41 and 42: MAJOR APPLIANCES & ACCESSORIEStime
- Page 43 and 44: otating the antenna until optimal r
- Page 45 and 46: emote that comes with the televisio
- Page 47 and 48: MAJOR APPLIANCES & ACCESSORIES6. Ro
- Page 49 and 50: MAJOR APPLIANCES & ACCESSORIEStelep
- Page 51 and 52: Pressure-Relief ValveMAJOR APPLIANC
- Page 53 and 54: MAJOR APPLIANCES & ACCESSORIESWarni
- Page 55 and 56: MAJOR APPLIANCES & ACCESSORIESon th
- Page 58 and 59: CABINETS & FURNITUREChapter5Cabinet
- Page 60 and 61: CABINETS & FURNITUREIn the kitchen,
- Page 62 and 63: Bedroom AreaCABINETS & FURNITUREIf
- Page 64: CABINETS & FURNITURE5-7
- Page 67: STRUCTURAL FEATURESChassis Features
- Page 70 and 71: ELECTRICAL FEATURESGeneral Informat
- Page 72 and 73: ELECTRICAL FEATURESCautionDisconnec
- Page 74 and 75: typically, it is a break in the gro
- Page 78 and 79: ELECTRICAL FEATURESWarningNever rep
- Page 81 and 82: SLIDE-OUT FEATURESChapter8Slide-Out
- Page 83 and 84: SLIDE-OUT FEATURESpower/water hooku
- Page 85: SLIDE-OUT FEATURESNOTE: If the slid
- Page 88 and 89: EXTERIOR FEATURESTowing HitchOn the
- Page 90 and 91: EXTERIOR FEATURESthe leveling syste
- Page 92 and 93: EXTERIOR FEATURESRETRACTION MODE:1.
- Page 94: EXTERIOR FEATURESMirrorsThis motor
- Page 97 and 98: INTERIOR FEATURESBedspreadAs a furn
- Page 100 and 101: PLUMBING & BATH FEATURESChapter11Pl
- Page 102 and 103: PLUMBING & BATH FEATURESspecified d
- Page 104 and 105: PLUMBING & BATH FEATUREStank has be
- Page 106 and 107: PLUMBING & BATH FEATURESpump still
- Page 108 and 109: Black-Water Holding TankPLUMBING &
- Page 110 and 111: PLUMBING & BATH FEATURESCautionThe
- Page 113 and 114: CONSTRUCTION FEATURESChapter12Const
- Page 116 and 117: WINDOWS, AWNINGS, VENTS, & DOORSCha
- Page 118 and 119: WINDOWS, AWNINGS, VENTS, & DOORSmak
- Page 120 and 121: WINDOWS, AWNINGS, VENTS, & DOORS7.
- Page 123 and 124: ROUTINE MAINTENANCEChapter14Routine
- Page 125 and 126: ROUTINE MAINTENANCEImportantNever u
- Page 127 and 128:
ROUTINE MAINTENANCEImportantDo not
- Page 129 and 130:
ROUTINE MAINTENANCEsettings, do not
- Page 131 and 132:
ROUTINE MAINTENANCE• When storing
- Page 133 and 134:
ROUTINE MAINTENANCEmentioned above,
- Page 135 and 136:
ROUTINE MAINTENANCEsidewall of the
- Page 137 and 138:
ROUTINE MAINTENANCEInformation on P
- Page 139 and 140:
ROUTINE MAINTENANCEAdditional Infor
- Page 141 and 142:
ROUTINE MAINTENANCEIt is the air pr
- Page 143 and 144:
ROUTINE MAINTENANCEExtra load tire
- Page 145 and 146:
ROUTINE MAINTENANCESidewall—That
- Page 147 and 148:
ROUTINE MAINTENANCEIf not stored un
- Page 149 and 150:
Frequency of Checking Tire Inflatio
- Page 151 and 152:
ROUTINE MAINTENANCETo start the vac
- Page 153 and 154:
ROUTINE MAINTENANCEDO NOT:• Use h
- Page 155 and 156:
ROUTINE MAINTENANCEMotorhomes Limit
- Page 157 and 158:
WinterizingROUTINE MAINTENANCETo st
- Page 159 and 160:
Dometic Refrigerator Ice Maker (opt
- Page 162 and 163:
MAINTENANCE & DATA CHARTSChapter15M
- Page 164 and 165:
MAINTENANCE & DATA CHARTSRV Owner
- Page 166 and 167:
MAINTENANCE & DATA CHARTSRV Owner
- Page 168 and 169:
MAINTENANCE & DATA CHARTSRV Owner
- Page 170 and 171:
MAINTENANCE & DATA CHARTSRV Owner