eQUEST Training Module 1
eQUEST Training Module 1 - Integrated Design Lab - Bozeman
eQUEST Training Module 1 - Integrated Design Lab - Bozeman
- No tags were found...

You also want an ePaper? Increase the reach of your titles
YUMPU automatically turns print PDFs into web optimized ePapers that Google loves.
SD Wizard: Step 2<br />
<strong>eQUEST</strong> <strong>Module</strong> 1<br />
MODULE TEXT<br />
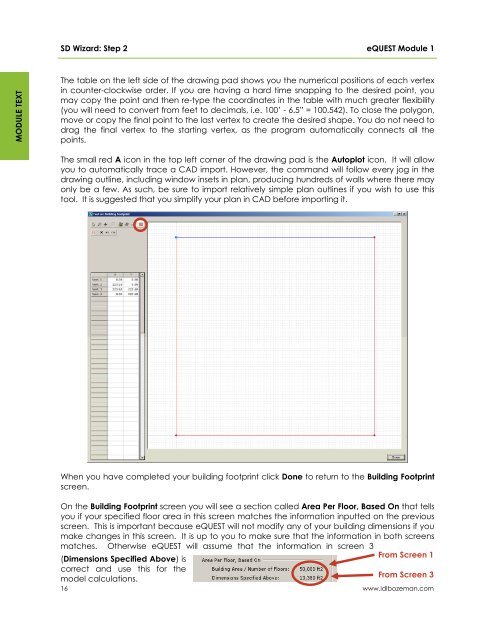
The table on the left side of the drawing pad shows you the numerical positions of each vertex<br />
in counter-clockwise order. If you are having a hard time snapping to the desired point, you<br />
may copy the point and then re-type the coordinates in the table with much greater flexibility<br />
(you will need to convert from feet to decimals, i.e. 100’ - 6.5” = 100.542). To close the polygon,<br />
move or copy the final point to the last vertex to create the desired shape. You do not need to<br />
drag the final vertex to the starting vertex, as the program automatically connects all the<br />
points.<br />
The small red A icon in the top left corner of the drawing pad is the Autoplot icon. It will allow<br />
you to automatically trace a CAD import. However, the command will follow every jog in the<br />
drawing outline, including window insets in plan, producing hundreds of walls where there may<br />
only be a few. As such, be sure to import relatively simple plan outlines if you wish to use this<br />
tool. It is suggested that you simplify your plan in CAD before importing it.<br />
When you have completed your building footprint click Done to return to the Building Footprint<br />
screen.<br />
On the Building Footprint screen you will see a section called Area Per Floor, Based On that tells<br />
you if your specified floor area in this screen matches the information inputted on the previous<br />
screen. This is important because <strong>eQUEST</strong> will not modify any of your building dimensions if you<br />
make changes in this screen. It is up to you to make sure that the information in both screens<br />
matches. Otherwise <strong>eQUEST</strong> will assume that the information in screen 3<br />
From Screen 1<br />
(Dimensions Specified Above) is<br />
correct and use this for the<br />
From Screen 3<br />
model calculations.<br />
16<br />
www.idlbozeman.com