

Popular Photography - February 2015 USA

Create successful ePaper yourself
Turn your PDF publications into a flip-book with our unique Google optimized e-Paper software.
HOW * SOFTWARE WORKSHOP 5<br />
Step 4<br />
Adjust noise reduction sliders.<br />
Move the Luminance slider carefully<br />
and in small increments to maintain<br />
as much detail as possible. Adjust the<br />
Chrominance slider to eliminate colored<br />
specks, which are generally more<br />
evident in shadow areas. However,<br />
we found that the default settings of<br />
Chrominance, Low Frequency, and<br />
Dead pixels are best left alone. Click the<br />
Magic Wand on the right of each slider<br />
for automatic adjustments.<br />
Final Step<br />
Export the processed image.<br />
When you’re satisfied with the<br />
adjustments you’ve made, go to the<br />
lower right and click “Export to disk” to<br />
save it onto your hard drive (for other<br />
options, click the dropdown menu<br />
arrow). Select the output type, quality,<br />
and destination, then click Export. A<br />
pop-up notification will let you know<br />
when the image has been processed<br />
and saved.<br />
Bonus Tip<br />
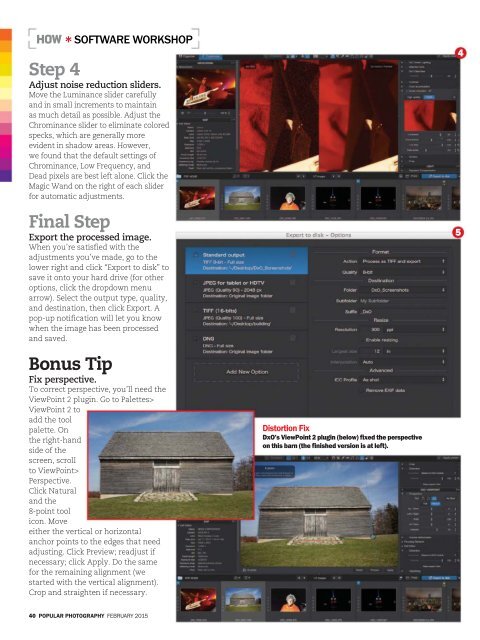
Fix perspective.<br />
To correct perspective, you’ll need the<br />
ViewPoint 2 plugin. Go to Palettes><br />
ViewPoint 2 to<br />
add the tool<br />
palette. On<br />
the right-hand<br />
side of the<br />
screen, scroll<br />
to ViewPoint><br />
Perspective.<br />
Click Natural<br />
and the<br />
8-point tool<br />
icon. Move<br />
either the vertical or horizontal<br />
anchor points to the edges that need<br />
adjusting. Click Preview; readjust if<br />
necessary; click Apply. Do the same<br />
for the remaining alignment (we<br />
started with the vertical alignment).<br />
Crop and straighten if necessary.<br />
Distortion Fix<br />
DxO’s ViewPoint 2 plugin (below) fixed the perspective<br />
on this barn (the finished version is at left).<br />
4<br />
40 POPULAR PHOTOGRAPHY FEBRUARY <strong>2015</strong>