Compiled Embroidery Skill Articles

Create successful ePaper yourself
Turn your PDF publications into a flip-book with our unique Google optimized e-Paper software.
10/28/2016 Getting Started Part 2 Troubleshooting Bad <strong>Embroidery</strong> <strong>Embroidery</strong> Article<br />
4 Reviews<br />
Getting Started Part 2 <br />
Troubleshooting Bad <strong>Embroidery</strong><br />
By Bonnie Landsberger on February 22, 2015<br />
Share Your Project<br />
(Click Image to Enlarge)<br />
0 0 0<br />
Always embroider a sample first to test whether the design meets the requirements of the fabric<br />
or other substrate that you are stitching. As well, if you have software, examine the design closely<br />
before you sew and then you’ll be able to determine and prevent many problems prior to stitching<br />
on the final item. Check your testsample for any issues that need improvement and you’ll know<br />
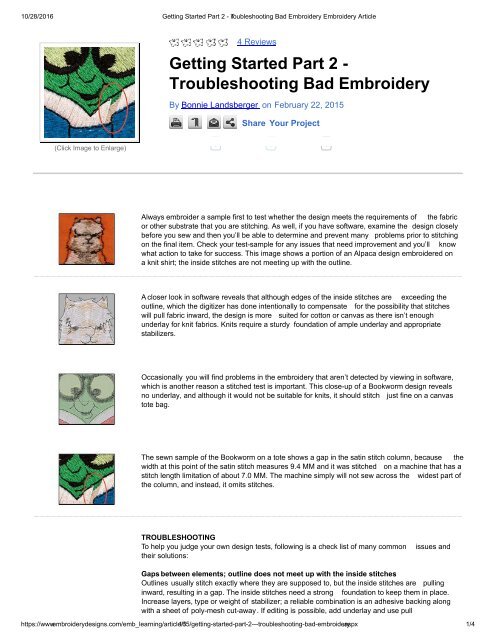
what action to take for success. This image shows a portion of an Alpaca design embroidered on<br />
a knit shirt; the inside stitches are not meeting up with the outline.<br />
A closer look in software reveals that although edges of the inside stitches are exceeding the<br />
outline, which the digitizer has done intentionally to compensate for the possibility that stitches<br />
will pull fabric inward, the design is more suited for cotton or canvas as there isn’t enough<br />
underlay for knit fabrics. Knits require a sturdy foundation of ample underlay and appropriate<br />
stabilizers.<br />
Occasionally you will find problems in the embroidery that aren’t detected by viewing in software,<br />
which is another reason a stitched test is important. This closeup of a Bookworm design reveals<br />
no underlay, and although it would not be suitable for knits, it should stitch just fine on a canvas<br />
tote bag.<br />
The sewn sample of the Bookworm on a tote shows a gap in the satin stitch column, because the<br />
width at this point of the satin stitch measures 9.4 MM and it was stitched on a machine that has a<br />
stitch length limitation of about 7.0 MM. The machine simply will not sew across the widest part of<br />
the column, and instead, it omits stitches.<br />
TROUBLESHOOTING<br />
To help you judge your own design tests, following is a check list of many common<br />
their solutions:<br />
issues and<br />
Gaps between elements; outline does not meet up with the inside stitches:<br />
Outlines usually stitch exactly where they are supposed to, but the inside stitches are pulling<br />
inward, resulting in a gap. The inside stitches need a strong foundation to keep them in place.<br />
Increase layers, type or weight of stabilizer; a reliable combination is an adhesive backing along<br />
with a sheet of polymesh cutaway. If editing is possible, add underlay and use pull<br />
https://www.embroiderydesigns.com/emb_learning/article/1<br />
compensation<br />
165/gettingstartedpart2troubleshootingbadembroidery<br />
to extend sides where stitches pull inward.<br />
.aspx 1/4