Compiled Embroidery Skill Articles
Create successful ePaper yourself
Turn your PDF publications into a flip-book with our unique Google optimized e-Paper software.
Tie In and Tie Off & Trims<br />
Tie ins and tie offs are some of the most important stitches in any design. The tie in stitches are the first few stitches at the<br />
beginning of an embroidery design. They are also necessary after any color change and after any thread trim or long jump.<br />
The tie in stitches ensure that the top thread and bobbin thread catch, or tie a knot before sewing begins. The tie in stitches<br />
are created by placing 3-5 stitches close together. These stitches are not part of the underlay and will be covered by top stitching,<br />
rendering them invisible. The tie off stitches are the last few stitches placed at the end of a design, and are mandatory to<br />
ensure that the threads do not unravel. They are also necessary at the end of a color and at the end of any object that will<br />
have a long jump or thread trim. A tie off is made in a similar fashion by placing 3-4 stitches very close together, creating a<br />
knot. The stitches should be placed inside the top stitching so that they are not visible. The stitch length for both tie ins and<br />
tie offs should be kept at 0.5 mm. Most digi systems have automatic tie ins and tie offs that can be preset for number of<br />
stitches and stitch lengths, and should be utilized at all times.<br />
Pathing<br />
Taking a moment to think through a design and choose a suitable path is essential to the digitizing process. The way that a<br />
design will be pathed determines both the efficiency and the aesthetics of the finished product. Machine time is reflected by<br />
the amount of trims, jumps and color changes in a design. This makes intelligent pathing extremely important in production.<br />
In deciding an effective path for a design, the digitizer must first learn to visualize the two dimensional artwork in its finished,<br />
three dimensional form. This process is important since some elements in the design may appear as if they are under other<br />
elements. Color sequence should be carefully thought out. Plan to use each color as few times as possible, to reduce the<br />
number of color stops in the design. Also consider the different elements of the design and how they affect the best path.<br />
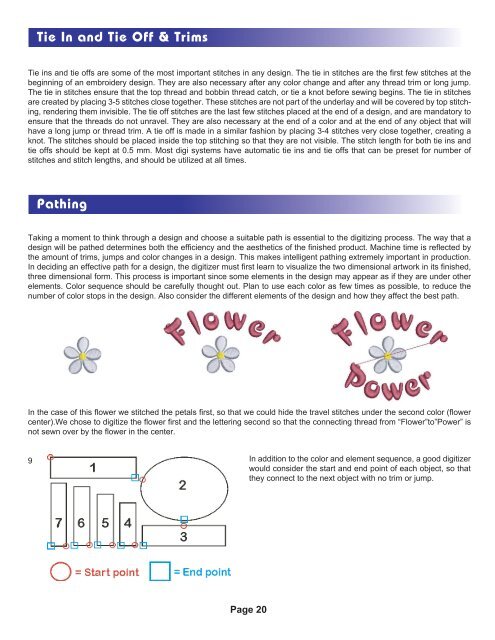
In the case of this flower we stitched the petals first, so that we could hide the travel stitches under the second color (flower<br />
center).We chose to digitize the flower first and the lettering second so that the connecting thread from “Flower”to”Power” is<br />
not sewn over by the flower in the center.<br />
9<br />
In addition to the color and element sequence, a good digitizer<br />
would consider the start and end point of each object, so that<br />
they connect to the next object with no trim or jump.<br />
Page 20


