

Slipstream - January 2005
The monthly newsletter of the Maverick Region of the Porsche Club of America
The monthly newsletter of the Maverick Region of the Porsche Club of America

You also want an ePaper? Increase the reach of your titles
YUMPU automatically turns print PDFs into web optimized ePapers that Google loves.
Early 911 Restoration: No. 5<br />
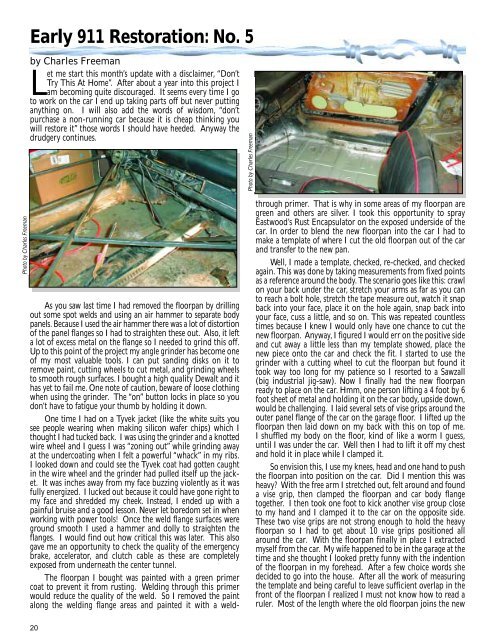
Photo by Charles Freeman<br />
by Charles Freeman<br />
Let me start this month’s update with a disclaimer, “Don’t<br />
Try This At Home”. After about a year into this project I<br />
am becoming quite discouraged. It seems every time I go<br />
to work on the car I end up taking parts off but never putting<br />
anything on. I will also add the words of wisdom, “don’t<br />
purchase a non-running car because it is cheap thinking you<br />
will restore it” those words I should have heeded. Anyway the<br />
drudgery continues.<br />
Photo by Charles Freeman<br />
As you saw last time I had removed the floorpan by drilling<br />
out some spot welds and using an air hammer to separate body<br />
panels. Because I used the air hammer there was a lot of distortion<br />
of the panel flanges so I had to straighten these out. Also, it left<br />
a lot of excess metal on the flange so I needed to grind this off.<br />
Up to this point of the project my angle grinder has become one<br />
of my most valuable tools. I can put sanding disks on it to<br />
remove paint, cutting wheels to cut metal, and grinding wheels<br />
to smooth rough surfaces. I bought a high quality Dewalt and it<br />
has yet to fail me. One note of caution, beware of loose clothing<br />
when using the grinder. The “on” button locks in place so you<br />
don’t have to fatigue your thumb by holding it down.<br />
One time I had on a Tyvek jacket (like the white suits you<br />
see people wearing when making silicon wafer chips) which I<br />
thought I had tucked back. I was using the grinder and a knotted<br />
wire wheel and I guess I was “zoning out” while grinding away<br />
at the undercoating when I felt a powerful “whack” in my ribs.<br />
I looked down and could see the Tyvek coat had gotten caught<br />
in the wire wheel and the grinder had pulled itself up the jacket.<br />
It was inches away from my face buzzing violently as it was<br />
fully energized. I lucked out because it could have gone right to<br />
my face and shredded my cheek. Instead, I ended up with a<br />
painful bruise and a good lesson. Never let boredom set in when<br />
working with power tools! Once the weld flange surfaces were<br />
ground smooth I used a hammer and dolly to straighten the<br />
flanges. I would find out how critical this was later. This also<br />
gave me an opportunity to check the quality of the emergency<br />
brake, accelerator, and clutch cable as these are completely<br />
exposed from underneath the center tunnel.<br />
The floorpan I bought was painted with a green primer<br />
coat to prevent it from rusting. Welding through this primer<br />
would reduce the quality of the weld. So I removed the paint<br />
along the welding flange areas and painted it with a weldthrough<br />
primer. That is why in some areas of my floorpan are<br />
green and others are silver. I took this opportunity to spray<br />
Eastwood’s Rust Encapsulator on the exposed underside of the<br />
car. In order to blend the new floorpan into the car I had to<br />
make a template of where I cut the old floorpan out of the car<br />
and transfer to the new pan.<br />
Well, I made a template, checked, re-checked, and checked<br />
again. This was done by taking measurements from fixed points<br />
as a reference around the body. The scenario goes like this: crawl<br />
on your back under the car, stretch your arms as far as you can<br />
to reach a bolt hole, stretch the tape measure out, watch it snap<br />
back into your face, place it on the hole again, snap back into<br />
your face, cuss a little, and so on. This was repeated countless<br />
times because I knew I would only have one chance to cut the<br />
new floorpan. Anyway, I figured I would err on the positive side<br />
and cut away a little less than my template showed, place the<br />
new piece onto the car and check the fit. I started to use the<br />
grinder with a cutting wheel to cut the floorpan but found it<br />
took way too long for my patience so I resorted to a Sawzall<br />
(big industrial jig-saw). Now I finally had the new floorpan<br />
ready to place on the car. Hmm, one person lifting a 4 foot by 6<br />
foot sheet of metal and holding it on the car body, upside down,<br />
would be challenging. I laid several sets of vise grips around the<br />
outer panel flange of the car on the garage floor. I lifted up the<br />
floorpan then laid down on my back with this on top of me.<br />
I shuffled my body on the floor, kind of like a worm I guess,<br />
until I was under the car. Well then I had to lift it off my chest<br />
and hold it in place while I clamped it.<br />
So envision this, I use my knees, head and one hand to push<br />
the floorpan into position on the car. Did I mention this was<br />
heavy? With the free arm I stretched out, felt around and found<br />
a vise grip, then clamped the floorpan and car body flange<br />
together. I then took one foot to kick another vise group close<br />
to my hand and I clamped it to the car on the opposite side.<br />
These two vise grips are not strong enough to hold the heavy<br />
floorpan so I had to get about 10 vise grips positioned all<br />
around the car. With the floorpan finally in place I extracted<br />
myself from the car. My wife happened to be in the garage at the<br />
time and she thought I looked pretty funny with the indention<br />
of the floorpan in my forehead. After a few choice words she<br />
decided to go into the house. After all the work of measuring<br />
the template and being careful to leave sufficient overlap in the<br />
front of the floorpan I realized I must not know how to read a<br />
ruler. Most of the length where the old floorpan joins the new<br />
20


