

-TechManual_SRK05,09,12CR-S,CRR-S,CRP-S

Create successful ePaper yourself
Turn your PDF publications into a flip-book with our unique Google optimized e-Paper software.
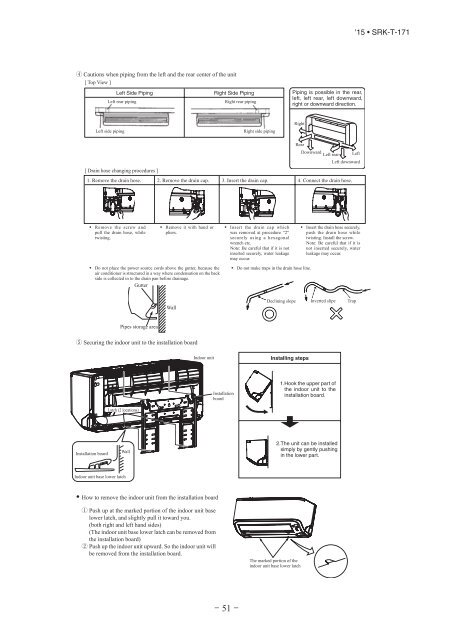
Cautions when piping from the left and the rear center of the unit<br />
[ Top View ]<br />
[ Drain hose changing procedures ]<br />
<br />
<br />
Left Side Piping<br />
Left rear piping<br />
Left side piping<br />
Remove the screw and<br />
pull the drain hose, while<br />
twisting.<br />
<br />
Remove it with hand or<br />
pliers.<br />
Do not place the power source cords above the gutter, because the<br />
air conditioner is structured in a way where condensation on the back<br />
side is collected in to the drain pan before drainage.<br />
Gutter<br />
'15 • SRK-T-171<br />
Right Side Piping<br />
Piping is possible in the rear,<br />
Right rear piping<br />
left, left rear, left downward,<br />
right or downward direction.<br />
Right<br />
Right side piping<br />
Rear<br />
Downward<br />
Left rear Left<br />
Left downward<br />
Insert the drain cap which Insert the drain hose securely,<br />
was removed at procedure “2” push the drain hose while<br />
securely using a hexagonal twisting. Install the screw.<br />
wrench etc.<br />
Note: Be careful that if it is<br />
Note: Be careful that if it is not not inserted securely, water<br />
inserted securely, water leakage leakage may occur.<br />
may occur.<br />
Do not make traps in the drain hose line.<br />
Declining slope Inverted slipe Trap<br />
Installing steps<br />
1.Hook the upper part of<br />
the indoor unit to the<br />
Installation<br />
board<br />
installation board.<br />
2.The unit can be installed<br />
simply by gently pushing<br />
in the lower part.<br />
The marked portion of the<br />
indoor unit base lower latch<br />
– 31 –<br />
1. Remove the drain hose. 2. Remove the drain cap. 3. Insert the drain cap. 4. Connect the drain hose.<br />
Pipes storage area<br />
Wall<br />
Securing the indoor unit to the installation board<br />
Installation board<br />
Latch (2 locations)<br />
Wall<br />
Indoor unit base lower latch<br />
Indoor unit<br />
How to remove the indoor unit from the installation board<br />
Push up at the marked portion of the indoor unit base<br />
lower latch, and slightly pull it toward you.<br />
(both right and left hand sides)<br />
(The indoor unit base lower latch can be removed from<br />
the installation board)<br />
Push up the indoor unit upward. So the indoor unit will<br />
be removed from the installation board.<br />
RMA012A080_<strong>09</strong>1-<strong>09</strong>3_EN.indb 31 05/11/2014 11:50:41