

-TechManual_SRK05,09,12CR-S,CRR-S,CRP-S

You also want an ePaper? Increase the reach of your titles
YUMPU automatically turns print PDFs into web optimized ePapers that Google loves.
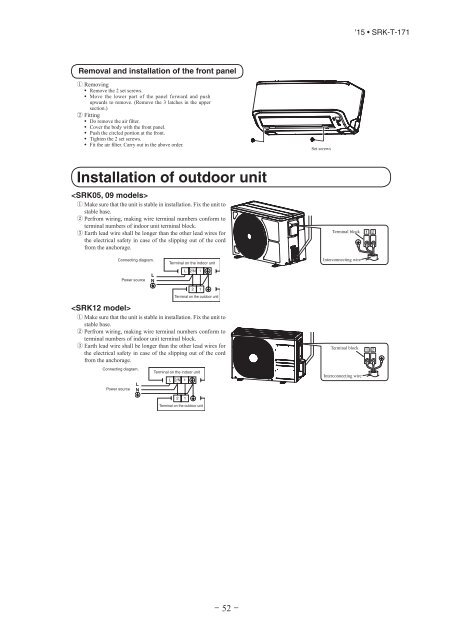
Removal and installation of the front panel<br />
Removing<br />
Remove the 2 set screws.<br />
Move the lower part of the panel forward and push<br />
upwards to remove. (Remove the 3 latches in the upper<br />
section.)<br />
Fitting<br />
Do remove the air filter.<br />
Cover the body with the front panel.<br />
Push the circled portion at the front.<br />
Tighten the 2 set screws.<br />
Fit the air filter. Carry out in the above order.<br />
Installation of outdoor unit<br />
<br />
Make sure that the unit is stable in installation. Fix the unit to<br />
stable base.<br />
Perfrom wiring, making wire terminal numbers conform to<br />
terminal numbers of indoor unit terminal block.<br />
Earth lead wire shall be longer than the other lead wires for<br />
the electrical safety in case of the slipping out of the cord<br />
from the anchorage.<br />
Connecting diagram.<br />
Power source<br />
Power source<br />
L<br />
N<br />
L<br />
N<br />
Terminal on the indoor unit<br />
Terminal on the indoor unit<br />
L 2/N 1<br />
2<br />
L 2/N 1<br />
Terminal on the outdoor unit<br />
1<br />
2<br />
Terminal on the outdoor unit<br />
1<br />
'15 • SRK-T-171<br />
Set screws<br />
Terminal block 1 2<br />
Interconnecting wire<br />
Terminal block<br />
1 2<br />
Interconnecting wire<br />
– 32–<br />
RMA012A080_<strong>09</strong>1-<strong>09</strong>3_EN.indb 32 05/11/2014 11:50:41