

MakerBot Educators Guidebook 3rd Edition

You also want an ePaper? Increase the reach of your titles
YUMPU automatically turns print PDFs into web optimized ePapers that Google loves.
MAKERBOT EDUCATORS GUIDEBOOK Chapter 5: Teachers’ Tricks of the Trade<br />
PAGE 120<br />
SECTION 5.2<br />
Z-Pause - Adding More to the 3D Print<br />
If you’re looking to add another element to your 3D prints you can use your <strong>MakerBot</strong> printer’s Pause feature to pause<br />
your print at a given Z-height or vertical length of the print. This method of Manual Z-Pause is commonly used by<br />
educators when looking to change or add colors to make features of a student’s model pop.<br />
Using Z-Pause, teachers and students can begin to incorporate the following:<br />
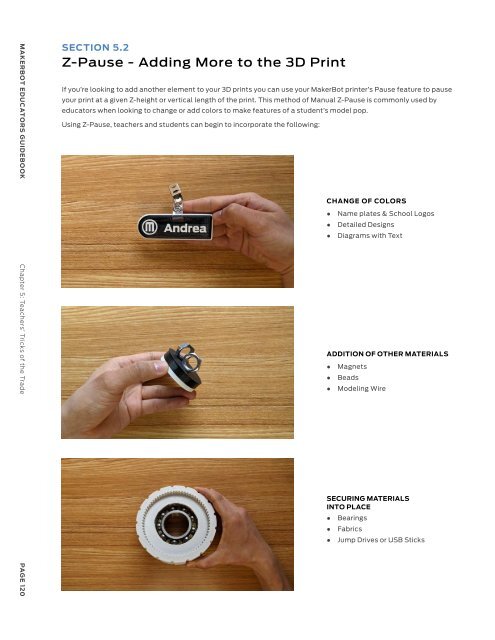
CHANGE OF COLORS<br />
●<br />
●<br />
●<br />
Name plates & School Logos<br />
Detailed Designs<br />
Diagrams with Text<br />
ADDITION OF OTHER MATERIALS<br />
●<br />
●<br />
●<br />
Magnets<br />
Beads<br />
Modeling Wire<br />
SECURING MATERIALS<br />
INTO PLACE<br />
●<br />
●<br />
●<br />
Bearings<br />
Fabrics<br />
Jump Drives or USB Sticks<br />
HOW IT’S DONE<br />
This <strong>MakerBot</strong> logo print was first started using black filament to print the base and once it got to the actual logo design<br />
we paused the printer and changed the filament to a white filament to make the logo standout from the original color.<br />
TIP:<br />
To pause your printer mid-print simply click ‘Pause’ on your <strong>MakerBot</strong> printer’s interface. The<br />
extruder will go back to its home position and give you enough access to manipulate your print.<br />
Z-Pause can also be used to add material to the inside of an ongoing print. One reason we might do this is to add<br />
magnets or even enclosing a bearing on the print like we did above. This technique is great for making musical<br />
instruments (by adding beads), making magnets, securing items in place, and even as shock absorbers (by adding<br />
hot glue to the inside of the print).<br />
TAKEAWAY<br />
NOTE:<br />
This process can be difficult to control<br />
since you will need to keep a close eye on<br />
your ongoing print in order to catch the<br />
specific layer or section at which you will<br />
be pausing your print.<br />
TIP:<br />
Older students can use this method as<br />
well but if you’re working with younger<br />
students we recommend teachers<br />
actually do this part as the printer will be<br />
paused and the extruder’s nozzle will still<br />
remain hot!<br />
Z-Pause is a great way to bring in another element into the 3D printing process and opens up the ways that 3D printing<br />
can be used to bring a 3D print or prototype to another level. Using Z-Pause can also help students further familiarize<br />
themselves with the potential capabilities of the <strong>MakerBot</strong> 3D printer giving them an added level of confidence and a<br />
better understanding of how to leverage 3D printing.<br />
MAKERBOT EDUCATORS GUIDEBOOK Chapter 5: Teachers’ Tricks of the Trade<br />
PAGE 121

