

MakerBot Educators Guidebook 3rd Edition

Create successful ePaper yourself
Turn your PDF publications into a flip-book with our unique Google optimized e-Paper software.
MAKERBOT EDUCATORS GUIDEBOOK Chapter 2: The X, Y, Zs of 3D Printing<br />
PAGE 30<br />
3D printing at a glance can seem like a technology that can be difficult to master - but like any new technology,<br />
machine or skill set, it starts with laying down a foundation of knowledge and growing on it. In this chapter, you’ll<br />
learn the overall process of how to go from a digital model to a physical print, how 3D printing actually works to<br />
create a physical, tangible object, what modeling programs students can begin using - no matter their skill level.<br />
SECTION 2.1<br />
From Digital Model to Physical Print<br />
How does a 3D printer know what to create and how? The process at first glance can seem like magic happening in<br />
front of our eyes, but like any technology there’s a series of steps that have to be followed before we get to a finished<br />
3D-printed model:<br />
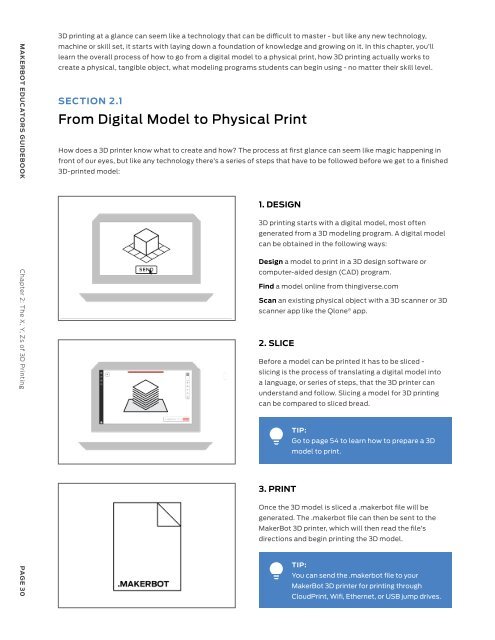
1. DESIGN<br />
3D printing starts with a digital model, most often<br />
generated from a 3D modeling program. A digital model<br />
can be obtained in the following ways:<br />
Design a model to print in a 3D design software or<br />
computer-aided design (CAD) program.<br />
Find a model online from thingiverse.com<br />
Scan an existing physical object with a 3D scanner or 3D<br />
scanner app like the Qlone ® app.<br />
2. SLICE<br />
Before a model can be printed it has to be sliced -<br />
slicing is the process of translating a digital model into<br />
a language, or series of steps, that the 3D printer can<br />
understand and follow. Slicing a model for 3D printing<br />
can be compared to sliced bread.<br />
TIP:<br />
Go to page 54 to learn how to prepare a 3D<br />
model to print.<br />
3. PRINT<br />
Once the 3D model is sliced a .makerbot file will be<br />
generated. The .makerbot file can then be sent to the<br />
<strong>MakerBot</strong> 3D printer, which will then read the file’s<br />
directions and begin printing the 3D model.<br />
TIP:<br />
You can send the .makerbot file to your<br />
<strong>MakerBot</strong> 3D printer for printing through<br />
CloudPrint, Wifi, Ethernet, or USB jump drives.<br />
SECTION 2.2<br />
How Does It Work?<br />
Now that we know how a digital model is taken to the printer to be 3D-printed, let’s take a look at how the 3D printer<br />
makes it possible for that sliced model to take its physical shape. All <strong>MakerBot</strong> 3D printers work in nearly the same<br />
way and use a technology called Fused Deposition Modeling, or FDM for short.<br />
FDM is the process of extruding a molten material, usually a type of plastic, from the printer’s extruder, similar to a<br />
hot glue gun onto a build surface that lowers as a new layer of molten material is extruded.<br />
A Closer Look<br />
01<br />
A printer’s extruder moves around a set<br />
plane, usually in the XY plane. As the extruder<br />
moves around the build plate following a long<br />
list of coordinates, melted plastic is extruded<br />
from the extruder as it moves and completes<br />
the first layer of a 3D print.<br />
02<br />
This forms a layer of melted plastic that cools<br />
off and can then hold its shape. As a layer is<br />
completed, the printer’s build plate will lower<br />
on the Z-axis and print another layer of plastic<br />
on the previously printed layer.<br />
03<br />
These layers then fuse together and the<br />
process continues over and over until a final<br />
3D shape is produced.<br />
MAKERBOT EDUCATORS GUIDEBOOK Chapter 2: The X, Y, Zs of 3D Printing<br />
PAGE 31

