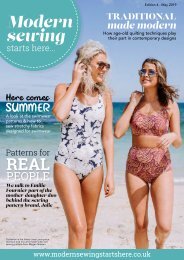
Modern Sewing Starts Here Edition 5
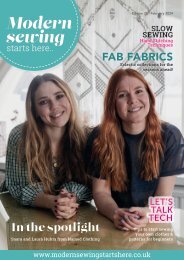
Modern Sewing Starts Here is the digital publication which features articles, reviews and handy tips for anyone with an interest in contemporary sewing This month we bring you: Pick of the latest sewing patterns Incorporate the Scarf Print Trend In Sewing Trendsetter - add style to your creations Organise Your Sewing Space Free motion Quilting Tips Sewing With Rayon + much more ...
Modern Sewing Starts Here is the digital publication which features articles, reviews and handy tips for anyone with an interest in contemporary sewing
This month we bring you:
Pick of the latest sewing patterns
Incorporate the Scarf Print Trend In Sewing
Trendsetter - add style to your creations
Organise Your Sewing Space
Free motion Quilting Tips
Sewing With Rayon
+ much more ...

You also want an ePaper? Increase the reach of your titles
YUMPU automatically turns print PDFs into web optimized ePapers that Google loves.
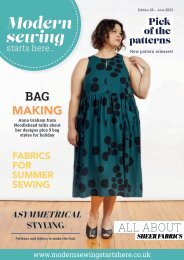
Requirements:<br />
Main fabric - 60 x140cm<br />
wide faux leather<br />
Lining fabric - 85<br />
x115cm wide cotton<br />
1 magnetic clasp (sewon<br />
or push-through)<br />
Light weight iron-on<br />
interfacing, approx 7.5 x<br />
3.5cm (3 x 1½in)<br />
Matching thread and<br />
contrasting thread for<br />
topstitching<br />
Quilting clips<br />
Paper for pattern at<br />
least 85 x 70cm (34 x 24in)<br />
To sew the bag:<br />
1. Place bag pieces in main<br />
fabric right sides together,<br />
and sew the centre front and<br />
back seams. Open out the<br />
seams, and topstitch from the<br />
right side of the fabric – I did<br />
two rows on both sides of the<br />
seam in a contrasting colour.<br />
2. Repeat this process for the<br />
lining. Sew centre back seam<br />
on lining, right sides together.<br />
3. Make pocket by folding<br />
the square in half, and with<br />
right sides together make a<br />
rectangle 25 x 11cm (9¾ x<br />
4½in), sew along both the<br />
short edges. Trim corners and<br />
turn right way out.<br />
4. Using a quilting ruler mark<br />
the placement for the internal<br />
pocket on the right side of the<br />
bag lining. Mark a line at right<br />
angles to the centre back<br />
seam 16cm (6¼in) down from<br />
the top edge, 12cm (4½in) to<br />
each side of the centre seam.<br />
5. Place the pocket with the<br />
raw edge to the line you’ve<br />
marked with the pocket<br />
facing downwards. Sew from<br />
one side of the pocket to<br />
the other with a 1cm seam,<br />
backstitching at each end to<br />
secure the seam.<br />
Fold and press the pocket<br />
upwards. Stitch up both sides<br />
of the pocket to secure in<br />
place – you may also wish<br />
to sew a divider to make two<br />
smaller pockets.<br />
To make the pattern:<br />
Visit www.modernsewingstartshere.com/slouchy-bag to download the template.<br />
Fold paper in half to make 85 x 30cm (34 x 12in)<br />
Draw the pattern out as per diagram measurements with the long straight side against<br />
the fold. Cut out and open up to make the pattern.<br />
Cut out two from both the faux leather and the cotton lining fabric. No need to worry<br />
about right or wrong sides as both pattern pieces are the same. You’ll also need to cut<br />
out a pocket in the lining fabric 25 x 22cm (9¾ x 8 ¾in).<br />
Seam allowance is 1cm<br />
There is enough fabric left to make a matching pouch (see instructions in the next issue).<br />
6. With right sides together<br />
sew the centre front seam of<br />
the bag lining. Fold the main<br />
bag right sides together with<br />
the centre front and back<br />
seams matching. Sew the<br />
bottom of the bag. Repeat<br />
for the bag lining leaving a<br />
gap open on one side of the<br />
centre seam of around 10cm<br />
(4in) to turn the bag.<br />
7. You now need to ‘bag’<br />
the bag bottom to make the<br />
shaping. To do this take the<br />
bag outer and firstly trim<br />
the corner off both ends of<br />
the bottom seam. Fold the<br />
corner right sides together so<br />
that the seam on the bottom<br />
matches the side of the bag,<br />
this should make a triangle<br />
with the bottom seam.<br />
8. Using a quilting ruler make<br />
a line across the triangle at<br />
right angles to the bottom<br />
seam 3.5cm (1½in) on either<br />
side of the seam and stitch<br />
securing the stitching at both<br />
ends. Trim the triangle off<br />
leaving a seam allowance of<br />
1cm. Repeat for all corners of<br />
the leather and lining.<br />
9. Cut the iron-on interfacing<br />
in half to make two small<br />
squares, and fuse these to<br />
the wrong side of the lining<br />
across the centre front and<br />
back seams approx 2cm (¾in)<br />
down from the top edge.<br />
This will provide support for<br />
the magnetic clasps. Fix the<br />
clasps onto the lining right<br />
side over the interfaced<br />
square making sure they are<br />
an equal distance from the<br />
top edge of the bag.<br />
10. Turn bag inside out<br />
and place the lining inside<br />
it with right side facing.<br />
Matching centre front and<br />
back seams, clip edges<br />
together and sew the bag<br />
and lining together. Always<br />
use clips rather than pins for<br />
faux leather as pins can mark<br />
the fabric.<br />
11. Clip seam allowances<br />
around the curves and turn<br />
the bag to the right sides<br />
through the lining opening.<br />
Topstitch edges.<br />
12. Sew the handles together<br />
by sewing them right<br />
sides together about 4cm<br />
(1½in) from the ends of the<br />
handles. Trim one handle<br />
seam allowance to approx<br />
1cm. Fold the other seam<br />
allowance in half and put<br />
the raw edge inside, then<br />
topstitch across the handle to<br />
secure. Slip stitch the gap in<br />
the bottom of the lining. Your<br />
bag is now finished...enjoy!<br />
<strong>Sewing</strong> with faux leather:<br />
The Modelo faux leather used<br />
here is available in a great<br />
range of colours including<br />
metallic and pearl finishes. It<br />
has a woven fabric backing,<br />
which sews really well with a<br />
normal machine foot.<br />
Depending on faux leather<br />
fabric you choose you might<br />
find it easier to sew with a<br />
teflon foot or walking foot<br />
(the Modelo is easy to sew<br />
with so I didn’t need either),<br />
also make sure you increase<br />
your stitch length a little to<br />
around as this avoids stressing<br />
the faux leather at the seams.<br />
To view everything used in<br />
this project – click here