the Toshiba LCD REGZA 32HL66 - Volume Mart
the Toshiba LCD REGZA 32HL66 - Volume Mart
the Toshiba LCD REGZA 32HL66 - Volume Mart
You also want an ePaper? Increase the reach of your titles
YUMPU automatically turns print PDFs into web optimized ePapers that Google loves.
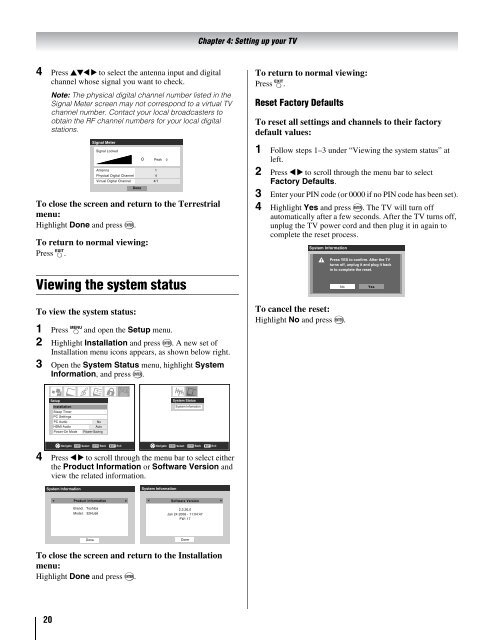
4 Press BbC c to select <strong>the</strong> antenna input and digital<br />
channel whose signal you want to check.<br />
20<br />
Note: The physical digital channel number listed in <strong>the</strong><br />
Signal Meter screen may not correspond to a virtual TV<br />
channel number. Contact your local broadcasters to<br />
obtain <strong>the</strong> RF channel numbers for your local digital<br />
stations.<br />
Signal Meter<br />
Signal Locked<br />
Antenna 1<br />
Physical Digital Channel 4<br />
Virtual Digital Channel<br />
Done<br />
4/1<br />
To close <strong>the</strong> screen and return to <strong>the</strong> Terrestrial<br />
menu:<br />
Highlight Done and press T.<br />
To return to normal viewing:<br />
Press O.<br />
Viewing <strong>the</strong> system status<br />
To view <strong>the</strong> system status:<br />
0 Peak 0<br />
1 Press Y and open <strong>the</strong> Setup menu.<br />
2 Highlight Installation and press T. A new set of<br />
Installation menu icons appears, as shown below right.<br />
3 Open <strong>the</strong> System Status menu, highlight System<br />
Information, and press T.<br />
Setup<br />
Installation<br />
Sleep Timer<br />
PC Settings<br />
PC Audio<br />
HDMI Audio<br />
Power-On Mode<br />
Navigate ENTER Select CH RTN Back EXIT Exit Navigate ENTER Select CH RTN Back EXIT Exit<br />
4 Press C c to scroll through <strong>the</strong> menu bar to select ei<strong>the</strong>r<br />
<strong>the</strong> Product Information or Software Version and<br />
view <strong>the</strong> related information.<br />
System Information<br />
No<br />
Auto<br />
Power-Saving<br />
Product Information<br />
Brand: <strong>Toshiba</strong><br />
Model: <strong>32HL66</strong><br />
Done<br />
System Information<br />
System Status<br />
System Infomation<br />
Software Version<br />
2.2.26.0<br />
Jan 24 2006 - 11:04:47<br />
FW: 17<br />
To close <strong>the</strong> screen and return to <strong>the</strong> Installation<br />
menu:<br />
Highlight Done and press T.<br />
Done<br />
Chapter 4: Setting up your TV<br />
To return to normal viewing:<br />
Press O.<br />
Reset Factory Defaults<br />
To reset all settings and channels to <strong>the</strong>ir factory<br />
default values:<br />
1 Follow steps 1–3 under “Viewing <strong>the</strong> system status” at<br />
left.<br />
2 Press C c to scroll through <strong>the</strong> menu bar to select<br />
Factory Defaults.<br />
3 Enter your PIN code (or 0000 if no PIN code has been set).<br />
4 Highlight Yes and press T. The TV will turn off<br />
automatically after a few seconds. After <strong>the</strong> TV turns off,<br />
unplug <strong>the</strong> TV power cord and <strong>the</strong>n plug it in again to<br />
complete <strong>the</strong> reset process.<br />
System Information<br />
To cancel <strong>the</strong> reset:<br />
Highlight No and press T.<br />
Press YES to confirm. After <strong>the</strong> TV<br />
turns off, unplug it and plug it back<br />
in to complete <strong>the</strong> reset.<br />
No<br />
Yes


