

the Toshiba LCD REGZA 32HL66 - Volume Mart
the Toshiba LCD REGZA 32HL66 - Volume Mart
the Toshiba LCD REGZA 32HL66 - Volume Mart

You also want an ePaper? Increase the reach of your titles
YUMPU automatically turns print PDFs into web optimized ePapers that Google loves.
Selecting <strong>the</strong> video input source<br />
to view<br />
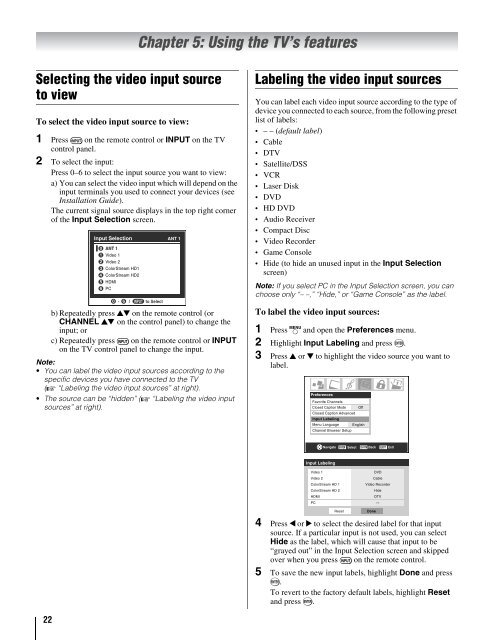
To select <strong>the</strong> video input source to view:<br />
1 Press + on <strong>the</strong> remote control or INPUT on <strong>the</strong> TV<br />
control panel.<br />
2 To select <strong>the</strong> input:<br />
Press 0–6 to select <strong>the</strong> input source you want to view:<br />
a) You can select <strong>the</strong> video input which will depend on <strong>the</strong><br />
input terminals you used to connect your devices (see<br />
Installation Guide).<br />
The current signal source displays in <strong>the</strong> top right corner<br />
of <strong>the</strong> Input Selection screen.<br />
22<br />
Input Selection ANT 1<br />
0<br />
1<br />
2<br />
3<br />
4<br />
5<br />
6<br />
ANT 1<br />
Video 1<br />
Video 2<br />
ColorStream HD1<br />
ColorStream HD2<br />
HDMI<br />
PC<br />
0 - 6 / INPUT to Select<br />
Chapter 5: Using <strong>the</strong> TV’s features<br />
b) Repeatedly press Bb on <strong>the</strong> remote control (or<br />
CHANNEL Bb on <strong>the</strong> control panel) to change <strong>the</strong><br />
input; or<br />
c) Repeatedly press + on <strong>the</strong> remote control or INPUT<br />
on <strong>the</strong> TV control panel to change <strong>the</strong> input.<br />
Note:<br />
You can label <strong>the</strong> video input sources according to <strong>the</strong><br />
specific devices you have connected to <strong>the</strong> TV<br />
(- “Labeling <strong>the</strong> video input sources” at right).<br />
The source can be “hidden” (- “Labeling <strong>the</strong> video input<br />
sources” at right).<br />
Labeling <strong>the</strong> video input sources<br />
You can label each video input source according to <strong>the</strong> type of<br />
device you connected to each source, from <strong>the</strong> following preset<br />
list of labels:<br />
– – (default label)<br />
Cable<br />
DTV<br />
Satellite/DSS<br />
VCR<br />
Laser Disk<br />
DVD<br />
HD DVD<br />
Audio Receiver<br />
Compact Disc<br />
Video Recorder<br />
Game Console<br />
Hide (to hide an unused input in <strong>the</strong> Input Selection<br />
screen)<br />
Note: If you select PC in <strong>the</strong> Input Selection screen, you can<br />
choose only “– –,” “Hide,” or “Game Console” as <strong>the</strong> label.<br />
To label <strong>the</strong> video input sources:<br />
1 Press Y and open <strong>the</strong> Preferences menu.<br />
2 Highlight Input Labeling and press T.<br />
3 Press B or b to highlight <strong>the</strong> video source you want to<br />
label.<br />
Preferences<br />
Favorite Channels<br />
Closed Caption Mode Off<br />
Closed Caption Advanced<br />
Input Labeling<br />
Menu Language English<br />
Channel Browser Setup<br />
Input Labeling<br />
Navigate ENTER Select CH RTN Back EXIT Exit<br />
Video 1 DVD<br />
Video 2 Cable<br />
ColorStream HD 1 Video Recorder<br />
ColorStream HD 2 Hide<br />
HDMI DTV<br />
PC --<br />
Reset<br />
4 Press C or c to select <strong>the</strong> desired label for that input<br />
source. If a particular input is not used, you can select<br />
Hide as <strong>the</strong> label, which will cause that input to be<br />
“grayed out” in <strong>the</strong> Input Selection screen and skipped<br />
over when you press + on <strong>the</strong> remote control.<br />
5 To save <strong>the</strong> new input labels, highlight Done and press<br />
T.<br />
To revert to <strong>the</strong> factory default labels, highlight Reset<br />
and press T.<br />
Done