

the Toshiba LCD REGZA 32HL66 - Volume Mart
the Toshiba LCD REGZA 32HL66 - Volume Mart
the Toshiba LCD REGZA 32HL66 - Volume Mart

Create successful ePaper yourself
Turn your PDF publications into a flip-book with our unique Google optimized e-Paper software.
Using <strong>the</strong> PC setting feature<br />
You can view <strong>the</strong> image from a PC on <strong>the</strong> TV screen. The PC<br />
must be connected to <strong>the</strong> TV’s PC IN terminals<br />
(- Installation Guide).<br />
You can use <strong>the</strong> PC Settings feature to adjust <strong>the</strong> picture’s<br />
horizontal position/width, vertical position/height, clock<br />
phase, and sampling clock.<br />
If <strong>the</strong> edges of <strong>the</strong> picture are cut off, readjust <strong>the</strong> Horizontal<br />
Position/Width and Vertical Position/Height. If <strong>the</strong><br />
picture is affected by interference, readjust <strong>the</strong> Clock Phase<br />
and Sampling Clock.<br />
To adjust <strong>the</strong> PC settings:<br />
1 Repeatedly press + to select PC input mode<br />
(- “Selecting <strong>the</strong> video input source to view” page 22).<br />
2 Press Y and open <strong>the</strong> Setup menu.<br />
3 Highlight PC Settings and press T.<br />
Note: If a PC is not connected, this feature will be grayed<br />
out in <strong>the</strong> Setup menu.<br />
4 Press B or b to highlight <strong>the</strong> item you want to adjust.<br />
5 Press C or c to make <strong>the</strong> appropriate adjustments.<br />
38<br />
Setup<br />
Installation<br />
Sleep Timer<br />
PC Settings<br />
PC Audio<br />
HDMI Audio<br />
Power-On Mode<br />
No<br />
Auto<br />
Power-Saving<br />
Navigate ENTER Select CH RTN Back EXIT Exit<br />
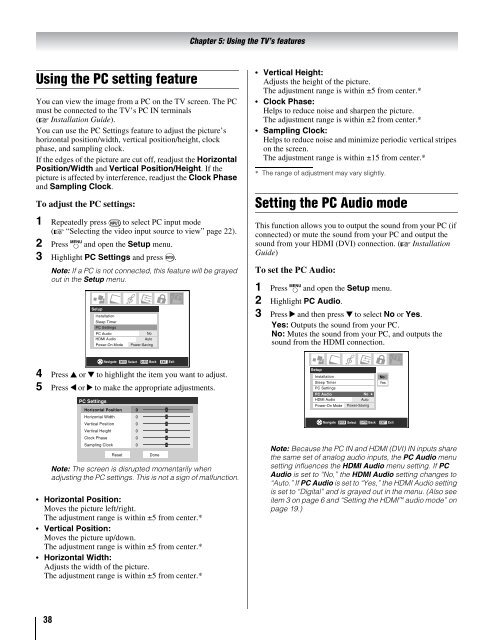
PC Settings<br />
Horizontal Position 0<br />
Horizontal Width 0<br />
Vertical Position<br />
0<br />
Vertical Height<br />
0<br />
Clock Phase<br />
0<br />
Sampling Clock<br />
0<br />
Reset<br />
Done<br />
Note: The screen is disrupted momentarily when<br />
adjusting <strong>the</strong> PC settings. This is not a sign of malfunction.<br />
Horizontal Position:<br />
Moves <strong>the</strong> picture left/right.<br />
The adjustment range is within ±5 from center.*<br />
Vertical Position:<br />
Moves <strong>the</strong> picture up/down.<br />
The adjustment range is within ±5 from center.*<br />
Horizontal Width:<br />
Adjusts <strong>the</strong> width of <strong>the</strong> picture.<br />
The adjustment range is within ±5 from center.*<br />
Chapter 5: Using <strong>the</strong> TV’s features<br />
Vertical Height:<br />
Adjusts <strong>the</strong> height of <strong>the</strong> picture.<br />
The adjustment range is within ±5 from center.*<br />
Clock Phase:<br />
Helps to reduce noise and sharpen <strong>the</strong> picture.<br />
The adjustment range is within ±2 from center.*<br />
Sampling Clock:<br />
Helps to reduce noise and minimize periodic vertical stripes<br />
on <strong>the</strong> screen.<br />
The adjustment range is within ±15 from center.*<br />
* The range of adjustment may vary slightly.<br />
Setting <strong>the</strong> PC Audio mode<br />
This function allows you to output <strong>the</strong> sound from your PC (if<br />
connected) or mute <strong>the</strong> sound from your PC and output <strong>the</strong><br />
sound from your HDMI (DVI) connection. (- Installation<br />
Guide)<br />
To set <strong>the</strong> PC Audio:<br />
1 Press Y and open <strong>the</strong> Setup menu.<br />
2 Highlight PC Audio.<br />
3 Press c and <strong>the</strong>n press b to select No or Yes.<br />
Yes: Outputs <strong>the</strong> sound from your PC.<br />
No: Mutes <strong>the</strong> sound from your PC, and outputs <strong>the</strong><br />
sound from <strong>the</strong> HDMI connection.<br />
Setup<br />
Installation<br />
Sleep Timer<br />
PC Settings<br />
PC Audio<br />
No<br />
HDMI Audio<br />
Auto<br />
Power-On Mode<br />
Power-Saving<br />
Navigate ENTER Select CH RTN Back EXIT Exit<br />
Note: Because <strong>the</strong> PC IN and HDMI (DVI) IN inputs share<br />
<strong>the</strong> same set of analog audio inputs, <strong>the</strong> PC Audio menu<br />
setting influences <strong>the</strong> HDMI Audio menu setting. If PC<br />
Audio is set to “No,” <strong>the</strong> HDMI Audio setting changes to<br />
“Auto.” If PC Audio is set to “Yes,” <strong>the</strong> HDMI Audio setting<br />
is set to “Digital” and is grayed out in <strong>the</strong> menu. (Also see<br />
item 3 on page 6 and “Setting <strong>the</strong> HDMI audio mode” on<br />
page 19.)<br />
No<br />
Yes