6-Channel 10-Model Memory Full Range DSM2™ 2.4GHz Radio ...
6-Channel 10-Model Memory Full Range DSM2™ 2.4GHz Radio ...
6-Channel 10-Model Memory Full Range DSM2™ 2.4GHz Radio ...

You also want an ePaper? Increase the reach of your titles
YUMPU automatically turns print PDFs into web optimized ePapers that Google loves.
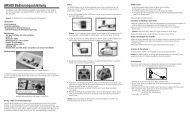
RECEIvER INSTAllATION<br />
Install the main receiver using the same method you would use to install a conventional receiver in your aircraft.<br />
Typically, wrap the main receiver in protective foam and fasten it in place using rubber bands or Velcro straps.<br />
Alternately, in electric models or helicopters, it’s acceptable to use thick double-sided foam tape to fasten the main<br />
receiver in place.<br />
Mounting the remote receiver in a slightly different location, even just inches away from the primary receiver,<br />
gives tremendous improvements in path diversity. Essentially, each receiver sees a different RF environment and<br />
this is key to maintaining a solid RF link, even in aircraft that have substantial conductive materials (i.e. larger gas<br />
engines, carbon fiber, pipes, etc.), which can attenuate the signal.<br />
Using servo tape, mount the remote receiver keeping the remote antennas at least 2 inches (51mm) away from the<br />
primary antenna. Ideally, the antennas will be oriented perpendicularly to each other, however, we’ve found this to<br />
not be critical. In airplanes, we’ve found it best to mount the primary receiver in the center of the fuselage on the<br />
servo tray and to mount the remote receiver to the side of the fuselage or in the turtle deck.<br />
In helicopters, there is generally enough room on the servo tray to achieve the necessary separation. If necessary,<br />
a mount can be fashioned using clear plastic to mount the external receiver.<br />
SPEKTRUM DX6i • RADIO PROGRAMMING GUIDE<br />
15