ā Evacuated Solar Energy Collector Technical Reference
ā Evacuated Solar Energy Collector Technical Reference
ā Evacuated Solar Energy Collector Technical Reference

Create successful ePaper yourself
Turn your PDF publications into a flip-book with our unique Google optimized e-Paper software.
thermomax �<br />
<strong>Evacuated</strong> <strong>Solar</strong> <strong>Energy</strong> <strong>Collector</strong><br />
<strong>Technical</strong> <strong>Reference</strong> & Installation<br />
Manual<br />
Thermo Technologies<br />
5560 Sterrett Place<br />
Suite 115<br />
Columbia, MD 21044<br />
Tel.: (410) 997-0779 www.thermomax.com<br />
Fax.: (410) 997-0778 info@thermomax.com
CONTENTS<br />
Contents<br />
1.0 What does THERMOMAX offer 1<br />
2.0 How to get the most out of a THERMOMAX system 2<br />
3.0 How does a THERMOMAX system work 3<br />
3.1 The THERMOMAX Tube<br />
3.1.1 The Absorber<br />
3.1.2 The <strong>Evacuated</strong> Glass Tube 4<br />
3.1.3 The Condenser<br />
3.2 The THERMOMAX MS Manifold<br />
3.3 Accessories 5<br />
3.3.1 Roof fixing kits 6<br />
3.3.2 <strong>Solar</strong> Differential Controller<br />
4. How does a THERMOMAX system perform 8<br />
4.1 <strong>Solar</strong> Fundamentals<br />
4.2 Thermal Performance<br />
5.0 How to design a THERMOMAX system 10<br />
5.1 <strong>Collector</strong> Area<br />
5.2 Flow rate<br />
5.3 Pipework 11<br />
5.4 Circulation Pump<br />
5.5 Expansion Vessel 13<br />
5.6 Hydraulics 14<br />
5.6.1 <strong>Collector</strong> System<br />
5.6.2 Overall System Design<br />
6.0 How to install a THERMOMAX system 19<br />
6.1 General<br />
6.2 Manifold Connections<br />
6.3 MS-System 21<br />
6.4 KS-System 24<br />
6.5 FS-System 27<br />
6.6 Alternative Methods 30<br />
6.7 Commissioning<br />
7.0 How to maintain a THERMOMAX System 31<br />
7.1 Periodic Checks<br />
7.2 Optional Checks<br />
7.3 Five Yearly Checks<br />
8.0 Trouble Shooting 32<br />
i
Contents<br />
9.0 Appendix 33<br />
9.1 Products and Spare Parts<br />
9.2 System sizing tables 35<br />
9.3 <strong>Solar</strong> Radiation Table 37<br />
9.4 Checklist 38/39<br />
9.5 Calculation Sheet 38/40<br />
9.6 Commissioning Sheet 38/42<br />
ii
(1.0) What does THERMOMAX offer<br />
<strong>Solar</strong> Division<br />
Thermomax Ltd. is a leading manufacturer<br />
of high efficiency equipment for efficient<br />
and economical conversion of solar<br />
radiation into thermal energy. Based in<br />
two locations in the United Kingdom, and<br />
a unit in Italy, Thermomax occupies over<br />
10,000m² of purpose built factories on 10<br />
acres (40,400m²) of land. The operation is<br />
complete with engineering and administration<br />
offices, manufacturing plants, development<br />
laboratory and testing facilities.<br />
Thermomax has a staff of professional,<br />
technical and production personnel with a<br />
high degree of dedication and competence.<br />
The evacuated heat-pipe solar collector<br />
is the result of extensive research, development<br />
and testing. These high performance,<br />
reliable and cost effective solar<br />
modules use advanced technology and<br />
new materials.<br />
Thermomax’s manufacturing operations<br />
are geared to volume production and high<br />
quality assurance. The plants are well<br />
equipped with modern machinery and<br />
specialised tooling for efficient and reliable<br />
production. Thermomax’s engineering factory<br />
in northern Italy is involved in manufacturing<br />
some of the unique and sophisticated<br />
equipment needed for production<br />
purposes as well as specialised components.<br />
Electronic Division<br />
An electronic division, established in<br />
1990, produces microprocessor controllers<br />
for the solar heating sy stems as well as<br />
sophisticated controllers and data loggers<br />
for commercial refrigeration applications.<br />
The Market<br />
The market for Thermomax solar products<br />
is worldwide and is managed through<br />
a network of distributors, dealers and independent<br />
agents. These firms provide<br />
1<br />
About THERMOMAX<br />
application and installation assistance to<br />
users, architects, engineers and contractors.<br />
Thermomax is currently sold to over 40<br />
countries with Western Europe, Far East<br />
and the United States as its main markets.<br />
The number of Thermomax collector tubes<br />
in service throughout the world is now in<br />
the millions. Satisfied Thermomax users<br />
achieve considerable savings in their fuel<br />
cost as well as contributing towards a reduction<br />
in CO 2 emissions.<br />
Installations in extreme climates such<br />
as Africa and the Antarctic clearly show<br />
the exceptional design characteristics of<br />
the Thermomax systems.<br />
Thermomax solar collectors are used to<br />
produce clean energy for domestic and<br />
industrial hot water, space heating and<br />
cooling. Projects such as the solar water<br />
heating at Singapore Airport are the largest<br />
of their kind, confirming international<br />
acknowledgement and full confidence in<br />
the Company and its products.<br />
Assured and approved Quality<br />
Thermomax solar manufacturing plants<br />
are fully registered to the internationally<br />
recognised ISO Quality Management Systems;<br />
the Company has obtained ISO<br />
9001 certificate.<br />
Thermomax collectors are tested and<br />
certified by major independent testing authorities<br />
in Germany, Switzerland, United<br />
States, Great Britain and Australia. Thermomax<br />
has received 10 major awards, the<br />
first being a 1982 Technology Award received<br />
in Germany and two prestige<br />
Queen’s Awards for export achievement.<br />
The Design Council confirms the Thermo-<br />
max collector to be an outstanding Brit ish Product and winner of a “Millennium<br />
Award”.<br />
Thermomax products and production<br />
techniques are protected<br />
throughout the world by several patents.
(2.0) How to get the most out of a THERMOMAX � system<br />
We recommend you to read this manual<br />
thoroughly before commencing installation<br />
and to adhere to the cautions given<br />
and to all local authorities regulations and<br />
relevant standards.<br />
1. Thermomax � sy stems should only be<br />
installed by qualified persons. If in<br />
doubt about any aspect of the installation<br />
contact your<br />
�<br />
Thermomax<br />
dealer.<br />
2. System sizing and application must be<br />
in accordance with recommendations<br />
by Thermomax � .<br />
3. Responsibility for safe and proper<br />
installation of a Thermomax � solar<br />
water heating sy stem rests with the<br />
installer.<br />
�<br />
4. Thermomax manifold sy stems are<br />
designed to work with a maximum<br />
operating pressure of 5 bar (75 psi).<br />
To guarantee this pressure is not exceeded<br />
a pressure relief valve and a<br />
pressure gauge must be used.<br />
5. The chloride content of the water<br />
passing through the manifold should<br />
not exceed 40 ppm – check with your<br />
local water authorities.<br />
6. In areas with hard water a heat exchanger<br />
is strongly recommended<br />
otherwise regular cleaning of the system<br />
is essential.<br />
7. In cool regions use suitable non-toxic<br />
antifreeze-inhibitor e.g. water/glycol<br />
mix (not car antifreeze).<br />
2<br />
Cautions<br />
8. When heating a swimming pool or<br />
spa a heat exchanger must be used<br />
between the pool and the collector.<br />
9. Unpack and install the collector tubes<br />
only after the manifold unit has been<br />
installed and the pipework has been<br />
connected.<br />
10. Make sure the COATED SURFACE of<br />
the absorber in the tube is uppermost<br />
when installed.<br />
11. The collector tubes should be covered<br />
if the system has not been filled and<br />
the tubes are exposed to the sun for<br />
extended periods (more than 1 day).<br />
12. Gloves and eye protection should be<br />
worn when handling glass.<br />
Avoid any sudden shock to tubes.<br />
Av oid scratching the glass collector<br />
tubes, as this will reduce their<br />
strength.<br />
Throughout this handbook various suggestions<br />
hav e been made for sy stem design<br />
and installation. You are strongly advised<br />
to follow these suggestions, however final<br />
design of any installation is left to the discretion<br />
of the installer.<br />
This manual was correct at the time of<br />
going to print but, as part of a continual<br />
product improvement, Thermomax � reserves<br />
the right to update and amend<br />
specifications without notice.<br />
The Thermomax � <strong>Solar</strong> <strong>Collector</strong> is patented<br />
worldwide.
(3.0) How does a Thermomax system work<br />
<strong>Technical</strong> product description<br />
The two main components of the THERMOMAX � solar collector sy stem are the THERMOMAX �<br />
Memotron � <strong>Evacuated</strong> <strong>Solar</strong> <strong>Collector</strong> Tube and the THERMOMAX � Manifold. Complete roof<br />
fixing kits and pump control units are available as accessories.<br />
THERMOMAX � MEMOTRON � <strong>Evacuated</strong> Heat-Pipe <strong>Solar</strong> <strong>Collector</strong>s offer the following features:<br />
- High performance<br />
- Low heat capacity and high heat<br />
transfer<br />
- Thermal diode operation – Heat<br />
flow only in one direction (Tube<br />
to manifold)<br />
- Control of maximum temperature<br />
- High durability<br />
- Freedom from corrosion problems<br />
- Freedom from cold weather/frost<br />
problems<br />
- Low maintenance effort<br />
- Easy installation of single or multiple<br />
units<br />
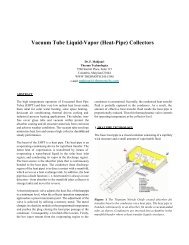
(3.1) The THERMOMAX �<br />
Tube<br />
� �<br />
The THERMOMAX Memotron<br />
<strong>Evacuated</strong> <strong>Solar</strong> <strong>Collector</strong> Tube as<br />
shown in Figure 1 combines the<br />
technology of the fully evacuated<br />
glass tube, the specially designed<br />
absorber with heat-pipe technology<br />
and the unique condenser.<br />
Ab sor pt ion<br />
(3.1.1) The Absorber<br />
The main assembly parts of the absorber<br />
are the ABSORBER PLATE and<br />
the HEAT-PIPE.<br />
The absorber plate is coated with a<br />
special high efficiency SELECTIVE<br />
COATING that ensures maximum<br />
radiation absorption and minimum<br />
thermal radiation losses. Figure 2 shows the characteristics of the selectiv e coating. The coat-<br />
0.0<br />
0.1<br />
0.2<br />
0.3<br />
0.4<br />
0.5<br />
0.6<br />
0.7<br />
0.8<br />
0.9<br />
1.0<br />
<strong>Solar</strong><br />
Radi ation<br />
Se lectiv e Coat ing<br />
Wavelength [� m]<br />
Fi gure 2<br />
Heat<br />
Radiation<br />
@ 37 3 K<br />
0.0<br />
0.1<br />
0.2<br />
0.3<br />
0.4<br />
0.5<br />
0.6<br />
0.7<br />
0.8<br />
0.9<br />
1.0<br />
3<br />
Emission<br />
ing undergoes a stringent quality control<br />
test with only the materials meeting our<br />
required levels of absorption and emittance<br />
standards being used in production.<br />
A heat-pipe performs like a high conductance<br />
thermal conductor. Due to its thermophysical<br />
properties, its heat transfer<br />
rate could be thousands of times greater<br />
than that of the best solid heat conductors<br />
of the same dimensions. The heatpipe<br />
employs an evaporating-condensing<br />
cycle, which accepts heat from an exter-
<strong>Technical</strong> product description<br />
nal source, uses this heat to evaporate the liquid (latent heat) and then releases the latent<br />
heat by reverse transformation (condensation) at a heat sink region. This process is repeated<br />
continuously as the condensed fluid returns to its original position due to gravity.<br />
Rapid temperature swings produce localised stresses within all glass to metal joints limiting<br />
the life of the joint. In order to remove these stresses a specially designed THERMAL SHOCK<br />
ABSORBER is incorporated into the THERMOMAX � �<br />
Memotron <strong>Evacuated</strong> <strong>Solar</strong> <strong>Collector</strong><br />
Tube. This patented thermal shock absorber is made of a metal having high thermal resistance<br />
and high mechanical strength to completely absorb the temperature swing.<br />
(3.1.2) The <strong>Evacuated</strong> Glass Tube<br />
�<br />
In a THERMOMAX collector the absorber plate and its heat-pipe is hermetically sealed within<br />
an evacuated glass tube. This protects the high efficiency of the absorber plate from adverse<br />
weathering influences as well as airborne pollutants.<br />
The vacuum in the evacuated glass tube is 10 -5 mbar. This can only be reached and maintained<br />
over a long period of time through a specialised evacuation process in production resulting<br />
in an almost total elimination of convection and conduction losses from the collector.<br />
Due to the tubular shape each glass tube offers<br />
minimal resistance to wind and snow build up.<br />
(3.1.3) The Condenser<br />
The heat-pipe is coupled to a high efficiency CON-<br />
DENSER, operating as the heat sink in the repetitive<br />
evaporation/condensation cycle of the heatpipe<br />
as shown in Figure 3. Radiation striking the<br />
collector plate is absorbed, then transferred via the<br />
heat-pipe as thermal energy to the condenser.<br />
Connected into the THERMOMAX � manifold, the<br />
condenser efficiently transfers this heat to the wa-<br />
ter of the connected circuit.<br />
The unique design of THERMOMAX � ’s Memotron<br />
condenser assembly provides an edge on other<br />
similar collectors. The special interior construction of the condenser prohibits any delay of its<br />
operation, which may be caused by overheating of the heat transfer vapour in the heat-pipe.<br />
This design of the condenser also increases considerably the output of the unit.<br />
(3.2) The THERMOMAX �<br />
MS Manifold<br />
The THERMOMAX � MS manifolds are designed in either a 2 m² or a 3 m² tube assembly configuration.<br />
A 20 tube manifold adds up to a 2 m² assembly, and the 30 tube manifold to a 3<br />
m² assembly. These can be extended by parallel and serial connection of as many manifolds<br />
as required to cover the demanded energy requirement.<br />
The insulated manifolds are supplied completely with the support assemblies and all connection<br />
fittings for the pipework required. The manifold chamber is made from high grade<br />
stainless steel and is sealed in a weather resistant metal cover. There is a thick CFC - free<br />
polyurethane foam insulating jacket, having a U value [W/(mK)] of 0.28 � U � 0.35. The<br />
stainless steel manifold inlet and outlet pipe has 22 mm diameter.<br />
The manifold section is 115 mm high and 120 mm wide. The approximate overall dimensions,<br />
weights, water capacity and absorber area are given in Table 1:<br />
4<br />
�
MS Manifold 20 tubes 30 tubes<br />
O v erall dimensions<br />
[mm]<br />
1415 x 2130 2124 x 2130<br />
Weight [kg] 45 68<br />
C apacity [l] 3.3 5.0<br />
Net A bsorber area<br />
[m²]<br />
2.0 3.0<br />
Table 1<br />
<strong>Technical</strong> product description<br />
The stainless steel manifold and all welds and joints are fully processed and pressure tested.<br />
Please refer to the CAUTIONS given at the beginning of this manual for detailed information<br />
about the water quality and application of the system.<br />
(3.3) Accessories<br />
To complete a solar sy stem v arious other parts are required. THERMOMAX supplies the following:<br />
- Variety of roof fixing kits<br />
- Flexible hose kits for ease of installation on the roof<br />
- Pump control units for efficient operation and control of the system<br />
THERMOMAX � does not normaly supply any plumbing equipment (except the required parts<br />
to connect the manifold) or hot water tanks and other commercially available parts. Figure 4<br />
shows an assembled THERMOMAX � <strong>Solar</strong> <strong>Collector</strong>.<br />
5<br />
�
(3.3.1) Roof fixing kits<br />
MS System<br />
<strong>Technical</strong> product description<br />
�<br />
The MS Sy stem is supplied as standard with the THERMOMAX MS manifolds. The patented<br />
stainless steel bands provided are suitable for pitched roof tiles, especially slated roofs.<br />
KS System<br />
The optional KS System is similar in its application to the MS System. It is also used on<br />
pitched roofs with roof tiles. The use of this system is recommended for stone/brick tiles, as a<br />
bigger distance has to be overcome between the rafter and the support frame of the THER-<br />
MOMAX � sy stem.<br />
FS System<br />
The optional FS System is to be used for flat roof or ground installations. It contains a complete<br />
frame set, manufactured out of stainless steel, allowing the system to be installed under<br />
different inclination angles on a flat roof or the ground. Basically the heat-pipe works under<br />
angles between 25° and 50° with the optimum angle of the solar radiation being equal to the<br />
geographical latitude of the system location.<br />
Alternative mounting methods<br />
The THERMOMAX � solar collector system can also be fixed directly to a concrete roof, a solid<br />
wall or a copper roof. It is possible to secure the support frame to the rafter using either the<br />
MS or the KS system by using a noggin. A noggin is a beam between two rafters. Figure 5<br />
shows one alternative roof mounting option.<br />
(3.3.2) <strong>Solar</strong> Differential Controller<br />
Figure 5<br />
THERMOMAX � manufacturers a compact and easily installed control device that will regulate<br />
the flow of water from the collector to the heat exchanger in the hot water storage tank using<br />
microprocessor technology. The control unit will automatically operate the pump according to<br />
conditions set by the installer.<br />
Pump Control Unit<br />
The pump control unit is a fully assembled group of components mounted on a back plate,<br />
enclosed by an insulated cover and includes the following parts:<br />
6
- Expansion vessel (18 l, 6 bar)<br />
- Pressure relief valve (opening pressure 5 bar) with pressure gauge<br />
- Filling loop including valve, hose connector, flexible hose<br />
Controllers<br />
<strong>Technical</strong> product description<br />
THERMOMAX � manufacturers a range of multi-functional microprocessor units providing complete<br />
control for the solar heating system. The microprocessor technology used in the<br />
manufacture ensures the collected energy from the sun is transferred efficiently and harnessed<br />
under optimum conditions. From the easy to understand SMT 100 to the more sophisticated<br />
SMT 400 via a middle of the range SMT 300, the units provide users with valuable<br />
information about their THERMOMAX � solar collector sy stem.<br />
System Kit / Active Pack<br />
The Active Pack contains all functional parts of the Pump Control Unit, without the back plate<br />
and the insulation cover, to allow a more flexible installation where sufficient space for installing<br />
a Pump Control Unit is not available.<br />
7
(4.0) How does a THERMOMAX � system perform<br />
(4.1) <strong>Solar</strong> Fundamentals<br />
All solar collector sy stems hav e the sun<br />
as common energy source. The performance<br />
depends therefore on the conversion<br />
of the solar radiation into useful thermal<br />
energy and to transfer it to the hot water<br />
sy stem.<br />
The ability to convert solar energy into<br />
thermal energy is expressed by the optical<br />
efficiency of the system � 0.<br />
The two factors<br />
k 1 and k 2 relate to the system's ability<br />
to transfer the energy gained. Equation<br />
4.1 combines the three empirical values to<br />
determine the efficiency of the collector<br />
sy stem.<br />
2<br />
��<br />
��<br />
� ��<br />
0 � k1<br />
� � k2<br />
�<br />
(4.1)<br />
G G<br />
with … � … efficiency [-]<br />
�0 … optical efficiency [-]<br />
k1 … linear heat loss factor<br />
[Km²/W]<br />
k … square heat loss factor<br />
2<br />
[K²m²/W]<br />
�� … collector–ambient temp. [K]<br />
G … Global solar radiation [W/m²]<br />
The global solar radiation G varies considerably<br />
from region to region. On a clear<br />
summer day approximately 850 W/m² can<br />
be expected whereas clouds can reduce it<br />
to 400 W/m² or less. Figure 6 shows the<br />
efficiency of the TMO 500 S and TMO 600<br />
S collectors in comparison with a flat plate<br />
collector.<br />
Due to the very<br />
good insulation<br />
properties of the<br />
evacuated solar<br />
tubes the “only” heat<br />
loss is via the<br />
THERMOMAX � manifold<br />
with it’s small<br />
surface area and the<br />
thick layer of high<br />
quality polyurethane<br />
foam insulation. The<br />
correlation between the level of vacuum<br />
and the losses can be seen in Figure 7 for<br />
e.g. � Col = 150 °C and � = 20 °C.<br />
Amb<br />
8<br />
Performance<br />
(4.2) Thermal Performance<br />
Two types of THERMOMAX � MEMO-<br />
TRON � <strong>Evacuated</strong> Heat-Pipe Tubes are<br />
available, differing only in their maximum<br />
working temperature.<br />
TMO 500 S<br />
The model TMO 500 S has a design<br />
cut-off temperature of 85 °C (185 °F) and<br />
is recommended for applications up to 75<br />
°C (�105 °F).<br />
TMO 600 S<br />
The model TMO 600 S has a cut-off<br />
temperature of approximately 130 °C<br />
(�270 °F) and is recommended for applications<br />
up to 120 °C (�250 °F).<br />
Losse s [%]<br />
100<br />
80<br />
60<br />
40<br />
20<br />
0<br />
10 -5<br />
10 -4<br />
Pressure [mbar]<br />
On all models the specially coated absorber<br />
has an absorption<br />
of better than 0.96 and<br />
an emittance of less than<br />
0.1.<br />
�<br />
The THERMOMAX<br />
�<br />
MEMOTRON <strong>Evacuated</strong><br />
Heat-Pipe collectors supply<br />
heat at temperatures<br />
significantly higher than<br />
those achieved by flatplate<br />
collectors. This<br />
comparison is particularly<br />
relevant in cold, windy<br />
and cloudy climates.<br />
10 -3<br />
Figure 7<br />
10 -2<br />
10 -1<br />
100<br />
80<br />
60<br />
40<br />
20<br />
0<br />
Lo sses [% ]
Even though the condenser valve assembly<br />
cuts of at 85 °C or 130 °C, heat transfer<br />
occurs via the metal assembly and a<br />
maximum stagnation temperature of approximately<br />
155 °C (�310 °F) can be<br />
reached by both types.<br />
Table 2 summarizes some of the recom-<br />
�<br />
mended applications of the THERMOMAX<br />
�<br />
MEMOTRON <strong>Evacuated</strong> Heat-Pipe Tubes.<br />
9<br />
Tube recommended for …<br />
Performance<br />
TMO 500 S<br />
TMO 600 S<br />
Domestic and industrial hot<br />
water<br />
� �<br />
Swimming Pool �<br />
Space Heating � �<br />
A ir C onditioning �<br />
Sea Water Desalination �<br />
Pow er ranking machines for<br />
irrigation purposes<br />
�<br />
Industrial process heat �<br />
Table 2
(5.0) How to design a THERMOMAX � system<br />
The first step to ensure enjoyment of<br />
� �<br />
your THERMOMAX MEMOTRON <strong>Evacuated</strong><br />
Heat-Pipe System over a long period<br />
of time is to design and specify the collector<br />
size and the associated components<br />
correctly.<br />
The following explanations are for installations<br />
up to 9 m² (90 tubes) of collector<br />
area. Some typical examples for the<br />
various components are given at the end<br />
of this chapter.<br />
(5.1) <strong>Collector</strong> Area<br />
If you are using the installation to provide<br />
hot water only it is strongly recommended<br />
to aim for 100% solar coverage<br />
during the summer months only. If the<br />
system has to provide additional energy<br />
for heating sy stems in the winter time or<br />
other applications an option for re-routing<br />
the excess heat has to be installed (i.e.<br />
heat-sink, connecting to a swimming pool)<br />
to avoid long stagnation times in the summer.<br />
Figure 8 shows the solar contribution of<br />
a correctly sized solar system over the<br />
year.<br />
<strong>Solar</strong> Contribution [ %]<br />
100<br />
80<br />
60<br />
40<br />
20<br />
0<br />
J<br />
F M A M J J A S O N D<br />
Figure 8<br />
- As a guide you can assume that 1<br />
tube can produce maximum 10 litres of<br />
hot water, e.g. your hot water consumption<br />
is 200 l per day, a 20 tube manifold<br />
system would give you an approximate<br />
60% solar contribution over the year in<br />
Middle European climates.<br />
- Using equation 5.1, a more accurate<br />
estimation of the overall system contribution<br />
per square meter can be made. For<br />
some cities the average daily global solar<br />
radiation per month is given in appendix 1.<br />
SC � R ��<br />
(5.1)<br />
100<br />
80<br />
60<br />
40<br />
20<br />
0<br />
<strong>Solar</strong> Contribution [% ]<br />
10<br />
<strong>Collector</strong> Area Flow rate<br />
[m²]<br />
[l/min]<br />
2 2.0 – 5.0<br />
3 3.0 – 7.5<br />
4 4.0 – 10.0<br />
5 5.0 – 12.5<br />
6 6.0 – 15.0<br />
7 7.0 – 17.5<br />
8 8.0 – 20.0<br />
9 9.0 – 22.5<br />
Table 3<br />
Sy stem design<br />
with … SC … System Contribution [kWh/m²]<br />
R … Monthly <strong>Solar</strong> Rad. [kWh/m²]<br />
� … Efficiency [-] (see 4.1)<br />
To find the required collector area, the<br />
energy demand has to be divided by the<br />
sy stem contribution (equation 5.2).<br />
ED<br />
AR �<br />
SC<br />
(5.2)<br />
with … A R … Required collector area [m²]<br />
ED … <strong>Energy</strong> Demand [kWh]<br />
SC … System Contribution [kWh/m²]<br />
As THERMOMAX � modules are only<br />
available in 2 and 3 m² sizes, the actual<br />
collector area A in [m²] has to be chosen<br />
accordingly.<br />
- For more precise predictions of the<br />
overall performance of the solar system<br />
� �<br />
THERMOMAX offers the <strong>Solar</strong>Master<br />
simulation software. Using a statistical<br />
method, the calculation of the daily divergent<br />
total radiation is based on the combination<br />
of theoretical solar radiation data<br />
and measured solar radiation data, the<br />
collector inclination and the azimuth angle.<br />
Integrating the 15 minute calculation interv<br />
als over each month simulates the sy stem<br />
performance over the year.<br />
(5.2) Flow rate<br />
The specific flow rate per tube V T in<br />
[l/(min Tube)] lies in the range of 0.1 � V T<br />
� 0.25 [l/(min Tube)]. Some examples are<br />
given in Table 3.
Multiplied with the collector area respectively<br />
the number of tubes, where 10<br />
tubes equal 1 m², the sy stem flow rate<br />
can be determined as shown in equation<br />
5.3.<br />
V � V � n<br />
(5.3)<br />
S<br />
T<br />
T<br />
with … V … Sy stem flow rate [l/min]<br />
s<br />
V T … F low rate per tube [l/(minTube)]<br />
n T … Number of tubes [-] (rises in<br />
multiples of 10)<br />
Or to convert the system flow rate V S<br />
into the unit [m³/h] circulation pumps are<br />
generally specified in use equation 5.4.<br />
3<br />
m l 6<br />
S [ ] � V [ ] �<br />
(5.4)<br />
h min 100<br />
V S<br />
The more tubes that are connected in<br />
series, the higher the specific flow rate V T<br />
should be. THERMOMAX � strongly recommends<br />
not to connect more than 90 to<br />
100 tubes in series.<br />
The flow rate further affects the<br />
achievable temperature difference �T in<br />
[K] between the collector outlet and the<br />
solar tank return. This value is used to<br />
switch the circulation pump in the system<br />
on and off. The longer the pipework in the<br />
installation, the bigger �T should be to<br />
avoid toggling of the pump. Through observation<br />
and some experience the flow<br />
rate can be easily altered after completion<br />
of the installation if necessary using a ball<br />
valve installed in the pipework or the tacosetter<br />
on the pump control unit.<br />
(5.3) Pipework<br />
Some recommended pipe sizes are<br />
given in Table 4.<br />
Flow rate [l/min]<br />
Copper pipe size<br />
[mm]<br />
2 – 6 @ �=1m/s Cu 15 x 1<br />
7 – 10 @ �=1m/s Cu 18 x 1<br />
12.5 – 17.5 @ �=1m/s Cu 22 x 1<br />
17.5 – 22.5 @ �=1m/s Cu 28 x 1.5<br />
Table 4<br />
11<br />
Sy stem design<br />
The sizing of the pipe has to be seen<br />
under two aspects. First under the aspect<br />
of the installation cost, secondly under the<br />
aspect of the costs caused by running the<br />
system (energy consumption of circulation<br />
pump).<br />
As the antifreeze causes approximately<br />
1.3 times higher pressure drop passing<br />
through the installation compared with<br />
water, the velocity � in [m/s] of the fluid<br />
passing through the sy stem should be 1.0<br />
� � � 1.25 [m/s]. Equation 5.5 gives the<br />
required pipe inside diameter Ø i in [mm].<br />
VS<br />
Øi � 4 . 6 �<br />
(5.5)<br />
�<br />
with … Ø i … Pipe inside diameter [mm]<br />
V S … Sy stem flow rate [l/min]<br />
� … V elocity of fluid [m/s]<br />
The pipe size best matching the calculated<br />
inside diameter Ø has to be chosen.<br />
THERMOMAX � i<br />
recommends the use of<br />
copper pipe but not smaller than 15 mm<br />
outside diameter. We do not recommend<br />
using plastic pipes in solar installations as<br />
high temperatures and the compatibility<br />
with the antifreeze can cause failure. The<br />
insulation has to be UV stable where exposed<br />
to the sunlight and has to be resistant<br />
to high temperatures. To prevent high<br />
heat losses through the pipe work it is<br />
recommended to use insulation with the<br />
thickness of at least half the pipe diameter<br />
and an U value in [W/(mK)] of U � 0.035<br />
[W/(mK)].<br />
(5.4) Circulation Pump<br />
The circulation pump has to overcome<br />
the total pressure drop of the<br />
system caused by the different compo-<br />
nents at the given flow rate V .<br />
In analogy to the correlation in<br />
electricity where the Ohm’s law applies,<br />
ev ery resistance (= resistance) causes<br />
a pressure drop (= voltage drop) as<br />
soon as there is a flow rate (= current).<br />
Table 5 gives a rough guide<br />
which pump should be used in domestic<br />
installations depending on the collector<br />
area.<br />
S
PCU 20-<br />
60<br />
Sys.<br />
Kit<br />
PCU 90-<br />
240<br />
C ollector<br />
Area [m²]<br />
Number<br />
of Tubes<br />
2 - 4 20 – 40<br />
5 - 6 50 – 60<br />
7 - 9<br />
Table 5<br />
70 – 90<br />
(240)<br />
As the flow rate V S is already determined<br />
(see chapter 5.2) the pressure drop<br />
�p s in [Pa] of the sy stem has to be calculated.<br />
The sy stem pressure drop �p s<br />
equals the sum of all single pressure drops<br />
of components in the installation connected<br />
in series (not parallel). Mainly<br />
these are - <strong>Solar</strong> <strong>Collector</strong>,<br />
- Pipe Work and<br />
- Heat Exchanger.<br />
The pressure drop of the solar collector<br />
�pc [Pa] can be chosen from Figure 9 as a<br />
function of the flow rate V S.<br />
As this is for a<br />
single collector the value has to be multiplied<br />
by the number of collectors n installed<br />
in series.<br />
The pressure drop of the pipe work��p p<br />
in [Pa] can be found in standard plumbing<br />
tables or in the manufactures information.<br />
Please remember to multiply the values in<br />
the tables given with 1.3 to take into account<br />
that antifreeze and not water is<br />
flowing through the system.<br />
12<br />
Sy stem design<br />
As for the pipe work the pressure drop<br />
for the heat-exchanger �p he in [Pa] can be<br />
found in the manufacturers information.<br />
The same as for the pipe work applies in<br />
regard to the values given.<br />
According to the information given<br />
above, the overall pressure drop of the<br />
sy stem �ps in [Pa] can be calculated using<br />
equation 5.6.<br />
�p<br />
S<br />
(5.6)<br />
�<br />
n<br />
� �p<br />
� n<br />
� �p<br />
20 C20<br />
30 C30<br />
p he<br />
10000<br />
� �p<br />
� �p<br />
with … �p s … Sy stem pressure drop [m]<br />
n20 … Number of 20 tube collectors [-]<br />
n30 … Number of 30 tube collectors [-]<br />
�pC20 … Pressure drop of 20 tube<br />
collectors [Pa]<br />
�pC30 … Pressure drop of 30 tube<br />
collectors [Pa]<br />
�p p … Pressure drop of pipe work<br />
[Pa]<br />
�phe … Pressure drop of heatexchanger<br />
[Pa]<br />
10000 … [Pa] to [m]<br />
Figure 10 shows the relationship between<br />
the flow rate and the head pressure<br />
of the pump used in the pump control unit<br />
PCU 20-60.<br />
For installations larger than 60 tubes a<br />
pump control unit with a bigger pump, the<br />
PCU 90-240 PCU, should be chosen. The<br />
pump diagram is shown in Figure 11.<br />
In the System Kit / Active Pack a pump<br />
with 5 m head pressure is used as shown<br />
in Figure 12.
(5.5) Expansion Vessel<br />
If the water temperature in the system<br />
rises, the water volume will increase resulting<br />
in a rise in pressure and the possibility<br />
of damage to the system if the expansion<br />
is not absorbed. By incorporating<br />
an expansion vessel into the system, the<br />
increase in water volume may be contained<br />
until the water temperature has<br />
reduced and the water volume returns to<br />
its initial level. Table 6 gives some sizes<br />
for expansion vessels for various collector<br />
areas and other parameters.<br />
Volume<br />
[l]<br />
8 l<br />
Tot. sy stemcontent<br />
[l]<br />
� 25<br />
15<br />
18 l � 80<br />
15<br />
30<br />
� 60<br />
20<br />
30<br />
� 25<br />
20<br />
35 l � 100<br />
40<br />
Static<br />
height [m]<br />
Table 6<br />
3<br />
� 8<br />
3<br />
� 20<br />
� 16<br />
3<br />
� 14<br />
� 12<br />
3<br />
� 4<br />
3<br />
� 11<br />
C ollector<br />
area<br />
[m²]<br />
2<br />
2<br />
3<br />
3<br />
3<br />
4<br />
4<br />
4<br />
6<br />
6<br />
9<br />
9<br />
13<br />
Sy stem design<br />
As the values in Table 6 indicate, the<br />
lower the static height of the system, the<br />
larger can the overall system content be,<br />
hence more tubes can be connected to the<br />
same size of expansion vessel.<br />
The vessel comprises of two halv es.<br />
One half connects directly to the water<br />
sy stem. The second, separated by a special<br />
diaphragm, contains nitrogen or air.<br />
As pressure rises and the v olume increases<br />
the diaphragm is displaced as<br />
shown in Figure 13.<br />
The size of the expansion vessel has to<br />
be determined as a function of the total<br />
water v olume of the solar sy stem, the<br />
static height of the sy stem and the water<br />
contents of the manifold. The following<br />
equations (5.7 – 5.11) determine the appropriate<br />
size of the expansion vessel.<br />
The overall volume increase of the water<br />
in the system due to temperature increase<br />
V �� in [l] is a function of the overall<br />
solar sy stem content V sys in [l] and the<br />
expansion coefficient � (water @ 80°C<br />
�=0.029, antifreeze @ 80°C �=0.07).<br />
V<br />
� V<br />
� � sys<br />
� �<br />
(5.7)<br />
The influence of the opening pressure<br />
of the pressure relief valve p rv in [bar] and<br />
the static height h in [m] is taken into account<br />
in equation 5.8<br />
p<br />
max<br />
� p rv<br />
�<br />
0.<br />
5<br />
(5.8)<br />
with … pmax … Maximum sy stem operating<br />
pressure [bar]<br />
prv … O pening pressure of relief<br />
valve [bar]
p d h<br />
� p � 0 . 1�<br />
h<br />
(5.9)<br />
with … p … set pressure for diaphragm [bar]<br />
d<br />
p h … Pressure in highest point of sy stem<br />
(e.g. 0.5 bar) [bar]<br />
0.1 … [m] to [bar]<br />
h … static height [m]<br />
To ensure a sufficient v olume of water<br />
in the system at all times a minimum volume<br />
V c in [l] must be present in the expansion<br />
vessel in the cold condition. With<br />
V c and the values calculated before the<br />
nominal size of the expansion vessel V in<br />
[l] can be calculated with equations 5.10<br />
and 5.11.<br />
Vc � V sys � 0. 015 �1[<br />
l]<br />
(5.10)<br />
with … V c … Water v olume in expansion v essel<br />
in cold sy stem condition [l]<br />
(minimum 1 litre)<br />
V sys … O v erall solar sy stem content [l]<br />
V<br />
n<br />
�<br />
�V � V � n � V �� �p � 1�<br />
c<br />
� �<br />
p<br />
col<br />
max<br />
col<br />
� p<br />
d<br />
max<br />
n<br />
(5.11)<br />
with … Vn … Nominal v olume of expansion<br />
v essel [l]<br />
V c … Water v olume in expansion v essel<br />
in cold sy stem condition [l]<br />
V�� … V olume increase due to temp.<br />
increase [l]<br />
n … Number of manifolds installed<br />
col<br />
[-]<br />
V col … Water v olume of single manifold<br />
[l]<br />
p max … Maximum sy stem operating<br />
pressure [bar]<br />
p … Set pressure for diaphragm [bar]<br />
d<br />
Having calculated the nominal size of<br />
the expansion vessel V n the closest available<br />
vessel size will be chosen.<br />
(5.6) Hydraulics<br />
(5.6.1) <strong>Collector</strong> System<br />
As mentioned before the maximum<br />
number of tubes installed in series should<br />
not exceed 90 to 100 tubes. For bigger<br />
installations the recommended manifold<br />
connection is shown in Figure 14.<br />
To achieve the highest output of the<br />
whole system every manifold needs the<br />
14<br />
Sy stem design<br />
correct flow rate. This can be achieved by<br />
connecting the manifolds according to<br />
“Tichelmann” (the flow and return pipe of<br />
each manifold adds up to the same<br />
length) or by using valves to regulate the<br />
flow rate.<br />
(5.6.2) Overall System Design<br />
Functional description of parts<br />
The following is a brief description of<br />
main parts used in the sy stem.<br />
Pump is used to circulate water from the<br />
collector to the user application.<br />
Flow-meter is attached to the pump to<br />
monitor flow rate of water within the system<br />
(optional).<br />
Non-Return Valve is used to prevent<br />
gravitational flow of water in solar circuit<br />
from the tank to the collector when the<br />
tank temperature may be greater than the<br />
collector temperature (e.g. at night). Be<br />
sure to install correctly.<br />
Air vent is fitted at the highest point of<br />
the system to facilitate removal of air<br />
pock ets from the sy stem. Air v ents should<br />
be open when filling the system. Automatic<br />
airvents should be fitted with a valve<br />
to prevent opening when the system<br />
reaches stagnation.<br />
Pressure Relief Valve and Pressure<br />
Gauge are used to monitor the pressure<br />
of the sy stem and to serv e as a safety<br />
mechanism to avoid over pressurising of<br />
the sy stem (max. 5 bar).<br />
Filling Loop consists of a flexible hose<br />
and stop valve and connects the water<br />
mains supply to the hose connector and<br />
filling valve.<br />
Expansion Vessel is used to contain increased<br />
water volume in the system due
to rise in temperature, and hence increased<br />
pressure, of water.<br />
Active System with Double Coil Tank<br />
Sy stem design<br />
Flush and Drain assembly is used to<br />
flush the system before filling with antifreeze<br />
and to drain it, if necessary.<br />
Figure 15 shows a typical solar installation incorporating a double coil hot water storage tank<br />
enabling energy input from the central heating system to the top half of the tank and energy<br />
input from the solar system to the bottom half of the tank.<br />
Active System with Immersion Heater<br />
F igure 15<br />
Similar to the system above an auxiliary electric heater compensates for periods of prolonged<br />
cloud or rainfall when the collector cannot operate at full potential (Figure 16).<br />
F igure 16<br />
15
Active System with Short Circuit<br />
Installation details<br />
Figure 17 shows an active system incorporating a short circuit. Hot water is only directed to<br />
the tank if the water temperature from the collector is above a set temperature. If not, the<br />
collector water is circulated back through the manifold via a 3-way valve. This type of installation<br />
is recommended where a long distance is between the collector and the hot water storage<br />
tank.<br />
Multiple Tank Installation - Series<br />
F igure 17<br />
For large installations two or more tank s may be connected to the solar sy stem in series (preheat).<br />
Using 3-way valves hot water from the collector passes through Tank 1 first, if the return<br />
temperature is above a set temperature it passes via a 3-way valve to Tank 2 (first pre-heat<br />
tank). Otherwise, it is circulated back to the collector. If water leaving Tank 2 is above a set<br />
temperature it is passed to Tank 3 (second preheat tank). This process may be repeated for a<br />
number of preheat tanks (Figure 18).<br />
F igure 18<br />
16
Installation details<br />
Similar to the previous system the series tank installations can be equipped with a short circuit<br />
also. Applications are hotels, hospitals and multi-storey buildings where the distance between<br />
the collector and the tank is rather long.<br />
As a cascade function the tanks can be loaded via separate pumps according to the set temperatures<br />
as shown in the Figure 19.<br />
Multiple Tank Installation - Parallel<br />
F igure 19<br />
Figure 20 shows a number of tanks connected in parallel to the collector system.<br />
When the water temperature in Tank 1 reaches a set temperature the water from the collector<br />
is directed via a 3-way valve, controlled by a temperature sensor at Tank 1 to Tank 2. If<br />
the water temperature in Tank 1 falls below a set temperature then the water from the collector<br />
is redirected through its heating coil.<br />
Once Tank 2 has reached a set temperature the water from the collector is diverted to a third<br />
tank and so on. This process can be repeated for any number of tanks. This system is applicable<br />
to hospitals, hotels and multi-storey buildings requiring large amounts of hot water.<br />
F igure 20<br />
17
Swimming Pool<br />
Installation details<br />
To incorporate a swimming pool into the system it is essential that a suitable heat exchanger<br />
is used between the pool water and the circulating water through the manifold of the solar<br />
sy stem (Figure 21).<br />
F igure 21<br />
Generally, wound coil heat exchangers should be used as they offer a big exchange area with<br />
a low pressure drop on the swimming pool side. This allows a high volume of pool water to<br />
be passed through the heat exchanger.<br />
It is necessary that the filtration pump is always ON when the solar collector pump is running<br />
to avoid overheating of heat-exchanger and pipework parts on the secondary side of the system.<br />
18
�<br />
(6.0) How to install a THERMOMAX System<br />
This chapter explains the installation<br />
procedures for the THERMOMAX � <strong>Evacuated</strong><br />
<strong>Solar</strong> <strong>Collector</strong> System with the various<br />
roof fixing kits.<br />
(6.1) General<br />
Due to the overall weight of the unit it<br />
MUST BE MOUNTED SECURELY TO A<br />
STRONG SECTION OF THE ROOF.<br />
Please observe the following simple<br />
precautions to ensure maximum efficiency<br />
from your THERMOMAX <strong>Solar</strong> <strong>Energy</strong><br />
<strong>Collector</strong> assembly.<br />
Locate the solar collector sy stem so<br />
that the tubes receive maximum sunshine<br />
through the day with no or minimum<br />
shading. NOTE: The coated surface of the<br />
absorber must face uppermost (±30°) and<br />
as south facing as possible (Azimuth angle).<br />
The solar collector sy stem can, be<br />
mounted at any suitable angle between<br />
25° and almost vertical position (Inclination<br />
Angle). The recommended angle is<br />
the same as the geographical latitude of<br />
the collector location.<br />
In areas where local water is known to<br />
be hard or aggressive, a heat exchanger<br />
must be used and the use of a water softener<br />
is recommended, otherwise regular<br />
cleaning of the system will be required.<br />
In areas where the chloride ion<br />
concentration is greater than 40 ppm a<br />
heat exchanger must be used in the hot<br />
water storage tank . The solar sy stem<br />
should be filled with distilled or<br />
dechlorinated water. Check with your local<br />
w ater authorities.<br />
CA UTIONA RY NOTES:<br />
- Mak e sure sufficient space is left between<br />
the manifold and roof apex for<br />
ease of working on pipework within<br />
the loft span.<br />
- Wear gloves and safety goggles when<br />
working with glass tubes.<br />
- Do not use sharp objects to open the<br />
covers or the box as this may scratch<br />
or damage the glass tube.<br />
- Do not remove the tubes from packaging<br />
until ready to assemble.<br />
�<br />
19<br />
Installation details<br />
- Connect the manifold, all the pipework<br />
and the pump first before installing<br />
the tubes.<br />
Pipes running horizontally should always<br />
be installed rising slightly to avoid the<br />
creation of air pockets.<br />
Note that when installing the<br />
collector and pipe work it is<br />
important that all local authority<br />
regulations, relevant technical and<br />
safety standards are adhered to.<br />
(6.2) Manifold Connections<br />
Series Connections<br />
The manifold flow and return connections<br />
are Ø22mm and are designed for use<br />
with compression fittings. The recommended<br />
manifold connections for installations<br />
are shown in Figure 22. Please remember<br />
as explained in chapter 5.6.1 that<br />
the maximum number of tubes connected<br />
in series should not exceed 90 to 100.<br />
Installation of Compression Joints<br />
Compression fittings are renowned for<br />
reliability and ease of assembly, as this<br />
step-by-step fixing guide amply demonstrates.<br />
To make the joint either of two<br />
methods may be followed.<br />
- The pipe can be firmly inserted into<br />
the compression fitting without removing<br />
the cap and the ring. Care<br />
should be taken to ensure that the<br />
ring is in the correct position and that<br />
the tube makes firm contact with the<br />
tube stop in the body of the fitting.
- Or the cap and the ring can be<br />
removed, slipped on to the pipe in<br />
logical sequence and the tube fully<br />
inserted into the compression fitting.<br />
20<br />
Installation details<br />
In both cases, tightening of the cap-nut<br />
is effected by hand as far as possible, followed<br />
by appropriate turning of the same<br />
with a suitable spanner while a second<br />
spanner is used to hold the fitting in position.
(6.3) MS-System<br />
Installation details<br />
The following procedure explains the installation of a THERMOMAX � <strong>Solar</strong> System using<br />
the stainless steel perforated bands (MS-Sy stem).<br />
1. Select a suitable position for the collector. It should face due south. Recommended angle<br />
of tilt is the same as your geographical latitude. The distances between the perforated<br />
bands (Pt. No. B0290) are as shown.<br />
2. Remove tiles.<br />
3. Secure LOWER band to rafter using the coach screws (Pt. No. A0168) and the plain<br />
washers (Pt. No. A0170). Pre-drill holes for screws to avoid splitting of rafter.<br />
4. Replace tiles.<br />
5. Locate and secure UPPER band (Pt. No. B0290) to top end of side rail (Pt. No. B0008)<br />
using the lower hole. Note: Use the nylon washer (Pt. No. A2158) to hold the bolt (Pt.<br />
No. A0175) and the formed washer (Pt. No. A0173) in place in the top hole for later securing<br />
of the manifold to the side rails.<br />
6. Locate and secure bottom end of side rail to LOWER band using the indicated hole of<br />
side rail. Note: Use the nylon washer to hold the bolt and the formed washer in place in<br />
the bottom hole for the later securing of the bottom support to the side rails.<br />
7. Secure UPPER band (mounted to side rail) using coach screws and plain washers to rafter.<br />
8. Tighten all nuts and bolts and replace remaining tiles.<br />
9. Locate bottom support (Pt. No. B0177 (20) or Pt. No. B0178 (30)) to bottom end of side<br />
rail. Remove and discard ny lon washer before placing plain washer (Pt. No. A0170),<br />
spring washer (Pt. No. A0172), clamping plate washer (Pt. No. A0176), and nut (Pt. No.<br />
A0169). The distance from the side rail to the bottom support ends should be equal.<br />
10. Locate manifold (Pt. No. B0258 (20) or Pt. No. B0259 (30)) to top end of side rails. Remove<br />
and discard nylon washer before placing plain washer, spring washer, clamping<br />
plate washer, and nut. The distance from the side rails to the manifold ends should be<br />
the same as those for the bottom support.<br />
11. Earth inlet or outlet pipe of manifold in accordance with local regulations. The same applies<br />
to the framework.<br />
12. Locate manifold fittings (Pt. No. A0188) to the manifold inlet and outlet pipe.<br />
When using an automatic air-vent note that it must be installed vertically. CHECK ALL<br />
plumbing and pipework between collector and hot water storage tank.<br />
13. - Unpack first tube (Pt. No. B2100 (TMO 600 S) or Pt. No. B2101 (TMO 500 S)).<br />
- Rest bottom end of tube on appropriate rubber pad on bottom support.<br />
ENSURE COATED SURFACE OF ABSORBER FACES UPPERMOST.<br />
- Insert condenser into manifold.<br />
14. - Tighten retaining cap to manifold by hand.<br />
- Make sure coated surface still faces uppermost.<br />
15. - Locate bottom support clip (Pt. No. A0921).<br />
- Tighten all retaining caps approximately ¼ to ½ turn using a suitable spanner. DO<br />
NOT OVER TIGHTEN.<br />
- Repeat steps 13, 14 and 15 for all other tubes.<br />
21
Installation steps 1 - 4<br />
Installation steps 5 - 8<br />
22<br />
Installation details
B0 177 ( 20)<br />
B0 178 ( 30)<br />
9<br />
A0921<br />
B2100 (TMO 600 S)<br />
B2101 (TMO 500 S)<br />
15<br />
10<br />
B02 58 (2 0)<br />
B02 59 (3 0)<br />
A0169<br />
A01 72<br />
A 017 0<br />
A0 176<br />
Installation steps 9 - 12<br />
14<br />
Installation steps 13 - 15<br />
23<br />
13<br />
A 018 8<br />
Installation details<br />
11<br />
12
(6.4) KS-System<br />
Installation details<br />
�<br />
The following procedure explains the installation of a THERMOMAX <strong>Solar</strong> System using<br />
the stainless steel K-Ty pe roof brack ets.<br />
1. Select a suitable position for the collector. It should face due south. Recommended angle<br />
of tilt is the same as your geographical latitude. The distances between the K-Type roof<br />
brackets are as shown (Pt. No. B0249).<br />
2. Remove tiles.<br />
3. Secure LOWER leg of bracket to rafter using the coach screws (Pt. No. A0168) and the<br />
plain washers (Pt. No. A0170). Pre-drill holes for screws to avoid splitting of rafter.<br />
4. Replace bottom tile.<br />
Locate and secure UPPER leg of bracket to rafter.<br />
5. Replace remaining tiles.<br />
6. Locate and secure side rail (Pt. No. B0008) to roof brack ets using the indicated holes in<br />
the side rail. The holes used in the roof brackets can vary. Note: Use the nylon washer<br />
(Pt. No. A2158) to hold the bolt (Pt. No. A0175) and the formed washer (Pt. No. A0173)<br />
in place in the hole for the later securing of the manifold to the side rails respectively the<br />
bottom support.<br />
Tighten all nuts and bolts.<br />
7. Locate bottom support (Pt. No. B0177 (20) or Pt. No. B0178 (30)) to bottom end of side<br />
rail. Remove and discard ny lon washer before placing plain washer (Pt. No. A0170),<br />
spring washer (Pt. No. A0172), clamping plate washer (Pt. No. A0176), and nut (Pt. No.<br />
A0169). The distance from the side rail to the bottom support ends should be equal.<br />
8. Locate manifold (Pt. No. B0258 (20) or Pt. No. B0259 (30)) to top end of side rails. Remove<br />
and discard nylon washer before placing plain washer, spring washer, clamping<br />
plate washer, and nut. The distance from the side rails to the manifold ends should be<br />
the same as those for the bottom support.<br />
9. Earth inlet or outlet pipe of manifold in accordance with local regulations. The same applies<br />
to the framework.<br />
10. Locate manifold fittings (Pt. No. A0188) to the manifold inlet and outlet pipe.<br />
When using an automatic air-vent note that it must be installed vertically. CHECK ALL<br />
plumbing and pipework between collector and hot water storage tank.<br />
11. - Unpack first tube (Pt. No. B2100 (TMO 600 S) or Pt. No. B2101 (TMO 500 S)).<br />
- Rest bottom end of tube on appropriate rubber pad on bottom support.<br />
ENSURE COATED SURFACE OF ABSORBER FACES UPPERMOST.<br />
- Insert condenser into manifold.<br />
12. - Tighten retaining cap to manifold by hand.<br />
- Make sure coated surface still faces uppermost.<br />
13. - Locate bottom support clip (Pt. No. A0921).<br />
- Tighten all retaining caps approximately ¼ to ½ turn using a suitable spanner. DO<br />
NOT OVER TIGHTEN.<br />
- Repeat steps 11, 12 and 13 for all other tubes.<br />
24
6<br />
20 Tube<br />
30 Tu be<br />
900 - 12 00 120 0 - 1400<br />
B0249<br />
1<br />
B0008<br />
app. 1400 - 150 0<br />
A0168<br />
A0170<br />
Installation steps 1 - 5<br />
A0173<br />
A 0175<br />
A0169<br />
A 0172<br />
A0170<br />
Installation step 6<br />
25<br />
A2158<br />
Installation details<br />
2<br />
3<br />
4<br />
5
7<br />
B0177 (20)<br />
B0178 (30)<br />
13<br />
A0169<br />
A0921<br />
A0172<br />
A0170<br />
A0176<br />
8<br />
B0258 (20)<br />
B0259 (30)<br />
Installations steps 7 - 10<br />
B2100 (TMO 600 S)<br />
B2101 (TMO 500 S)<br />
12<br />
Installations steps 11 - 13<br />
26<br />
11<br />
Installation details<br />
B0188 (30)<br />
10<br />
9
(6.5) FS-System<br />
Installation details<br />
The following procedure explains the installation of a THERMOMAX � <strong>Solar</strong> System using<br />
the stainless steel A-Frame for ground and flat-roof mounting.<br />
1. Select a suitable position for the collector. It should face due south. Recommended angle<br />
of tilt is the same as your geographical latitude. The distances between the front brackets<br />
(Pt. No. A0327) and the rear brackets (Pt. No. A0328) are as shown.<br />
2. Drill Ø10mm holes for rawl plugs (Pt. No. A0836) and push plugs into holes lev el with<br />
mounting surface.<br />
3. Locate front and rear brackets in appropriate positions and secure with coach screws (Pt.<br />
No. A0168) and plain washers (Pt. No. A0170).<br />
4. Locate side brace (Pt. No. B0005) to front bracket securing it using bolt (Pt. No. A0713),<br />
formed washer (Pt. No. A0173), spacer (Pt. No. A0357), plain washer (Pt. No. A0170),<br />
spring washer (Pt. No. A0172) and nut (Pt. No. A0169).<br />
5. Before securing the side brace to the rear brack et the rear strut (Pt. No. B0007) has to<br />
be fitted over the hinge of the bracket. The side brace can also be fitted under various<br />
angles to the rear strut depending on the required tilt angle of the system.<br />
6. Locate and secure bottom end of side rail (Pt. No. B0008) to front bracket using the indicated<br />
hole in the side rail.<br />
7. Use hinge (Pt. No. A0174) to secure top end of side rail to rear strut.<br />
8. After assembling both side rails reinforce frame by using univ ersal brace (Pt. No. B0006).<br />
Secure to both rear struts by diagonal connection (as indicated).<br />
9. Locate bottom support (Pt. No. B0177 (20) or Pt. No. B0178 (30)) to bottom end of side<br />
rail. Remove and discard nylon washer before placing plain washer, spring washer,<br />
clamping plate washer (Pt. No. A0176), and nut. The distance from the side rail to the<br />
bottom support ends should be equal.<br />
Tighten all nuts and bolts.<br />
10. Locate manifold (Pt. No. B0258 (20) or Pt. No. B0259 (30)) to top end of side rails. Remove<br />
and discard nylon washer before placing plain washer, spring washer, clamping<br />
plate washer, and nut. The distance from the side rails to the manifold ends should be<br />
the same as those for the bottom support.<br />
11. Earth inlet or outlet pipe of manifold in accordance with local regulations. The same applies<br />
to the framework.<br />
12. Locate manifold fittings (Pt. No. A0188) to the manifold inlet and outlet pipe.<br />
When using an automatic air-vent note that it must be installed vertically. CHECK ALL<br />
plumbing and pipework between collector and hot water storage tank.<br />
13. - Unpack first tube (Pt. No. B2100 (TMO 600 S) or Pt. No. B2101 (TMO 500 S)).<br />
- Rest bottom end of tube on appropriate rubber pad on bottom support.<br />
ENSURE COATED SURFACE OF ABSORBER FACES UPPERMOST.<br />
- Insert condenser into manifold.<br />
14. - Tighten retaining cap to manifold by hand.<br />
- Make sure coated surface still faces uppermost.<br />
15. - Locate bottom support clip (Pt. No. A0921).<br />
- Tighten all retaining caps approximately ¼ to ½ turn using a suitable spanner. DO<br />
NOT OVER TIGHTEN.<br />
- Repeat steps 13, 14 and 15 for all other tubes.<br />
27
15<br />
A0921<br />
20 Tube<br />
30 Tube<br />
900 - 1200 1200 - 1400<br />
A0328<br />
1<br />
A0327<br />
B2100 (TMO 600 S)<br />
app. 1400<br />
Installation steps 1 - 3<br />
B2101 (TMO 500 S) 13<br />
Installation steps 13 - 15<br />
28<br />
14<br />
A0168<br />
A0170<br />
A0836<br />
Installation details<br />
3<br />
2
B0177 ( 20)<br />
B0178 ( 30)<br />
4<br />
B0258 ( 20)<br />
B0259 ( 30)<br />
B0008<br />
9<br />
A0357<br />
6<br />
10<br />
A0174<br />
A0 169<br />
A01 72<br />
A017 0<br />
B000 5<br />
Installation steps 4 - 12<br />
29<br />
B000 6<br />
A0188<br />
7<br />
A0173<br />
12<br />
A0713<br />
Installation details<br />
B 0007<br />
8<br />
11<br />
5
(6.6) Alternative Methods<br />
Installation details<br />
It is possible to secure the side rails to rafter or tiles that are nailed in and cannot be removed<br />
using either perforated bands (5.3) or brackets (5.4) a noggin can be installed. A noggin<br />
is a beam secured between two rafters.<br />
- Coach screws to noggin or rafter: This method is used only if at least 50mm (2”) of screw<br />
thread can be secured into noggin or rafter.<br />
- Stainless steel threaded rod: This method is used if the tile depth or uneven roof prevents<br />
use of coach screws, or if collector is to be secured directly to wall.<br />
For further explanation see also Figure 5 chapter 3.3.1.<br />
(6.7) Commissioning<br />
Before filling the system with the antifreeze and bringing it up to it’s operating pressure<br />
the following steps should be carried out.<br />
1. Check all joints have been soldered and all compression joints have been tightened.<br />
Open all valves in the system (pump ball valves, check valves, etc.).<br />
2. Make temporary hose connection between mains supply and flush and drain assembly.<br />
Close middle valve of assembly and flush system thoroughly via the two other valves to<br />
remove all dirt and solder residues.<br />
3. Open the middle valve of the flush and drain assembly, drain the system and close the<br />
inlet and outlet valve of the flush and drain assembly. Recheck all joints and connections<br />
for leaks.<br />
4. Use a hand pump or a pumped garden spray bottle to fill the required amount of antifreeze/inhibitor<br />
into the system through the filling loop. The amount of antifreeze/inhibitor<br />
depends on the location of the system and the overall system volume<br />
(ratio antifreeze/water = frost protection).<br />
5. Connect hose to water mains supply and fill system to its operating pressure.<br />
6. Open all air-vents and run circulation pump on manual mode. Make sure no antifreeze/inhibitor<br />
will be drained through opened air-vents.<br />
It may be necessary to top up the system pressure in the first few days of operation as<br />
dissolved air in the antifreeze/inhibitor is expelled through the automatic air-vent.<br />
7. Adjust system flow rate to the right value. Begin with speed level 1 of circulation pump<br />
with fully opened flow-meter and adapt speed level and flow-meter (if used) settings accordingly.<br />
8. Adapt controller settings according to system properties as described in the controller<br />
manual.<br />
30
(7.0) How to maintain a Thermomax � System<br />
(7.1) Periodic Checks<br />
- Ensure that no physical damage has<br />
occurred to the tubes and remove any<br />
debris that may have accumulated.<br />
- Check the flow and return pipework<br />
between collector and storage tank.<br />
Check all connections for leaks and ensure<br />
all components are operating correctly.<br />
- Check that the system pressure is<br />
maintained at the set value. If the system<br />
pressure repeatedly drops more<br />
than 0.5 bar below the set pressure<br />
check the system for leaks.<br />
(7.2) Optional Checks<br />
The checks listed in this section depend<br />
on the components used in the system<br />
installation.<br />
- Each spring vent system as some air<br />
will come out of the system solution<br />
during the course of the year.<br />
- Check the pressure to see if the set<br />
value is still maintained. If top up is<br />
necessary connect hose to water<br />
31<br />
Maintenance<br />
mains, fill hose with water to avoid introduction<br />
of air into system.<br />
Connect hose to filling loop, open valve<br />
very slowly until pressure is increased<br />
to set value.<br />
- To check antifreeze/inhibitor concentration,<br />
draw off a small sample at the<br />
drain cock and place in the freezer<br />
compartment. Remove when frozen<br />
then measure temperature at “slush”<br />
stage i.e. when ice and liquid are both<br />
present. Temperature should be the<br />
same or lower than the minimum expected<br />
for the locality.<br />
(7.3) Five Yearly Checks<br />
- If using antifreeze/inhibitor, every five<br />
years the system should be completely<br />
drained and flushed then refilled with<br />
new antifreeze/inhibitor.<br />
- Check all insulation of pipework and<br />
the condition of the sensors, especially<br />
the manifold sensor.<br />
- Check the seals where the flow and<br />
return connections pass through the<br />
roof tiles.
(8.0) Trouble Shooting<br />
No circulation in sy stem<br />
Pressure drops in<br />
sy stem<br />
Overheating<br />
Performance loss<br />
C ollector<br />
maximum<br />
temperature at<br />
Pump isolating v alv es closed<br />
A utomatic air-v ent closed<br />
Damaged insulation<br />
Build up of lime stone<br />
around heat exchanger tube<br />
condenser<br />
Troubleshooting<br />
Problem Cause Action<br />
A n ‘F’ reading on<br />
controller LC D display<br />
1.<br />
2.<br />
3.<br />
Loose connections on<br />
sensor leads<br />
F aulty sensor<br />
C ollector sensor at maximum<br />
1.<br />
2.<br />
3.<br />
C heck sensor w ires for connection<br />
Replace sensor<br />
No action required<br />
Pump will not run 1. Mains/pump w iring faulty 1. C heck wiring at mains/pump<br />
2. Pump rotor damaged 2. See pump manufacturers instructions<br />
3. The pump control selector P 3. C heck SMT unit and return pump con-<br />
is in manual ‘O F F ’ position trol P to automatic mode ‘A UT’<br />
4. TC incorrectly set<br />
4. Reset to 25°C<br />
5. TC and �T not satisfied 5. No action required<br />
Pump runs continu- 1. C ollector temperature is 1. No action required TF flashes<br />
ously<br />
below TF temperature<br />
2. Loose connection or faulty<br />
sensor on the collector<br />
2. C heck connections and sensor w ires<br />
3.<br />
3. No action required<br />
1.<br />
1. O pen v alv es<br />
2.<br />
2. O pen aut. air-v ent and check condition<br />
– replace if necessary<br />
3. A ir lock at pressure relief 3. Twist cap at pressure relief v alv e and<br />
valve<br />
vent air<br />
4. A ir lock in the sy stem 4. C heck all pipew ork rises on return<br />
side, falls on flow side – clear manual<br />
vents<br />
5. Non-return v alv e jammed 5. Free v alv e or replace<br />
6. Pump is not running 6. See abov e<br />
7. Sy stem in stagnation 7. Wait until sy stem reaches normal<br />
operating conditions<br />
1. Leak at manifold<br />
1. C heck collars on all tubes for leaks<br />
tighten if necessary<br />
2. Leak in sy stem<br />
2. C heck all joints<br />
3. Drain/filling v alv e not closed 3. C lose fully<br />
4. A ut. air-v ent passing water 4. C lean or replace if necessary<br />
5. F aulty pressure relief v alv e 5. Replace<br />
6. Damaged expansion v essel<br />
causes pressure fluctuation<br />
and relief v alv e to open<br />
6. Replace<br />
1. Pump does not run<br />
1. See abov e<br />
2. Prolonged period of low hot<br />
w ater consumption<br />
2. Div ert heat to heat sink<br />
1. Broken tubes<br />
1. Replace broken tubes (because of<br />
diode function of tube replacement<br />
does not hav e to be done immediately<br />
)<br />
2.<br />
2. Replace damaged parts<br />
3.<br />
3. Drain and clean sy stem thoroughly<br />
32
(9.0) Appendix<br />
(9.1) Products and Spare Parts<br />
Products<br />
Tubes<br />
Manifolds<br />
Roof Kits<br />
Various<br />
PCUs and Controllers<br />
Description<br />
Product Number<br />
TMO 500 S (Box of 10) C0207<br />
TMO 600 S (Box of 10) C0206<br />
20 Manifold + MS Roof Kit C0001<br />
30 Manifold + MS Roof Kit<br />
C0004<br />
KS Roof Kit<br />
C0022<br />
Biberschwanz Roof Kit C0024<br />
Copper Roof Kit C0056<br />
FS Roof Kit C0076<br />
K-Type Elevation Kit<br />
C0121<br />
Blank Insert Assembly C0052<br />
Flexible Hose Set (1000 mm) C0067<br />
Manifold Connection Kit C0082<br />
PCU 20/60 SMT100 (18l.-5 bar) C0179<br />
PCU 20/60 SMT300 (18l.-5 bar) C0191<br />
PCU 20/60 SMT400 (18l.-5 bar) C0180<br />
PCU 90/240 SMT300 (5 bar) C0189<br />
PCU 90/240 SMT400 (5 bar) C0190<br />
Cascade for PCU 20/60 C0050<br />
Cascade for PCU 90/240 C0060<br />
System Kit SMT100 (8l.-3 bar) C0173<br />
Control Unit SMT100 C0132<br />
Control Unit SMT300 C0126<br />
Control Unit SMT400 C0128<br />
Spare Parts<br />
Tubes<br />
Manifolds<br />
Description Part Number<br />
Tube end support plug TMO 600 S A0634<br />
Type 2 Support Clips (10 OFF) A1091<br />
20 Manifold<br />
B0258<br />
30 Manifold<br />
B0259<br />
Manifold Spare Parts A1093<br />
Universal Bag of Fittings A0276<br />
Bag of Compression Fittings A0350<br />
22 x ½” x 22 T<br />
A0188<br />
½“ Plug Hex Head<br />
A0189<br />
½” Air Vent Hex Head A0190<br />
33<br />
Appendix
Spare Parts continued<br />
Fittings and Assembly<br />
PCUs<br />
20 Bottom Support Rail + Pads B0177<br />
30 Bottom Support Rails + Pads B0178<br />
Support Pads (5 OFF) A3550<br />
Side Brace (FS) B0005<br />
Universal Brace (FS) B0006<br />
Side Rail B0008<br />
Front Bracket + Ftgs. (FS) A0327<br />
Rear Bracket + Ftgs. (FS) A0328<br />
Rear Strut (FS) A0356<br />
Coach Screw Kit (8 OFF) A0351<br />
M8 Rawl Plugs (8 OFF) A0858<br />
13 mm A/F Box Spanner A0198<br />
Return Sensor A0740<br />
<strong>Collector</strong> Sensor A0741<br />
Tank Sensor A0742<br />
Tank Sensor Pocket A0332<br />
<strong>Collector</strong> Sensor Pocket A0477<br />
Return Sensor Pocket A0683<br />
34<br />
Appendix
(9.2) System Sizing Tables<br />
Appendix<br />
The following tables give an indication for domestic and commercial energy requirements.<br />
PLEASE NOTE THAT THESE SHOULD ONLY BE USED AS A VERY ROUGH GUIDE.<br />
Table survey: Table 1 - Average domestic hot water utilisation per household<br />
Table 2 - Hotel/restaurant/guest house<br />
Table 3 - Outdoor pool energy requirement [kWh]<br />
Table 4 - Specific heat loss [kWh] for outdoor pool<br />
Table 5 - Average space heating requirements – target temp. 20°C<br />
Table 6 - Latent heat<br />
Table 7 - System sizing<br />
Table 1: Average domestic hot water utilisation per household<br />
A pplications Water temp. [°C ] C onsumption [l/day ]<br />
Sink 55 30 – 50<br />
Wash basin<br />
35 5 – 15<br />
Bath 40 100 – 170<br />
Shower 40 50<br />
Bidet 40<br />
25<br />
Washing m/c cold<br />
30 – 40 60 – 70<br />
Washing m/c hot<br />
Total consumption<br />
50 – 60 60 – 70<br />
Low 60 10 – 20<br />
A v erage 60<br />
20 – 40<br />
High<br />
60 40 – 80<br />
Table 2: Hotel/restaurant/guest house<br />
A pplications<br />
Restaurant<br />
Water temp. [°C ] C onsumption [l/day ]<br />
per menu 45 6 – 12<br />
per guest<br />
Hotel per room<br />
45<br />
12 – 30<br />
Room + wash basin<br />
45 15 – 20<br />
Room + shower 45 70 – 120<br />
Room + bath 45 140 – 200<br />
Guest house 45<br />
35 – 70<br />
Table 3: Outdoor pool energy requirement [kWh]<br />
Water temp.<br />
[°C ]<br />
Swimming season / annum<br />
4 month 5 month 6 month<br />
22 150<br />
200 280<br />
24 250<br />
340 480<br />
26 420 560<br />
720<br />
Example: <strong>Energy</strong> requirement to heat the a pool for a four month season to 22°C.<br />
Assume solar insolation of 5 kWh/(m² day)<br />
4 month season = 120 days/season<br />
Therefore: 5 kWh/(m² day) x 120 days/season = 600 kWh/(m² season)<br />
<strong>Collector</strong> efficiency = 0.7<br />
Therefore: 600 kWh/(m² season) x 0.7 = 420 kWh/(m² season)<br />
35<br />
Units<br />
kWh/(m²<br />
season)
<strong>Energy</strong> available during a 4 month period from collector.<br />
Table 5: Average space heating requirements – target temp. 20°C<br />
Example: <strong>Energy</strong> requirement to heat large detached house, floor space 150 m².<br />
Appendix<br />
<strong>Energy</strong> required to heat pool to 22°C from table 3 is 150 kWh/(m² season) i.e. required<br />
ratio of collector surface to pool surface area of 1:3, as 150/450.<br />
Table 4: Specific heat loss [kWh] for outdoor pool<br />
Swimming period in months/annum<br />
Target<br />
temp. [°C ]<br />
20<br />
23<br />
26<br />
Pool A Pool B Pool C Pool D<br />
5 7 5 7 5 7 5 7<br />
0.034 0.072 0.110 0.158 0.302 0.373 0.036 0.068<br />
0.133 0.170 0.269 0.314 0.565 0.634 0.060 0.069<br />
0.275 0.315 0.476 0.523 0.881 0.938 0.083 0.091<br />
[kWh/m²]<br />
Legend: Pool A: Pool with two sides well protected (trees, building or wall), wind speed of<br />
1 m/s.<br />
Pool B: Pool with two sides partially protected, wind speed 2 m/s.<br />
Pool C: Pool with no protection, wind speed 4 m/s.<br />
Pool D: Pool with a cover with a coefficient of conductivity of 8.12 W/(mK).<br />
Building Ty pe F loor space m² Insulation<br />
Units<br />
Loft only Loft & walls<br />
Small detached 100 220 110<br />
Large detached 150 210 110<br />
Bungalow 65<br />
240 140<br />
Large semi 90<br />
180 100<br />
Small semi 75 180<br />
100<br />
Semi bungalow 65 220<br />
130<br />
Terrace<br />
90 145 90<br />
End terrace<br />
90 180 100<br />
Note: ALL ABOVE DATA VARIES ACCORDING TO METHOD OF INSULATION, AGE AND SIZE<br />
OF HOUSE, EXTERNAL AND TARGET TEMPERTAURES, …<br />
Assume solar insulation of 3 kWh(m² day)<br />
Therefore: 3 kWh/(m² day) x 180 days/a = 540 kWh/(m² a)<br />
<strong>Collector</strong> efficiency = 0.7<br />
Therefore: 540 x 0.7 = 378 kWh/(m² season), i.e. energy available over a 6<br />
month period from collector.<br />
<strong>Energy</strong> required to heat a large detached house, with good loft and wall insulation, floor<br />
space 150 m², to a target temperature of 20 °C, is 110 kWh/(m² a).<br />
Require a ratio of collector area to floor space of approximately 110/378 = 0.3, respectively<br />
30 %, giving a collector area of 50 m².<br />
36<br />
KWh/(m² a)
Table 6: Latent heat<br />
Appendix<br />
1 m² of collector area, with a solar insolation of 1000 W/m² can approximately in one<br />
hour …<br />
… increase the temperature of 7.8 kg of water from 25 °C to 100 °C or<br />
… produce 1.0 kg of vapour at 100 °C from water at 100 °C or<br />
… produce 0.9 kg of vapour at 100 °C from water at 25 °C or<br />
… produce 0.8 kg of vapour at 140 °C from water at 25 °C.<br />
Table 7: System sizing<br />
No. of persons No. of tubes A pproximate storage tank<br />
size [l]<br />
1 – 2 20<br />
100 – 150<br />
3 – 4<br />
30 200 – 250<br />
5 – 6 40 300 – 350<br />
7 – 8 50 400 – 450<br />
(9.3) <strong>Solar</strong> Radiation Table<br />
The following table gives some values for the solar radiation per month [kWh/m²] for different<br />
locations. These values may be used for an estimate as described in chapter 5.2.<br />
Location Jan Feb March A pril May June July A ug Sept Oct Nov Dec<br />
(A) Vienna 0.76 1.42 2.64 3.95 5.1 5.33 5.44 4.52 3.30 2.05 1.01 0.69<br />
(AUS)<br />
Melbourne<br />
6.67 5.92 4.89 3.70 2.64 2.28 2.39 3.04 4.03 5.95 6.51 4.42<br />
(CH) Basel 1.03 1.64 2.61 4.07 4.87 5.40 5.52 4.55 3.50 2.26 1.13 0.87<br />
(CH) Geneve 0.94 1.79 2.97 4.47 5.26 6.07 6.29 5.03 3.70 2.23 1.07 0.74<br />
(CH) Zürich 0.84 1.64 2.68 4.17 5.06 5.70 5.81 4.71 3.57 2.03 0.96 0.68<br />
(D)<br />
Bremerhaven<br />
0.58 1.22 2.42 4.02 5.00 5.84 5.18 4.60 2.98 1.62 0.70 0.44<br />
(D) Freiburg 1.04 1.75 2.80 4.24 5.06 5.63 5.69 4.66 3.73 2.25 1.16 0.84<br />
(D)<br />
Würzburg<br />
0.82 1.60 2.68 4.04 5.03 5.54 5.34 4.48 3.53 1.94 0.92 0.65<br />
(F) Nice 1.36 2.11 3.30 4.32 5.54 6.00 5.90 5.12 4.01 2.69 1.51 1.05<br />
(F) Paris 0.77 1.54 2.60 3.94 4.81 5.52 5.40 4.50 3.34 1.95 0.99 0.66<br />
(GB)<br />
deenAber-<br />
0.40 1.02 2.13 3.54 4.36 5.03 4.57 3.80 2.35 1.36 0.61 0.33<br />
(GB) London 0.56 1.10 2.07 3.04 4.12 4.99 4.38 3.62 2.71 1.56 0.81 0.47<br />
(GB)<br />
mouthPly-<br />
0.69 1.48 2.84 4.25 5.03 5.84 5.63 4.44 3.31 1.92 1.03 0.63<br />
(I) Bozen 1.21 1.92 3.16 4.42 4.87 5.39 5.48 4.90 3.94 2.65 1.40 1.04<br />
(I) Locarno 1.44 2.14 3.58 4.71 5.19 6.02 6.30 5.20 3.95 2.85 1.53 1.32<br />
(I) Pisa 1.42 2.10 3.41 4.73 5.53 6.10 6.34 5.60 4.50 3.08 1.77 1.33<br />
(IRL) Dublin 0.68 1.48 2.67 4.23 5.18 6.09 5.32 4.36 3.26 1.86 0.96 0.58<br />
(Korea)<br />
Seoul<br />
2.40 3.03 3.83 4.33 4.56 4.87 3.62 3.63 3.78 3.62 2.45 2.12<br />
(NL) Rotterdam<br />
0.68 1.36 2.94 3.79 4.92 5.48 5.00 4.34 3.12 1.83 0.88 0.54<br />
(S)<br />
holmStock-<br />
0.32 0.95 2.24 3.68 5.29 6.58 5.59 4.52 2.70 1.24 0.46 0.23<br />
(UAE) Dubai 4.75 4.96 4.89 5.86 6.56 5.65 6.10 5.98 6.03 5.83 5.53 4.70<br />
(USA) Washington<br />
0.80 1.48 2.70 4.30 5.20 6.09 5.40 4.30 3.2 1.8 0.95 0.50<br />
37
(9.4) Checklist<br />
Appendix<br />
This checklist will help to collect all the necessary data to design a solar collector system and<br />
to give a quotation for it.<br />
(9.5) Calculation Sheet<br />
The following chart will help to size the expansion vessel, to determine the overall system<br />
flow rate and to calculate the minimum inside pipe diameter required. All calculations are<br />
based on the explanations and equations in chapter 5.<br />
(9.6) Commissioning Sheet<br />
After completion of the installation we recommend to fill in the commissioning sheet and to<br />
leave a copy at the location of the solar system for reference.<br />
38
Project Data<br />
Appendix<br />
Thermomax � <strong>Solar</strong> System CHECKLIST<br />
Date ____________________________________________________________<br />
Name ____________________________________________________________<br />
Address ____________________________________________________________<br />
Postcode ____________________________________________________________<br />
Tel. ____________________________________________________________<br />
Consumption<br />
Persons in household Persons<br />
Hot water consumption at °C per person l<br />
Application � Hot Water � Swimming Pool<br />
� Heating � Other<br />
Expected solar contribution % in month<br />
Building features<br />
Available mounting surface m² (Length m x Width m)<br />
Inclination angle � ° Azimuth angle � °<br />
Roof type � Sloping Roof � Flat Roof<br />
� Other<br />
Static height of system m<br />
Installation<br />
Installation scheme (chapter 5.6.2)<br />
Tube type � TMO 500 S<br />
� TMO 600 S<br />
Control Unit � SMT 100 � SMT 300<br />
� SMT 400<br />
Manifold � 20 Tube � 30 Tube<br />
39
Project Data<br />
Appendix<br />
Thermomax � <strong>Solar</strong> System CALCULATION<br />
SHEET<br />
Date ____________________________________________________________<br />
Name ____________________________________________________________<br />
Address ____________________________________________________________<br />
Postcode ____________________________________________________________<br />
Tel. ____________________________________________________________<br />
<strong>Collector</strong> Efficiency �<br />
Explanation see chapter 4.1<br />
� ��<br />
0<br />
�k<br />
1<br />
��<br />
� � k<br />
G<br />
2<br />
��<br />
�<br />
G<br />
<strong>Collector</strong> Area A R<br />
Explanation see chapter 5.1<br />
Values taken from table 10.3<br />
A R<br />
�<br />
ED<br />
R ��<br />
�<br />
System Flow rate V S<br />
Explanation see chapter 5.2<br />
VS � VT<br />
� nT<br />
�<br />
Flow and return pipe diameter Ø i<br />
Explanation see chapter 5.3<br />
Ø<br />
i<br />
�<br />
�<br />
2<br />
�<br />
�<br />
�<br />
�<br />
[ m²]<br />
�<br />
l<br />
[ ]<br />
min<br />
VS<br />
� 4. 6 � � 4.<br />
6 � � [ mm]<br />
�<br />
40<br />
�<br />
�<br />
�<br />
x 20 Manifold(s)<br />
x 30 Manifold(s)<br />
3<br />
6 m<br />
� � [ ] �<br />
100 h<br />
[ �]<br />
m<br />
[<br />
h<br />
= [m²]<br />
3<br />
]
System pressure drop �p S<br />
Explanation see chapter 5.4<br />
�p<br />
�p<br />
�p<br />
�p<br />
�p<br />
C20<br />
C30<br />
P<br />
he<br />
S<br />
�<br />
�<br />
�<br />
�<br />
�<br />
�<br />
n<br />
20<br />
� �p<br />
[Pa]<br />
[Pa]<br />
[Pa]<br />
[Pa]<br />
C20<br />
[m]<br />
Expansion Vessel<br />
Explanation see chapter 5.5<br />
V<br />
V<br />
V<br />
��<br />
p<br />
p<br />
c<br />
max<br />
d<br />
n<br />
� V<br />
� p<br />
� V<br />
� p<br />
h<br />
sys<br />
( V<br />
�<br />
c<br />
Summary<br />
sys<br />
rv<br />
� � �<br />
�<br />
�V<br />
0.<br />
5<br />
� 0.<br />
1 � h �<br />
� n � �p<br />
30 C<br />
10000<br />
� 0.<br />
015 � 1[<br />
l]<br />
�<br />
��<br />
�<br />
� n<br />
p<br />
col<br />
max<br />
�<br />
�V<br />
col<br />
� p<br />
30<br />
) � ( p<br />
d<br />
�<br />
� 0.<br />
5 �<br />
� 0.<br />
1 �<br />
� �p<br />
max<br />
P<br />
[ l]<br />
� 0.<br />
015 �<br />
� �p<br />
[ bar]<br />
�<br />
he<br />
�1)<br />
(<br />
�<br />
�<br />
[ bar]<br />
[ l]<br />
�1[<br />
l]<br />
Chosen collector Area = [m²]<br />
3<br />
Flow rate VS = [l/min] = [m /h]<br />
Pipe Øi = [mm]<br />
Required head pressure �p S of circulation pump at V S = [m]<br />
Expansion Vessel chosen Volume = [l]<br />
Pre-pressure = [bar]<br />
Max. sys. operating pressure = [bar]<br />
41<br />
�<br />
�<br />
�<br />
�<br />
�<br />
�<br />
�<br />
10000<br />
) � (<br />
Appendix<br />
�<br />
�<br />
�1)<br />
�<br />
[ l ]
Project Data<br />
Appendix<br />
Thermomax � <strong>Solar</strong> System COMMISSIONING<br />
SHEET<br />
Date ____________________________________________________________<br />
Name ____________________________________________________________<br />
Address ____________________________________________________________<br />
Postcode ____________________________________________________________<br />
Tel. ____________________________________________________________<br />
General Information<br />
Date of purchase _____________________ Supplied by _____________________<br />
Invoice number _____________________<br />
Date of installation _____________________ Installed by _____________________<br />
System Information<br />
Tube Prod. Ser. No. TMO 500 S C0207 _ _ _ _ _ _ to C0207 _ _ _ _ _ _<br />
TMO 500 S C0206 _ _ _ _ _ _ to C0206 _ _ _ _ _ _<br />
Manifold Prod. Ser. No. 20 Sys. C0001 _ _ _ _ _ _ to C0001 _ _ _ _ _ _<br />
30 Sys. C0004 _ _ _ _ _ _ to C0004 _ _ _ _ _ _<br />
<strong>Solar</strong> Controller Model ____________________________________________<br />
Serial No. _________________________________________<br />
Settings TC _________<br />
TT _________<br />
TF _________<br />
�T _________<br />
TM _________<br />
Expansion Vessel Volume _________________ [l]<br />
Pre-Pressure ____________ [bar]<br />
System filling pressure ____ [bar]<br />
Pump Specification V S ___________________ [m3/h]<br />
�p S _____________________ [m]<br />
Frost protection down to _____________________ [°C]<br />
42