


Create successful ePaper yourself
Turn your PDF publications into a flip-book with our unique Google optimized e-Paper software.
WIRIng<br />
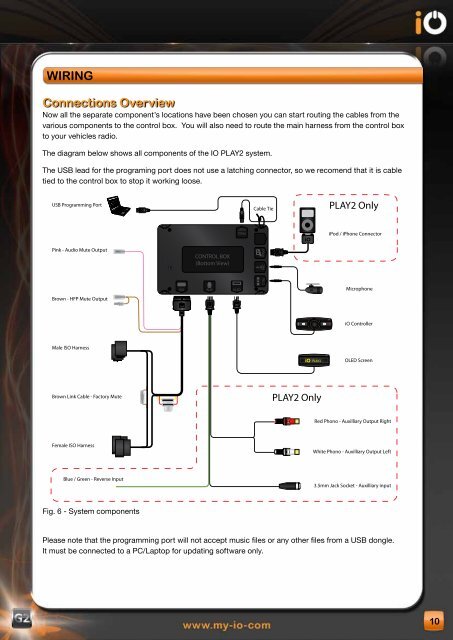
Connections Overview<br />
Now all the separate component’s locations have been chosen you can start routing the cables from the<br />
various components to the control box. You will also need to route the main harness from the control box<br />
to your vehicles radio.<br />
The diagram below shows all components of the IO PLAY2 system.<br />
The USB lead for the programing port does not use a latching connector, so we recomend that it is cable<br />
tied to the control box to stop it working loose.<br />
USB Programming Port PLAY2 Only<br />
Pink - Audio Mute Output<br />
Brown - HFP Mute Output<br />
Male ISO Harness<br />
Brown Link Cable - Factory Mute<br />
Female ISO Harness<br />
Blue / Green - Reverse Input<br />
Fig. 6 - System components<br />
ISO<br />
CONTROL BOX<br />
(Bottom View)<br />
AUX<br />
Cable Tie<br />
PLAY2 Only<br />
iPod / iPhone Connector<br />
Red Phono - Auxilliary Output Right<br />
White Phono - Auxilliary Output Left<br />
3.5mm Jack Socket - Auxilliary input<br />
Please note that the programming port will not accept music files or any other files from a USB dongle.<br />
It must be connected to a PC/Laptop for updating software only.<br />
iPod<br />
iPod<br />
PLAY2<br />
Microphone<br />
<strong>iO</strong> Controller<br />
OLED Screen<br />
10