18.64MB - View From The Trenches
18.64MB - View From The Trenches
18.64MB - View From The Trenches
- TAGS
- trenches
- www.vftt.co.uk

Create successful ePaper yourself
Turn your PDF publications into a flip-book with our unique Google optimized e-Paper software.
wears on the British only get stronger, while the<br />
French get no reinforcements. As Wellington, you<br />
will not be confined by a downpour of rain to slog<br />
north along the one decent road. You will be able<br />
to fan out your army and defend forward river lines<br />
such as the Genappe, which was out of the ques-<br />
tion given the actual weather on that day.<br />
Indeed both players will see for themselves just<br />
how crucial weather could be in battles of this era.<br />
<strong>The</strong> contrast between the free-wheeling maneuvers<br />
you execute on the game board and the dull plodding<br />
on the Brussels high road which actually took place<br />
will be very great.<br />
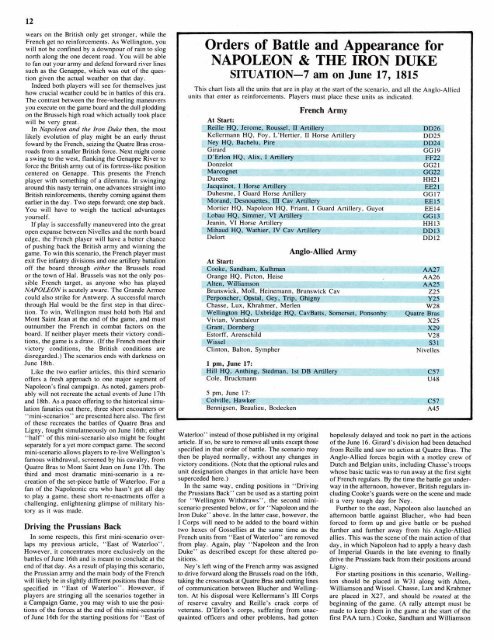
In Napoleon and the Iron Duke then, the most<br />
likely evolution of play might be an early thrust<br />
foward by the French, seizing the Quatre Bras cross-<br />
roads from a smaller British force. Next might come<br />
a swing to the west, flanking the Genappe River to<br />
force the British army out of its fortress-like position<br />
centered on Genappe. This presents the French<br />
player with something of a dilemma. In swinging<br />
around this nasty terrain, one advances straight into<br />
British reinforcements, thereby coming against them<br />
earlier in the day. Two steps forward; one step back.<br />
You will have to weigh the tactical advantages<br />
yourself.<br />
If play is successfully maneuvered into the great<br />
open expanse between Nivelles and the north board<br />
edge, the French player will have a better chance<br />
of pushing back the British army and winning the<br />
game. To win this scenario, the French player must<br />
exit five infantry divisions and one artillery battalion<br />
off the board through either the Brussels road<br />
or the town of Hal. Brussels was not the only pos-<br />
sible French target, as anyone who has played<br />
NAPOLEON is acutely aware. <strong>The</strong> Grande Armee<br />
could also strike for Antwerp. A successful march<br />
through Hal would be the first step in that direc-<br />
tion. To win, Wellington must hold both Hal and<br />
Mont Saint Jean at the end of the game, and must<br />
outnumber the French in combat factors on the<br />
board. If neither player meets their victory condi-<br />
tions, the game is a draw. (If the French meet their<br />
victory conditions, the British conditions are<br />
disregarded.) <strong>The</strong> scenarios ends with darkness on<br />
June 18th.<br />
Like the two earlier articles, this third scenario<br />
offers a fresh approach to one major segment of<br />
Napoleon's final campaign. As noted, gamers prob-<br />
ably will not recreate the actual events of June 17th<br />
and 18th. As a peace offering to the historical simu-<br />
lation fanatics out there, three short encounters or<br />
"mini-scenarios" are presented here also. <strong>The</strong> first<br />
of these recreates the battles of Quatre Bras and<br />
Ligny, fought simulatneously on June 16th; either<br />
"half" of this mini-scenario also might be fought<br />
separately for a yet more compact game. <strong>The</strong> second<br />
mini-scenario allows players to re-live Wellington's<br />
famous withdrawal, screened by his cavalry, from<br />
Quatre Bras to Mont Saint Jean on June 17th. <strong>The</strong><br />
third and most dramatic mini-scenario is a re-<br />
creation of the set-piece battle of Waterloo. For a<br />
fan of the Napoleonic era who hasn't got all day<br />
to play a game, these short re-enactments offer a<br />
challenging, enlightening glimpse of military his-<br />
tory as it was made.<br />
Driving the Prussians Back<br />
In some respects, this first mini-scenario over-<br />
laps my previous article, "East of Waterloo".<br />
However, it concentrates more exclusively on the<br />
battles of June 16th and is meant to conclude at the<br />
end of that day. As a result of playing this scenario,<br />
the Prussian army and the main body of the French<br />
will likely be in slightly different positions than those<br />
specified in "East of Waterloo". However, if<br />
players are stringing all the scenarios together in<br />
a Campaign Game, you may wish to use the posi-<br />
tions of the forces at the end of this mini-scenario<br />
of June 16th for the starting positions for "East of<br />
NAPOLEON & THE<br />
Waterloo" instead of those published in my original<br />
article. If so, be sure to remove all units except those<br />
specified in that order of battle. <strong>The</strong> scenario may<br />
then be played normally, without any changes in<br />
victory conditions. (Note that the optional rules and<br />
unit designation changes in that article have been<br />
superceded here.)<br />
In the same way, ending positions in "Driving<br />
the Prussians Back" can be used as a starting point<br />
for "Wellington Withdraws", the second mini-<br />
scenario presented below, or for "Napoleon and the<br />
Iron Duke" above. In the latter case, however, the<br />
I Corps will need to be added to the board within<br />
two hexes of Gossellies at the same time as the<br />
French units from "East of Waterloo" are removed<br />
from play. Again, play "Napoleon and the Iron<br />
Duke" as described except for these altered po-<br />
sitions.<br />
Ney's left wing of the French army was assigned<br />
to drive forward along the Brussels road on the 16th,<br />
taking the crossroads at Quatre Bras and cutting lines<br />
of communication between Blucher and Welling-<br />
ton. At his disposal were Kellermann's 111 Corps<br />
of reserve cavalry and Reille's crack corps of<br />
veterans. D'Erlon's corps, suffering from unac-<br />
quainted officers and other problems, had gotten<br />
Anglo-Allied Army<br />
hopelessly delayed and took no part in the actions<br />
of the June 16. Girard's division had been detached<br />
from Reille and saw no action at Quatre Bras. <strong>The</strong><br />
Anglo-Allied forces begin with a motley crew of<br />
Dutch and Belgian units, including Chasse's troops<br />
whose basic tactic was to run away at the first sight<br />
of French regulars. By the time the battle got under-<br />
way in the afternoon, however, British regulars in-<br />
cluding Cooke's guards were on the scene and made<br />
it a very tough day for Ney.<br />
Further to the east, Napoleon also launched an<br />
afternoon battle against Blucher, who had been<br />
forced to form up and give battle or be pushed<br />
further and further away from his Anglo-Allied<br />
allies. This was the scene of the main action of that<br />
day, in which Napoleon had to apply a heavy dash<br />
of Imperial Guards in the late evening to finally<br />
drive the Prussians back from their positions around<br />
Ligny.<br />
For starting positions in this scenario, Welling-<br />
ton should be placed in W31 along with Alten,<br />
Williamson and Wissel. Chasse, Lux and Krahmer<br />
are placed in X27, and should be routed at the<br />
beginning of the game. (A rally attempt must be<br />
made to keep them in the game at the start of the<br />
first PAA turn.) Cooke, Sandham and Williamson