Instruction Manual Manual de Instrucciones - PlayStation
Instruction Manual Manual de Instrucciones - PlayStation
Instruction Manual Manual de Instrucciones - PlayStation

You also want an ePaper? Increase the reach of your titles
YUMPU automatically turns print PDFs into web optimized ePapers that Google loves.
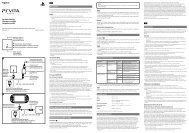
6 Confirm the settings, select [Yes], and then press the button.<br />
Depending on the connector selected in step 2 and the resolutions selected<br />
in step 5, this screen may not be displayed.<br />
9 Adjust audio output settings.<br />
Continue on to adjust audio output settings. Adjust settings to match the TV<br />
or audio <strong>de</strong>vice in use.<br />
US<br />
Getting started<br />
7 Select the type of TV, and then press the button.<br />
If you selected [Standard (NTSC)] or [480p] in step 5, a screen for selecting<br />
the TV screen size will be displayed. Adjust the setting to match the TV in use.<br />
If you selected [720p] or a higher resolution in step 5, the TV type will<br />
automatically be set to 16:9 and the screen for selecting the TV screen size<br />
will not be displayed.<br />
8 Confirm the settings, and then press the button.<br />
The vi<strong>de</strong>o output settings will be saved on the system.<br />
If you select [HDMI], you will have the option to choose [Automatic] or<br />
[<strong>Manual</strong>] on the next screen. In most cases, select [Automatic].<br />
If using a cable other than an HDMI cable to output audio from the TV, select<br />
[Audio Input Connector / SCART / AV MULTI]. If using an optical digital cable<br />
to output audio, select [Digital Out (Optical)] and choose the output format<br />
on the next screen.<br />
10 Confirm the settings, and then press the button.<br />
The audio output settings will be saved on the system.<br />
Hint<br />
You can adjust audio output settings un<strong>de</strong>r (Settings) (Sound Settings)<br />
[Audio Output Settings].<br />
19
![사용ìƒÂì˜ 주ì˜/고장ì´ë¼고ìƒÂê°Âë 때 [0.7MB] - PlayStation](https://img.yumpu.com/48197031/1/190x135/aaaaasacaaaaaa-aaa-1-4-aaa-aaa-aazaaaaaaa-1-4-aaa-aaaaaaaaa-aaoaoe-07mb-playstation.jpg?quality=85)
![SCPH-30005 R [1.64MB] - PlayStation](https://img.yumpu.com/48010538/1/190x143/scph-30005-r-164mb-playstation.jpg?quality=85)
![SCPH-55005 GT/N [2.02 MB] - PlayStation](https://img.yumpu.com/35261967/1/190x143/scph-55005-gt-n-202-mb-playstation.jpg?quality=85)