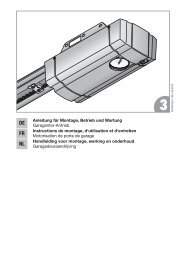
Automatismo para puerta corredera LineaMatic - Hörmann
Automatismo para puerta corredera LineaMatic - Hörmann
Automatismo para puerta corredera LineaMatic - Hörmann

You also want an ePaper? Increase the reach of your titles
YUMPU automatically turns print PDFs into web optimized ePapers that Google loves.
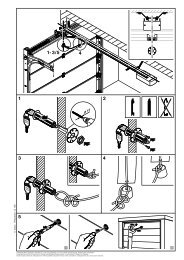
ENGLISHNote:The installer must check that the fitting materials supplied aresuitable for the purpose and intended place of installation.4.2Fitting the sliding gate operator4.2.1 Foundation for the sliding gate operatorff A foundation must be laid for the sliding gate operator asshown in Figure 1a and Figure 1b - the * mark hererepresents the frost-free depth (in Germany = 80 cm).A larger foundation must be laid if using a closing edgesafety device (see Figure 1c/1d).ff A base foundation may be required for gates with insiderollers. The 230/240 V AC mains lead for the sliding gateoperator must be routed through an empty tube in thefoundation. The lead to connect 24 V accessories mustbe installed in a se<strong>para</strong>te tube that is se<strong>para</strong>ted from themains lead (see Figure 1.1).Note:The foundation must have set and dried sufficiently before thefollowing work is carried out!4.2.2 Establishing the fitting dimensions1. Before drilling the four Ø12 mm drill holes, mark theirposition on the surface of the foundation. To do so, usethe drilling template included with these instructions (seeFigure 1.2).2. First select the toothed track to be used from the tablebelow and find the minimum and maximum fittingdimensions (dimensions A).4.2.3Toothed trackDimensions A (mm)Min.Max.438 759 126 138438 631 125 129438 632 129 133Anchoring the operatorff After drilling, check the depth of the drill holes (80 mmdeep) to ensure that the stock screws can be screwed inas far as shown in Figure 1.2.Use the socket wrench included in the scope of deliveryto fit the stock screws in the foundation.4.2.4Opening the operator housingCAUTIONDamage due to moisturePenetrating moisture may damage the control.ff Protect the control from moisture when you open theoperator housing.ff The housing cover must be opened in order to fit thesliding gate operator (see Figure 1.3).4.2.5 Fitting the operator housing1. Release the operator (see Figure 1.4).Note:The motor and pinion are lowered in the housing when theoperator is released.2. Unplug the existing connecting terminals, loosen thefastening screws on the print bracket and completelyremove the print bracket (see Figure 1.5).3. Insert the tube seals from the scope of delivery into theoperator housing (see Figure 1.6). If necessary, cut theseal to fit the tube.4. Insert the provided fitting aid in the socket wrench foreasy installation of screws and nuts.5. When the operator housing is placed on the stockscrews, the mains lead and, if applicable, 24 Vconnecting lead must be pulled into the operator housingthrough the tube seals inserted before.6. Screw down the operator housing (see Figure 1.6 andFigure 1.7).Pay attention that the operator fitting is horizontal, stableand secure.7. Seal the operator housing to protect it from humidity andvermin (see Figure 1.8).4.3Fitting the toothed trackBefore fitting:ff The sliding gate operator must be released before thetoothed tracks are installed (see Figure 1.4).ff Make sure that the required hole depths are availablebefore fitting the toothed tracks.ff To fit the toothed tracks to the sliding gate, use theconnectors (bolts and nuts) from the se<strong>para</strong>tely orderedfitting accessories (see Figure C1 or Figure C5).Note:• Contrary to the illustrated section, use the appropriateconnectors (e.g. for timber gates use woodscrews), aswell as the proper hole depths for other gate types.• Contrary to the illustrated section, the required core holediameter may vary depending on material thickness orstrength. The required diameter may be Ø 5.0-5.5 mm foraluminium and Ø 5.7-5.8 mm for steel.Fitting:CAUTIONDamage caused by dirtDrilling dust and chippings from drilling work can lead tomalfunctions.ff Cover the operator during drilling work.1. For simple assembly of the toothed tracks, fit the plastictoothed wheels into the holes of the toothed wheel cap(see Figure 2.1).2. Place the middle of the toothed track firmly onto bothplastic toothed wheels.3. Mark the position of the holes on the gate.ff When fitting the toothed tracks, make sure that thetransitions between the individual toothed tracks aresmooth to ensure uniform gate movement.ff After fitting, the toothed tracks and the toothed wheel ofthe operator must be aligned to each other. To do so,both the toothed tracks as well as the operator housingcan be adjusted.Incorrectly fitted or poorly aligned toothed tracks maylead to unintentional reversing. It is essential that thespecified dimensions are adhered to!24 TR10A059-C RE / 10.2008