

Instruction Book Libro de Instrucciones Livret d'Instructions ... - Singer
Instruction Book Libro de Instrucciones Livret d'Instructions ... - Singer
Instruction Book Libro de Instrucciones Livret d'Instructions ... - Singer

You also want an ePaper? Increase the reach of your titles
YUMPU automatically turns print PDFs into web optimized ePapers that Google loves.
Changing snap-on<br />
presser feet (B), (D),<br />
(J), (L)<br />
Your machine comes with the General Purpose<br />
Presser Foot (B) already attached. You can<br />
easily change to any one of the other presser<br />
feet which snap onto a common shank by<br />
following the directions below.<br />
Raise needle to its highest position by turning<br />
hand wheel toward you.<br />
Raise presser foot using presser foot lifter at<br />
back of machine.<br />
Push toe of presser foot (1) up, until it snaps<br />
off the shank (2).<br />
Remove foot from machine.<br />
Place new foot un<strong>de</strong>r centre of shank.<br />
Lower presser foot lifter, fitting shank over<br />
presser foot pin (3).<br />
Don’t turn screw. Instead, push presser foot<br />
screw (4) down, firmly until foot snaps into<br />
place.<br />
Changing screw-on<br />
presser feet (H)<br />
Some special presser feet can be purchased at<br />
your SINGER stockist which have built-in<br />
shanks that can be replaced as follows:<br />
Raise needle and presser foot.<br />
Loosen presser foot screw (1) and remove<br />
presser foot with shank (2), guiding it toward<br />
you and to the right.<br />
To replace presser foot with shank, hook<br />
shank around the presser bar and tighten<br />
presser foot screw with the use of a coin.<br />
Cambio <strong>de</strong>l prensatelas<br />
<strong>de</strong> colocación instantánea<br />
(B), (D), (J), (L)<br />
Su máquina viene con el prensatelas <strong>de</strong> uso<br />
general (B). Pue<strong>de</strong> fácilmente cambiar dicho<br />
prensatelas<br />
directrices.<br />
por otro bajo las siguientes<br />
Eleve la aguja a su posición más alta, girando<br />
el volante <strong>de</strong> mano hacia Vd.<br />
Suba el prensatelas utilizando la palanca<br />
elevadora situada <strong>de</strong>trás <strong>de</strong> la máquina.<br />
Presione el <strong>de</strong>do <strong>de</strong>l prensatelas (1) hacia<br />
arriba, hasta que éste salga <strong>de</strong> su anclaje (2).<br />
Quite el prensatelas <strong>de</strong> la máquina.<br />
Coloque el nuevo prensatelas <strong>de</strong>bajo <strong>de</strong>l<br />
centro <strong>de</strong> su anclaje.<br />
Baje la palanca <strong>de</strong>l prensatelas colocando el<br />
anclaje sobre el eje <strong>de</strong>l prensatelas (3).<br />
No gire el tornillo. En su lugar, presione el<br />
tornillo (4) hacia abajo firmemente hasta que<br />
encaje en su sitio.<br />
Cambio <strong>de</strong> prensatelas a<br />
tornillo (H)<br />
Algunos prensatelas especiales que se pue<strong>de</strong>n<br />
adquirir en su centro <strong>de</strong> costura tienen el<br />
anclaje y pue<strong>de</strong>n pue<strong>de</strong>n recambiarse como sigue:<br />
Eleve Eleve la aguja aguja y el prensatelas.<br />
Afloje Afloje el tornillo (1) y quite el prensatelas (2),<br />
guiándolo hacia Vd. y a la <strong>de</strong>recha.<br />
Para sustituir el prensatelas, enganche el<br />
tronco alre<strong>de</strong>dor <strong>de</strong> la barra prensatelas y<br />
ajuste el tornillo tornillo con una una moneda.<br />
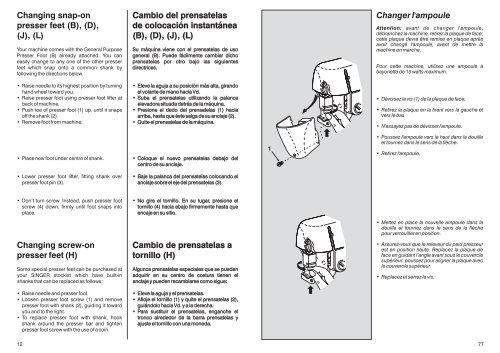
Changer l'ampoule<br />
Attention: avant <strong>de</strong> changer l'ampoule,<br />
débranchez la machine, retirez la plaque <strong>de</strong> face;<br />
cette plaque <strong>de</strong>vra être remise en plaque après<br />
avoir changé l'ampoule, avant <strong>de</strong> mettre la<br />
machine en marche.<br />
Pour cette machine, utilisez une ampoule à<br />
bayonette <strong>de</strong> 15 watts maximum.<br />
Dévissez la vis (1) <strong>de</strong> la plaque <strong>de</strong> face.<br />
Retirez la plaque en la tirant vers la gauche et<br />
vers le bas.<br />
N'essayez pas <strong>de</strong> dévisser l'ampoule.<br />
Poussez l'ampoule vers le haut dans la douille<br />
et tournez dans le sens <strong>de</strong> la flèche.<br />
Retirez l'ampoule.<br />
Mettez en place la nouvelle ampoule dans la<br />
douille et tournez dans le sens <strong>de</strong> la flèche<br />
pour verrouiller en position.<br />
Assurez-vous que le releveur du peid presseur<br />
est en position haute. Replacez la plaque <strong>de</strong><br />
face en guidant l’angle avant sous le couvercle<br />
supérieur: poussez pour aligner la plaque avec<br />
le couvercle supérieur.<br />
Replacez et serrez la vis.<br />
12 77<br />
1


