

Instruction Book Libro de Instrucciones Livret d'Instructions ... - Singer
Instruction Book Libro de Instrucciones Livret d'Instructions ... - Singer
Instruction Book Libro de Instrucciones Livret d'Instructions ... - Singer

Create successful ePaper yourself
Turn your PDF publications into a flip-book with our unique Google optimized e-Paper software.
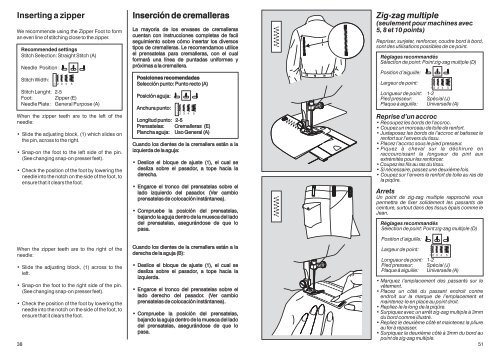
Inserting a zipper<br />
We recommen<strong>de</strong> using the Zipper Foot to form<br />
an even line of stitching close to the zipper.<br />
Recommen<strong>de</strong>d settings<br />
Stitch Selection: Straight Stitch (A)<br />
Needle Position :<br />
Stitch Width:<br />
12 3 4 5<br />
Stitch Lenght: 2-5<br />
Foot: Zipper (E)<br />
Needle Plate : General Purpose (A)<br />
When the zipper teeth are to the left of the<br />
needle:<br />
Sli<strong>de</strong> the adjusting block, (1) which sli<strong>de</strong>s on<br />
the pin, across to the right.<br />
Snap-on the foot to the left si<strong>de</strong> of the pin.<br />
(See changing snap-on presser feet).<br />
Check the position of the foot by lowering the<br />
needle into the notch on the si<strong>de</strong> of the foot, to<br />
ensure that it clears the foot.<br />
Inserción <strong>de</strong> cremalleras<br />
La mayoria <strong>de</strong> los envases <strong>de</strong> cremalleras<br />
cuentan con instrucciones completas <strong>de</strong> facil<br />
seguimiento sobre cómo insertar los diversos<br />
tipos <strong>de</strong> cremalleras. Le recomendamos utilice<br />
el prensatelas para cremalleras, con el cual<br />
formará una línea <strong>de</strong> puntadas uniformes y<br />
próximas a la cremallera.<br />
Posiciones recomendadas<br />
Selección punto: Punto recto (A)<br />
Posición aguja:<br />
Anchura punto:<br />
12<br />
3 4 5<br />
Longitud punto: 2-5<br />
Prensatelas: Cremalleras (E)<br />
Plancha aguja: Uso General (A)<br />
Cuando los dientes <strong>de</strong> la cremallera están a la<br />
izquierda <strong>de</strong> la aguja:<br />
Deslice el bloque <strong>de</strong> ajuste (1), el cual se<br />
<strong>de</strong>sliza sobre el pasador, a tope hacia la<br />
<strong>de</strong>recha.<br />
Engarce el tronco <strong>de</strong>l prensatelas sobre el<br />
lado izquierdo <strong>de</strong>l pasador. (Ver cambio<br />
prensatelas <strong>de</strong> colocación instántanea).<br />
Compruebe la posición <strong>de</strong>l prensatelas,<br />
bajando la aguja <strong>de</strong>ntro <strong>de</strong> la muesca <strong>de</strong>l lado<br />
<strong>de</strong>l prensatelas, asegurándose <strong>de</strong> que lo<br />
pasa.<br />
Zig-zag multiple<br />
(seulement pour machines avec<br />
5, 8 et 10 points)<br />
Repriser, surjeter, renforcer, coudre bord à bord,<br />
sont <strong>de</strong>s utilisations possibles <strong>de</strong> ce point.<br />
Réglages recommandés<br />
Sélection <strong>de</strong> point: Point zig-zag multiple (D)<br />
Position d’aiguille:<br />
Largeur <strong>de</strong> point:<br />
Longueur <strong>de</strong> point: 1-2<br />
Pied presseur: Spécial (J)<br />
Plaque à aiguille: Universelle (A)<br />
Reprise d’un accroc<br />
Recoupez les bords <strong>de</strong> l’accroc.<br />
Coupez un morceau <strong>de</strong> toile <strong>de</strong> renfort.<br />
Juxtaposez les bords <strong>de</strong> l’accroc et batissez le<br />
renfort sur l’envers du tissu.<br />
Placez l’accroc sous le pied presseur.<br />
Piquez à cheval sur la déchirure en<br />
raccourcissant la longueur <strong>de</strong> pint aux<br />
extrémités pour les renforcer.<br />
Coupez les fils au ras du tissu.<br />
Si nécessaire, passez une <strong>de</strong>uxième fois.<br />
Coupez sur l’envers le renfort <strong>de</strong> toile au ras <strong>de</strong><br />
la piqûre.<br />
Arrets<br />
Un point <strong>de</strong> zig-zag multiple rapproché vous<br />
permettra <strong>de</strong> fixer soli<strong>de</strong>ment les passants <strong>de</strong><br />
ceinture, surtout dans <strong>de</strong>s tissus épais comme le<br />
Jean.<br />
Réglages recommandés<br />
Sélection <strong>de</strong> point: Point zig-zag multiple (D)<br />
When the zipper teeth are to the right of the<br />
needle:<br />
Cuando los dientes <strong>de</strong> la cremallera están a la<br />
<strong>de</strong>recha <strong>de</strong> la aguja (B):<br />
Position d’aiguille:<br />
Largeur <strong>de</strong> point:<br />
Longueur <strong>de</strong> point:<br />
12 3<br />
1-2<br />
4 5<br />
Sli<strong>de</strong> the adjusting block, (1) across to the<br />
left.<br />
Snap-on the foot to the right si<strong>de</strong> of the pin.<br />
(See changing snap-on presser feet).<br />
Deslice el bloque <strong>de</strong> ajuste (1), el cual se<br />
<strong>de</strong>sliza sobre el pasador, a tope hacia la<br />
izquierda.<br />
Engarce el tronco <strong>de</strong>l prensatelas sobre el<br />
lado <strong>de</strong>recho <strong>de</strong>l pasador. (Ver cambio<br />
Pied presseur: Spécial (J)<br />
Plaque à aiguille: Universelle (A)<br />
Marquez l’emplacement <strong>de</strong>s passants sur le<br />
vêtement.<br />
Placez un côté du passant endroit contre<br />
endroit sur la marque <strong>de</strong> l’emplacement et<br />
Check the position of the foot by lowering the<br />
needle into the notch on the si<strong>de</strong> of the foot, to<br />
ensure that it clears the foot.<br />
prensatelas <strong>de</strong> colocación instántanea).<br />
Compruebe la posición <strong>de</strong>l prensatelas,<br />
bajando la aguja <strong>de</strong>ntro <strong>de</strong> la muesca <strong>de</strong>l lado<br />
<strong>de</strong>l prensatelas, asegurándose <strong>de</strong> que lo<br />
pasa.<br />
maintenez-le en place au point droit.<br />
Repliez-le le long <strong>de</strong> la piqûre.<br />
Surpiquez avec un arrêt zig-zag multiple à 3mm<br />
du bord comme illustré.<br />
Repliez le <strong>de</strong>uxième côté et maintenez la pliure<br />
au fer à repasser.<br />
Surpiquez la <strong>de</strong>uxième côté à 3mm du bord au<br />
point <strong>de</strong> zig-zag multiple.<br />
38 51<br />
12 3 4 5


