

Instruction Book Libro de Instrucciones Livret d'Instructions ... - Singer
Instruction Book Libro de Instrucciones Livret d'Instructions ... - Singer
Instruction Book Libro de Instrucciones Livret d'Instructions ... - Singer

You also want an ePaper? Increase the reach of your titles
YUMPU automatically turns print PDFs into web optimized ePapers that Google loves.
Honeycomb stitch<br />
(only for machines with<br />
8 and 10 stitches)<br />
Use the Honeycomb Stitch for smocking,<br />
mending and sewing stretch fabrics. Smocking<br />
is <strong>de</strong>corative stitching across evenly spaced<br />
gathers of fabric.<br />
To gather fabric<br />
Sew rows of straight stitches, 1/4” (6mm)<br />
apart, across area to be smocked.<br />
Pull thread evenly, gathering fabric.<br />
Tie ends of every two rows of stitching<br />
together to hold gathers in place.<br />
Baste a backing to wrong si<strong>de</strong> of fabric.<br />
To smock fabric<br />
Required settings<br />
Stich Selection: Honeycomb stitch (D)<br />
Needle Position:<br />
Stitch Width:<br />
12 3 4 5<br />
Stitch Lenght: Mark ( )<br />
Foot: Special Purpose (J)<br />
Needle Plate: General Purpose (A)<br />
Sew between rows of straight stitches.<br />
Pull out straight stitches when completed.<br />
Patchwork quilting<br />
Patchwork quilting can be used effectively on a<br />
wi<strong>de</strong> range of household items.<br />
Cut fabric squares to the <strong>de</strong>sired size.<br />
Join the alternating squares with the straight<br />
stitch.<br />
Finger-press open.<br />
After stitching, cut a backing to the full size of<br />
the finished work.<br />
Create a quilted effect by basting a padding<br />
layer to the backing.<br />
Stitch lenghtwise and crosswise, overlapping<br />
the patches so the seams are straddled.<br />
Pull the threads to the un<strong>de</strong>rsi<strong>de</strong> of the work,<br />
and trim.<br />
Finish by sewing a binding to the edges.<br />
Punto nido <strong>de</strong> abeja<br />
(solamente para máquinas con<br />
8 y 10 mo<strong>de</strong>los <strong>de</strong> puntos)<br />
Utilice el punto <strong>de</strong> Nido <strong>de</strong> Abeja para fruncir,<br />
remendar y coser tejidos elásticos. El fruncido<br />
es <strong>de</strong>corativo al coser sobre el tejido con puntos<br />
cruzados y espaciados uniformemente.<br />
Para preparar el tejido<br />
Cosa unas líneas <strong>de</strong> puntos rectos, con<br />
separaciones <strong>de</strong> 1/4”, a lo largo <strong>de</strong>l área a<br />
fruncir.<br />
Tire <strong>de</strong> los hilos por igual para fruncir el tejido.<br />
Anu<strong>de</strong> los hilos <strong>de</strong> cada dos líneas <strong>de</strong> puntos<br />
para mantener el fruncido en su posición.<br />
Hilvane un refuerzo por el revés <strong>de</strong>l tejido.<br />
Para fruncir el tejido<br />
Posiciones recomendadas<br />
Selección punto: Nido <strong>de</strong> abeja (D)<br />
Posición aguja:<br />
Anchura punto:<br />
12<br />
3 4 5<br />
Longitud punto: Símbolo ( )<br />
Prensatelas: Uso especial (J)<br />
Plancha aguja: Uso general (A)<br />
Cosa entre las líneas <strong>de</strong> puntos rectos.<br />
Quite los puntos rectos al terminar.<br />
Acolchado con parches<br />
El acolchado con parches pue<strong>de</strong> utilizarse con<br />
efectividad en una amplia variedad <strong>de</strong><br />
complementos para el hogar.<br />
Corte trozos cuadrados <strong>de</strong> tejido al tamaño<br />
<strong>de</strong>seado.<br />
Cosa con puntada recta los cuadros<br />
alternándolos.<br />
Abra las costuras con los <strong>de</strong>dos.<br />
Después <strong>de</strong> coserlos, corte un refuerzo <strong>de</strong>l<br />
tamaño completo <strong>de</strong> la labor.<br />
Cree un efecto <strong>de</strong> acolchado hilvanando un<br />
relleno por el revés.<br />
Cosa longitudinalmente y al través, solapando<br />
los parches y montando las costuras.<br />
Lleve los hilos al revés <strong>de</strong> la labor y córtelos.<br />
Termine cosiendo un ribete a los bor<strong>de</strong>s.<br />
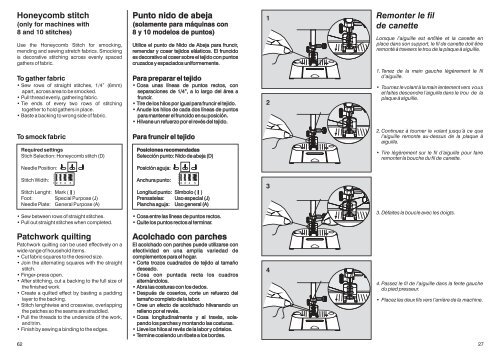
Remonter le fil<br />
<strong>de</strong> canette<br />
Lorsque l’aiguille est enfilée et la canette en<br />
place dans son support, le fil <strong>de</strong> canette doit être<br />
remonté à traveers le trou <strong>de</strong> la plaque à aiguille.<br />
1. Tenez <strong>de</strong> la main gauche légèrement le fil<br />
d’aiguille.<br />
Tournez le volant à la main lentement vers vous<br />
et faites <strong>de</strong>scendre l’aiguille dans le trou <strong>de</strong> la<br />
plaque à aiguille.<br />
2. Continuez à tourner le volant jusqu’à ce que<br />
l’aiguille remonte au-<strong>de</strong>ssus <strong>de</strong> la plaque à<br />
aiguille.<br />
Tire légèrement sur le fil d’aiguille pour faire<br />
remonter la bouche du fil <strong>de</strong> canette.<br />
3. Défaites la boucle avec les doigts.<br />
4. Passez le fil <strong>de</strong> l’aiguille dans la fente gauche<br />
du pied presseur.<br />
Placez les <strong>de</strong>ux fils vers l’arrière <strong>de</strong> la machine.<br />
62 27<br />
1<br />
2<br />
3<br />
4


